Owner's Manual
Page 2
... reading, please keep the manual in a safe and accessible place for purchasing this manual before using the product for Pioneer products 4 Visit our website 4 Protecting your unit from theft 4 - Selecting a source 7 - Listening to ensure proper use. Pausing ... 11 - Power ON/OFF 7 - Storing the strongest broadcast frequencies 8 Built-in strong signals 8 - Using compression and BMX 10 - Setting the clock 12 - Compressed audio compatibility 18 Specifications 20 Contents Thank you for future reference. Adjusting the volume 7 Tuner 7 - Using the equalizer 11...
... reading, please keep the manual in a safe and accessible place for purchasing this manual before using the product for Pioneer products 4 Visit our website 4 Protecting your unit from theft 4 - Selecting a source 7 - Listening to ensure proper use. Pausing ... 11 - Power ON/OFF 7 - Storing the strongest broadcast frequencies 8 Built-in strong signals 8 - Using compression and BMX 10 - Setting the clock 12 - Compressed audio compatibility 18 Specifications 20 Contents Thank you for future reference. Adjusting the volume 7 Tuner 7 - Using the equalizer 11...
Owner's Manual
Page 6
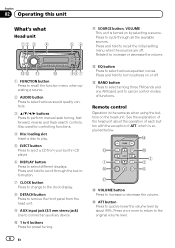
...9 AUX input jack (3.5 mm stereo jack) Use to quickly lower the volume level by selecting a source. Press and hold to recall the initial setting menu when the sources are off . Press and hold to turn loudness on or off . See the explanation of functions. Press once more to return...band and to perform manual seek tuning, fast forward, reverse and track search controls. Press to cycle through the text information. 7 CLOCK button Press to change to the clock display. 8 DETACH button Press to remove the front panel from your built-in CD player. 6 DISPLAY button Press to increase ...
...9 AUX input jack (3.5 mm stereo jack) Use to quickly lower the volume level by selecting a source. Press and hold to recall the initial setting menu when the sources are off . Press and hold to turn loudness on or off . See the explanation of functions. Press once more to return...band and to perform manual seek tuning, fast forward, reverse and track search controls. Press to cycle through the text information. 7 CLOCK button Press to change to the clock display. 8 DETACH button Press to remove the front panel from your built-in CD player. 6 DISPLAY button Press to increase ...
Owner's Manual
Page 12
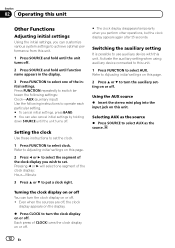
... temporarily when you wish to operate each particular setting. # To cancel initial settings, press BAND. # You can turn the clock display on or off . Each press of the initial settings. Press FUNCTION repeatedly to switch between the following settings: Clock-AUX (auxiliary input) Use the following instructions to set the clock. 1 Press FUNCTION to select AUX. Turning the...
... temporarily when you wish to operate each particular setting. # To cancel initial settings, press BAND. # You can turn the clock display on or off . Each press of the initial settings. Press FUNCTION repeatedly to switch between the following settings: Clock-AUX (auxiliary input) Use the following instructions to set the clock. 1 Press FUNCTION to select AUX. Turning the...


