Owner's Manual
Page 2
... Adjust 6 Resetting the Microprocessor 6 Key Finder 7 Remote Control 7 - To Operate Pioneer DVD player This Product 8 Using the Remote Control 9 Battery 9 Setting Remote Control Code 10 - DIMMER Input Setting [VIDEO2/VIDEO3 22 Output Setting 23 Remote Control Setting 24 Using the Display Correctly 25 Handling the Display 25 About the Liquid Crystal Display (LCD) Screen 26 Keeping the Display in Good...
... Adjust 6 Resetting the Microprocessor 6 Key Finder 7 Remote Control 7 - To Operate Pioneer DVD player This Product 8 Using the Remote Control 9 Battery 9 Setting Remote Control Code 10 - DIMMER Input Setting [VIDEO2/VIDEO3 22 Output Setting 23 Remote Control Setting 24 Using the Display Correctly 25 Handling the Display 25 About the Liquid Crystal Display (LCD) Screen 26 Keeping the Display in Good...
Owner's Manual
Page 5
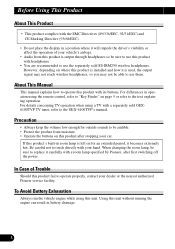
...ÇAIS ITALIANO NEDERLANDS However, there is used in the installation and operation of the FCC Rules. For details concerning TV operation when using the remote control, refer to "Key Finder" on a circuit different from this product is installed and how it will impede the driver's visibility or affect the operation of...
...ÇAIS ITALIANO NEDERLANDS However, there is used in the installation and operation of the FCC Rules. For details concerning TV operation when using the remote control, refer to "Key Finder" on a circuit different from this product is installed and how it will impede the driver's visibility or affect the operation of...
Owner's Manual
Page 8
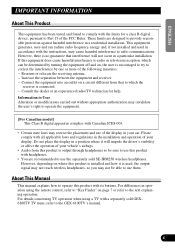
... button !3 BACK button !5 CH CALL button !6 Remote control operation mode switch (For details, see page 10.) !7 STEP buttons !8 POWER button @1 STOP button @2 CLEAR button Note: • For details concerning Pioneer DVD Player operation, refer to "DVD". Key Finder Remote Control Point the Remote Control towards @9. !1 w !2 e !3 !4 q r !5 t !6 !7 y !8 u !9 i @0 @1 o @2 !0 To Operate This Product Set the remote control operation mode switch to "DISP/TV".
... button !3 BACK button !5 CH CALL button !6 Remote control operation mode switch (For details, see page 10.) !7 STEP buttons !8 POWER button @1 STOP button @2 CLEAR button Note: • For details concerning Pioneer DVD Player operation, refer to "DVD". Key Finder Remote Control Point the Remote Control towards @9. !1 w !2 e !3 !4 q r !5 t !6 !7 y !8 u !9 i @0 @1 o @2 !0 To Operate This Product Set the remote control operation mode switch to "DISP/TV".

Owner's Manual
Page 9
ENGLISH ESPAÑOL DEUTSCH This Product #0 @9 @3 !2 !8 @4 @5 w @6 @8 @7 #1 @3 RESET button @4 WIDE/MENU button @5 CH button @6 Dome Light switch @7 OPEN button @8 Dome Light @9 Remote control signal sensor #0 Wireless headphone output section #1 Optical sensor Note: • Obstacles between the wireless headphones and output section may prevent reception. FRANÇAIS ITALIANO NEDERLANDS 8
ENGLISH ESPAÑOL DEUTSCH This Product #0 @9 @3 !2 !8 @4 @5 w @6 @8 @7 #1 @3 RESET button @4 WIDE/MENU button @5 CH button @6 Dome Light switch @7 OPEN button @8 Dome Light @9 Remote control signal sensor #0 Wireless headphone output section #1 Optical sensor Note: • Obstacles between the wireless headphones and output section may prevent reception. FRANÇAIS ITALIANO NEDERLANDS 8

Owner's Manual
Page 10
... or accelerator pedal. Precaution: • Remove the battery if the remote control is equipped with a remote control for the first time, pull out the film protruding from the tray. Using the Remote Control This product is not used batteries, please comply with governmental regulations or... and (-) poles facing in the proper directions. CAUTION: • Do not recharge, disassemble, heat or dispose of battery leakage, wipe the remote control completely clean and install a new battery. Replacing the Lithium Battery: • Use only lithium battery "CR2025", 3 V. WARNING: • Keep...
... or accelerator pedal. Precaution: • Remove the battery if the remote control is equipped with a remote control for the first time, pull out the film protruding from the tray. Using the Remote Control This product is not used batteries, please comply with governmental regulations or... and (-) poles facing in the proper directions. CAUTION: • Do not recharge, disassemble, heat or dispose of battery leakage, wipe the remote control completely clean and install a new battery. Replacing the Lithium Battery: • Use only lithium battery "CR2025", 3 V. WARNING: • Keep...

Owner's Manual
Page 11
Select a code type. Using this product, a GEX-6100TV TV tuner, and a Pioneer DVD Player. Use a pen or other pointed object to "DVD". 2. Using the Pioneer DVD Player 1. Set the switch to switch the setting. 10 FRANÇAIS ITALIANO NEDERLANDS ENGLISH ESPAÑOL DEUTSCH Setting Remote Control Code Changing the remote control operation mode of the remote control included with this product lets you operate this product and a GEX-6100TV TV tuner • Set the switch to "DISP/TV".
Select a code type. Using this product, a GEX-6100TV TV tuner, and a Pioneer DVD Player. Use a pen or other pointed object to "DVD". 2. Using the Pioneer DVD Player 1. Set the switch to switch the setting. 10 FRANÇAIS ITALIANO NEDERLANDS ENGLISH ESPAÑOL DEUTSCH Setting Remote Control Code Changing the remote control operation mode of the remote control included with this product lets you operate this product and a GEX-6100TV TV tuner • Set the switch to "DISP/TV".

Owner's Manual
Page 12
..., code type A, code type B and code type DVH. Set the remote control selection switch on reception signal setting of the remote control to appropriate position with "XDV-P9II" or "XDV-P9" Multi-DVD Players, select code A. When using this ...Pressing 7 and 0 on the remote control simultaneously changes the code type between A and B. 11 Using the Remote Control Setting remote control code type When the remote control operation switch is set to DVD, changing the remote control code type enable to operate the Pioneer DVD player by the supplied remote control. When using this unit with ...
..., code type A, code type B and code type DVH. Set the remote control selection switch on reception signal setting of the remote control to appropriate position with "XDV-P9II" or "XDV-P9" Multi-DVD Players, select code A. When using this ...Pressing 7 and 0 on the remote control simultaneously changes the code type between A and B. 11 Using the Remote Control Setting remote control code type When the remote control operation switch is set to DVD, changing the remote control code type enable to operate the Pioneer DVD player by the supplied remote control. When using this unit with ...
Owner's Manual
Page 14
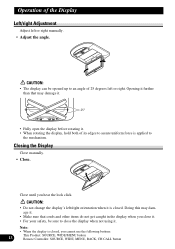
... Display Close manually. • Close. Note: • When the display is closed , you cannot use the following buttons: 13 This Product: SOURCE, WIDE/MENU button Remote Controller: SOURCE, WIDE, MENU, BACK, CH CALL button Opening it further than that may damage it . Close until you close the display when not using it...
... Display Close manually. • Close. Note: • When the display is closed , you cannot use the following buttons: 13 This Product: SOURCE, WIDE/MENU button Remote Controller: SOURCE, WIDE, MENU, BACK, CH CALL button Opening it further than that may damage it . Close until you close the display when not using it...

Owner's Manual
Page 16
ACC ON ST 2. Each press of the POWER button, the power of the system ON/OFF. Pull down the display. 3. Turn on the power to preserve battery life. 1. Open the display to a position where it is easy to switch ON/OFF. 15 Start the car engine. Note: • Press the remote control's POWER button to see, and adjust the direction it is pointing in. 4. LOCK ART Basic Operation Turn On Power Remember to start the car engine before turning on the system.
ACC ON ST 2. Each press of the POWER button, the power of the system ON/OFF. Pull down the display. 3. Turn on the power to preserve battery life. 1. Open the display to a position where it is easy to switch ON/OFF. 15 Start the car engine. Note: • Press the remote control's POWER button to see, and adjust the direction it is pointing in. 4. LOCK ART Basic Operation Turn On Power Remember to start the car engine before turning on the system.
Owner's Manual
Page 20
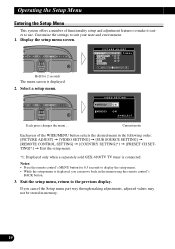
... to use. VIDEO SETTING VIDEO2 ON VIDEO3 ON SELECT Each press changes the menu ... If you can move back in the menu using the remote control's BACK button. 3. Select a setup menu. Exit the setup menu, return to suit your taste and environment. 1. Customize the settings to ...the previous display. Notes: • Press the remote control's MENU button for 2 seconds The menu screen is connected. Operating the Setup Menu Entering the Setup Menu This system offers a number of the...
... to use. VIDEO SETTING VIDEO2 ON VIDEO3 ON SELECT Each press changes the menu ... If you can move back in the menu using the remote control's BACK button. 3. Select a setup menu. Exit the setup menu, return to suit your taste and environment. 1. Customize the settings to ...the previous display. Notes: • Press the remote control's MENU button for 2 seconds The menu screen is connected. Operating the Setup Menu Entering the Setup Menu This system offers a number of the...

Owner's Manual
Page 21
... to the right of [BRIGHT] and [CONTRAST] on the screen, respectively, as the front-panel ambient light sensor determines brightness or darkness. • Use the remote control's 5/∞ buttons to select an item, and the 2/3 buttons to adjust parameter. ENGLISH ESPAÑOL DEUTSCH Picture Adjust BRIGHT/CONTRAST/COLOR/HUE Settings are...
... to the right of [BRIGHT] and [CONTRAST] on the screen, respectively, as the front-panel ambient light sensor determines brightness or darkness. • Use the remote control's 5/∞ buttons to select an item, and the 2/3 buttons to adjust parameter. ENGLISH ESPAÑOL DEUTSCH Picture Adjust BRIGHT/CONTRAST/COLOR/HUE Settings are...
Owner's Manual
Page 22
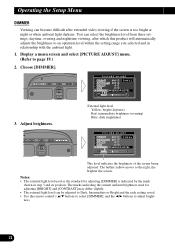
...the right, the brighter the screen. You can be adjusted to Dark, Intermediate or Bright and the each setting saved. • Use the remote control's 5/∞ buttons to select [DIMMER], and the 2/3 buttons to page 19.) 2. Choose [DIMMER]. The farther yellow moves to an optimum...too bright at night or when ambient light darkens. Display a menu screen and select [PICTURE ADJUST] menu. (Refer to adjust brightness. 21 External light level Yellow: bright (daytime) Red: intermediate brightness (evening) Blue: dark (nighttime) PICTURE ADJUST BRIGHT SEL CONTRAST COLOR HUE DIMMER SENSOR ...
...the right, the brighter the screen. You can be adjusted to Dark, Intermediate or Bright and the each setting saved. • Use the remote control's 5/∞ buttons to select [DIMMER], and the 2/3 buttons to page 19.) 2. Choose [DIMMER]. The farther yellow moves to an optimum...too bright at night or when ambient light darkens. Display a menu screen and select [PICTURE ADJUST] menu. (Refer to adjust brightness. 21 External light level Yellow: bright (daytime) Red: intermediate brightness (evening) Blue: dark (nighttime) PICTURE ADJUST BRIGHT SEL CONTRAST COLOR HUE DIMMER SENSOR ...

Owner's Manual
Page 23
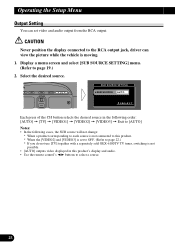
... When a video player, DVD player or other component is ON, so connect the cord supplied with this product to the VIDEO1 input. • Use the remote control's 5/∞ buttons to select a video source, and the 2/3 buttons to page 19.) 2. DEUTSCH FRANÇAIS ITALIANO NEDERLANDS 22 Display a menu screen.... (Refer to switch ON/OFF. VIDEO SETTING VIDEO2 ON VIDEO3 ON SELECT 3. Select video ON/OFF. Select the connection mode of the source external unit on the right of the CH button selects ON or OFF. Notes: • Usually [VIDEO1] is not connected, you can delete VIDEO2...
... When a video player, DVD player or other component is ON, so connect the cord supplied with this product to the VIDEO1 input. • Use the remote control's 5/∞ buttons to select a video source, and the 2/3 buttons to page 19.) 2. DEUTSCH FRANÇAIS ITALIANO NEDERLANDS 22 Display a menu screen.... (Refer to switch ON/OFF. VIDEO SETTING VIDEO2 ON VIDEO3 ON SELECT 3. Select video ON/OFF. Select the connection mode of the source external unit on the right of the CH button selects ON or OFF. Notes: • Usually [VIDEO1] is not connected, you can delete VIDEO2...
Owner's Manual
Page 24
... cases, the SUB source will not change: * When a product corresponding to each source is not connected to this product's display and audio. • Use the remote control's 2/3 buttons to select a source. 23
... cases, the SUB source will not change: * When a product corresponding to each source is not connected to this product's display and audio. • Use the remote control's 2/3 buttons to select a source. 23

Owner's Manual
Page 25
...] menu. (Refer to this product's [VIDEO1] and [VIDEO2] inputs via this product. Select the desired type. REMOTE CONTROL SETTING CARRIER TYPE TYPE1 SELECT Each press of your car. ENGLISH ESPAÑOL DEUTSCH Remote Control Setting Remote Control Setting enables remote control of auxiliary components connected to page 11.) 2. Notes: • To ascertain whether the auxiliary component is...
...] menu. (Refer to this product's [VIDEO1] and [VIDEO2] inputs via this product. Select the desired type. REMOTE CONTROL SETTING CARRIER TYPE TYPE1 SELECT Each press of your car. ENGLISH ESPAÑOL DEUTSCH Remote Control Setting Remote Control Setting enables remote control of auxiliary components connected to page 11.) 2. Notes: • To ascertain whether the auxiliary component is...

Owner's Manual
Page 31
... component with this product to the VIDEO1 input. ENGLISH Connection Diagram (VIDEO input) Usually [VIDEO1] is ON, so connect the cord supplied with RCA output Remote control signal transmitter For transmission of vision. 30 ITALIANO NEDERLANDS Also, be sure to VIDEO3 does not obstruct the driver's field of an auxiliary components...
... component with this product to the VIDEO1 input. ENGLISH Connection Diagram (VIDEO input) Usually [VIDEO1] is ON, so connect the cord supplied with RCA output Remote control signal transmitter For transmission of vision. 30 ITALIANO NEDERLANDS Also, be sure to VIDEO3 does not obstruct the driver's field of an auxiliary components...
User Manual
Page 2
Using this product and a GEX-6100TVP TV tuner - Using the Pioneer DVD Player Setting Remote Control Code Type 9 Operation of the Display 10 Deploying the Display 10 Left/right Adjustment 11 Closing the Display 11 Operation of the Display ........ 3 When ... 14 Changing the Wide Screen Mode 15 - DIMMER Input Setting [VIDEO2/VIDEO3 20 Output Setting 21 Remote Control Setting 22 Using the Display Correctly 23 Handling the Display 23 About the Liquid Crystal Display (LCD) Screen 24 Keeping the Display in Good Condition ........ 24 About the Small Fluorescent Tube 24 Connecting ...
Using this product and a GEX-6100TVP TV tuner - Using the Pioneer DVD Player Setting Remote Control Code Type 9 Operation of the Display 10 Deploying the Display 10 Left/right Adjustment 11 Closing the Display 11 Operation of the Display ........ 3 When ... 14 Changing the Wide Screen Mode 15 - DIMMER Input Setting [VIDEO2/VIDEO3 20 Output Setting 21 Remote Control Setting 22 Using the Display Correctly 23 Handling the Display 23 About the Liquid Crystal Display (LCD) Screen 24 Keeping the Display in Good Condition ........ 24 About the Small Fluorescent Tube 24 Connecting ...
User Manual
Page 4
... on this product after first switching off the power. Using this product fail to operate properly, contact your dealer or the nearest authorized Pioneer service facility. If this product with its buttons. When changing the room lamp, be able to use the separately sold GEX6100TVP TV tuner...be sure to use this product with your hand. Be careful not to the text explaining operation. For details concerning TV operation when using the remote control, refer to use them. However, depending on page 5 or refer to touch directly with headphones. • You are recommended to "Key ...
... on this product after first switching off the power. Using this product fail to operate properly, contact your dealer or the nearest authorized Pioneer service facility. If this product with its buttons. When changing the room lamp, be able to use the separately sold GEX6100TVP TV tuner...be sure to use this product with your hand. Be careful not to the text explaining operation. For details concerning TV operation when using the remote control, refer to use them. However, depending on page 5 or refer to touch directly with headphones. • You are recommended to "Key ...

User Manual
Page 6
... mode switch (For details, see page 8.) !7 STEP buttons !8 POWER button @1 STOP button @2 CLEAR button Note: • For details concerning Pioneer DVD Player operation, refer to the Pioneer DVD Player's manual. 5 q Remote control code selection switch (For details, see page 8.) w VOLUME buttons e MENU button r AUDIO button t SUBTITLE button y ANGLE button u FORWARD/REVERSE buttons i PLAY/PAUSE...
... mode switch (For details, see page 8.) !7 STEP buttons !8 POWER button @1 STOP button @2 CLEAR button Note: • For details concerning Pioneer DVD Player operation, refer to the Pioneer DVD Player's manual. 5 q Remote control code selection switch (For details, see page 8.) w VOLUME buttons e MENU button r AUDIO button t SUBTITLE button y ANGLE button u FORWARD/REVERSE buttons i PLAY/PAUSE...

User Manual
Page 7
FRANÇAIS ITALIANO NEDERLANDS 6 ENGLISH ESPAÑOL DEUTSCH This Product #0 @9 @3 !2 !8 @4 @5 w @6 @8 @7 #1 @3 RESET button @4 WIDE/MENU button @5 CH button @6 Dome Light switch @7 OPEN button @8 Dome Light @9 Remote control signal sensor #0 Wireless headphone output section #1 Optical sensor Note: • Obstacles between the wireless headphones and output section may prevent reception.
FRANÇAIS ITALIANO NEDERLANDS 6 ENGLISH ESPAÑOL DEUTSCH This Product #0 @9 @3 !2 !8 @4 @5 w @6 @8 @7 #1 @3 RESET button @4 WIDE/MENU button @5 CH button @6 Dome Light switch @7 OPEN button @8 Dome Light @9 Remote control signal sensor #0 Wireless headphone output section #1 Optical sensor Note: • Obstacles between the wireless headphones and output section may prevent reception.


