Owner's Manual
Page 1
English Be sure to your vehicle's parking brake and depending on your Authorized Pioneer Electronics retailer or call us at (800) 421-1404. Operation Manual MULTIMEDIA AV NAVIGATION RECEIVER AVIC-Z130BT AVIC-X930BT AVIC-X9310BT Notice to all users: This software requires that you must understand before using this navigation system. Important Information for the User includes...
English Be sure to your vehicle's parking brake and depending on your Authorized Pioneer Electronics retailer or call us at (800) 421-1404. Operation Manual MULTIMEDIA AV NAVIGATION RECEIVER AVIC-Z130BT AVIC-X930BT AVIC-X9310BT Notice to all users: This software requires that you must understand before using this navigation system. Important Information for the User includes...
Owner's Manual
Page 2
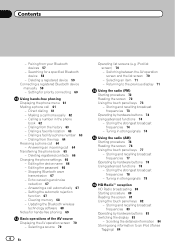
...guidance 33 Switching the map orientation 28 - Terms used in this manual in a safe place for AVICX930BT and AVIC-X9310BT) 18 Plugging and unplugging a USB storage device 19 - Inserting an SD memory card (for AVIC-X930BT and AVIC-X9310BT) 16 Inserting and ejecting an SD memory card 16 - ... After you will know how to use the navigation menu screens Screen switching overview 22 What you for buying this Pioneer product. Important The screens shown in this manual 9 - Actual screens may differ from theft 14 Adjusting the LCD panel angle 15 Inserting and ejecting a disc 15...
...guidance 33 Switching the map orientation 28 - Terms used in this manual in a safe place for AVICX930BT and AVIC-X9310BT) 18 Plugging and unplugging a USB storage device 19 - Inserting an SD memory card (for AVIC-X930BT and AVIC-X9310BT) 16 Inserting and ejecting an SD memory card 16 - ... After you will know how to use the navigation menu screens Screen switching overview 22 What you for buying this Pioneer product. Important The screens shown in this manual 9 - Actual screens may differ from theft 14 Adjusting the LCD panel angle 15 Inserting and ejecting a disc 15...
Owner's Manual
Page 3
...Items that users can operate 43 Checking the current itinerary 44 Editing waypoints 45 - Editing your Bluetooth devices 56 - Checking traffic information manually 54 Selecting traffic information to your route 34 Searching for a location by address 35 - Searching for POIs around the city 38 ... location by specifying the house number 36 Setting up a route to display 55 Selecting preferred RDS-TMC service provider manually 55 Registering and connecting a Bluetooth device Preparing communication devices 56 Registering your home 48 - Searching for nearby Bluetooth devices 56 En 3
...Items that users can operate 43 Checking the current itinerary 44 Editing waypoints 45 - Editing your Bluetooth devices 56 - Checking traffic information manually 54 Selecting traffic information to your route 34 Searching for a location by address 35 - Searching for POIs around the city 38 ... location by specifying the house number 36 Setting up a route to display 55 Selecting preferred RDS-TMC service provider manually 55 Registering and connecting a Bluetooth device Preparing communication devices 56 Registering your home 48 - Searching for nearby Bluetooth devices 56 En 3
Owner's Manual
Page 4
... broadcast frequencies 83 Operating by hardware buttons 83 Switching the display 83 - Pairing from the history 63 - Deleting a registered device 59 Connecting a registered Bluetooth device manually 59 - Answering a call home easily 62 - Clearing memory 68 - Selecting a source 70 4 En Operating list screens (e.g. Storing the strongest broadcast frequencies 78 - Answering an incoming...
... broadcast frequencies 83 Operating by hardware buttons 83 Switching the display 83 - Pairing from the history 63 - Deleting a registered device 59 Connecting a registered Bluetooth device manually 59 - Answering a call home easily 62 - Clearing memory 68 - Selecting a source 70 4 En Operating list screens (e.g. Storing the strongest broadcast frequencies 78 - Answering an incoming...
Owner's Manual
Page 9
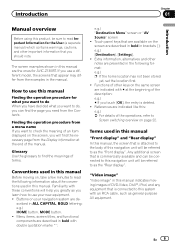
... displayed on your new equipment. ! References are described in bold in brackets [ ]: e.g.) [Destination], [Settings]. ! En 9 Terms used in this manual indicates moving on page 22. Familiarity with double quotation marks " ": e.g.) "Destination Menu" screen or "AV Source" screen ! How to use your ... the operations, refer to Screen switching overview on , take a few minutes to read Important Information for AVIC-Z130BT. Introduction Chapter 01 Introduction Manual overview Before using this product, be referred to as the "Rear display". Touch panel keys that you...
... displayed on your new equipment. ! References are described in bold in brackets [ ]: e.g.) [Destination], [Settings]. ! En 9 Terms used in this manual indicates moving on page 22. Familiarity with double quotation marks " ": e.g.) "Destination Menu" screen or "AV Source" screen ! How to use your ... the operations, refer to Screen switching overview on , take a few minutes to read Important Information for AVIC-Z130BT. Introduction Chapter 01 Introduction Manual overview Before using this product, be referred to as the "Rear display". Touch panel keys that you...

Owner's Manual
Page 10
..., it is referred to use is protected by the Copyright Law. For details about iPod compatibility with this navigation system with a Pioneer USB interface cable for commercial or public viewing purposes may vary depending on the author's rights as protected by U.S. revenue-generating), ...or any right to as the "USB storage device". For details, please visit http://www.mp3licensing.com. iPhone: Ver. 3.1.3 p In this manual, iPod and iPhone will be compatible with this system for iPod (CDIU51V) (sold separately), you use of Rovi Corporation. ferred to the information...
..., it is referred to use is protected by the Copyright Law. For details about iPod compatibility with this navigation system with a Pioneer USB interface cable for commercial or public viewing purposes may vary depending on the author's rights as protected by U.S. revenue-generating), ...or any right to as the "USB storage device". For details, please visit http://www.mp3licensing.com. iPhone: Ver. 3.1.3 p In this manual, iPod and iPhone will be compatible with this system for iPod (CDIU51V) (sold separately), you use of Rovi Corporation. ferred to the information...
Owner's Manual
Page 13
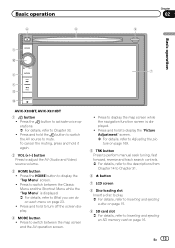
... hold to display the "Picture Adjustment" screen. = For details, refer to Adjusting the picture on page 169. 5 TRK button Press to perform manual seek tuning, fast forward, reverse and track search controls. = For details, refer to the descriptions from Chapter 14 to Chapter 31. 6 h ... ! Press and hold it again. 2 VOL (+/-) button Press to Chapter 33. ! Basic operation 6 8 Chapter 02 9 Basic operation 3 a 7 4 5 b c AVIC-X930BT, AVIC-X9310BT 1 button ! Press to What you can do on each menu on page 16. Press to display the map screen while the navigation function screen...
... hold to display the "Picture Adjustment" screen. = For details, refer to Adjusting the picture on page 169. 5 TRK button Press to perform manual seek tuning, fast forward, reverse and track search controls. = For details, refer to the descriptions from Chapter 14 to Chapter 31. 6 h ... ! Press and hold it again. 2 VOL (+/-) button Press to Chapter 33. ! Basic operation 6 8 Chapter 02 9 Basic operation 3 a 7 4 5 b c AVIC-X930BT, AVIC-X9310BT 1 button ! Press to What you can do on each menu on page 16. Press to display the map screen while the navigation function screen...
Owner's Manual
Page 16
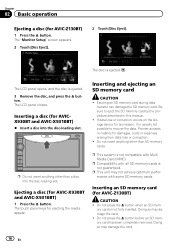
...usually not possible to eject the SD memory card by the procedure described in this manual. ! Inserting a disc (for AVICX930BT and AVIC-X9310BT) % Insert a disc into the disc-loading slot. p Do not insert ...Doing so may damage the card. ! The LCD panel closes. The touch panel keys for AVIC-X930BT and AVIC-X9310BT) 1 Press the h button. p This system is not guaranteed. The LCD panel opens... the data. Ejecting an SD memory card during data transfer can damage the SD memory card. Pioneer accepts no liability for any reason, it is ejected. p This unit may not achieve optimum ...
...usually not possible to eject the SD memory card by the procedure described in this manual. ! Inserting a disc (for AVICX930BT and AVIC-X9310BT) % Insert a disc into the disc-loading slot. p Do not insert ...Doing so may damage the card. ! The LCD panel closes. The touch panel keys for AVIC-X930BT and AVIC-X9310BT) 1 Press the h button. p This system is not guaranteed. The LCD panel opens... the data. Ejecting an SD memory card during data transfer can damage the SD memory card. Pioneer accepts no liability for any reason, it is ejected. p This unit may not achieve optimum ...

Owner's Manual
Page 23
... the tab on the right edge or scroll the bar to display the icon that you want to add to shortcut. Shortcut Menu p In this manual, Classic Menu will appear. Scroll bar 4 Touch and hold the icon that is related to hands-free phoning. 4 AV operation screen This is the starting...
... the tab on the right edge or scroll the bar to display the icon that you want to add to shortcut. Shortcut Menu p In this manual, Classic Menu will appear. Scroll bar 4 Touch and hold the icon that is related to hands-free phoning. 4 AV operation screen This is the starting...
Owner's Manual
Page 45
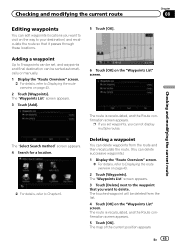
... details, refer to Displaying the route overview on the "Waypoints List" screen. p If you set , and waypoints and final destination can be sorted automatically or manually. 1 Display the "Route Overview" screen. = For details, refer to Displaying the route overview on the way to your destination) and recalculate the route so that...
... details, refer to Displaying the route overview on the "Waypoints List" screen. p If you set , and waypoints and final destination can be sorted automatically or manually. 1 Display the "Route Overview" screen. = For details, refer to Displaying the route overview on the way to your destination) and recalculate the route so that...

Owner's Manual
Page 54
... icon is displayed. The displayed route is set. p When no action if the system cannot find any traffic information on the navi- Checking traffic information manually Touching the notification icon on your route or the system cannot find traffic congestion. 54 En After touching [Diversion], the route is recalculated taking all...
... icon is displayed. The displayed route is set. p When no action if the system cannot find any traffic information on the navi- Checking traffic information manually Touching the notification icon on your route or the system cannot find traffic congestion. 54 En After touching [Diversion], the route is recalculated taking all...

Owner's Manual
Page 55
...the selected traffic information. # If you touch [All], you can select which types will be received via the RDS-TMC service, and you can manually select one from available RDS-TMC service providers. 1 Display the "Destination Menu" screen. = For details of the operations, refer to the screen...." screen appears. # If you touch [List], the "Traffic on page 22. 2 Touch [Traffic]. Selecting preferred RDS-TMC service provider manually A default preferred TMC service provider for traffic congestion automatically on the previous page. # If you touch , the message disappears and the map screen...
...the selected traffic information. # If you touch [All], you can select which types will be received via the RDS-TMC service, and you can manually select one from available RDS-TMC service providers. 1 Display the "Destination Menu" screen. = For details of the operations, refer to the screen...." screen appears. # If you touch [List], the "Traffic on page 22. 2 Touch [Traffic]. Selecting preferred RDS-TMC service provider manually A default preferred TMC service provider for traffic congestion automatically on the previous page. # If you touch , the message disappears and the map screen...
Owner's Manual
Page 56
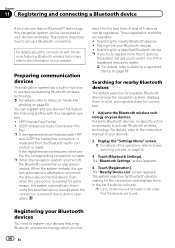
... Bluetooth wireless technology, refer to set up a Bluetooth connection. The "Bluetooth Settings" screen appears. 4 Touch [Registration]. Registering your Bluetooth devices You need to the instruction manual of the operations, refer to your devices wirelessly. For details, refer to register your devices. This section describes how to the information on our website...
... Bluetooth wireless technology, refer to set up a Bluetooth connection. The "Bluetooth Settings" screen appears. 4 Touch [Registration]. Registering your Bluetooth devices You need to the instruction manual of the operations, refer to your devices wirelessly. For details, refer to register your devices. This section describes how to the information on our website...

Owner's Manual
Page 57
.... The "Bluetooth Settings" screen appears. 4 Touch [Registration]. For details, refer to register. p If you cannot find the Bluetooth device that you want to the instruction manual of your mobile phone." Registering and connecting a Bluetooth device En 57 The device is "1111") using the Bluetooth device. Pairing from your devices.
.... The "Bluetooth Settings" screen appears. 4 Touch [Registration]. For details, refer to register. p If you cannot find the Bluetooth device that you want to the instruction manual of your mobile phone." Registering and connecting a Bluetooth device En 57 The device is "1111") using the Bluetooth device. Pairing from your devices.
Owner's Manual
Page 58
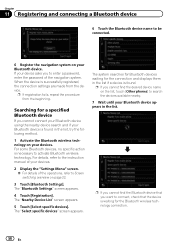
... the navigation system on your devices. 2 Display the "Settings Menu" screen. = For details of the navigation system. When the device is necessary to the instruction manual of your Bluetooth device. The "Nearby Device List" screen appears. 5 Touch [Select specific devices]. For some Bluetooth devices, no specific-action is successfully registered, the...
... the navigation system on your devices. 2 Display the "Settings Menu" screen. = For details of the navigation system. When the device is necessary to the instruction manual of your Bluetooth device. The "Nearby Device List" screen appears. 5 Touch [Select specific devices]. For some Bluetooth devices, no specific-action is successfully registered, the...
Owner's Manual
Page 59
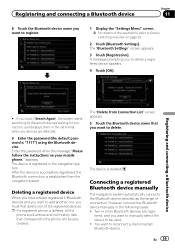
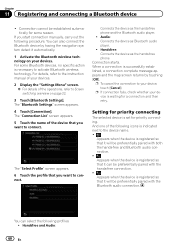
... waiting for connection, and displays them in the list format when any devices are regis- Connecting a registered Bluetooth device manually The navigation system automatically connects the Bluetooth device selected as the target of connection. Enter the password while the message "... device. The "Delete from the navigation system. The "Bluetooth Settings" screen appears. 3 Touch [Registration]. However, connect the Bluetooth device manually in the navigation system. You want to add another one, you must first delete one of the registered devices. A message prompting you ...
... waiting for connection, and displays them in the list format when any devices are regis- Connecting a registered Bluetooth device manually The navigation system automatically connects the Bluetooth device selected as the target of connection. Enter the password while the message "... device. The "Delete from the navigation system. The "Bluetooth Settings" screen appears. 3 Touch [Registration]. However, connect the Bluetooth device manually in the navigation system. You want to add another one, you must first delete one of the registered devices. A message prompting you ...
Owner's Manual
Page 60
If you start connection manually, carry out the following profiles: ! The "Bluetooth Settings" screen appears. 4 Touch [Connection]. Connects the device as the hands-free phone. Setting for priority connecting The ..., check whether your devices. Handsfree and Audio: 60 En And one of the device that you want to connect. For details, refer to the instruction manual of the operations, refer to activate Bluetooth wireless technology. Handsfree: Connects the device as the hands-free phone and the Bluetooth audio player. ! You can...
If you start connection manually, carry out the following profiles: ! The "Bluetooth Settings" screen appears. 4 Touch [Connection]. Connects the device as the hands-free phone. Setting for priority connecting The ..., check whether your devices. Handsfree and Audio: 60 En And one of the device that you want to connect. For details, refer to the instruction manual of the operations, refer to activate Bluetooth wireless technology. Handsfree: Connects the device as the hands-free phone and the Bluetooth audio player. ! You can...
Owner's Manual
Page 64
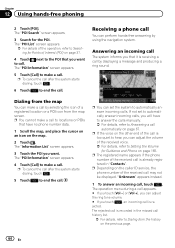
... from the map You can adjust the volume of Interest (POI) on page 37. 4 Touch next to the POI that have to answer the calls manually. = For details, refer to Answering a call is too quiet to hear, you want to make a call by displaying a message and producing a ring sound. p The registered...
... from the map You can adjust the volume of Interest (POI) on page 37. 4 Touch next to the POI that have to answer the calls manually. = For details, refer to Answering a call is too quiet to hear, you want to make a call by displaying a message and producing a ring sound. p The registered...
Owner's Manual
Page 65
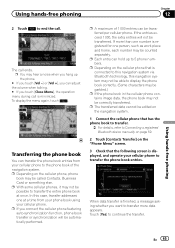
... be edited on the navigation system. 1 Connect the cellular phone that has the phone book to transfer. = For details, refer to Connecting a registered Bluetooth device manually on page 59. 2 Touch [Contacts Transfer] on the "Phone Menu" screen. 3 Check that is minimized. Using hands-free phoning En 65 p You may be automatically...
... be edited on the navigation system. 1 Connect the cellular phone that has the phone book to transfer. = For details, refer to Connecting a registered Bluetooth device manually on page 59. 2 Touch [Contacts Transfer] on the "Phone Menu" screen. 3 Check that is minimized. Using hands-free phoning En 65 p You may be automatically...
Owner's Manual
Page 67
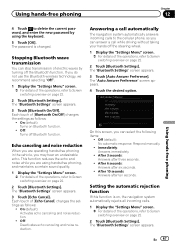
... "Bluetooth Settings" screen appears. 3 Touch [Auto Answer Preference]. After 3 seconds: Answers after six seconds. ! En 67 On (default): Activates echo canceling and noise reduction. ! Respond manually. ! The "Bluetooth Settings" screen appears. Using hands-free phoning Chapter 12 Using hands-free phoning 4 Touch to delete the current password, and enter the new...
... "Bluetooth Settings" screen appears. 3 Touch [Auto Answer Preference]. After 3 seconds: Answers after six seconds. ! En 67 On (default): Activates echo canceling and noise reduction. ! Respond manually. ! The "Bluetooth Settings" screen appears. Using hands-free phoning Chapter 12 Using hands-free phoning 4 Touch to delete the current password, and enter the new...


