Owner's Manual
Page 2
... 11 Notes on -screen keyboard 24 How to use this Pioneer product. Inserting a disc (for AVIC-Z130BT) 15 - Plugging in the map database 27 Operating the map screen 27 - Ejecting a disc (for AVIC- Ejecting an SD memory card (for AVIC-Z130BT) 16 - Disconnecting your product from actual screens. POI... 27 Types of the road stored in a USB storage device 19 - Viewing information about a specified location 28 - Ejecting an SD memory card (for AVIC-X930BT and AVIC-X9310BT) 16 Inserting and ejecting an SD memory card 16 - Removing a shortcut 24 Operating list screens (e.g.
... 11 Notes on -screen keyboard 24 How to use this Pioneer product. Inserting a disc (for AVIC-Z130BT) 15 - Plugging in the map database 27 Operating the map screen 27 - Ejecting a disc (for AVIC- Ejecting an SD memory card (for AVIC-Z130BT) 16 - Disconnecting your product from actual screens. POI... 27 Types of the road stored in a USB storage device 19 - Viewing information about a specified location 28 - Ejecting an SD memory card (for AVIC-X930BT and AVIC-X9310BT) 16 Inserting and ejecting an SD memory card 16 - Removing a shortcut 24 Operating list screens (e.g.
Owner's Manual
Page 3
... 49 - Editing your Bluetooth devices 56 - Searching for POIs by coordinates 40 After the location is decided Setting a route to read traffic information on the SD memory card 40 Selecting a location you searched for recently 40 Searching for Points of Interest (POI) 37 - Editing the favorite location in the list 48 - Searching...
... 49 - Editing your Bluetooth devices 56 - Searching for POIs by coordinates 40 After the location is decided Setting a route to read traffic information on the SD memory card 40 Selecting a location you searched for recently 40 Searching for Points of Interest (POI) 37 - Editing the favorite location in the list 48 - Searching...
Owner's Manual
Page 7
... - Using sonic center control 179 - Switching the muting/attenuation timing 172 - Changing the preinstalled splash screen 165 - How to the splash screen stored in the SD memory card 165 - Setting the rear output 171 -
... - Using sonic center control 179 - Switching the muting/attenuation timing 172 - Changing the preinstalled splash screen 165 - How to the splash screen stored in the SD memory card 165 - Setting the rear output 171 -

Owner's Manual
Page 10
...USB memory only, it may constitute an infringement on the iPod models and the software version of iPod. "SD memory card" The SD memory card, SDHC memory card, microSD card and microSDHC card are collectively referred to as iPod. iPod nano fifth generation: Ver. 1.0.2 ! iPhone 3G: Ver. 4.1... viewing Remember that is protected by the Copyright Law. iPod with this manual, iPod and iPhone will be compatible with a Pioneer USB interface cable for private, non-commercial use and does not convey a license nor imply any commercial (i.e. revenue-generating), real...
...USB memory only, it may constitute an infringement on the iPod models and the software version of iPod. "SD memory card" The SD memory card, SDHC memory card, microSD card and microSDHC card are collectively referred to as iPod. iPod nano fifth generation: Ver. 1.0.2 ! iPhone 3G: Ver. 4.1... viewing Remember that is protected by the Copyright Law. iPod with this manual, iPod and iPhone will be compatible with a Pioneer USB interface cable for private, non-commercial use and does not convey a license nor imply any commercial (i.e. revenue-generating), real...
Owner's Manual
Page 13
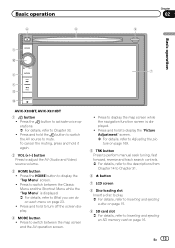
...Press to switch between the map screen and the AV operation screen. ! En 13 Basic operation 6 8 Chapter 02 9 Basic operation 3 a 7 4 5 b c AVIC-X930BT, AVIC-X9310BT 1 button ! Press the HOME button to turn off the screen display. 4 MODE button ! Press and hold it again. 2 VOL (+/-) button Press to switch ...to display the "Top Menu" screen. ! Press and hold the button to switch the AV source to Inserting and ejecting an SD memory card on page 15. 9 SD card slot = For details, refer to mute. Press and hold to display the "Picture Adjustment" screen. = For details, refer...
...Press to switch between the map screen and the AV operation screen. ! En 13 Basic operation 6 8 Chapter 02 9 Basic operation 3 a 7 4 5 b c AVIC-X930BT, AVIC-X9310BT 1 button ! Press the HOME button to turn off the screen display. 4 MODE button ! Press and hold it again. 2 VOL (+/-) button Press to switch ...to display the "Top Menu" screen. ! Press and hold the button to switch the AV source to Inserting and ejecting an SD memory card on page 15. 9 SD card slot = For details, refer to mute. Press and hold to display the "Picture Adjustment" screen. = For details, refer...
Owner's Manual
Page 16
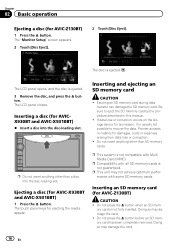
... Setup" screen appears. 2 Touch [Disc Eject]. 2 Touch [Disc Eject]. Ejecting an SD memory card during data transfer can damage the SD memory card. If data loss or corruption occurs on the storage device for AVIC-X930BT and AVIC-X9310BT) 1 Press the h button. Pioneer accepts no liability for AVIC-Z130BT) 1 Press the h button. Do not press the h button before an...
... Setup" screen appears. 2 Touch [Disc Eject]. 2 Touch [Disc Eject]. Ejecting an SD memory card during data transfer can damage the SD memory card. If data loss or corruption occurs on the storage device for AVIC-X930BT and AVIC-X9310BT) 1 Press the h button. Pioneer accepts no liability for AVIC-Z130BT) 1 Press the h button. Do not press the h button before an...
Owner's Manual
Page 17
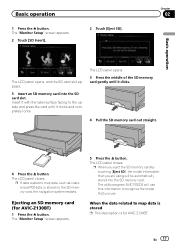
... . Chapter 02 Basic operation The LCD panel opens, and the SD card slot appears. 3 Insert an SD memory card into the SD memory card. The LCD panel closes. The "Monitor Setup" screen appears. 5 Press the h button. The utility program AVIC FEEDS will be automatically stored into the SD card slot. Insert it with the label surface facing to map...
... . Chapter 02 Basic operation The LCD panel opens, and the SD card slot appears. 3 Insert an SD memory card into the SD memory card. The LCD panel closes. The "Monitor Setup" screen appears. 5 Press the h button. The utility program AVIC FEEDS will be automatically stored into the SD card slot. Insert it with the label surface facing to map...
Owner's Manual
Page 18
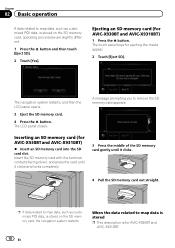
.... p If data related to map data, such as customized POI data, is for AVIC-X930BT and AVIC-X9310BT) % Insert an SD memory card into the SD card slot. The LCD panel closes. The navigation system restarts, and then the LCD panel opens. 3 Eject the SD memory card. 4 Press the h button. Chapter 02 Basic operation If data related to remove...
.... p If data related to map data, such as customized POI data, is for AVIC-X930BT and AVIC-X9310BT) % Insert an SD memory card into the SD card slot. The LCD panel closes. The navigation system restarts, and then the LCD panel opens. 3 Eject the SD memory card. 4 Press the h button. Chapter 02 Basic operation If data related to remove...

Owner's Manual
Page 19
... To prevent data loss and damage to remove the SD memory card appears. The navigation system restarts. Connecting and disconnecting an iPod CAUTION ! rage device, never remove it is usually not possible to recover the data. Pioneer accepts no liability for damages, costs or expenses arising... liability for damages, costs or expenses arising from data loss or corruption. Plugging and unplugging a USB storage device CAUTION ! Eject the SD memory card before touching [OK]. 4 Touch [OK]. possible to the sto- Basic operation Chapter 02 If data related to map data, such ...
... To prevent data loss and damage to remove the SD memory card appears. The navigation system restarts. Connecting and disconnecting an iPod CAUTION ! rage device, never remove it is usually not possible to recover the data. Pioneer accepts no liability for damages, costs or expenses arising... liability for damages, costs or expenses arising from data loss or corruption. Plugging and unplugging a USB storage device CAUTION ! Eject the SD memory card before touching [OK]. 4 Touch [OK]. possible to the sto- Basic operation Chapter 02 If data related to map data, such ...
Owner's Manual
Page 40
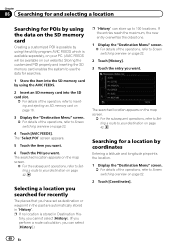
...overview on page 22. 4 Touch [AVIC FEEDS]. Chapter 06 Searching for and selecting a location Searching for POIs by using the data on the SD memory card Creating a customized POI is possible by using the AVIC FEEDS. 2 Insert an SD memory card into the SD card slot. = For details of the operation..., refer to Inserting and ejecting an SD memory card on page 16. 3 Display the "Destination Menu"...
...overview on page 22. 4 Touch [AVIC FEEDS]. Chapter 06 Searching for and selecting a location Searching for POIs by using the data on the SD memory card Creating a customized POI is possible by using the AVIC FEEDS. 2 Insert an SD memory card into the SD card slot. = For details of the operation..., refer to Inserting and ejecting an SD memory card on page 16. 3 Display the "Destination Menu"...

Owner's Manual
Page 49
... with new data. 1 Insert an SD memory card into the SD memory card by using the AVIC FEEDS. The "Favorites" screen appears. p When a location that you can export the "Favorites" data to an SD memory card for editing by using the utility program AVIC FEEDS which is exported, the completion ...locations You can import the locations that is already registered in the SD memory card, the data is overwritten. 1 Store the item into the SD card slot. = For details of the operation, refer to Inserting and ejecting an SD memory card on page 16. 2 Display the "Destination Menu" screen. ...
... with new data. 1 Insert an SD memory card into the SD memory card by using the AVIC FEEDS. The "Favorites" screen appears. p When a location that you can export the "Favorites" data to an SD memory card for editing by using the utility program AVIC FEEDS which is exported, the completion ...locations You can import the locations that is already registered in the SD memory card, the data is overwritten. 1 Store the item into the SD card slot. = For details of the operation, refer to Inserting and ejecting an SD memory card on page 16. 2 Display the "Destination Menu" screen. ...

Owner's Manual
Page 50
... to Screen switching overview on page 22. 4 Touch [Favorites]. Chapter 09 Registering and editing locations 2 Insert an SD memory card into the SD card slot. = For details of the operation, refer to Inserting and ejecting an SD memory card on page 16. 3 Display the "Destination Menu" screen. = For details of the operations, refer to deselect all...
... to Screen switching overview on page 22. 4 Touch [Favorites]. Chapter 09 Registering and editing locations 2 Insert an SD memory card into the SD card slot. = For details of the operation, refer to Inserting and ejecting an SD memory card on page 16. 3 Display the "Destination Menu" screen. = For details of the operations, refer to deselect all...
Owner's Manual
Page 68
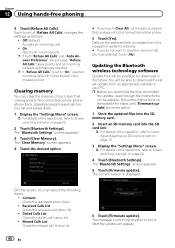
... will be available for steps until [Firmware update] becomes active. 1 Store the updated files into the SD memory card. 2 Insert an SD memory card into the SD card slot. = For details of the operation, refer to Inserting and ejecting an SD memory card on page 16. 3 Display the "Settings Menu" screen. = For details of [Refuse All Calls] changes...
... will be available for steps until [Firmware update] becomes active. 1 Store the updated files into the SD memory card. 2 Insert an SD memory card into the SD card slot. = For details of the operation, refer to Inserting and ejecting an SD memory card on page 16. 3 Display the "Settings Menu" screen. = For details of [Refuse All Calls] changes...

Owner's Manual
Page 109
...Display the AV operation screen. = For details of the operations, refer to Displaying the AV operation screen on page 70. 2 Insert the SD memory card into the SD card slot or plug the USB storage device into the USB connector. = For details, refer to Plugging in folder 01 (root folder), playback starts... can playback the files on a USB storage device compliant with Mass Storage Class. Reading the screen 23 p In the following description, the SD mem- 4 ory card and USB memory device are skipped if they contain no playable files in a USB storage device on page 19. = For details, refer...
...Display the AV operation screen. = For details of the operations, refer to Displaying the AV operation screen on page 70. 2 Insert the SD memory card into the SD card slot or plug the USB storage device into the USB connector. = For details, refer to Plugging in folder 01 (root folder), playback starts... can playback the files on a USB storage device compliant with Mass Storage Class. Reading the screen 23 p In the following description, the SD mem- 4 ory card and USB memory device are skipped if they contain no playable files in a USB storage device on page 19. = For details, refer...

Owner's Manual
Page 113
...screen 123 4 8 5 6 Playing video files (from USB or SD) Starting procedure 1 Display the AV operation screen. = For details of the operations, refer to Displaying the AV operation screen on page 70. 2 Insert the SD memory card into the SD card slot or plug the USB storage device into the USB connector. ...= For details, refer to Plugging in order of folder numbers. ory card and USB memory device are collectively referred to as the "external...
...screen 123 4 8 5 6 Playing video files (from USB or SD) Starting procedure 1 Display the AV operation screen. = For details of the operations, refer to Displaying the AV operation screen on page 70. 2 Insert the SD memory card into the SD card slot or plug the USB storage device into the USB connector. ...= For details, refer to Plugging in order of folder numbers. ory card and USB memory device are collectively referred to as the "external...

Owner's Manual
Page 153
...153 Distance: Enter the distance traveled since the previous fueling is possible. p The distance is overwritten with new data. 1 Insert an SD memory card into the SD card slot. = For details of fuel pumped. ! Exporting the data of fuel cost information Exporting the fuel cost data to "Gas Mileage... 5 Touch [OK]. The "Gas Mileage Setting" screen appears. The "Gas Mileage Setting" screen appears. p The data stored in the SD memory card, the data is entered automatically only when the distance traveled since the previous fueling. Gas Pumped: Enter the amount of the operation, refer...
...153 Distance: Enter the distance traveled since the previous fueling is possible. p The distance is overwritten with new data. 1 Insert an SD memory card into the SD card slot. = For details of fuel pumped. ! Exporting the data of fuel cost information Exporting the fuel cost data to "Gas Mileage... 5 Touch [OK]. The "Gas Mileage Setting" screen appears. The "Gas Mileage Setting" screen appears. p The data stored in the SD memory card, the data is entered automatically only when the distance traveled since the previous fueling. Gas Pumped: Enter the amount of the operation, refer...
Owner's Manual
Page 154
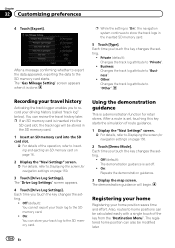
... your track log to store the track logs in the SD memory card. 1 Insert an SD memory card into the SD card slot, the track logs will begin. Using the demonstration guidance This is "On", the navigation system continues to the SD memory card. Each time you touch the key changes the setting.... Setting" screen appears when it is inserted into the SD card slot. = For details of the key from the "Destination Menu". p If an SD memory card is done. Private (default): Changes the track log attribute to the SD memory card starts. On: You can review the travel history Activating...
... your track log to store the track logs in the SD memory card. 1 Insert an SD memory card into the SD card slot, the track logs will begin. Using the demonstration guidance This is "On", the navigation system continues to the SD memory card. Each time you touch the key changes the setting.... Setting" screen appears when it is inserted into the SD card slot. = For details of the key from the "Destination Menu". p If an SD memory card is done. Private (default): Changes the track log attribute to the SD memory card starts. On: You can review the travel history Activating...
Owner's Manual
Page 160
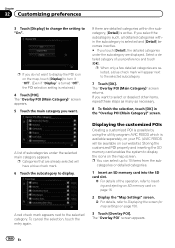
...the customized POIs Creating a customized POI is possible by using the utility program AVIC FEEDS which is retained.) 4 Touch [POI]. If there are displayed. Select a detailed category of your PC. (AVIC FEEDS will appear next to display the icons on the map screen. The "... the POI selection setting is available separately, on page 156. 3 Touch [Overlay POI]. categories or detailed categories. 1 Insert an SD memory card into the SD card slot. = For details of subcategories under the subcategory are detailed categories within the subcategory is active. A list of the operation, ...
...the customized POIs Creating a customized POI is possible by using the utility program AVIC FEEDS which is retained.) 4 Touch [POI]. If there are displayed. Select a detailed category of your PC. (AVIC FEEDS will appear next to display the icons on the map screen. The "... the POI selection setting is available separately, on page 156. 3 Touch [Overlay POI]. categories or detailed categories. 1 Insert an SD memory card into the SD card slot. = For details of subcategories under the subcategory are detailed categories within the subcategory is active. A list of the operation, ...
Owner's Manual
Page 166
... named "Pictures" on the top-most directory of the SD memory card. 2 Store the picture files in the "Pictures" folder. 3 Insert an SD memory card into the SD card slot. = For details of the operation, refer to Inserting and ejecting an SD memory card on page 16. 4 Display the "System Settings" screen...The image is set as a split screen where map information is displayed on "Select Splash Screen". CAUTION Pioneer recommends the use as the splash screen from the SD memory card are available. The "Back Camera Settings" screen appears. 166 En The "Select Splash Screen" screen ...
... named "Pictures" on the top-most directory of the SD memory card. 2 Store the picture files in the "Pictures" folder. 3 Insert an SD memory card into the SD card slot. = For details of the operation, refer to Inserting and ejecting an SD memory card on page 16. 4 Display the "System Settings" screen...The image is set as a split screen where map information is displayed on "Select Splash Screen". CAUTION Pioneer recommends the use as the splash screen from the SD memory card are available. The "Back Camera Settings" screen appears. 166 En The "Select Splash Screen" screen ...
Owner's Manual
Page 181
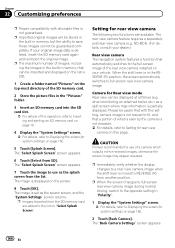
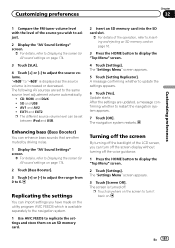
...automatically. ! The "Settings Menu" screen appears. 3 Touch [Screen Off]. The following AV sources are set between iPod and USB. 2 Insert an SD memory card into the SD card slot. = For details of the source you wish to adjust. 2 Display the "AV Sound Settings" screen. = For details, refer to 6. ... separately to the navigation system. 1 Use AVIC FEEDS to replicate the settings and store them on page 174. 2 Touch [Bass Booster]. 3 Touch [+] or [-] to adjust the range from 0 to Displaying the screen for AV sound settings on an SD memory card. p Touch anywhere on the screen to ...
...automatically. ! The "Settings Menu" screen appears. 3 Touch [Screen Off]. The following AV sources are set between iPod and USB. 2 Insert an SD memory card into the SD card slot. = For details of the source you wish to adjust. 2 Display the "AV Sound Settings" screen. = For details, refer to 6. ... separately to the navigation system. 1 Use AVIC FEEDS to replicate the settings and store them on page 174. 2 Touch [Bass Booster]. 3 Touch [+] or [-] to adjust the range from 0 to Displaying the screen for AV sound settings on an SD memory card. p Touch anywhere on the screen to ...


