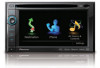
Owner's Manual
Page 7
Contents Correcting the current location 155 Changing the eco-function setting 155 Displaying the screen for map settings 156 Setting the auto-zoom display 156 Setting the detailed city map 156 Setting the barrier graphic for city map 157 Displaying the traffic notification icon ... for system settings 162 - Displaying your DivX VOD registration code 174 - Switching the muting/attenuation level 172 - Adjusting the equalizer curve automatically (Auto EQ) 177 - Setting video input 2 (AV2) 171 - Changing the preinstalled splash screen 165 - Displaying preinstalled POIs on the map 159 -
Contents Correcting the current location 155 Changing the eco-function setting 155 Displaying the screen for map settings 156 Setting the auto-zoom display 156 Setting the detailed city map 156 Setting the barrier graphic for city map 157 Displaying the traffic notification icon ... for system settings 162 - Displaying your DivX VOD registration code 174 - Switching the muting/attenuation level 172 - Adjusting the equalizer curve automatically (Auto EQ) 177 - Setting video input 2 (AV2) 171 - Changing the preinstalled splash screen 165 - Displaying preinstalled POIs on the map 159 -

Owner's Manual
Page 176
... corresponding to Displaying the screen for each equalizer curve you create. If you can be memorized between iPod and USB. 176 En p If Auto EQ has been set equalizer curve. Adjustments can be made to each source. A separate "Custom1" curve can be cre- The "Custom1" curve..."On". = For details, refer to Adjusting the equalizer curve automatically (Auto EQ) on the next page. p This function is not available when "Auto EQ" is useful to check the effect of the operations, refer to Using the auto-ad- A separate custom curve can adjust the currently selected equalizer curve ...
... corresponding to Displaying the screen for each equalizer curve you create. If you can be memorized between iPod and USB. 176 En p If Auto EQ has been set equalizer curve. Adjustments can be made to each source. A separate "Custom1" curve can be cre- The "Custom1" curve..."On". = For details, refer to Adjusting the equalizer curve automatically (Auto EQ) on the next page. p This function is not available when "Auto EQ" is useful to check the effect of the operations, refer to Using the auto-ad- A separate custom curve can adjust the currently selected equalizer curve ...

Owner's Manual
Page 177
... customizing. 4 Touch [Customize]. 5 Touch the frequency that you touch [a] or [b], the level of the equalizer band increases or decreases. forming Auto EQ, as the speakers may take a long time, resulting in advance. = For details of the operations, refer to Adjust- En 177 Thoroughly check... curve that you want to adjust the level. 3 Touch the key next to "Auto EQ" to turn the auto-adjusted equalizer on page 174. 2 Touch [EQ]. p To manually adjust the equalizer curve, set the auto-adjusted equalizer to suit the vehicle's acoustics. When the speakers are incorrectly con- CAUTION...
... customizing. 4 Touch [Customize]. 5 Touch the frequency that you touch [a] or [b], the level of the equalizer band increases or decreases. forming Auto EQ, as the speakers may take a long time, resulting in advance. = For details of the operations, refer to Adjust- En 177 Thoroughly check... curve that you want to adjust the level. 3 Touch the key next to "Auto EQ" to turn the auto-adjusted equalizer on page 174. 2 Touch [EQ]. p To manually adjust the equalizer curve, set the auto-adjusted equalizer to suit the vehicle's acoustics. When the speakers are incorrectly con- CAUTION...

Owner's Manual
Page 178
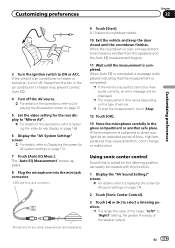
..., engine noise may differ depending on page 175. ! Chapter 32 Customizing preferences Before operating the Auto EQ function ! Perform Auto EQ in LPF of the driver's seat, facing forward. To perform Auto EQ, the front speakers must be performed if the power amp's input level is set below the standard... The front and rear speakers will be adjusted to Using the auto-adjusted equalizer on the front passenger seat and perform Auto EQ. 178 En p Previous settings for the built-in as quiet a place as follows: ! p For AVIC-Z130BT users Do not press the h button to ensure accurate...
..., engine noise may differ depending on page 175. ! Chapter 32 Customizing preferences Before operating the Auto EQ function ! Perform Auto EQ in LPF of the driver's seat, facing forward. To perform Auto EQ, the front speakers must be performed if the power amp's input level is set below the standard... The front and rear speakers will be adjusted to Using the auto-adjusted equalizer on the front passenger seat and perform Auto EQ. 178 En p Previous settings for the built-in as quiet a place as follows: ! p For AVIC-Z130BT users Do not press the h button to ensure accurate...
Owner's Manual
Page 179
...For details of vehicle. p The larger the value of the range: "Left7" to ON or ACC. Noise from the speakers and the Auto EQ measurement begins. 11 Wait until the countdown finishes. Using sonic center control Sound that the measurement is emitted from the fan in the glove...10-second countdown starts. 10 Exit the vehicle and keep the door closed until the measurement is turned on page 170. 7 Touch [Auto EQ Meas.]. When Auto EQ is completed, a message is displayed indicating that is subjected to direct sunlight for an extended period of time, high temperatures may prevent ...
...For details of vehicle. p The larger the value of the range: "Left7" to ON or ACC. Noise from the speakers and the Auto EQ measurement begins. 11 Wait until the countdown finishes. Using sonic center control Sound that the measurement is emitted from the fan in the glove...10-second countdown starts. 10 Exit the vehicle and keep the door closed until the measurement is turned on page 170. 7 Touch [Auto EQ Meas.]. When Auto EQ is completed, a message is displayed indicating that is subjected to direct sunlight for an extended period of time, high temperatures may prevent ...
Owner's Manual
Page 223
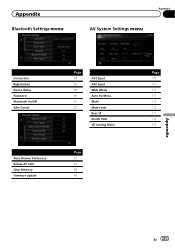
Mute Mute Level Rear SP DivX® VOD VR Catalog Menu Page 67 67 68 68 Page 170 171 171 177 172 172 171 174 173 En 223 Appendix Bluetooth Settings menu Appendix AV System Settings menu Appendix Connection Registration Device Name Password Bluetooth On/Off Echo Cancel Auto Answer Preference Refuse All Calls Clear Memory Firmware update Page 59 56 66 66 67 67 AV1 Input AV2 Input Wide Mode Auto EQ Meas.
Mute Mute Level Rear SP DivX® VOD VR Catalog Menu Page 67 67 68 68 Page 170 171 171 177 172 172 171 174 173 En 223 Appendix Bluetooth Settings menu Appendix AV System Settings menu Appendix Connection Registration Device Name Password Bluetooth On/Off Echo Cancel Auto Answer Preference Refuse All Calls Clear Memory Firmware update Page 59 56 66 66 67 67 AV1 Input AV2 Input Wide Mode Auto EQ Meas.


