Owner's Manual
Page 1
...Manual MULTIMEDIA NAVIGATION RECEIVER AVIC-8000NEX AVIC-7000NEX AVIC-6000NEX AVIC-5000NEX AVIC-X8610BS Notice to all users: This software requires that the product is properly connected to read Important Information for the User includes the important information that you must understand before using this product. Important Information for the User... first! For more information, please contact your vehicle, additional installation may be required. Be sure to your vehicle's parking brake and depending on your Authorized Pioneer Electronics retailer or call...
...Manual MULTIMEDIA NAVIGATION RECEIVER AVIC-8000NEX AVIC-7000NEX AVIC-6000NEX AVIC-5000NEX AVIC-X8610BS Notice to all users: This software requires that the product is properly connected to read Important Information for the User includes the important information that you must understand before using this product. Important Information for the User... first! For more information, please contact your vehicle, additional installation may be required. Be sure to your vehicle's parking brake and depending on your Authorized Pioneer Electronics retailer or call...

Owner's Manual
Page 10
...these conventions will be referred to as you should note. Buttons on , take a few minutes to read Important Information for the User (a separate manual) which contains warnings, cautions, and other notes are presented in the following format: e.g.) p If the home location has not ... Menu items, screen titles, and functional components are those for AVIC-8000NEX. Chapter 01 Introduction Manual overview Before using this product, be sure to read the following information about the conventions used in this manual. References are described in bold in ALL CAPITALS, BOLD lettering: ...
...these conventions will be referred to as you should note. Buttons on , take a few minutes to read Important Information for the User (a separate manual) which contains warnings, cautions, and other notes are presented in the following format: e.g.) p If the home location has not ... Menu items, screen titles, and functional components are those for AVIC-8000NEX. Chapter 01 Introduction Manual overview Before using this product, be sure to read the following information about the conventions used in this manual. References are described in bold in ALL CAPITALS, BOLD lettering: ...
Owner's Manual
Page 53
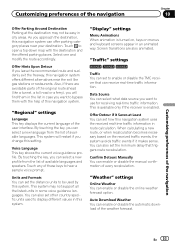
...also set the distance units to use for receiving real-time traffic information. "Weather" settings Online Weather You can enable or disable the manual confirmation of every recalculation. "Regional" settings Language This key displays the current language of the weather forecast. En 53 This system may ... be used to enable or disable the TMC receiver that triggers route recalculation. You can enable or disable the automatic download of the user interface. Touch to open a top-down map with the help of this system. Select one and modify the route accordingly. This ...
...also set the distance units to use for receiving real-time traffic information. "Weather" settings Online Weather You can enable or disable the manual confirmation of every recalculation. "Regional" settings Language This key displays the current language of the weather forecast. En 53 This system may ... be used to enable or disable the TMC receiver that triggers route recalculation. You can enable or disable the automatic download of the user interface. Touch to open a top-down map with the help of this system. Select one and modify the route accordingly. This ...

Owner's Manual
Page 68
Refer to the entry of an unknown user (no history data will be reversed.) ! You may not be transferred correctly. (Image data cannot be transferred from your cellular phone for handsfree phoning. You cannot make a call to the instruction manual that case, disconnect your phone, and then perform pairing again from your cellular...
Refer to the entry of an unknown user (no history data will be reversed.) ! You may not be transferred correctly. (Image data cannot be transferred from your cellular phone for handsfree phoning. You cannot make a call to the instruction manual that case, disconnect your phone, and then perform pairing again from your cellular...
Owner's Manual
Page 103
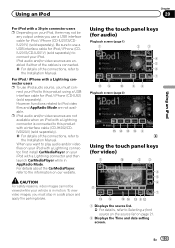
... with a Lightning connector, first install CarMediaPlayer on your iPod with a 30-pin connector users p Depending on your iPod, there may not be viewed while your iPod to this product with a Lightning connector users p To use a USB interface cable for iPod / iPhone (CD-IU52) (sold separately...) (sold separately). p iPod audio and/or video sources are not available when an iPod with a Lightning connector is connected to the Installation Manual. For iPod / iPhone with a interface cable (CD-IH202/CDIV202AV) (sold separately). En 103 Be sure to use iPod audio source, you...
... with a Lightning connector, first install CarMediaPlayer on your iPod with a 30-pin connector users p Depending on your iPod, there may not be viewed while your iPod to this product with a Lightning connector users p To use a USB interface cable for iPod / iPhone (CD-IU52) (sold separately...) (sold separately). p iPod audio and/or video sources are not available when an iPod with a Lightning connector is connected to the Installation Manual. For iPod / iPhone with a interface cable (CD-IH202/CDIV202AV) (sold separately). En 103 Be sure to use iPod audio source, you...
Owner's Manual
Page 110
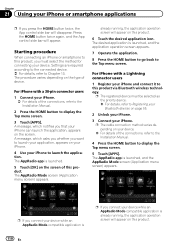
...button twice again, and the App control side bar will appear on your device. = For details of the connections, refer to the Installation Manual. 4 Press the HOME button to display the Top menu screen. 5 Touch [APPS]. Starting procedure When connecting an iPhone or smartphone to ...product via Bluetooth wireless technology. The AppRadio app is already running , the application operation screen will disappear. For iPhone with a 30-pin connector users 1 Connect your iPhone or smartphone applications p If you want to launch your application, appears on page 55. 2 Unlock your iPhone. 3 ...
...button twice again, and the App control side bar will appear on your device. = For details of the connections, refer to the Installation Manual. 4 Press the HOME button to display the Top menu screen. 5 Touch [APPS]. Starting procedure When connecting an iPhone or smartphone to ...product via Bluetooth wireless technology. The AppRadio app is already running , the application operation screen will disappear. For iPhone with a 30-pin connector users 1 Connect your iPhone or smartphone applications p If you want to launch your application, appears on page 55. 2 Unlock your iPhone. 3 ...
Owner's Manual
Page 111
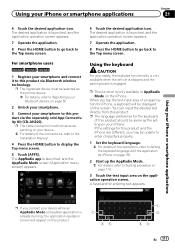
...iPhone. The desired application is only available in AppRadio Mode on this product. 7 65 1 2 43 En 111 For smartphone users 8000NEX 7000NEX 6000NEX 1 Register your smartphone and connect it to this product and the iPhone are different, you may be displayed... operation screen will be unable to enter characters properly. 1 Set the keyboard language. = For details of the connections, refer to the Installation Manual. 4 Press the HOME button to Registering your Bluetooth devices on your iPhone or smartphone applications Chapter 21 6 Touch the desired application icon. A...
...iPhone. The desired application is only available in AppRadio Mode on this product. 7 65 1 2 43 En 111 For smartphone users 8000NEX 7000NEX 6000NEX 1 Register your smartphone and connect it to this product and the iPhone are different, you may be displayed... operation screen will be unable to enter characters properly. 1 Set the keyboard language. = For details of the connections, refer to the Installation Manual. 4 Press the HOME button to Registering your Bluetooth devices on your iPhone or smartphone applications Chapter 21 6 Touch the desired application icon. A...
Owner's Manual
Page 118
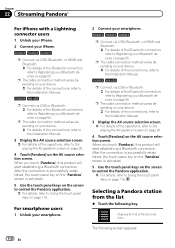
... page 55. p The cable connection method varies depending on your device. = For details of the connections, refer to the Installation Manual. 5000NEX X8610BS p Connect via USB, Bluetooth, or HDMI and Bluetooth. = For details of the Bluetooth connection, refer to Using the touch...details of the Bluetooth connection, refer to Displaying the AV operation screen on page 20. 4 Touch [Pandora] on page 116. For smartphone users 1 Unlock your smartphone. 2 Connect your Bluetooth devices on page 116. When you touch [Pandora], this product will start establishing a Bluetooth connection...
... page 55. p The cable connection method varies depending on your device. = For details of the connections, refer to the Installation Manual. 5000NEX X8610BS p Connect via USB, Bluetooth, or HDMI and Bluetooth. = For details of the Bluetooth connection, refer to Using the touch...details of the Bluetooth connection, refer to Displaying the AV operation screen on page 20. 4 Touch [Pandora] on page 116. For smartphone users 1 Unlock your smartphone. 2 Connect your Bluetooth devices on page 116. When you touch [Pandora], this product will start establishing a Bluetooth connection...
Owner's Manual
Page 122
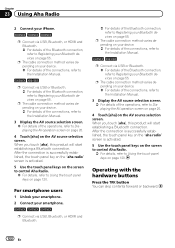
...HDMI and Bluetooth. = For details of the Bluetooth connection, refer to Registering your Bluetooth devices on the AV source selection screen. For smartphone users 1 Unlock your smartphone. 2 Connect your smartphone. 8000NEX 7000NEX 6000NEX p Connect via USB, Bluetooth, or HDMI and Bluetooth. = For details ... to control Aha Radio. = For details, refer to Registering your device. = For details of the connections, refer to the Installation Manual. 5000NEX X8610BS p Connect via USB or Bluetooth. = For details of the Bluetooth connection, refer to Using the touch panel keys on page 120...
...HDMI and Bluetooth. = For details of the Bluetooth connection, refer to Registering your Bluetooth devices on the AV source selection screen. For smartphone users 1 Unlock your smartphone. 2 Connect your smartphone. 8000NEX 7000NEX 6000NEX p Connect via USB, Bluetooth, or HDMI and Bluetooth. = For details ... to control Aha Radio. = For details, refer to Registering your device. = For details of the connections, refer to the Installation Manual. 5000NEX X8610BS p Connect via USB or Bluetooth. = For details of the Bluetooth connection, refer to Using the touch panel keys on page 120...
Owner's Manual
Page 156
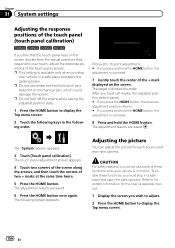
...tools such as a ballpoint or mechanical pen, which could damage the screen. Adjusting the picture You can adjust the picture for the User (a separate manual). 1 Display the screen you feel that the touch panel keys on the screen. The target indicates the order. CAUTION For safety ... setting is in the following screen appears. Chapter 31 System settings Adjusting the response positions of the touch panel (touch panel calibration) 7000NEX 6000NEX 5000NEX X8610BS If you wish to adjust. 2 Press the HOME button to display the Top menu screen. 156 En The "System" screen appears. ...
...tools such as a ballpoint or mechanical pen, which could damage the screen. Adjusting the picture You can adjust the picture for the User (a separate manual). 1 Display the screen you feel that the touch panel keys on the screen. The target indicates the order. CAUTION For safety ... setting is in the following screen appears. Chapter 31 System settings Adjusting the response positions of the touch panel (touch panel calibration) 7000NEX 6000NEX 5000NEX X8610BS If you wish to adjust. 2 Press the HOME button to display the Top menu screen. 156 En The "System" screen appears. ...
Installation Manual
Page 2
... the High Speed HDMI® Cable 18 Connecting a rear view camera 19 Connecting the external video component 20 - For AVIC-8000NEX and AVIC-7000NEX users 24 Installing this product 25 - Parts supplied 25 - Installation using a rear display connected to separately sold power amp 13... an AUX input 21 Connecting an HDMI device 22 Connecting the rear display 22 2 En - Contents Precautions Your new product and this manual 3 Important safeguards 3 Connection Precautions before installation 23 To avoid electromagnetic interference 23 Before installing 23 - Notice for the blue/white lead...
... the High Speed HDMI® Cable 18 Connecting a rear view camera 19 Connecting the external video component 20 - For AVIC-8000NEX and AVIC-7000NEX users 24 Installing this product 25 - Parts supplied 25 - Installation using a rear display connected to separately sold power amp 13... an AUX input 21 Connecting an HDMI device 22 Connecting the rear display 22 2 En - Contents Precautions Your new product and this manual 3 Important safeguards 3 Connection Precautions before installation 23 To avoid electromagnetic interference 23 Before installing 23 - Notice for the blue/white lead...


