Owner's Manual
Page 2
... Operating the Map screen 29 - Operating the time bar 23 - Switching between 2D, 3D, and 2D North up views 29 - Please read the Map screen 26 Frequently shown route events 26 Seeing the current position on internal memory 11 - Introduction Manual overview 10 - Plugging and unplugging a USB storage device 16 Startup and termination 16 On first-time startup 17 Regular startup 17 - Operating list screens 22 - Smart Zoom 29 - Switching screens using the touch...
... Operating the Map screen 29 - Operating the time bar 23 - Switching between 2D, 3D, and 2D North up views 29 - Please read the Map screen 26 Frequently shown route events 26 Seeing the current position on internal memory 11 - Introduction Manual overview 10 - Plugging and unplugging a USB storage device 16 Startup and termination 16 On first-time startup 17 Regular startup 17 - Operating list screens 22 - Smart Zoom 29 - Switching screens using the touch...
Owner's Manual
Page 3
... route 39 - Editing the list of the navigation Customizing the navigation settings 47 - Canceling the current route guidance 40 Building a route using preset categories 32 - "Route Preferences" settings 48 - "Navigation Map" settings 51 - "Connected Services" settings 54 - Searching for providers nearby that offer emergency or roadside assistance services 34 Selecting a destination from stored locations 34 Selecting a destination from the name of "Settings" 48 - "Regional" settings 53 - "Display" settings 53 - "Usage Reports" settings 54 - Restoring the default settings...
... route 39 - Editing the list of the navigation Customizing the navigation settings 47 - Canceling the current route guidance 40 Building a route using preset categories 32 - "Route Preferences" settings 48 - "Navigation Map" settings 51 - "Connected Services" settings 54 - Searching for providers nearby that offer emergency or roadside assistance services 34 Selecting a destination from stored locations 34 Selecting a destination from the name of "Settings" 48 - "Regional" settings 53 - "Display" settings 53 - "Usage Reports" settings 54 - Restoring the default settings...
Owner's Manual
Page 4
... Operating with the hardware buttons 77 HD Radio™ reception HD Radio stations 78 Using the touch panel keys 78 Reading the screen 79 Starting procedure 80 Selecting a band 80 Manual tuning 80 Seek tuning 80 Contents Registering and connecting a Bluetooth device Preparing communication devices 55 Registering your Bluetooth devices 56 - Searching for Bluetooth wireless connection 59 Displaying the Bluetooth device address 59 Clearing the Bluetooth memory 59 Updating Bluetooth software 60 Displaying the Bluetooth software version 60 Using hands-free phoning Displaying the phone menu...
... Operating with the hardware buttons 77 HD Radio™ reception HD Radio stations 78 Using the touch panel keys 78 Reading the screen 79 Starting procedure 80 Selecting a band 80 Manual tuning 80 Seek tuning 80 Contents Registering and connecting a Bluetooth device Preparing communication devices 55 Registering your Bluetooth devices 56 - Searching for Bluetooth wireless connection 59 Displaying the Bluetooth device address 59 Clearing the Bluetooth memory 59 Updating Bluetooth software 60 Displaying the Bluetooth software version 60 Using hands-free phoning Displaying the phone menu...
Owner's Manual
Page 7
... view camera activation 151 - Setting the polarity of all channels 134 Selecting a channel from a list of the rear view camera 151 Setting the camera for Camera View mode 152 Displaying the parking assist guidelines 152 Setting guidelines on the rear view image 153 Turning off the demo screen 154 Selecting the system language 154 Setting the keyboard language with the hardware buttons 140 Using an HDMI source Using the touch panel keys 141 Reading the screen 141 Starting...
... view camera activation 151 - Setting the polarity of all channels 134 Selecting a channel from a list of the rear view camera 151 Setting the camera for Camera View mode 152 Displaying the parking assist guidelines 152 Setting guidelines on the rear view image 153 Turning off the demo screen 154 Selecting the system language 154 Setting the keyboard language with the hardware buttons 140 Using an HDMI source Using the touch panel keys 141 Reading the screen 141 Starting...
Owner's Manual
Page 8
... calibration) 156 Adjusting the picture 156 Displaying the firmware version 158 Updating firmware 158 Checking sensor learning status and driving status 159 Clearing the status 159 Checking the connections of DVDs 185 Setting the video signal for the rear view camera 186 Language code chart for DVDs 187 Favorite menu Selecting a shortcut 188 Removing a shortcut 188 Common operations Setting the time and date 189 Storing song information to the splash screen stored on the external device (USB...
... calibration) 156 Adjusting the picture 156 Displaying the firmware version 158 Updating firmware 158 Checking sensor learning status and driving status 159 Clearing the status 159 Checking the connections of DVDs 185 Setting the video signal for the rear view camera 186 Language code chart for DVDs 187 Favorite menu Selecting a shortcut 188 Removing a shortcut 188 Common operations Setting the time and date 189 Storing song information to the splash screen stored on the external device (USB...
Owner's Manual
Page 12
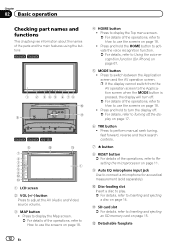
... to How to use the screens on page 11. 9 Auto EQ microphone input jack Use to connect a microphone for iPhone) on page 18. 4 HOME button ! Press to adjust the AV (Audio and Video) source volume. 3 MAP button ! Press to display the Map screen. = For details of the parts and the main features using the buttons. 8000NEX 7000NEX 1 2 3 4 5 6 78 a b 9 6000NEX 5000NEX X8610BS 8 a 7 2 3 4 5 6 c d b 1 1 LCD screen 2 VOL (+/-) button Press to switch between the Application screen and the AV operation screen.
... to How to use the screens on page 11. 9 Auto EQ microphone input jack Use to connect a microphone for iPhone) on page 18. 4 HOME button ! Press to adjust the AV (Audio and Video) source volume. 3 MAP button ! Press to display the Map screen. = For details of the parts and the main features using the buttons. 8000NEX 7000NEX 1 2 3 4 5 6 78 a b 9 6000NEX 5000NEX X8610BS 8 a 7 2 3 4 5 6 c d b 1 1 LCD screen 2 VOL (+/-) button Press to switch between the Application screen and the AV operation screen.

Owner's Manual
Page 24
... software collects usage information and GPS logs that the connected online features are activated appears if you want to Customizing the navigation settings on page 47. The "End User Licence Agreement" screen appears. 4 Read the terms carefully, checking its details, and then touch [Accept] if you can start using the navigation system. The "Usage Reports" screen appears. 5 Touch [Yes]. p Later you agree to use online services, which require a subscription. The "Voice Language" screen appears. 7 Select the language...
... software collects usage information and GPS logs that the connected online features are activated appears if you want to Customizing the navigation settings on page 47. The "End User Licence Agreement" screen appears. 4 Read the terms carefully, checking its details, and then touch [Accept] if you can start using the navigation system. The "Usage Reports" screen appears. 5 Touch [Yes]. p Later you agree to use online services, which require a subscription. The "Voice Language" screen appears. 7 Select the language...
Owner's Manual
Page 36
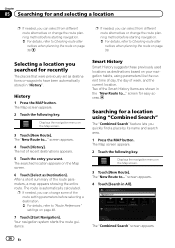
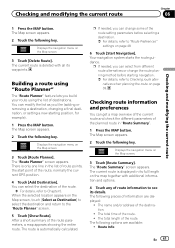
.... The Map screen appears. 2 Touch the following key. Your navigation system starts the route guidance. Selecting a location you can change some of the Smart History Items are shown in the "New Route to "Route Preferences" settings on the Map screen. 3 Touch [New Route]. The "New Route to ..." p If needed, you searched for recently The places that were previously set as destinations based on your navigation habits, using "Combined Search" The "Combined Search" feature lets you quickly find a place...
.... The Map screen appears. 2 Touch the following key. Your navigation system starts the route guidance. Selecting a location you can change some of the Smart History Items are shown in the "New Route to "Route Preferences" settings on the Map screen. 3 Touch [New Route]. The "New Route to ..." p If needed, you searched for recently The places that were previously set as destinations based on your navigation habits, using "Combined Search" The "Combined Search" feature lets you quickly find a place...
Owner's Manual
Page 41
Building a route using "Route Planner" The "Route Planner" feature lets you like (adding or removing a destination, changing a final destination, or setting a new starting navigation. = For details, refer to "Route Preferences" settings on page 48. 6 Touch [Start Navigation]. p If needed , you can modify the list as Destination] to select the destination and return to see its full length on page 39. The Map screen appears. 2 Touch the following key. The following options are displayed: ! You can change the route planning method...
Building a route using "Route Planner" The "Route Planner" feature lets you like (adding or removing a destination, changing a final destination, or setting a new starting navigation. = For details, refer to "Route Preferences" settings on page 48. 6 Touch [Start Navigation]. p If needed , you can modify the list as Destination] to select the destination and return to see its full length on page 39. The Map screen appears. 2 Touch the following key. The following options are displayed: ! You can change the route planning method...
Owner's Manual
Page 46
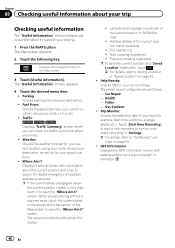
.... Latitude and longitude (coordinate of the current position (when available) ! Next crossing road/street ! The preset search categories are driving without a planned route, touch the current street or the arrows at the top section of your trips (for nearby emergency or roadside assistance services. Car Repair: - Touch [Start New Recording] to search for example, start a new recording or turn on automatic recording in "Settings". = For details, refer to "Trip Monitor" set- The "Useful Information" screen appears. 4 Touch the...
.... Latitude and longitude (coordinate of the current position (when available) ! Next crossing road/street ! The preset search categories are driving without a planned route, touch the current street or the arrows at the top section of your trips (for nearby emergency or roadside assistance services. Car Repair: - Touch [Start New Recording] to search for example, start a new recording or turn on automatic recording in "Settings". = For details, refer to "Trip Monitor" set- The "Useful Information" screen appears. 4 Touch the...
Owner's Manual
Page 47
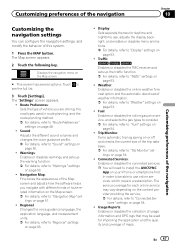
... Map screen and adjusts how the software helps you are driving, the road types used for improving the application and the quality and coverage of usage information and GPS logs that may vary depending on the Map screen. # This screen has several options. Display: Sets separate themes for each online service may be used in order to be able to use , adjusts the display backlight, and enables or disables menu animations. = For details, refer to "Display" settings...
... Map screen and adjusts how the software helps you are driving, the road types used for improving the application and the quality and coverage of usage information and GPS logs that may vary depending on the Map screen. # This screen has several options. Display: Sets separate themes for each online service may be used in order to be able to use , adjusts the display backlight, and enables or disables menu animations. = For details, refer to "Display" settings...
Owner's Manual
Page 52
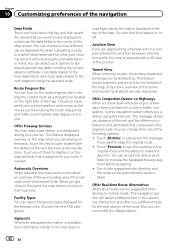
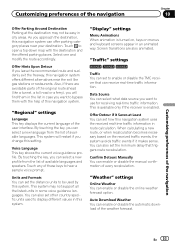
... needed. Waypoints and traffic event markers also display on freeways. Touch this navigation system offers you a detour using the next exit. Automatic Overview When selected, the map zooms out to make the decision. Junction View If you cannot modify the offered detour. 52 En You can select such options to display as general trip data including the current speed or altitude, route data related to the final destination, and route data...
... needed. Waypoints and traffic event markers also display on freeways. Touch this navigation system offers you a detour using the next exit. Automatic Overview When selected, the map zooms out to make the decision. Junction View If you cannot modify the offered detour. 52 En You can select such options to display as general trip data including the current speed or altitude, route data related to the final destination, and route data...
Owner's Manual
Page 53
... traffic events if it Saves at the destination may not support all the listed units in some voice guidance languages. Confirm Detours Manually You can enable or disable the online weather forecast option. "Weather" settings Online Weather You can enable or disable the manual confirmation of every recalculation. Select one and modify the route accordingly. By touching the key, you can select a new language from the list of available languages and speakers. Data Source You can receive real-time traffic information...
... traffic events if it Saves at the destination may not support all the listed units in some voice guidance languages. Confirm Detours Manually You can enable or disable the online weather forecast option. "Weather" settings Online Weather You can enable or disable the manual confirmation of every recalculation. Select one and modify the route accordingly. By touching the key, you can select a new language from the list of available languages and speakers. Data Source You can receive real-time traffic information...
Owner's Manual
Page 59
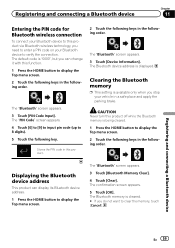
...to display the Top menu screen. The "Bluetooth" screen appears. 3 Touch [Device Information]. Displaying the Bluetooth device address This product can change it with this function. 1 Press the HOME button to display the Top menu screen. 2 Touch the following keys in the following order. The "Bluetooth" screen appears. 3 Touch [PIN Code Input]. CAUTION Never turn this product off while the Bluetooth memory is available only when you stop your Bluetooth device to clear the memory, touch [Cancel]. Registering and connecting a Bluetooth device Chapter 11 Entering the PIN code for...
...to display the Top menu screen. The "Bluetooth" screen appears. 3 Touch [Device Information]. Displaying the Bluetooth device address This product can change it with this function. 1 Press the HOME button to display the Top menu screen. 2 Touch the following keys in the following order. The "Bluetooth" screen appears. 3 Touch [PIN Code Input]. CAUTION Never turn this product off while the Bluetooth memory is available only when you stop your Bluetooth device to clear the memory, touch [Cancel]. Registering and connecting a Bluetooth device Chapter 11 Entering the PIN code for...

Owner's Manual
Page 68
... 12 Using hands-free phoning Registration and connection ! Making and receiving calls ! tions: - In this case, transfer items one by operating your phone is displayed. ! Refer to the entry of an unknown user (no history data will be available. 68 En With cellular phones, phone book transfer may not work even though your cellular phone, no phone number) in , hands-free phoning may download completely. ! When you press the accept button on your phone to transfer all...
... 12 Using hands-free phoning Registration and connection ! Making and receiving calls ! tions: - In this case, transfer items one by operating your phone is displayed. ! Refer to the entry of an unknown user (no history data will be available. 68 En With cellular phones, phone book transfer may not work even though your cellular phone, no phone number) in , hands-free phoning may download completely. ! When you press the accept button on your phone to transfer all...
Owner's Manual
Page 114
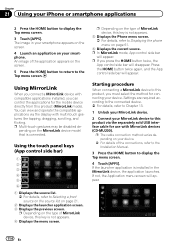
... device, the application launches. Using MirrorLink When you connect a MirrorLink device with compatible applications installed, you press the HOME button twice, the App control side bar will appear. 114 En pending on the screen. 5 Press the HOME button to return to display the Top menu screen. 3 Touch [APPS]. Starting procedure When connecting a MirrorLink device to Displaying the phone menu on the type of MirrorLink device, this product (MirrorLink mode). If not, the Application menu screen...
... device, the application launches. Using MirrorLink When you connect a MirrorLink device with compatible applications installed, you press the HOME button twice, the App control side bar will appear. 114 En pending on the screen. 5 Press the HOME button to return to display the Top menu screen. 3 Touch [APPS]. Starting procedure When connecting a MirrorLink device to Displaying the phone menu on the type of MirrorLink device, this product (MirrorLink mode). If not, the Application menu screen...
Owner's Manual
Page 151
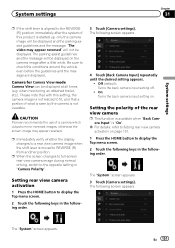
... rear view camera p This function is available when "Back Camera Input" is "On". = For details, refer to Setting rear view camera activation on page 151. 1 Press the HOME button to fit, and that with this product is moved to the opposite setting in the following order. 3 Touch [Camera settings]. when monitoring an attached trailer, etc.). The "System" screen appears. 3 Touch [Camera settings]. p Immediately verify whether the display changes to a rear view camera image...
... rear view camera p This function is available when "Back Camera Input" is "On". = For details, refer to Setting rear view camera activation on page 151. 1 Press the HOME button to fit, and that with this product is moved to the opposite setting in the following order. 3 Touch [Camera settings]. when monitoring an attached trailer, etc.). The "System" screen appears. 3 Touch [Camera settings]. p Immediately verify whether the display changes to a rear view camera image...
Owner's Manual
Page 190
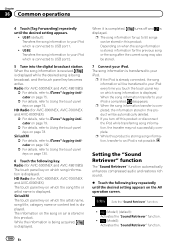
... information transfer is displayed. p While this product will be stored. 7 Connect your iPod which is connected to an iPod is displayed. Setting the "Sound Retriever" function The "Sound Retriever" function automatically enhances compressed audio and restores rich sound. % Touch the following key. Chapter 36 Common operations 4 Touch [Tag Forwarding] repeatedly until the desired setting appears on which song information is being broadcast, and the touch panel key becomes active...
... information transfer is displayed. p While this product will be stored. 7 Connect your iPod which is connected to an iPod is displayed. Setting the "Sound Retriever" function The "Sound Retriever" function automatically enhances compressed audio and restores rich sound. % Touch the following key. Chapter 36 Common operations 4 Touch [Tag Forwarding] repeatedly until the desired setting appears on which song information is being broadcast, and the touch panel key becomes active...
Owner's Manual
Page 195
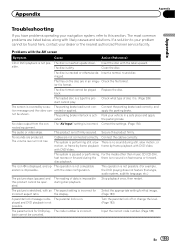
... still, slow There is not firmly secured. with the video configuration. Input the correct code number. (Page 183) En 195 sible. Check the file format. back. No video output from the con- Correct the settings. (Page 150) nected equipment. No sounds are listed below, along with the label upward. Connect the cables correctly. disc playback. The icon 9 is dirty. with DVD-Video...
... still, slow There is not firmly secured. with the video configuration. Input the correct code number. (Page 183) En 195 sible. Check the file format. back. No video output from the con- Correct the settings. (Page 150) nected equipment. No sounds are listed below, along with the label upward. Connect the cables correctly. disc playback. The icon 9 is dirty. with DVD-Video...
Owner's Manual
Page 198
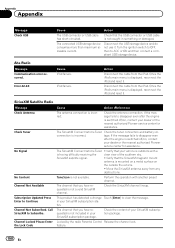
... difficulty receiving the clear view of the southern sky. Appendix Appendix Message Check USB Cause Action The USB connector or USB cable Check that the SiriusXM magnetic mount antenna is not available. iPod failure. Disconnect the cable from the iPod. Channel Locked Please Enter the Lock Code The antenna connection is incorrect. connection is incorrect. The SiriusXM Connect Vehicle Tuner ! Verify that you have requested is displayed, reconnect the iPod and reset...
... difficulty receiving the clear view of the southern sky. Appendix Appendix Message Check USB Cause Action The USB connector or USB cable Check that the SiriusXM magnetic mount antenna is not available. iPod failure. Disconnect the cable from the iPod. Channel Locked Please Enter the Lock Code The antenna connection is incorrect. connection is incorrect. The SiriusXM Connect Vehicle Tuner ! Verify that you have requested is displayed, reconnect the iPod and reset...


