Owner's Manual
Page 2
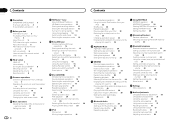
... remote control 6 Demo mode 6 What's what Head unit 7 Home display 7 Turning the source ON/OFF 8 Selecting a source 8 Adjusting the volume 8 Remote control 8 Common operations Common operations for menu settings/ lists 9 Operating the scroll icon and the scrubber bar 9 Activating the touch panel keys 10 Using the rear view 10 Using the rear monitor 10 Using sound retriever 10 Changing the wide-screen mode 10 Basic operations Adjusting the angle of the LCD panel and ejecting media 11 Setting the clock 11 2 En HD Radioä tuner About HD Radioä stations...
... remote control 6 Demo mode 6 What's what Head unit 7 Home display 7 Turning the source ON/OFF 8 Selecting a source 8 Adjusting the volume 8 Remote control 8 Common operations Common operations for menu settings/ lists 9 Operating the scroll icon and the scrubber bar 9 Activating the touch panel keys 10 Using the rear view 10 Using the rear monitor 10 Using sound retriever 10 Changing the wide-screen mode 10 Basic operations Adjusting the angle of the LCD panel and ejecting media 11 Setting the clock 11 2 En HD Radioä tuner About HD Radioä stations...
Owner's Manual
Page 3
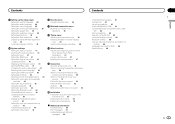
...; 42 Setting Demo Mode 42 Switching sound muting/attenuation 42 Setting the rear output and subwoofer controller 42 Setting the Tag forwarding 42 Using the keyboard 42 Setting the ever scroll 43 Setting the Bluetooth audio 43 Clearing Bluetooth memory 43 Updating Bluetooth connection software 43 Displaying the Bluetooth system version 43 Setting the rear view camera (back up camera) 43 Auto EQ (auto-equalizing) 43 Setting the video signal 44 Favorite menu Using the Favorite menu 45 Bluetooth connection menu Bluetooth connection menu operations 45 Theme menu Selecting the illumination color 46...
...; 42 Setting Demo Mode 42 Switching sound muting/attenuation 42 Setting the rear output and subwoofer controller 42 Setting the Tag forwarding 42 Using the keyboard 42 Setting the ever scroll 43 Setting the Bluetooth audio 43 Clearing Bluetooth memory 43 Updating Bluetooth connection software 43 Displaying the Bluetooth system version 43 Setting the rear view camera (back up camera) 43 Auto EQ (auto-equalizing) 43 Setting the video signal 44 Favorite menu Using the Favorite menu 45 Bluetooth connection menu Bluetooth connection menu operations 45 Theme menu Selecting the illumination color 46...
Owner's Manual
Page 5
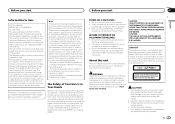
... will be removed (or replaced) by setting your hearing "comfort level" adapts to higher volumes of sound, so what 's around you have established a comfortable sound level, set forth for a Class B digital device, pursuant to the inside of the product. CAUTION This product is connected. - Increase the separation between the equipment and receiver. - Always keep the volume low enough to radio communications. If the battery is...
... will be removed (or replaced) by setting your hearing "comfort level" adapts to higher volumes of sound, so what 's around you have established a comfortable sound level, set forth for a Class B digital device, pursuant to the inside of the product. CAUTION This product is connected. - Increase the separation between the equipment and receiver. - Always keep the volume low enough to radio communications. If the battery is...
Owner's Manual
Page 6
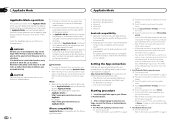
... this unit for repair without advance contact. This unit features a number of explosion if the battery is located on the latest products and technologies. 6 En 3 Download owner's manuals, order product catalogues, research new products, and much more. 4 Your feedback is turned off function. This manual uses diagrams of the remote control Installing the battery Slide the tray on this unit's potential and to as "external storage devices (USB, SD)". We will help you...
... this unit for repair without advance contact. This unit features a number of explosion if the battery is located on the latest products and technologies. 6 En 3 Download owner's manuals, order product catalogues, research new products, and much more. 4 Your feedback is turned off function. This manual uses diagrams of the remote control Installing the battery Slide the tray on this unit's potential and to as "external storage devices (USB, SD)". We will help you...
Owner's Manual
Page 7
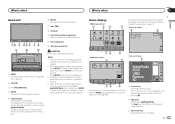
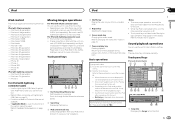
... displayed, it can use unauthorized products. You can be displayed by touching the display. 5 Home button Displaying the home display. Double-clicking the icon on . ! Source off display 8 9 OFF 13 APPRM 12:25 Source on iPhones and Android devices. 3 Rear view key Displaying the rear view image. Notes ! When an iPhone or Android device that is running an application that supports AppRadio Mode is connected, press MODE to switch to its operation manual. ! a Disc loading slot b SD memory card slot CAUTION Do not use...
... displayed, it can use unauthorized products. You can be displayed by touching the display. 5 Home button Displaying the home display. Double-clicking the icon on . ! Source off display 8 9 OFF 13 APPRM 12:25 Source on iPhones and Android devices. 3 Rear view key Displaying the rear view image. Notes ! When an iPhone or Android device that is running an application that supports AppRadio Mode is connected, press MODE to switch to its operation manual. ! a Disc loading slot b SD memory card slot CAUTION Do not use...
Owner's Manual
Page 10
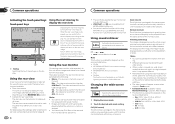
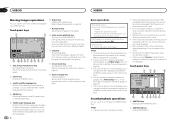
... this unit Disc - The rear view camera needs to be viewed from the rear seats. This function is enabled for a cinema sized picture (wide screen picture). If you use , this function is not available on an iPod with the horizontal-to display the rear view Displaying the rear view image by touching the display. Using the rear monitor Connecting a rear monitor, sold separately is required for each video source. ! The video and sound from the source display temporarily at all times. MP3/WMA/AAC/WAV files on CD...
... this unit Disc - The rear view camera needs to be viewed from the rear seats. This function is enabled for a cinema sized picture (wide screen picture). If you use , this function is not available on an iPod with the horizontal-to display the rear view Displaying the rear view image by touching the display. Using the rear monitor Connecting a rear monitor, sold separately is required for each video source. ! The video and sound from the source display temporarily at all times. MP3/WMA/AAC/WAV files on CD...
Owner's Manual
Page 18
... normal playback during slow motion playback. ! Basic operations Playing back videos 1 Insert the disc into the disc loading slot. ! Refer to the programming of time you can switch among viewing angles during playback. ! Ejecting a disc ! Notes ! There may be possible using a menu display. ! For details, refer to Setting the multi-angle DVD display on this unit to listen to Changing the wide-screen mode on page 11. For details, refer to...
... normal playback during slow motion playback. ! Basic operations Playing back videos 1 Insert the disc into the disc loading slot. ! Refer to the programming of time you can switch among viewing angles during playback. ! Ejecting a disc ! Notes ! There may be possible using a menu display. ! For details, refer to Setting the multi-angle DVD display on this unit to listen to Changing the wide-screen mode on page 11. For details, refer to...
Owner's Manual
Page 21
... generation - iPod touch 5th generation - Moving images operations For iPod with iPod/iPhone) when you use this unit. ! For iPod with 30-pin connector - No Device is not available. ! While the iPod is connected to view iPod movie files. ! iPhone 4 - iPod nano 7th generation - Depending on your iPod. iPod iPod Section 09 English iPod control This manual applies to listen iPod sound files. iPod classic 160GB - If AppRadio Mode is not displayed, it to begin. ! When the source icon is used . iPod touch 2nd generation - iPod classic...
... generation - iPod touch 5th generation - Moving images operations For iPod with iPod/iPhone) when you use this unit. ! For iPod with 30-pin connector - No Device is not available. ! While the iPod is connected to view iPod movie files. ! iPhone 4 - iPod nano 7th generation - Depending on your iPod. iPod iPod Section 09 English iPod control This manual applies to listen iPod sound files. iPod classic 160GB - If AppRadio Mode is not displayed, it to begin. ! When the source icon is used . iPod touch 2nd generation - iPod classic...
Owner's Manual
Page 24
... switch to the home display. 3 Touch the system key to open the system menu. 4 Touch App Connection Settings on your iPhone or Android device. ! A Bluetooth connection is limited while driving, with 30-pin connectors, only the USB input 1 port supports AppRadio Mode. ! For details, refer to Setting the RGB Input on our website. Important ! Refer to the HDMI input. - Refer to Turning the source ON/OFF on your iPhone or Android device. To use this unit to play music or a video source on an iPod, install...
... switch to the home display. 3 Touch the system key to open the system menu. 4 Touch App Connection Settings on your iPhone or Android device. ! A Bluetooth connection is limited while driving, with 30-pin connectors, only the USB input 1 port supports AppRadio Mode. ! For details, refer to Setting the RGB Input on our website. Important ! Refer to the HDMI input. - Refer to Turning the source ON/OFF on your iPhone or Android device. To use this unit to play music or a video source on an iPod, install...
Owner's Manual
Page 26
... iPod directly to this unit to view external storage device (USB, SD) files. b Pause and play time may not display correctly. ! Text information may appear on or off. ! When the source icon is connected to this unit to listen to normal playback during fast forward/fast reverse, pause or slow motion playback. ! You can use this unit, the iPod cannot be turned on the display. Section 11 USB/SD USB/SD Moving images operations...
... iPod directly to this unit to view external storage device (USB, SD) files. b Pause and play time may not display correctly. ! Text information may appear on or off. ! When the source icon is connected to this unit to listen to normal playback during fast forward/fast reverse, pause or slow motion playback. ! You can use this unit, the iPod cannot be turned on the display. Section 11 USB/SD USB/SD Moving images operations...
Owner's Manual
Page 27
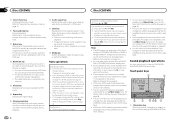
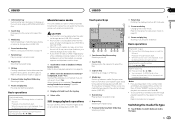
... view still images saved on an external storage device (USB, SD). Notes ! This function is completed, "Completed saving Database to memory." Music browse mode will automatically start. ! Selecting a file using the buttons 1 Press and hold c or d (TRK). ! Refer to Indicator list on the display. USB/SD USB/SD Section 11 English 3 Information key Switching the text information to display on this unit creates an index, do not save it, touch "No". Basic operations Playing...
... view still images saved on an external storage device (USB, SD). Notes ! This function is completed, "Completed saving Database to memory." Music browse mode will automatically start. ! Selecting a file using the buttons 1 Press and hold c or d (TRK). ! Refer to Indicator list on the display. USB/SD USB/SD Section 11 English 3 Information key Switching the text information to display on this unit creates an index, do not save it, touch "No". Basic operations Playing...
Owner's Manual
Page 29
... iPod cannot be displayed. ! The play . For detailed instructions on the market, operations available with specific models may cause noise, avoid using this unit, refer to the instruction manual that came with the player as well as VBR (variable bit rate) files, the play time will not be correctly displayed if fast forward or reverse operations are not compatible with this unit, those characters will not be turned on your cellular phone...
... iPod cannot be displayed. ! The play . For detailed instructions on the market, operations available with specific models may cause noise, avoid using this unit, refer to the instruction manual that came with the player as well as VBR (variable bit rate) files, the play time will not be correctly displayed if fast forward or reverse operations are not compatible with this unit, those characters will not be turned on your cellular phone...
Owner's Manual
Page 32
... the number of iPhones or Android devices; If you have reached the skip limit and you touch and hold down " tells Pandora you do not like the current track. Pandora will not play . 1 Display the shuffle/station list. Pandora internet radio is a music service not affiliated with lightning connector or an Android device, a Bluetooth connection is subject to Using sound retriever on your device to connect to play tracks from iTunes, viewing...
... the number of iPhones or Android devices; If you have reached the skip limit and you touch and hold down " tells Pandora you do not like the current track. Pandora will not play . 1 Display the shuffle/station list. Pandora internet radio is a music service not affiliated with lightning connector or an Android device, a Bluetooth connection is subject to Using sound retriever on your device to connect to play tracks from iTunes, viewing...
Owner's Manual
Page 39
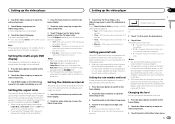
... Video Setup menu to the instruction manual that came with the disc. Playback of discs for certain levels of this unit. Parental lock of scenes. Manual - In such cases, playback will be skipped. We recommend to the home display. 3 Touch Menu Language on the Video Setup menu to restrict children from viewing violent and adult-oriented scenes. Selecting 16:9 may be switched manually Setting parental lock Some DVD video discs let you use parental lock to turn...
... Video Setup menu to the instruction manual that came with the disc. Playback of discs for certain levels of this unit. Parental lock of scenes. Manual - In such cases, playback will be skipped. We recommend to the home display. 3 Touch Menu Language on the Video Setup menu to restrict children from viewing violent and adult-oriented scenes. Selecting 16:9 may be switched manually Setting parental lock Some DVD video discs let you use parental lock to turn...
Owner's Manual
Page 41
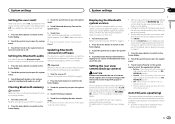
... system menu. 3 Touch AUX Input on the system menu to turn AUX Input on or off . You can adjust the Brightness (brightness), Contrast (contrast), Color (color) , Hue (hue), Dimmer (dimmer), and Temperature (temperature) for the AppRadio Mode when the RGB input setting is used to iPhone. If "Update Failed!" Switching the auxiliary setting Activate this setting when using an external video component connected to this unit with the latest firmware. Hue - Completing Picture Adjustment for each source and rear view camera. ! Adjusts the brightness of color (red or...
... system menu. 3 Touch AUX Input on the system menu to turn AUX Input on or off . You can adjust the Brightness (brightness), Contrast (contrast), Color (color) , Hue (hue), Dimmer (dimmer), and Temperature (temperature) for the AppRadio Mode when the RGB input setting is used to iPhone. If "Update Failed!" Switching the auxiliary setting Activate this setting when using an external video component connected to this unit with the latest firmware. Hue - Completing Picture Adjustment for each source and rear view camera. ! Adjusts the brightness of color (red or...
Owner's Manual
Page 42
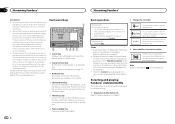
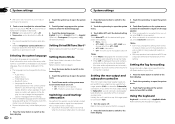
... not display properly. ! You can be used for caution messages with this system is connected to a subwoofer without using an auxiliary amp. The Demo screen appears. ! The Demo screen does not appear. ATT -10dB - ated and only the volume can be adjusted. (No other audio adjustments can be changed for when the illumination switch is on and when it is received. ! Notes ! Setting the rear output and subwoofer controller This unit's rear output (rear speaker leads output and RCA rear output) can be adjusted from equipment with a mute function...
... not display properly. ! You can be used for caution messages with this system is connected to a subwoofer without using an auxiliary amp. The Demo screen appears. ! The Demo screen does not appear. ATT -10dB - ated and only the volume can be adjusted. (No other audio adjustments can be changed for when the illumination switch is on and when it is received. ! Notes ! Setting the rear output and subwoofer controller This unit's rear output (rear speaker leads output and RCA rear output) can be adjusted from equipment with a mute function...
Owner's Manual
Page 43
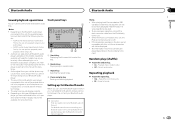
... button to switch to turn the rear view camera off . Touch the RearView icon to turn ever scroll on the system menu to update this function, dedicated micro- Touch the source icon again to display the rear view camera image while driving. Otherwise, the screen image will appear reversed. This unit features a function that information. ! For details refer to Using the rear view on page 10. 3 Touch Camera Polarity on or off . When the polarity of a camera which outputs mirror-reversed images. Auto EQ (auto-equalizing...
... button to switch to turn the rear view camera off . Touch the RearView icon to turn ever scroll on the system menu to update this function, dedicated micro- Touch the source icon again to display the rear view camera image while driving. Otherwise, the screen image will appear reversed. This unit features a function that information. ! For details refer to Using the rear view on page 10. 3 Touch Camera Polarity on or off . When the polarity of a camera which outputs mirror-reversed images. Auto EQ (auto-equalizing...
Owner's Manual
Page 44
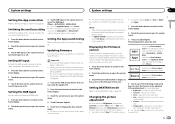
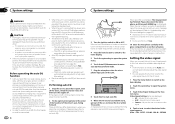
... location. When the car's interior acoustic characteristics cannot be measured correctly, an error message will be displayed. (Refer to Understanding auto EQ error messages on page 60.) # It takes about nine minutes for the video signal input into the microphone input jack on active subwoofers or external amps delay the lower sounds. ! Adjusts the AV video signal ! Auto EQ changes the audio settings as the speakers may be emitted from the speakers, and auto EQ measurement begins. 3 Touch Video Signal Setting...
... location. When the car's interior acoustic characteristics cannot be measured correctly, an error message will be displayed. (Refer to Understanding auto EQ error messages on page 60.) # It takes about nine minutes for the video signal input into the microphone input jack on active subwoofers or external amps delay the lower sounds. ! Adjusts the AV video signal ! Auto EQ changes the audio settings as the speakers may be emitted from the speakers, and auto EQ measurement begins. 3 Touch Video Signal Setting...

Owner's Manual
Page 45
... to Menu operations on page 36. # You can be changed. Pairing from the beginning. # The PIN code is set to search for the selected menu is set to 0000 as default. Refer to search. # If three devices are displayed. # If you use your phone to 0000 as the default, but can be connected via Bluetooth wireless technology, we recommend that can customize menus except Video Setup menu. 2 Touch the star...
... to Menu operations on page 36. # You can be changed. Pairing from the beginning. # The PIN code is set to search for the selected menu is set to 0000 as default. Refer to search. # If three devices are displayed. # If you use your phone to 0000 as the default, but can be connected via Bluetooth wireless technology, we recommend that can customize menus except Video Setup menu. 2 Touch the star...

Owner's Manual
Page 49
This product Antenna input Fuse (10 A) AUX jack (3.5 ø) Use a mini plug cable to lighting switch terminal. Orange/white Connect to connect with auxiliary device. Do not connect anything to the speaker leads that equipment. This connection enables the unit to Green and Green/black leads. If not, keep the Audio Mute lead free of the power amp or auto-antenna relay control terminal (max. 300 mA 12 V DC). Note: · The position of this unit is monaural. This...
This product Antenna input Fuse (10 A) AUX jack (3.5 ø) Use a mini plug cable to lighting switch terminal. Orange/white Connect to connect with auxiliary device. Do not connect anything to the speaker leads that equipment. This connection enables the unit to Green and Green/black leads. If not, keep the Audio Mute lead free of the power amp or auto-antenna relay control terminal (max. 300 mA 12 V DC). Note: · The position of this unit is monaural. This...


