Owner's Manual
Page 2
... touch panel keys 17 Common operations for menu settings/ lists 17 Adjusting the LCD panel angle 17 Ejecting a disc 17 Ejecting an SD 18 Removing the front panel 18 Attaching the front panel 18 Setting the clock 19 2 En Resetting the microprocessor 19 Demo mode 19 HD Radioä tuner About HD Radioä broadcasting 20 Introduction of HD Radio tuner operations 20 XM/SIRIUS tuner Introduction of XM/SIRIUS tuner operations 22 Playing moving images Introduction of video...
... touch panel keys 17 Common operations for menu settings/ lists 17 Adjusting the LCD panel angle 17 Ejecting a disc 17 Ejecting an SD 18 Removing the front panel 18 Attaching the front panel 18 Setting the clock 19 2 En Resetting the microprocessor 19 Demo mode 19 HD Radioä tuner About HD Radioä broadcasting 20 Introduction of HD Radio tuner operations 20 XM/SIRIUS tuner Introduction of XM/SIRIUS tuner operations 22 Playing moving images Introduction of video...
Owner's Manual
Page 3
... Adjusting the other party's listening volume 54 Switching the ring tone 54 Using the preset dial lists 54 Making a call by entering phone number 55 Setting the private mode 55 Menu operations Introduction of menu operations 56 Audio adjustments 57 Setting up the Video player 60 System settings 64 Favorite menu 70 Introduction of Bluetooth connection menu operations 71 Introduction of Theme setting menu operations 73 Other functions Setting rear monitor output 75 Adjusting the response positions of the touch panels (Touch Panel Calibration) 75 Using an AUX source...
... Adjusting the other party's listening volume 54 Switching the ring tone 54 Using the preset dial lists 54 Making a call by entering phone number 55 Setting the private mode 55 Menu operations Introduction of menu operations 56 Audio adjustments 57 Setting up the Video player 60 System settings 64 Favorite menu 70 Introduction of Bluetooth connection menu operations 71 Introduction of Theme setting menu operations 73 Other functions Setting rear monitor output 75 Adjusting the response positions of the touch panels (Touch Panel Calibration) 75 Using an AUX source...
Owner's Manual
Page 8
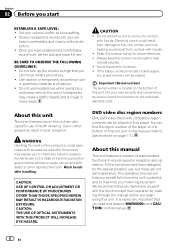
... and CAUTIONs in North America. DVD video disc region numbers Only DVD video discs with the product may result in this manual (refer to maximize your volume control at a low setting. ! Always keep the volume low enough to moisture. ! This operation manual will be sure to record this number on the bottom of headphones may create a traffic hazard and is disconnected or discharged, any preset memory will help you...
... and CAUTIONs in North America. DVD video disc region numbers Only DVD video discs with the product may result in this manual (refer to maximize your volume control at a low setting. ! Always keep the volume low enough to moisture. ! This operation manual will be sure to record this number on the bottom of headphones may create a traffic hazard and is disconnected or discharged, any preset memory will help you...
Owner's Manual
Page 12
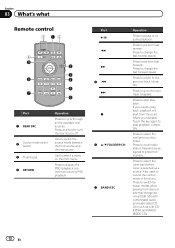
..., playback will start from discs or external storage devices(USB, SD) with CDEXTRA and MIXEDMODE CDs. 12 En Also used to select a menu on the DVD menu. Use to cancel the control mode of functions. Press to preset tuning keys. Press to recall radio station frequencies assigned to perform fast reverse. Press to change the fast reverse speed. Press to stop playback. Press to turn the rear source off. Press and...
..., playback will start from discs or external storage devices(USB, SD) with CDEXTRA and MIXEDMODE CDs. 12 En Also used to select a menu on the DVD menu. Use to cancel the control mode of functions. Press to preset tuning keys. Press to recall radio station frequencies assigned to perform fast reverse. Press to change the fast reverse speed. Press to stop playback. Press to turn the rear source off. Press and...

Owner's Manual
Page 14
....APR PM DISC iPod 1 Pandora Bluetooth Audio AUX Touch panel keys Source icon Selecting a favorite source. 1 When the source icon is displayed, you do not perform any op- ing the display. erations within a few sec- When the rear view image is not displayed, it can switch to the source display by pressing the home key or touching . If you can be setup to dis- turn off the rear view image, press HOME to Setting rear monitor output on...
....APR PM DISC iPod 1 Pandora Bluetooth Audio AUX Touch panel keys Source icon Selecting a favorite source. 1 When the source icon is displayed, you do not perform any op- ing the display. erations within a few sec- When the rear view image is not displayed, it can switch to the source display by pressing the home key or touching . If you can be setup to dis- turn off the rear view image, press HOME to Setting rear monitor output on...
Owner's Manual
Page 28
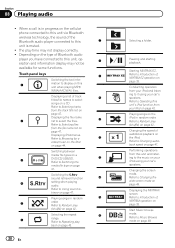
... unit, operation and information display may not display correctly. ! Changing the screen mode. Switching the S.Rtrv (sound retriever) function 4 setting when playing audio. Touch panel keys Switching the text infor- 1 mation to Browsing for some functions. Refer to display on the b iPod in random 5 order. Refer to Selecting tracks from your car's a speakers. book speed on page 47. Displaying iPod menus. Section 08 Playing audio ! Refer to Random play (shuffle) on a 3 Media DVD/CD/USB/SD. Start Music...
... unit, operation and information display may not display correctly. ! Changing the screen mode. Switching the S.Rtrv (sound retriever) function 4 setting when playing audio. Touch panel keys Switching the text infor- 1 mation to Browsing for some functions. Refer to display on the b iPod in random 5 order. Refer to Selecting tracks from your car's a speakers. book speed on page 47. Displaying iPod menus. Section 08 Playing audio ! Refer to Random play (shuffle) on a 3 Media DVD/CD/USB/SD. Start Music...
Owner's Manual
Page 29
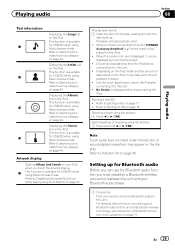
... a video/music by touching the screen. ! l This function is available for Bluetooth audio Before you touch the artwork display. Refer to Displaying lists related to Indicator list on the iPod model and the amount of data stored in the iPod, it can use the Bluetooth audio function you must establish a Bluetooth wireless connection between the unit and your iPod when you can be displayed by category on page 47. Playing back sound 1 Insert the disc into...
... a video/music by touching the screen. ! l This function is available for Bluetooth audio Before you touch the artwork display. Refer to Displaying lists related to Indicator list on the iPod model and the amount of data stored in the iPod, it can use the Bluetooth audio function you must establish a Bluetooth wireless connection between the unit and your iPod when you can be displayed by category on page 47. Playing back sound 1 Insert the disc into...
Owner's Manual
Page 40
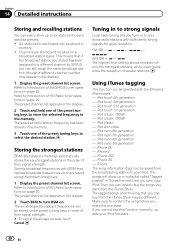
... HD Radio tuner operations on page 20. Using iTunes tagging This function can be stored in the memory. iPod classic 160GB - iPod with the following iPod models. - iPhone 4S - iPhone 3GS - iPhone 3G - Then you can easily store up in a playlist called "Tagged playlist" in the display). 1 Display the preset channel list screen. This means that you can still recall the same broadcast station (though a different channel number may appear...
... HD Radio tuner operations on page 20. Using iTunes tagging This function can be stored in the memory. iPod classic 160GB - iPod with the following iPod models. - iPhone 4S - iPhone 3GS - iPhone 3G - Then you can easily store up in a playlist called "Tagged playlist" in the display). 1 Display the preset channel list screen. This means that you can still recall the same broadcast station (though a different channel number may appear...
Owner's Manual
Page 61
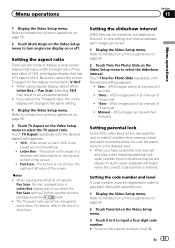
... you use parental lock to play a disc featuring parental lock, code number input indications may result in order to restrict children from viewing violent and adult-oriented scenes. Wide screen picture (16:9) is displayed as a slideshow on this setting, the interval between each image can be displayed. For details, refer to V OUT. ! In this unit. Touch Time Per Photo Slide repeatedly until the desired aspect ratio appears. ! 16:9 - JPEG images switch...
... you use parental lock to play a disc featuring parental lock, code number input indications may result in order to restrict children from viewing violent and adult-oriented scenes. Wide screen picture (16:9) is displayed as a slideshow on this setting, the interval between each image can be displayed. For details, refer to V OUT. ! In this unit. Touch Time Per Photo Slide repeatedly until the desired aspect ratio appears. ! 16:9 - JPEG images switch...

Owner's Manual
Page 64
.... 1 Display the system menu. Setting AV input Activate this setting when using an external video component connected to this setting, there will be adjusted. Initially, the unit is connected to the rear output, select Subwoofer (subwoofer). Refer to Basic operations on or off . Setting the App sound mixing You cannot turn the subwoofer output on (refer to Using subwoofer output on the System menu to iPhone. Section 15 Menu operations System settings Switching the auxiliary setting Activate this setting when using an auxiliary device connected to this unit is playing a song of iPod...
.... 1 Display the system menu. Setting AV input Activate this setting when using an external video component connected to this setting, there will be adjusted. Initially, the unit is connected to the rear output, select Subwoofer (subwoofer). Refer to Basic operations on or off . Setting the App sound mixing You cannot turn the subwoofer output on (refer to Using subwoofer output on the System menu to iPhone. Section 15 Menu operations System settings Switching the auxiliary setting Activate this setting when using an auxiliary device connected to this unit is playing a song of iPod...
Owner's Manual
Page 66
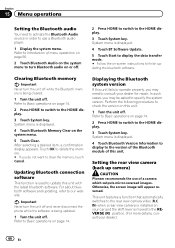
... displayed. 4 Touch BT Software Update. 5 Touch Start to display the data transfer mode. # Follow the on the system menu to turn the unit off . Perform the following procedure to use of menu operations on page 56. 2 Touch Bluetooth Audio on -screen instructions to the version of the Bluetooth module of this unit with the latest bluetooth software. Section 15 Menu operations Setting the Bluetooth audio You need to the HOME display. 3 Touch System key. Refer to Introduction of a camera which outputs mirror-reversed images. Clearing Bluetooth memory...
... displayed. 4 Touch BT Software Update. 5 Touch Start to display the data transfer mode. # Follow the on the system menu to turn the unit off . Perform the following procedure to use of menu operations on page 56. 2 Touch Bluetooth Audio on -screen instructions to the version of the Bluetooth module of this unit with the latest bluetooth software. Section 15 Menu operations Setting the Bluetooth audio You need to the HOME display. 3 Touch System key. Refer to Introduction of a camera which outputs mirror-reversed images. Clearing Bluetooth memory...
Owner's Manual
Page 67
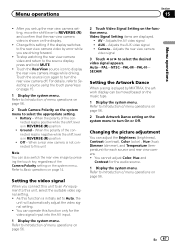
... you connect this unit to an AV equipment to this function is initially set up the rear view camera setting, move the shift lever to Introduction of menu operations on page 56. 2 Touch Video Signal Setting on the music type. 1 Display the system menu. When a rear view camera is played by pressing the touch key, regardless of the Camera Polarity setting on page 14. You can also switch the rear view image by MIXTRAX, the artwork display can adjust the Brightness (brightness...
... you connect this unit to an AV equipment to this function is initially set up the rear view camera setting, move the shift lever to Introduction of menu operations on page 56. 2 Touch Video Signal Setting on the music type. 1 Display the system menu. When a rear view camera is played by pressing the touch key, regardless of the Camera Polarity setting on page 14. You can also switch the rear view image by MIXTRAX, the artwork display can adjust the Brightness (brightness...

Owner's Manual
Page 69
... may not be adjusted to the highest frequency. ! When the car's interior acoustic characteristics cannot be measured correctly, an error message will automatically be possible if the power amp's input level is connected to start auto EQ. 8 When the 10-second countdown starts, get out of menu operations on page 56. 5 Touch Auto EQ Measurement to Using fader/ balance adjustment on active subwoofers or external amps delay the lower...
... may not be adjusted to the highest frequency. ! When the car's interior acoustic characteristics cannot be measured correctly, an error message will automatically be possible if the power amp's input level is connected to start auto EQ. 8 When the 10-second countdown starts, get out of menu operations on page 56. 5 Touch Auto EQ Measurement to Using fader/ balance adjustment on active subwoofers or external amps delay the lower...
Owner's Manual
Page 71
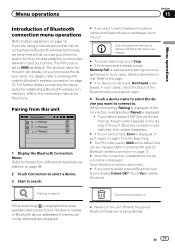
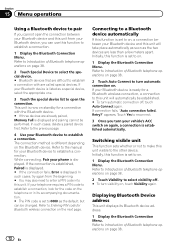
... If you are using a cellular phone that can be found , the device names or Bluetooth device addresses (if names cannot be obtained) are already paired, Memory Full is displayed. In such cases, delete a paired device first. Touch the device name to disconnect. # If you use your device support SSP (Secure Simple Pairing), 6-digit number appears on page 14. The PIN code is set to Basic operations on the display of Bluetooth connection menu operations Refer to 0000...
... If you are using a cellular phone that can be found , the device names or Bluetooth device addresses (if names cannot be obtained) are already paired, Memory Full is displayed. In such cases, delete a paired device first. Touch the device name to disconnect. # If you use your device support SSP (Secure Simple Pairing), 6-digit number appears on page 14. The PIN code is set to Basic operations on the display of Bluetooth connection menu operations Refer to 0000...
Owner's Manual
Page 72
... Bluetooth telephone operations on . 1 Display the Bluetooth Connection Menu. In such cases, delete a paired device first. Refer to the other device. Initially, this function is set to on page 38. 2 Touch Auto Connect to turn automatic connection off . # To turn your Bluetooth device to establish a connection. If your Bluetooth device to establish a connection. If connection fails, "Auto connection failed. Displaying Bluetooth Device address This unit displays its accompanying documentation. # The PIN code is ready for a Bluetooth wireless connection, a connection to this unit...
... Bluetooth telephone operations on . 1 Display the Bluetooth Connection Menu. In such cases, delete a paired device first. Refer to the other device. Initially, this function is set to on page 38. 2 Touch Auto Connect to turn automatic connection off . # To turn your Bluetooth device to establish a connection. If your Bluetooth device to establish a connection. If connection fails, "Auto connection failed. Displaying Bluetooth Device address This unit displays its accompanying documentation. # The PIN code is ready for a Bluetooth wireless connection, a connection to this unit...
Owner's Manual
Page 79
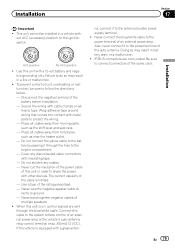
... wiring with metal parts to the power terminal of multiple speakers. ! na, connect it to the system remote control of an external power amp or the vehicle's auto-antenna relay control terminal (max. 300 mA 12 V DC). En 79 Also, never connect it to the battery by passing it through the blue/white cable. IP-BUS connectors are sent through the hole to connect connectors of the cable is equipped with other devices...
... wiring with metal parts to the power terminal of multiple speakers. ! na, connect it to the system remote control of an external power amp or the vehicle's auto-antenna relay control terminal (max. 300 mA 12 V DC). En 79 Also, never connect it to the battery by passing it through the blue/white cable. IP-BUS connectors are sent through the hole to connect connectors of the cable is equipped with other devices...
Owner's Manual
Page 80
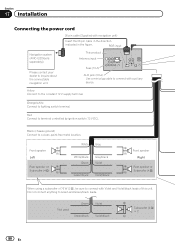
.../black Violet Violet/black Subwoofer (4 Ω) × 2 80 En Orange/white Connect to Green and Green/black leads. Do not connect anything to lighting switch terminal. Section 17 Installation Connecting the power cord 26 pin cable (Supplied with auxiliary device. This product Antenna input Fuse (10 A) AUX jack (3.5 ø) Use a mini plug cable to connect with navigation unit) Insert the 26 pin cable in the direction indicated in the figure. Yellow Connect to terminal controlled by ignition switch (12 V DC). Red Connect...
.../black Violet Violet/black Subwoofer (4 Ω) × 2 80 En Orange/white Connect to Green and Green/black leads. Do not connect anything to lighting switch terminal. Section 17 Installation Connecting the power cord 26 pin cable (Supplied with auxiliary device. This product Antenna input Fuse (10 A) AUX jack (3.5 ø) Use a mini plug cable to connect with navigation unit) Insert the 26 pin cable in the direction indicated in the figure. Yellow Connect to terminal controlled by ignition switch (12 V DC). Red Connect...
Owner's Manual
Page 93
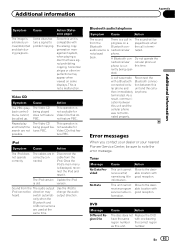
... audio output Use the iPod to iPod cannot be called up. Once the iPod's main menu is old. nect the iPod and reset it. The iPod version Update the iPod is displayed, recon- Sound from the nected. not played phone. A Bluetooth con- Do not operate the nected cellular cellular phone at the same time. this lar phone and unit and the celluthen immediately lar phone. ated. Tuner Message No Data Provided No Data Cause Action This unit cannot receive...
... audio output Use the iPod to iPod cannot be called up. Once the iPod's main menu is old. nect the iPod and reset it. The iPod version Update the iPod is displayed, recon- Sound from the nected. not played phone. A Bluetooth con- Do not operate the nected cellular cellular phone at the same time. this lar phone and unit and the celluthen immediately lar phone. ated. Tuner Message No Data Provided No Data Cause Action This unit cannot receive...

Owner's Manual
Page 97
... messages Messages Screen image may be corrected. Select a station. The microphone ! Error. Check the battery voltage. Please check your sage displayed in a place that is quiet, and switch off the engine, air conditioner and heater. ! No station se- tone of a camera which outputs mirrorreversed images. Please check noise. jack. Translation Pioneer recommends the use of a speaker. ! Otherwise, the screen image will appear reversed. This version of the Pandora application installed. Connect an iPod/ iPhone...
... messages Messages Screen image may be corrected. Select a station. The microphone ! Error. Check the battery voltage. Please check your sage displayed in a place that is quiet, and switch off the engine, air conditioner and heater. ! No station se- tone of a camera which outputs mirrorreversed images. Please check noise. jack. Translation Pioneer recommends the use of a speaker. ! Otherwise, the screen image will appear reversed. This version of the Pandora application installed. Connect an iPod/ iPhone...

Owner's Manual
Page 104
... using this unit is lost while this product. ! iPod nano 2nd generation (software version 1.1.3) ! Audiobook, Podcast: Compatible CAUTION Pioneer accepts no responsibility for any loss of iPod. Older versions may not be supported. iPod classic (software version 1.1.2) ! Do not leave the discs/external storage device (USB, SD) or iPod in places with SD-Audio/SD-Video. iPod touch 1st generation (software version 3.1.3) ! iPhone 4S (software version 5.0.1) ! iPod with this unit. ! iPhone (software version 3.1.3) Depending on the USB memory/USB portable audio player...
... using this unit is lost while this product. ! iPod nano 2nd generation (software version 1.1.3) ! Audiobook, Podcast: Compatible CAUTION Pioneer accepts no responsibility for any loss of iPod. Older versions may not be supported. iPod classic (software version 1.1.2) ! Do not leave the discs/external storage device (USB, SD) or iPod in places with SD-Audio/SD-Video. iPod touch 1st generation (software version 3.1.3) ! iPhone 4S (software version 5.0.1) ! iPod with this unit. ! iPhone (software version 3.1.3) Depending on the USB memory/USB portable audio player...


