Owner's Manual
Page 4
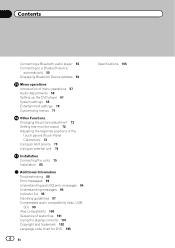
... Functions Changing the picture adjustment 72 Setting rear monitor output 72 Adjusting the response positions of the touch panels (Touch Panel Calibration) 73 Using an AUX source 73 Using an external unit 74 Installation Connecting the units 75 Installation 85 Additional Information Troubleshooting 88 Error messages 90 Understanding auto EQ error...
... Functions Changing the picture adjustment 72 Setting rear monitor output 72 Adjusting the response positions of the touch panels (Touch Panel Calibration) 73 Using an AUX source 73 Using an external unit 74 Installation Connecting the units 75 Installation 85 Additional Information Troubleshooting 88 Error messages 90 Understanding auto EQ error...
Owner's Manual
Page 11
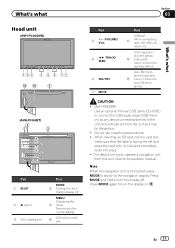
AUX input jack (3.5 mm stereo/ c video jack) Use to connect...be dangerous. ! MENU Displaying the 9 menu. Do not use unauthorized products. ! CAUTION ! (AVH-P3300BT) Use an optional Pioneer USB cable (CD-U50E) to connect the USB audio player/USB memory as any device connected ...directly to the unit will protrude out from this unit, refer to turn the display off . When inserting an SD card into place. ! What's what Section 03 What's what Head unit (AVH-P4300DVD) da 3 (AVH...
AUX input jack (3.5 mm stereo/ c video jack) Use to connect...be dangerous. ! MENU Displaying the 9 menu. Do not use unauthorized products. ! CAUTION ! (AVH-P3300BT) Use an optional Pioneer USB cable (CD-U50E) to connect the USB audio player/USB memory as any device connected ...directly to the unit will protrude out from this unit, refer to turn the display off . When inserting an SD card into place. ! What's what Section 03 What's what Head unit (AVH-P4300DVD) da 3 (AVH...
Owner's Manual
Page 13
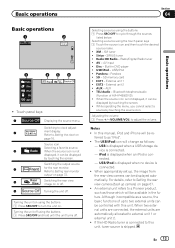
...VOL) to clock adjust- 2 Wed 28 May 12:45 PM ment display. If the HD Radio tuner is connected to a Pioneer product, such as a source, the basic functions of AVH-P4300DVD) ! Source icon Selecting a favorite source. 3 Radio When the source icon is not displayed, it can be referred to as... ! SD memory card ! TEL/Audio - Refer to two external units can be controlled with this unit, tuner source is connected. ! USB/iPod - AUX - iPod is displayed when an iPod is connected. - SD - En 13 Selecting a source using the buttons 1 Press SRC/OFF to external unit 1...
...VOL) to clock adjust- 2 Wed 28 May 12:45 PM ment display. If the HD Radio tuner is connected to a Pioneer product, such as a source, the basic functions of AVH-P4300DVD) ! Source icon Selecting a favorite source. 3 Radio When the source icon is not displayed, it can be referred to as... ! SD memory card ! TEL/Audio - Refer to two external units can be controlled with this unit, tuner source is connected. ! USB/iPod - AUX - iPod is displayed when an iPod is connected. - SD - En 13 Selecting a source using the buttons 1 Press SRC/OFF to external unit 1...
Owner's Manual
Page 65
..., you turn AV Input on or off En 65 ATT -10dB - Refer to Introduction of menu operations on page 57. 2 Touch AUX Input on the system menu to turn AUX Input on or off . If you change this setting, there will return to the factory settings. ! Both rear speaker lead outputs and...
..., you turn AV Input on or off En 65 ATT -10dB - Refer to Introduction of menu operations on page 57. 2 Touch AUX Input on the system menu to turn AUX Input on or off . If you change this setting, there will return to the factory settings. ! Both rear speaker lead outputs and...
Owner's Manual
Page 67
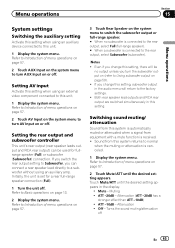
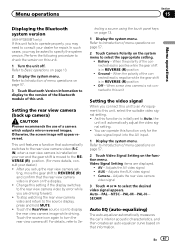
...Setting on the display. ! When the polarity of a camera which outputs mirror-reversed images. AUX - SECAM Auto EQ (auto-equalizing) The auto-equalizer automatically measures the car's interior acoustic ...PAL-NTSC-PAL-M-PAL-N- Menu operations Section 15 Menu operations Displaying the Bluetooth system version (AVH-P3300BT only) If this setting if the display switches to the rear view camera video ... will automatically adjust the video signal setting. ! After you set up camera) CAUTION Pioneer recommends the use of the connected lead is negative while the gear shift is initially set...
...Setting on the display. ! When the polarity of a camera which outputs mirror-reversed images. AUX - SECAM Auto EQ (auto-equalizing) The auto-equalizer automatically measures the car's interior acoustic ...PAL-NTSC-PAL-M-PAL-N- Menu operations Section 15 Menu operations Displaying the Bluetooth system version (AVH-P3300BT only) If this setting if the display switches to the rear view camera video ... will automatically adjust the video signal setting. ! After you set up camera) CAUTION Pioneer recommends the use of the connected lead is negative while the gear shift is initially set...
Owner's Manual
Page 72
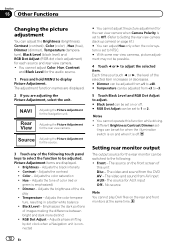
... 1 or 2. The source on the rear and front monitors at the same time. 72 En You cannot adjust Color, Hue, Contrast and Black Level for AUX input Off- Adjusts the black intensity ! Adjusts the color saturation ! Dimmer - Adjusting the Picture Adjustment for the Navigation unit. Adjusts phase shifting by dot clock... View Adjusting the Picture Adjustment for the rear view camera. Adjusts the contrast ! Each time you are displayed. ! The video and sound from AV input AUX-
... 1 or 2. The source on the rear and front monitors at the same time. 72 En You cannot adjust Color, Hue, Contrast and Black Level for AUX input Off- Adjusts the black intensity ! Adjusts the color saturation ! Dimmer - Adjusting the Picture Adjustment for the Navigation unit. Adjusts phase shifting by dot clock... View Adjusting the Picture Adjustment for the rear view camera. Adjusts the contrast ! Each time you are displayed. ! The video and sound from AV input AUX-
Owner's Manual
Page 73
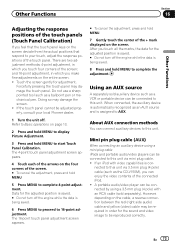
... Picture Adjustment. 3 Press and hold MENU. 5 Press MENU to start Touch Panel Calibration. Mini pin plug cable (AUX) When connecting an auxiliary device using a mini plug cable iPods and portable audio/video players can be adjusted properly,...the auxiliary device is assigned to 16-point adjustment. Do not use a sharp pointed tool such as an AUX source and is automatically recognized as a ballpoint pen or mechanical pen. Data for adjustment. Other Functions Section 16...screen deviate from the actual positions that respond to your local Pioneer dealer. 1 Turn the unit off.
... Picture Adjustment. 3 Press and hold MENU. 5 Press MENU to start Touch Panel Calibration. Mini pin plug cable (AUX) When connecting an auxiliary device using a mini plug cable iPods and portable audio/video players can be adjusted properly,...the auxiliary device is assigned to 16-point adjustment. Do not use a sharp pointed tool such as an AUX source and is automatically recognized as a ballpoint pen or mechanical pen. Data for adjustment. Other Functions Section 16...screen deviate from the actual positions that respond to your local Pioneer dealer. 1 Turn the unit off.
Owner's Manual
Page 74
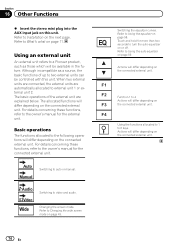
... two seconds to the following operations will differ depending on page 43. 74 En Using an external unit An external unit refers to a Pioneer product, such as a source, the basic functions of the external unit are automatically allocated to 6 keys. Basic operations The functions allocated ...1 to external unit 1 or external unit 2. Switching the equalizer curves. Section 16 Other Functions % Insert the stereo mini plug into the AUX input jack on page 11. Refer to Installation on or off. When two external units are connected, the external units are explained below. ...
... two seconds to the following operations will differ depending on page 43. 74 En Using an external unit An external unit refers to a Pioneer product, such as a source, the basic functions of the external unit are automatically allocated to 6 keys. Basic operations The functions allocated ...1 to external unit 1 or external unit 2. Switching the equalizer curves. Section 16 Other Functions % Insert the stereo mini plug into the AUX input jack on page 11. Refer to Installation on or off. When two external units are connected, the external units are explained below. ...
Owner's Manual
Page 78
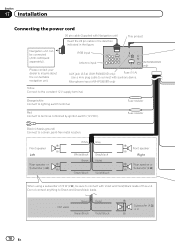
Microphone input (AVH-P3300BT only) (AVH-P4300DVD only) Yellow Connect to inquire about the connectable navigation unit. Fuse resistor Black (chassis ground) Connect to connect with Navigation unit) Insert the 26 pin .../black Subwoofer (4 Ω) × 2 78 En Please contact your dealer to the constant 12 V supply terminal. Not used. RGB input Antenna input AUX jack (3.5 ø) (AVH-P4300DVD only) Fuse (10 A) Use a mini plug cable to a clean, paint-free metal location. Front speaker Left Rear speaker or Subwoofer (4 Ω...
Microphone input (AVH-P3300BT only) (AVH-P4300DVD only) Yellow Connect to inquire about the connectable navigation unit. Fuse resistor Black (chassis ground) Connect to connect with Navigation unit) Insert the 26 pin .../black Subwoofer (4 Ω) × 2 78 En Please contact your dealer to the constant 12 V supply terminal. Not used. RGB input Antenna input AUX jack (3.5 ø) (AVH-P4300DVD only) Fuse (10 A) Use a mini plug cable to a clean, paint-free metal location. Front speaker Left Rear speaker or Subwoofer (4 Ω...
Owner's Manual
Page 82
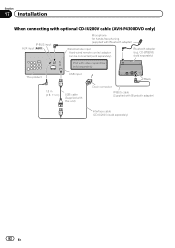
CD-BTB200) (sold separately) iPod with video capabilities (sold separately) This product USB input Black 1.5 m (4 ft. 11 in.) USB cable (Supplied with this unit) Dock connector IP-BUS cable (Supplied with Bluetooth adapter) Wired remote input Hard-wired remote control adaptor can be connected (sold separately) 82 En Section 17 Installation When connecting with optional CD-IU200V cable (AVH-P4300DVD only) IP-BUS input AUX input (AUX) Microphone for hands-free phoning (supplied with Bluetooth adapter) Interface cable (CD-IU200V) (sold separately). Bluetooth adapter (e.g.
CD-BTB200) (sold separately) iPod with video capabilities (sold separately) This product USB input Black 1.5 m (4 ft. 11 in.) USB cable (Supplied with this unit) Dock connector IP-BUS cable (Supplied with Bluetooth adapter) Wired remote input Hard-wired remote control adaptor can be connected (sold separately) 82 En Section 17 Installation When connecting with optional CD-IU200V cable (AVH-P4300DVD only) IP-BUS input AUX input (AUX) Microphone for hands-free phoning (supplied with Bluetooth adapter) Interface cable (CD-IU200V) (sold separately). Bluetooth adapter (e.g.


