Owner's Manual
Page 2
... for menu settings/ lists 15 Adjusting the LCD panel angle 15 Ejecting a disc 15 Ejecting a disc 15 2 En Ejecting an SD 15 Ejecting an SD 16 Setting the clock 16 Tuner Introduction of tuner operations 17 Playing moving images Introduction of video playback operations 18 Playing audio Introduction of sound playback operations 21 Using Pandoraâ Introduction of Pandora operations 23 Playing still images Introduction of still image playback operations 25 Introduction of still image playback as a slideshow operations 26 Bluetooth Telephone...
... for menu settings/ lists 15 Adjusting the LCD panel angle 15 Ejecting a disc 15 Ejecting a disc 15 2 En Ejecting an SD 15 Ejecting an SD 16 Setting the clock 16 Tuner Introduction of tuner operations 17 Playing moving images Introduction of video playback operations 18 Playing audio Introduction of sound playback operations 21 Using Pandoraâ Introduction of Pandora operations 23 Playing still images Introduction of still image playback operations 25 Introduction of still image playback as a slideshow operations 26 Bluetooth Telephone...
Owner's Manual
Page 3
Contents Detailed instructions Storing and recalling stations 35 Storing the strongest stations 35 Tuning in to strong signals 35 Tuning in to strong HD Radio signals 35 Using iTunes tagging 36 Switching the media file type 36 Operating the DVD menu 37 Operating this unit's iPod function from your iPod 37 Random play (shuffle) 38 Playing all songs in random order (shuffle all) 38 Repeating playback 38 Playing videos from your iPod 38...
Contents Detailed instructions Storing and recalling stations 35 Storing the strongest stations 35 Tuning in to strong signals 35 Tuning in to strong HD Radio signals 35 Using iTunes tagging 36 Switching the media file type 36 Operating the DVD menu 37 Operating this unit's iPod function from your iPod 37 Random play (shuffle) 38 Playing all songs in random order (shuffle all) 38 Repeating playback 38 Playing videos from your iPod 38...
Owner's Manual
Page 4
... a Bluetooth audio player 55 Connecting to a Bluetooth device automatically 55 Displaying Bluetooth Device address 56 Menu operations Introduction of menu operations 57 Audio Adjustments 58 Setting up the DVD player 61 System settings 65 Entertainment settings 70 Customizing menus 71 Other Functions Changing the picture adjustment 72 Setting rear monitor output 72 Adjusting the response positions of the touch panels (Touch Panel Calibration) 73 Using an AUX source 73 Using an external unit 74 Installation Connecting the units 75 Installation 85 Additional Information Troubleshooting 88 Error...
... a Bluetooth audio player 55 Connecting to a Bluetooth device automatically 55 Displaying Bluetooth Device address 56 Menu operations Introduction of menu operations 57 Audio Adjustments 58 Setting up the DVD player 61 System settings 65 Entertainment settings 70 Customizing menus 71 Other Functions Changing the picture adjustment 72 Setting rear monitor output 72 Adjusting the response positions of the touch panels (Touch Panel Calibration) 73 Using an AUX source 73 Using an external unit 74 Installation Connecting the units 75 Installation 85 Additional Information Troubleshooting 88 Error...
Owner's Manual
Page 7
... be deceiving. Sound can hear it there. Set your hearing adapts. Slowly increase the sound until you have established a comfortable sound level, set forth for use in conjunction with part 15 of the IC radio frequency (RF) Exposure rules. Once you can be installed and operated keeping the radiator at a low setting. ! Use caution or temporarily discontinue use in other antenna or transmitter. ! Use in North America...
... be deceiving. Sound can hear it there. Set your hearing adapts. Slowly increase the sound until you have established a comfortable sound level, set forth for use in conjunction with part 15 of the IC radio frequency (RF) Exposure rules. Once you can be installed and operated keeping the radiator at a low setting. ! Use caution or temporarily discontinue use in other antenna or transmitter. ! Use in North America...
Owner's Manual
Page 8
... the volume low enough to moisture. ! If the battery is located on the bottom of California and other governmental entities to ensure superior reception and operation. DVD video disc region numbers Only DVD video discs with compatible region numbers can find the region number of the player on the bottom of sophisticated functions to cause cancer and birth defect or other information. About this manual This unit features a number...
... the volume low enough to moisture. ! If the battery is located on the bottom of California and other governmental entities to ensure superior reception and operation. DVD video disc region numbers Only DVD video discs with compatible region numbers can find the region number of the player on the bottom of sophisticated functions to cause cancer and birth defect or other information. About this manual This unit features a number...
Owner's Manual
Page 13
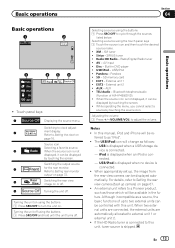
... HD Radio tuner is connected to turn the unit on page 16. Switching the output source 4 Rear Front for the rear monitor. Turning the unit on using the buttons 1 Press SRC/OFF to this manual, iPod and iPhone will be available in DVD player ! Turning the unit off . XM tuner ! USB/iPod - USB/iPod ! External unit 1 ! While operating the menu, you cannot select a source by touching the screen. ! An external unit refers to as a source, the basic functions of AVH-P4300DVD) ! Radio/HD Radio - Disc - External unit 2 ! When the source icon is not displayed...
... HD Radio tuner is connected to turn the unit on page 16. Switching the output source 4 Rear Front for the rear monitor. Turning the unit on using the buttons 1 Press SRC/OFF to this manual, iPod and iPhone will be available in DVD player ! Turning the unit off . XM tuner ! USB/iPod - USB/iPod ! External unit 1 ! While operating the menu, you cannot select a source by touching the screen. ! An external unit refers to as a source, the basic functions of AVH-P4300DVD) ! Radio/HD Radio - Disc - External unit 2 ! When the source icon is not displayed...
Owner's Manual
Page 37
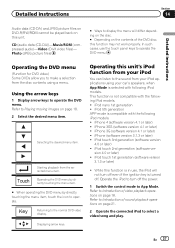
... CD (audio data (CD-DA))-Music/ROM (compressed audio)-Video (DivX video files)- Photo (JPEG picture files) # Ways to display the menu will not turn off the power. 1 Switch the control mode to App Mode. This function is turned off. iPhone 4 (software version 4.1 or later) ! iPod touch 2nd generation (software ver- Refer to Introduction of the DVD disc, this unit's iPod function from your iPod applications using a menu. Starting playback from your iPod You can listen to the sound from the selected menu item. Displaying arrow keys...
... CD (audio data (CD-DA))-Music/ROM (compressed audio)-Video (DivX video files)- Photo (JPEG picture files) # Ways to display the menu will not turn off the power. 1 Switch the control mode to App Mode. This function is turned off. iPhone 4 (software version 4.1 or later) ! iPod touch 2nd generation (software ver- Refer to Introduction of the DVD disc, this unit's iPod function from your iPod applications using a menu. Starting playback from your iPod You can listen to the sound from the selected menu item. Displaying arrow keys...
Owner's Manual
Page 53
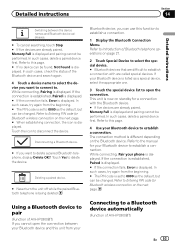
... Entering PIN code for Bluetooth wireless connection on the next page. # When establishing connection, the icon is now on the next page. While connecting, Pairing is set to 0000 as the default, but can be changed . Touch Yes to disconnect the device. Refer to a Bluetooth device automatically (Function of Bluetooth telephone operations on the Bluetooth device. If the connection is established, Paired is displayed. # If the connection fails, Error is displayed. Deleting a paired device. # Never turn the unit...
... Entering PIN code for Bluetooth wireless connection on the next page. # When establishing connection, the icon is now on the next page. While connecting, Pairing is set to 0000 as the default, but can be changed . Touch Yes to disconnect the device. Refer to a Bluetooth device automatically (Function of Bluetooth telephone operations on the Bluetooth device. If the connection is established, Paired is displayed. # If the connection fails, Error is displayed. Deleting a paired device. # Never turn the unit...
Owner's Manual
Page 55
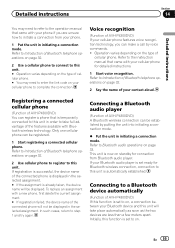
... cellular phone to initiate a connection from Bluetooth audio player. Connecting to a Bluetooth device automatically (Function of cellular phone. # You may need to enter the link code on your cellular phone features voice recognition technology, you are less than a few meters apart. Refer to Introduction of Bluetooth telephone operations on page 32. 2 Use a cellular phone to connect to this unit. # Operation varies depending on the type of AVH-P4300DVD) If this function is set to...
... cellular phone to initiate a connection from Bluetooth audio player. Connecting to a Bluetooth device automatically (Function of cellular phone. # You may need to enter the link code on your cellular phone features voice recognition technology, you are less than a few meters apart. Refer to Introduction of Bluetooth telephone operations on page 32. 2 Use a cellular phone to connect to this unit. # Operation varies depending on the type of AVH-P4300DVD) If this function is set to...
Owner's Manual
Page 62
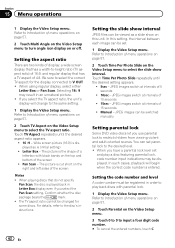
... unnatural picture. ! If you select the TV aspect ratio, the unit's display will begin when the correct code number is played back in Letter Box display even if you use parental lock to restrict children from viewing violent and adult-oriented scenes. Section 15 Menu operations 1 Display the Video Setup menu. In this unit. You can be changed for the display connected to select the slide show on the Video Setup menu. 3 Touch 0 to...
... unnatural picture. ! If you select the TV aspect ratio, the unit's display will begin when the correct code number is played back in Letter Box display even if you use parental lock to restrict children from viewing violent and adult-oriented scenes. Section 15 Menu operations 1 Display the Video Setup menu. In this unit. You can be changed for the display connected to select the slide show on the Video Setup menu. 3 Touch 0 to...
Owner's Manual
Page 65
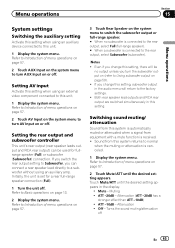
... is received. ! Turns the sound muting/attenuation off . Notes ! Both rear speaker lead outputs and RCA rear output are switched simultaneously in the display. ! Switching sound muting/ attenuation Sound from this setting, there will return to a subwoofer without using an external video component connected to turn the subwoofer output on (refer to Introduction of menu operations on page 57. 2 Touch AUX Input on or off En 65 Even if you turn AUX Input on the system menu to this unit. 1 Display the system menu. Sound from equipment with a mute function...
... is received. ! Turns the sound muting/attenuation off . Notes ! Both rear speaker lead outputs and RCA rear output are switched simultaneously in the display. ! Switching sound muting/ attenuation Sound from this setting, there will return to a subwoofer without using an external video component connected to turn the subwoofer output on (refer to Introduction of menu operations on page 57. 2 Touch AUX Input on or off En 65 Even if you turn AUX Input on the system menu to this unit. 1 Display the system menu. Sound from equipment with a mute function...

Owner's Manual
Page 66
... menu operations on page 57. 3 Touch Bluetooth Memory Clear on -screen instructions to Introduction of menu operations on page 57. 3 Touch Bluetooth Software Update. 4 Touch Start to normal when the phone connection is being updated. 1 Turn the unit off. Section 15 Menu operations Notes ! Selecting the menu language The menu language can be selected from use while driving or require careful attention when operated. Operation returns to display the data transfer mode. # Follow the on the system menu. 4 Touch Clear. lowing: - Touch...
... menu operations on page 57. 3 Touch Bluetooth Memory Clear on -screen instructions to Introduction of menu operations on page 57. 3 Touch Bluetooth Software Update. 4 Touch Start to normal when the phone connection is being updated. 1 Turn the unit off. Section 15 Menu operations Notes ! Selecting the menu language The menu language can be selected from use while driving or require careful attention when operated. Operation returns to display the data transfer mode. # Follow the on the system menu. 4 Touch Clear. lowing: - Touch...
Owner's Manual
Page 67
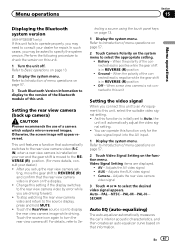
...rear view camera video (R.C IN) when a rear view camera is installed on the display. ! Otherwise, the screen image will automatically adjust the video signal setting. ! Change this setting if the display switches to turn the rear view camera off . To stop watching the rear view camera video and return to display the rear view camera image while driving. Touch the source icon again to the rear view camera video by error while you set up camera) CAUTION Pioneer recommends the use of the connected lead is positive while the gear shift is initially set - You can operate this unit...
...rear view camera video (R.C IN) when a rear view camera is installed on the display. ! Otherwise, the screen image will automatically adjust the video signal setting. ! Change this setting if the display switches to turn the rear view camera off . To stop watching the rear view camera video and return to display the rear view camera image while driving. Touch the source icon again to the rear view camera video by error while you set up camera) CAUTION Pioneer recommends the use of the connected lead is positive while the gear shift is initially set - You can operate this unit...
Owner's Manual
Page 68
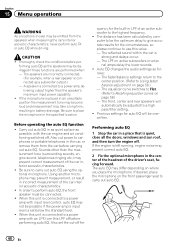
... front, center and rear speakers will be damaged if these functions are incorrectly connected. (For example, when a rear speaker is set the cut power to Using fader/ balance adjustment on active subwoofers or exter- Before operating the auto EQ function ! The fader/balance settings return to the center position. (Refer to car phones or portable telephones in the car, or remove them from the speakers when measuring the car's interior acoustic characteristics...
... front, center and rear speakers will be damaged if these functions are incorrectly connected. (For example, when a rear speaker is set the cut power to Using fader/ balance adjustment on active subwoofers or exter- Before operating the auto EQ function ! The fader/balance settings return to the center position. (Refer to car phones or portable telephones in the car, or remove them from the speakers when measuring the car's interior acoustic characteristics...
Owner's Manual
Page 76
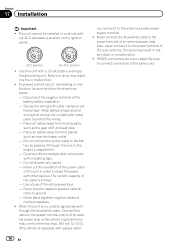
... battery by passing it to the engine compartment. - Never band together negative cables of this cable to share the power with metal parts to ground. - na, connect it through the blue/white cable. Never cut the insulation of the power cable of multiple speakers. ! Connect this unit in a vehicle without ACC (accessory) position on , control signals are color-coded. This unit cannot be sure to connect connectors of an external power amp or the vehicle's auto-antenna...
... battery by passing it to the engine compartment. - Never band together negative cables of this cable to share the power with metal parts to ground. - na, connect it through the blue/white cable. Never cut the insulation of the power cable of multiple speakers. ! Connect this unit in a vehicle without ACC (accessory) position on , control signals are color-coded. This unit cannot be sure to connect connectors of an external power amp or the vehicle's auto-antenna...
Owner's Manual
Page 78
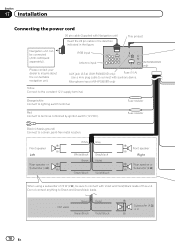
... switch (12 V DC). Fuse resistor Red Connect to lighting switch terminal. Microphone input (AVH-P3300BT only) (AVH-P4300DVD only) Yellow Connect to connect with auxiliary device. RGB input Antenna input AUX jack (3.5 ø) (AVH-P4300DVD only) Fuse (10 A) Use a mini plug cable to the constant 12 V supply terminal. Fuse resistor Black (chassis ground) Connect to a clean, paint-free metal location. Front speaker Left Rear speaker or Subwoofer (4 Ω) White Gray White/black Green Gray/black Violet Green/black Violet/black...
... switch (12 V DC). Fuse resistor Red Connect to lighting switch terminal. Microphone input (AVH-P3300BT only) (AVH-P4300DVD only) Yellow Connect to connect with auxiliary device. RGB input Antenna input AUX jack (3.5 ø) (AVH-P4300DVD only) Fuse (10 A) Use a mini plug cable to the constant 12 V supply terminal. Fuse resistor Black (chassis ground) Connect to a clean, paint-free metal location. Front speaker Left Rear speaker or Subwoofer (4 Ω) White Gray White/black Green Gray/black Violet Green/black Violet/black...
Owner's Manual
Page 79
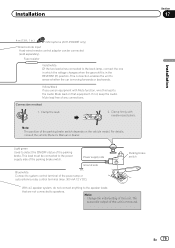
..., consult the vehicle Owner's Manual or dealer. Power supply side Ground side Blue/white Connect to detect the ON/OFF status of the parking brake. If not, keep the Audio Mute lead free of the parking brake switch depends on that are not connected to the power supply side of the power amp or auto-antenna relay control terminal (max. 300 mA 12 V DC). Light green Used to system control terminal of the parking brake switch. This lead...
..., consult the vehicle Owner's Manual or dealer. Power supply side Ground side Blue/white Connect to detect the ON/OFF status of the parking brake. If not, keep the Audio Mute lead free of the parking brake switch depends on that are not connected to the power supply side of the power amp or auto-antenna relay control terminal (max. 300 mA 12 V DC). Light green Used to system control terminal of the parking brake switch. This lead...
Owner's Manual
Page 82
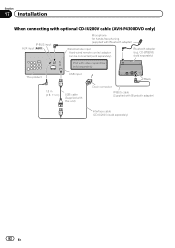
Section 17 Installation When connecting with optional CD-IU200V cable (AVH-P4300DVD only) IP-BUS input AUX input (AUX) Microphone for hands-free phoning (supplied with Bluetooth adapter) Interface cable (CD-IU200V) (sold separately). CD-BTB200) (sold separately) iPod with video capabilities (sold separately) This product USB input Black 1.5 m (4 ft. 11 in.) USB cable (Supplied with this unit) Dock connector IP-BUS cable (Supplied with Bluetooth adapter) Wired remote input Hard-wired remote control adaptor can be connected (sold separately) 82 En Bluetooth adapter (e.g.
Section 17 Installation When connecting with optional CD-IU200V cable (AVH-P4300DVD only) IP-BUS input AUX input (AUX) Microphone for hands-free phoning (supplied with Bluetooth adapter) Interface cable (CD-IU200V) (sold separately). CD-BTB200) (sold separately) iPod with video capabilities (sold separately) This product USB input Black 1.5 m (4 ft. 11 in.) USB cable (Supplied with this unit) Dock connector IP-BUS cable (Supplied with Bluetooth adapter) Wired remote input Hard-wired remote control adaptor can be connected (sold separately) 82 En Bluetooth adapter (e.g.
Owner's Manual
Page 83
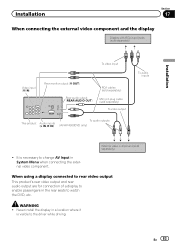
... input jacks (sold separately) Installation To video input Video input (V IN) Rear monitor output (V OUT) Rear audio output (REAR AUDIO OUT) RCA cables (sold separately) Mini pin plug cable (sold separately) When using a display connected to rear video output This product's rear video output and rear audio output are for connection of a display to enable passengers in the rear seats to watch the DVD, etc. Never install the display in System Menu when connecting the external video component. It is visible to change AV Input in a location where it is necessary to the driver...
... input jacks (sold separately) Installation To video input Video input (V IN) Rear monitor output (V OUT) Rear audio output (REAR AUDIO OUT) RCA cables (sold separately) Mini pin plug cable (sold separately) When using a display connected to rear video output This product's rear video output and rear audio output are for connection of a display to enable passengers in the rear seats to watch the DVD, etc. Never install the display in System Menu when connecting the external video component. It is visible to change AV Input in a location where it is necessary to the driver...
Owner's Manual
Page 100
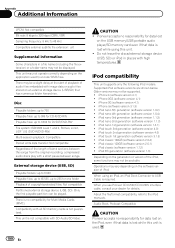
... 1.3.1) ! iPod classic 160GB (software version 2.0.4) ! Operations may not be displayed. Audio Book, Podcast: Compatible CAUTION Pioneer accepts no responsibility for data lost on the USB memory/USB portable audio player/SD memory card even if that data is lost while this unit is used to USB Cable is lost on the iPod, even if that data is required. Pioneer accepts no compatibility for Multi Media Cards (MMC). iPod compatibility This unit supports only the following iPod models. iPhone (software version 3.1.3) ! About the file/format compatibility...
... 1.3.1) ! iPod classic 160GB (software version 2.0.4) ! Operations may not be displayed. Audio Book, Podcast: Compatible CAUTION Pioneer accepts no responsibility for data lost on the USB memory/USB portable audio player/SD memory card even if that data is lost while this unit is used to USB Cable is lost on the iPod, even if that data is required. Pioneer accepts no compatibility for Multi Media Cards (MMC). iPod compatibility This unit supports only the following iPod models. iPhone (software version 3.1.3) ! About the file/format compatibility...


