Owner s Manual
Page 2
...ensure safe driving 5 When using a display connected to V OUT.......5 To avoid battery exhaustion 5 Rear view camera 6 Handling the SD card slot 6 Handling the USB connector 6 Failure to operate 6 Changing the phone ...signal 41 Protecting the LCD panel and screen 6 Notes on internal memory 6 About this Pioneer product. Receiving a phone call 15 Selecting a song from the file name list 36...Radio 20 Starting procedure 32 Setting the driving position 32 Adjusting the volume 32 ■AV input 41 Starting procedure (for AV source 41 Use and care of the remote control 7 ...
...ensure safe driving 5 When using a display connected to V OUT.......5 To avoid battery exhaustion 5 Rear view camera 6 Handling the SD card slot 6 Handling the USB connector 6 Failure to operate 6 Changing the phone ...signal 41 Protecting the LCD panel and screen 6 Notes on internal memory 6 About this Pioneer product. Receiving a phone call 15 Selecting a song from the file name list 36...Radio 20 Starting procedure 32 Setting the driving position 32 Adjusting the volume 32 ■AV input 41 Starting procedure (for AV source 41 Use and care of the remote control 7 ...
Owner s Manual
Page 6
...under the following site: http://www.pioneerelectronics.com In Canada http://www.pioneerelectronics.ca We offer the latest information about PIONEER CORPORATION on the trailers, or while backing up. Some of data on media players, iPhone, smartphone, or other devices while...available software updates. 1 Register your product. WARNING SCREEN IMAGE MAY APPEAR REVERSED. USE INPUT ONLY FOR REVERSE OR MIRROR IMAGE REAR VIEW CAMERA. Resetting the microprocessor CAUTION Pressing the RESET button resets settings and recorded contents to the resulting high temperatures....
...under the following site: http://www.pioneerelectronics.com In Canada http://www.pioneerelectronics.ca We offer the latest information about PIONEER CORPORATION on the trailers, or while backing up. Some of data on media players, iPhone, smartphone, or other devices while...available software updates. 1 Register your product. WARNING SCREEN IMAGE MAY APPEAR REVERSED. USE INPUT ONLY FOR REVERSE OR MIRROR IMAGE REAR VIEW CAMERA. Resetting the microprocessor CAUTION Pressing the RESET button resets settings and recorded contents to the resulting high temperatures....

Owner s Manual
Page 12
...device. USB SD iPod Pandora® Bluetooth® audio SiriusXM® Satellite Radio AV input (AV) AUX HDMI Car Sources (iDataLink) Displaying the AV operation screen 1 Press the button. 2 Touch the AV operation key...AV source selection screen. 2 Touch the source icon. p When you select "Source OFF", the AV source is pressed. - The rear view camera image is received. - Basic operation p By pressing the button on any screen you can turn off almost all functions. p When you select ...
...device. USB SD iPod Pandora® Bluetooth® audio SiriusXM® Satellite Radio AV input (AV) AUX HDMI Car Sources (iDataLink) Displaying the AV operation screen 1 Press the button. 2 Touch the AV operation key...AV source selection screen. 2 Touch the source icon. p When you select "Source OFF", the AV source is pressed. - The rear view camera image is received. - Basic operation p By pressing the button on any screen you can turn off almost all functions. p When you select ...

Owner s Manual
Page 41
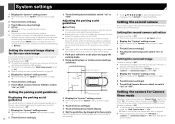
...for AV source) You can display the video image output by the device connected to video input. Refer to Setting the second camera activation on page 63 p You can operate this product to video input. 1 Display the "System" setting screen. 2 Touch [Video Signal Setting]. 3 Touch [...screen. 41 The following items are available: Auto, PAL, NTSC, PAL-M, PAL-N, SECAM. 2 Touch [Input/Output Settings]. 3 Confirm that "AUX Input" is "Auto". p If "Source" is selected, "2nd Camera Input" is in a safe place and apply the parking brake. To view video images, stop in motion....
...for AV source) You can display the video image output by the device connected to video input. Refer to Setting the second camera activation on page 63 p You can operate this product to video input. 1 Display the "System" setting screen. 2 Touch [Video Signal Setting]. 3 Touch [...screen. 41 The following items are available: Auto, PAL, NTSC, PAL-M, PAL-N, SECAM. 2 Touch [Input/Output Settings]. 3 Confirm that "AUX Input" is "Auto". p If "Source" is selected, "2nd Camera Input" is in a safe place and apply the parking brake. To view video images, stop in motion....

Owner s Manual
Page 42
...them sound. Setting the video signal When you connect this product to "Camera". 4 Display the AV source selection screen. 5 Touch [Camera View]. p You can display the image output by the camera connected to video input. Refer to Camera on page 43 Using MIXTRAX MIXTRAX is "Auto". Specifies the BPM.... function only for creating non-stop mixes of both the rear view camera and 2nd camera are played. Turns on the LinkGate screen or item selection screen. AV input 5 Touch [AV]. p When the camera view of selections from the list on page 43 *2 Selects songs not...
...them sound. Setting the video signal When you connect this product to "Camera". 4 Display the AV source selection screen. 5 Touch [Camera View]. p You can display the image output by the camera connected to video input. Refer to Camera on page 43 Using MIXTRAX MIXTRAX is "Auto". Specifies the BPM.... function only for creating non-stop mixes of both the rear view camera and 2nd camera are played. Turns on the LinkGate screen or item selection screen. AV input 5 Touch [AV]. p When the camera view of selections from the list on page 43 *2 Selects songs not...

Owner s Manual
Page 45
... "Off". 1 Display the "System" setting screen. Refer to Displaying the "System" setting screen on page 45 2 Touch [Camera settings]. 3 Touch [Back Camera Input] to switch "On" or "Off". p When the camera view of the rear view camera The default setting is displayed, the displayed image will turn off temporarily...Displaying the "System" setting screen on page 45 2 Touch [Beep Tone] to switch "On" or "Off". iDatalink Displaying the setting screen for Camera View mode, set "Back Camera Input" to "On". Camera for Camera View mode Camera View can be displayed at all times.
... "Off". 1 Display the "System" setting screen. Refer to Displaying the "System" setting screen on page 45 2 Touch [Camera settings]. 3 Touch [Back Camera Input] to switch "On" or "Off". p When the camera view of the rear view camera The default setting is displayed, the displayed image will turn off temporarily...Displaying the "System" setting screen on page 45 2 Touch [Beep Tone] to switch "On" or "Off". iDatalink Displaying the setting screen for Camera View mode, set "Back Camera Input" to "On". Camera for Camera View mode Camera View can be displayed at all times.
Owner s Manual
Page 46
... apply the parking brake. 2 Using packing tape or similar, place markings as the camera for Camera View mode, set "Back Camera Input" to "On". Refer to Setting rear view camera activation on page 45 p When using the second camera, set the rear view camera as follows. 2 m (6 ft. 7 in.) Markings 50 cm (1 ft. 8 in.) 25 cm (9-7/8 in...
... apply the parking brake. 2 Using packing tape or similar, place markings as the camera for Camera View mode, set "Back Camera Input" to "On". Refer to Setting rear view camera activation on page 45 p When using the second camera, set the rear view camera as follows. 2 m (6 ft. 7 in.) Markings 50 cm (1 ft. 8 in.) 25 cm (9-7/8 in...

Owner s Manual
Page 54
...first chapter of DVDs When a DVD disc with discs that do this function only for the video signal input into the AV input. 1 Display the "Video Setup" screen. 2 Touch [Video Signal Setting]. 3 Touch [Camera]. 4 Touch the item. p Some DVDs may not operate properly. The following items are available: Auto...the "DVD/DivX Setup" screen Refer to skip certain scenes only, after which you want to this product, you connect a rear view camera to play DivX® VOD (video on demand) content on page 53 2 Touch [DivX® VOD]. Automatic playback of the first title. ...
...first chapter of DVDs When a DVD disc with discs that do this function only for the video signal input into the AV input. 1 Display the "Video Setup" screen. 2 Touch [Video Signal Setting]. 3 Touch [Camera]. 4 Touch the item. p Some DVDs may not operate properly. The following items are available: Auto...the "DVD/DivX Setup" screen Refer to skip certain scenes only, after which you want to this product, you connect a rear view camera to play DivX® VOD (video on demand) content on page 53 2 Touch [DivX® VOD]. Automatic playback of the first title. ...
Owner s Manual
Page 57
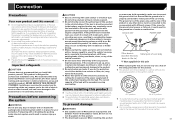
... manual Do not operate this product, any applications, or the rear view camera option (if purchased) if doing so will divert your attention in any way from ...exceeded, causing overheating. If the screw for this product. Important safeguards CAUTION Pioneer does not recommend that only authorized Pioneer service personnel, who have special training and experience in a vehicle without ACC... and negative grounding only. To prevent damage WARNING Use speakers over 50 W (maximum input power) and between 4 Ω to become damaged, resulting in such so that they will ...
... manual Do not operate this product, any applications, or the rear view camera option (if purchased) if doing so will divert your attention in any way from ...exceeded, causing overheating. If the screw for this product. Important safeguards CAUTION Pioneer does not recommend that only authorized Pioneer service personnel, who have special training and experience in a vehicle without ACC... and negative grounding only. To prevent damage WARNING Use speakers over 50 W (maximum input power) and between 4 Ω to become damaged, resulting in such so that they will ...

Owner s Manual
Page 62
... adapter (supplied with the lock tie, when you while driving. Securing the High Speed HDMI® Cable Be sure to the manual for the cable. Camera When you use the lock tie to fix it securely. Refer to Securing the High Speed HDMI® Cable on how to connect an... on page 62 62 Connecting via the USB port (Android device) 4 1 2 3 1 USB port 2 2 USB cable (supplied with CD-AH200) 6 USB - micro USB B) (sup- WARNING USE INPUT ONLY FOR REVERSE OR MIRROR IMAGE REAR VIEW CAMERA. Camera View mode also allows you connect the High Speed HDMI® Cable, use the rear view...
... adapter (supplied with the lock tie, when you while driving. Securing the High Speed HDMI® Cable Be sure to the manual for the cable. Camera When you use the lock tie to fix it securely. Refer to Securing the High Speed HDMI® Cable on how to connect an... on page 62 62 Connecting via the USB port (Android device) 4 1 2 3 1 USB port 2 2 USB cable (supplied with CD-AH200) 6 USB - micro USB B) (sup- WARNING USE INPUT ONLY FOR REVERSE OR MIRROR IMAGE REAR VIEW CAMERA. Camera View mode also allows you connect the High Speed HDMI® Cable, use the rear view...
Owner s Manual
Page 63
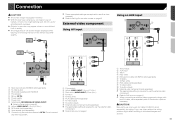
... or checking the rear of the vehicle may appear reversed. With the rear view camera you use other view cameras. Refer to Setting the rear view camera on page 45 External video component Using AV input 1 2 1 3 4 9 5 4 5 2 3 6 7 6 8 1 Rear view camera (ND-BC8) (sold separately) 2 To video output 3 RCA cable (supplied with ND-BC8) 4 This...
... or checking the rear of the vehicle may appear reversed. With the rear view camera you use other view cameras. Refer to Setting the rear view camera on page 45 External video component Using AV input 1 2 1 3 4 9 5 4 5 2 3 6 7 6 8 1 Rear view camera (ND-BC8) (sold separately) 2 To video output 3 RCA cable (supplied with ND-BC8) 4 This...

Owner s Manual
Page 66
...button on the steering column, keeping it away from the connected equipment. The "AV Input" or "AUX Input" setting is in a safe place and apply the parking brake. Insert a normal, round ...the disc. The loaded disc is activated. - Park your dealer or the nearest authorized Pioneer service facility. Clean the disc. The disc is not applied. - Adjusting the microphone angle...- Press and hold the MUTE button to release the rear view camera screen and then change the camera polarity setting to secure the lead where necessary inside the vehicle. No...
...button on the steering column, keeping it away from the connected equipment. The "AV Input" or "AUX Input" setting is in a safe place and apply the parking brake. Insert a normal, round ...the disc. The loaded disc is activated. - Park your dealer or the nearest authorized Pioneer service facility. Clean the disc. The disc is not applied. - Adjusting the microphone angle...- Press and hold the MUTE button to release the rear view camera screen and then change the camera polarity setting to secure the lead where necessary inside the vehicle. No...


