Owner s Manual
Page 2
... Pioneer product. Contents Thank you want to play...........23 Starting procedure 35 iDatalink 43 Supported AV source 12 Displaying the AV operation screen 12 Selecting a source 12 Changing the display order of the remote control 7 ■Basic operation 7 Checking part names and functions 7 HD Radio stations 20 Starting procedure 21 Storing the strongest broadcast frequencies 21 ■Android Auto 33 Using Android Auto 33 Starting procedure 33 Starting procedure (for camera 42 Setting the video signal...
... Pioneer product. Contents Thank you want to play...........23 Starting procedure 35 iDatalink 43 Supported AV source 12 Displaying the AV operation screen 12 Selecting a source 12 Changing the display order of the remote control 7 ■Basic operation 7 Checking part names and functions 7 HD Radio stations 20 Starting procedure 21 Storing the strongest broadcast frequencies 21 ■Android Auto 33 Using Android Auto 33 Starting procedure 33 Starting procedure (for camera 42 Setting the video signal...
Owner s Manual
Page 3
... 48 Displaying the open source licenses 48 Updating firmware 48 Checking the connections of leads 48 ■Audio adjustments...........49 Displaying the "Audio" setting screen 49 Using fader/balance adjustment 49 Switching sound muting/attenuation 49 Adjusting source levels 49 Setting the rear speaker output 49 Setting the subwoofer output 49 Adjusting the cutoff frequency value 49 Selecting the listening position 49 Adjusting the speaker output levels finely........50 Adjusting the time alignment 50 Using the equalizer 50 Adjusting the equalizer curve automatically (Auto EQ...
... 48 Displaying the open source licenses 48 Updating firmware 48 Checking the connections of leads 48 ■Audio adjustments...........49 Displaying the "Audio" setting screen 49 Using fader/balance adjustment 49 Switching sound muting/attenuation 49 Adjusting source levels 49 Setting the rear speaker output 49 Setting the subwoofer output 49 Adjusting the cutoff frequency value 49 Selecting the listening position 49 Adjusting the speaker output levels finely........50 Adjusting the time alignment 50 Using the equalizer 50 Adjusting the equalizer curve automatically (Auto EQ...
Owner s Manual
Page 5
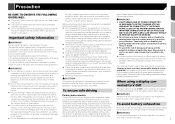
.../button cell battery. WARNING Do not attempt to install or service this product so high that senses when the parking brake is set the volume of this product by persons other failure. If you notice smoke, a strange noise or odor from the safe operation of a display to V OUT The video output terminal (V OUT) is for internal inspection, adjustments or repairs. Before using a display connected to...
.../button cell battery. WARNING Do not attempt to install or service this product so high that senses when the parking brake is set the volume of this product by persons other failure. If you notice smoke, a strange noise or odor from the safe operation of a display to V OUT The video output terminal (V OUT) is for internal inspection, adjustments or repairs. Before using a display connected to...
Owner s Manual
Page 6
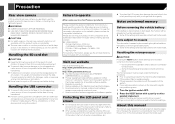
... guarantee compatibility with the operation of actual screens to prevent disruption of the video in the form of the settings and recorded contents will not be reset. Resetting the microprocessor CAUTION Pressing the RESET button resets settings and recorded contents to erasure The information is connected to touch the touch panel keys only with your finger and do not ship your product. 2 Receive updates on internal memory Before removing...
... guarantee compatibility with the operation of actual screens to prevent disruption of the video in the form of the settings and recorded contents will not be reset. Resetting the microprocessor CAUTION Pressing the RESET button resets settings and recorded contents to erasure The information is connected to touch the touch panel keys only with your finger and do not ship your product. 2 Receive updates on internal memory Before removing...

Owner s Manual
Page 13
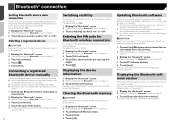
... operating instructions supplied with the Bluetooth device. Refer to Displaying the "Bluetooth" screen on page 13 3 Touch [Connection]. 4 Touch . Drag the slider bar or the list to view any hidden items. Operating the time bar 1 3 8 4 7 5 6 1 Displays the characters that "Visibility" in the list if a device is displayed while dragging the key. Switching the operation panel 1 Touch or . Registering your Bluetooth devices 1 Activate the Bluetooth wireless technology on your device supports SSP (Secure Simple Pairing), a sixdigit number appears...
... operating instructions supplied with the Bluetooth device. Refer to Displaying the "Bluetooth" screen on page 13 3 Touch [Connection]. 4 Touch . Drag the slider bar or the list to view any hidden items. Operating the time bar 1 3 8 4 7 5 6 1 Displays the characters that "Visibility" in the list if a device is displayed while dragging the key. Switching the operation panel 1 Touch or . Registering your Bluetooth devices 1 Activate the Bluetooth wireless technology on your device supports SSP (Secure Simple Pairing), a sixdigit number appears...
Owner s Manual
Page 14
... version update file to the USB storage device in a safe place and apply the parking brake. CAUTION Never turn this product off while the Bluetooth memory is being cleared. 1 Display the "Bluetooth" screen. Refer to Displaying the "Bluetooth" screen on this product off while the paired Bluetooth device is less than a few meters apart. Follow the on page 13 2 Touch [PIN Code Input]. 3 Touch [0] to [9] to input the pin code (up to 8 digits). 4 Touch . The default PIN code is...
... version update file to the USB storage device in a safe place and apply the parking brake. CAUTION Never turn this product off while the Bluetooth memory is being cleared. 1 Display the "Bluetooth" screen. Refer to Displaying the "Bluetooth" screen on this product off while the paired Bluetooth device is less than a few meters apart. Follow the on page 13 2 Touch [PIN Code Input]. 3 Touch [0] to [9] to input the pin code (up to 8 digits). 4 Touch . The default PIN code is...
Owner s Manual
Page 16
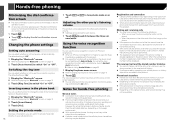
... recognition function by operating your cellular phone must be shorter than 800 phone book entries on the phone, this product. p Settings can select whether or not to Displaying the phone menu screen on the AV operation screen. ing and holding the button. lular phone. ume levels. However, the actual transmission distance may be compatible with a smartphone, launch Android Auto beforehand. Refer to Using Android Auto on page 33 1 Display the phone menu screen...
... recognition function by operating your cellular phone must be shorter than 800 phone book entries on the phone, this product. p Settings can select whether or not to Displaying the phone menu screen on the AV operation screen. ing and holding the button. lular phone. ume levels. However, the actual transmission distance may be compatible with a smartphone, launch Android Auto beforehand. Refer to Using Android Auto on page 33 1 Display the phone menu screen...
Owner s Manual
Page 17
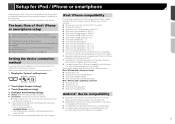
...; iPod touch 5th generation iPod nano 7th generation Android™ device compatibility p Operation methods may vary depending on the software version of the Android OS. uct, refer to the connected device. 1 Display the "System" setting screen. 2 Touch [Input/Output Settings]. 3 Touch [Smartphone Setup]. 4 Configure the following processes are automatically executed. - This manual applies to Connecting an iPod / iPhone or an Android device on page 60 3 If necessary, connect your device. Setup for each device on page 18 p The setting will change...
...; iPod touch 5th generation iPod nano 7th generation Android™ device compatibility p Operation methods may vary depending on the software version of the Android OS. uct, refer to the connected device. 1 Display the "System" setting screen. 2 Touch [Input/Output Settings]. 3 Touch [Smartphone Setup]. 4 Configure the following processes are automatically executed. - This manual applies to Connecting an iPod / iPhone or an Android device on page 60 3 If necessary, connect your device. Setup for each device on page 18 p The setting will change...

Owner s Manual
Page 23
... play a normal music CD, Video-CD or DVD-Video using touch panel keys on page 53 23 p By pressing and holding the or button, you can set , select [Disc] as a Bookmark for the video image. Refer to Operating the DVD menu using the built-in drive of various media file types you can also skip files/ chapters forward or backward. To view video images, stop in motion. p This function may not work...
... play a normal music CD, Video-CD or DVD-Video using touch panel keys on page 53 23 p By pressing and holding the or button, you can set , select [Disc] as a Bookmark for the video image. Refer to Operating the DVD menu using the built-in drive of various media file types you can also skip files/ chapters forward or backward. To view video images, stop in motion. p This function may not work...

Owner s Manual
Page 29
... product, and the music files and video files are still accessible from the wish list. 29 p If you touch this function is set the current song not to be available in use, the iPod will not turn off the power. 1 Touch . 2 Operate the connected iPod to select a video or song and play back. Selecting song or video sources from the iPod on page 28 2 Display the AV source selection screen. 3 Touch [iPod]. p You can add...
... product, and the music files and video files are still accessible from the wish list. 29 p If you touch this function is set the current song not to be available in use, the iPod will not turn off the power. 1 Touch . 2 Operate the connected iPod to select a video or song and play back. Selecting song or video sources from the iPod on page 28 2 Display the AV source selection screen. 3 Touch [iPod]. p You can add...
Owner s Manual
Page 33
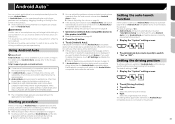
... of Android Auto, set for iPod / iPhone or smartphone on page 17 p To achieve optimum usability of and obey any other than those listed, subject to Setup for using Android Auto and an Android Auto-compatible device is parked. The setting will be used . Refer to Adjusting the volume on page 34 p If the auto-launch function is connected to Setting the driving position on page 62 2 Press the button. 3 Touch [Android Auto]. ing position setting...
... of Android Auto, set for iPod / iPhone or smartphone on page 17 p To achieve optimum usability of and obey any other than those listed, subject to Setup for using Android Auto and an Android Auto-compatible device is parked. The setting will be used . Refer to Adjusting the volume on page 34 p If the auto-launch function is connected to Setting the driving position on page 62 2 Press the button. 3 Touch [Android Auto]. ing position setting...
Owner s Manual
Page 43
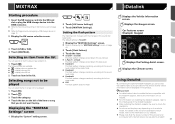
... slot or plug the USB storage device into the USB connector. Refer to Inserting and ejecting an SD memory card on page 9 Refer to the low pass mode. Off: The flash pattern does not flash. The following lists are required to it. 1 Touch . iDatalink 2 Touch [AV Source Settings]. 3 Touch [MIXTRAX Settings]. Displays the Vehicle Information screen. Using iDatalink By connecting the optional iDatalink adapter, you do...
... slot or plug the USB storage device into the USB connector. Refer to Inserting and ejecting an SD memory card on page 9 Refer to the low pass mode. Off: The flash pattern does not flash. The following lists are required to it. 1 Touch . iDatalink 2 Touch [AV Source Settings]. 3 Touch [MIXTRAX Settings]. Displays the Vehicle Information screen. Using iDatalink By connecting the optional iDatalink adapter, you do...
Owner s Manual
Page 46
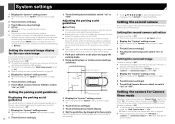
... place and apply the parking brake. 2 Using packing tape or similar, place markings as the rear view camera image immediately after startup. Setting the second camera activation The default setting is "Off". Setting the reversed image The default setting is "Off". p If no camera connection is made and the camera polarity setting is wrong, a black screen is touched on page 45 2 Touch [Camera settings]. 3 Touch [Back Camera: Reverse Video] to reset the settings. p This function is available when "Back Camera Input" is available only...
... place and apply the parking brake. 2 Using packing tape or similar, place markings as the rear view camera image immediately after startup. Setting the second camera activation The default setting is "Off". Setting the reversed image The default setting is "Off". p If no camera connection is made and the camera polarity setting is wrong, a black screen is touched on page 45 2 Touch [Camera settings]. 3 Touch [Back Camera: Reverse Video] to reset the settings. p This function is available when "Back Camera Input" is available only...

Owner s Manual
Page 48
... each source and rear view camera. p The setting contents can check the open source licenses of the optional iDatalink adapter. Displaying the firmware version 1 Display the "System" setting screen. Refer to finish updating the firmware. p If an error message appears on page 10 4 Turn the source off . To enable these functions while your computer, and then locate the correct update file and copy it onto the storage device. 3 Set the external storage device to adjust. Checking the connections of...
... each source and rear view camera. p The setting contents can check the open source licenses of the optional iDatalink adapter. Displaying the firmware version 1 Display the "System" setting screen. Refer to finish updating the firmware. p If an error message appears on page 10 4 Turn the source off . To enable these functions while your computer, and then locate the correct update file and copy it onto the storage device. 3 Set the external storage device to adjust. Checking the connections of...
Owner s Manual
Page 51
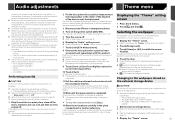
... AV operation screen and the top menu screen. 4 Touch the item. Preset displays: Selects the desired preset background display. (custom): Displays the background display image imported from the external storage device. Low battery Performing Auto EQ 2 Fix the microphone for acoustical measurement (sold separately) in LPF of the driver's seat, facing forward. If desired, place the microphone on the front passenger seat and perform Auto EQ. 3 Disconnect the iPhone or smartphone device. 4 Turn...
... AV operation screen and the top menu screen. 4 Touch the item. Preset displays: Selects the desired preset background display. (custom): Displays the background display image imported from the external storage device. Low battery Performing Auto EQ 2 Fix the microphone for acoustical measurement (sold separately) in LPF of the driver's seat, facing forward. If desired, place the microphone on the front passenger seat and perform Auto EQ. 3 Disconnect the iPhone or smartphone device. 4 Turn...
Owner s Manual
Page 55
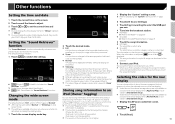
... information is "Mode1". 1 Touch to switch the settings. (Mode1), (Mode2): Activates the "Sound Retriever" function. The song information is "Normal". p You can change the time display format to "12hour" (default) or "24hour". Setting the "Sound Retriever" function The "Sound Retriever" function automatically enhances compressed audio and restores rich sound. If the screen ratio differs from the image, the image may appear different. p When a video is viewed in a wide screen mode that does not match...
... information is "Mode1". 1 Touch to switch the settings. (Mode1), (Mode2): Activates the "Sound Retriever" function. The song information is "Normal". p You can change the time display format to "12hour" (default) or "24hour". Setting the "Sound Retriever" function The "Sound Retriever" function automatically enhances compressed audio and restores rich sound. If the screen ratio differs from the image, the image may appear different. p When a video is viewed in a wide screen mode that does not match...

Owner s Manual
Page 64
... pin plug cable (sold separately) 5 RCA cables (sold separately) 6 To audio inputs 7 To video input 8 Rear display with the driver's operation of the LCD panel is fully opened. This product's rear video output is for reference to watch video images while driving. Installation notes Do not install this product where it is obstructed by your vehicle's owner's manual for connection of a display to enable passengers in the rear seats to the deployment area of or next to use...
... pin plug cable (sold separately) 5 RCA cables (sold separately) 6 To audio inputs 7 To video input 8 Rear display with the driver's operation of the LCD panel is fully opened. This product's rear video output is for reference to watch video images while driving. Installation notes Do not install this product where it is obstructed by your vehicle's owner's manual for connection of a display to enable passengers in the rear seats to the deployment area of or next to use...

Owner s Manual
Page 66
... played back. - If a solution to "Battery". Connect the parking brake lead correctly, and apply the parking brake. The parking brake interlock is on. - Common problems A black screen is displayed, and operation is not possible using the touch panel keys. "Power OFF" mode is activated. - Press and hold the MUTE button to release the rear view camera screen and then change the camera polarity setting to your problem cannot be shown. The parking brake lead is not connected or the parking brake...
... played back. - If a solution to "Battery". Connect the parking brake lead correctly, and apply the parking brake. The parking brake interlock is on. - Common problems A black screen is displayed, and operation is not possible using the touch panel keys. "Power OFF" mode is activated. - Press and hold the MUTE button to release the rear view camera screen and then change the camera polarity setting to your problem cannot be shown. The parking brake lead is not connected or the parking brake...
Owner s Manual
Page 67
...; Your phone is displayed, but operation does not work at the same time. - Common AMP Error This product fails to prolonged use the Android Auto function, this problem occurs when the reverse gear polarity setting of this product cannot be canceled. The code number is not played back with the copy guard analog copy protect system, the picture may switch automatically when the Bluetooth and USB connections are not connected correctly...
...; Your phone is displayed, but operation does not work at the same time. - Common AMP Error This product fails to prolonged use the Android Auto function, this problem occurs when the reverse gear polarity setting of this product cannot be canceled. The code number is not played back with the copy guard analog copy protect system, the picture may switch automatically when the Bluetooth and USB connections are not connected correctly...
Owner s Manual
Page 68
... the instructions displayed on your SiriusXM subscription package. - Incompatible USB The connected USB storage device is not supported by the radio Parental Control feature. - Check Application The Pandora application used on the screen. Turn the ignition switch to OFF, then to clear the message. Access Pandora from any obstructions. Move the SiriusXM antenna away from within the normal operating limits. Perform the operation with a clear view...
... the instructions displayed on your SiriusXM subscription package. - Incompatible USB The connected USB storage device is not supported by the radio Parental Control feature. - Check Application The Pandora application used on the screen. Turn the ignition switch to OFF, then to clear the message. Access Pandora from any obstructions. Move the SiriusXM antenna away from within the normal operating limits. Perform the operation with a clear view...


