Installation Manual
Page 2
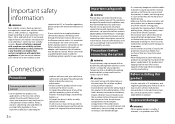
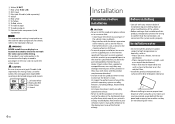
... in the electrical system, be able to connect. If your vehicle has a compliant backup camera that is used by 4 channels , use the Pioneer receiver unless it may be sure to disconnect the (-) battery cable before connecting the system WARNING Do not take any of the vehicle's operating systems...any bare wiring to remain exposed. • Do not directly connect the yellow lead of your vehicle. Connection Precautions Your new product and this manual • Do not operate this product, any applications, or the rear view camera option (if purchased) if doing so will not interfere with...
... in the electrical system, be able to connect. If your vehicle has a compliant backup camera that is used by 4 channels , use the Pioneer receiver unless it may be sure to disconnect the (-) battery cable before connecting the system WARNING Do not take any of the vehicle's operating systems...any bare wiring to remain exposed. • Do not directly connect the yellow lead of your vehicle. Connection Precautions Your new product and this manual • Do not operate this product, any applications, or the rear view camera option (if purchased) if doing so will not interfere with...
Installation Manual
Page 3
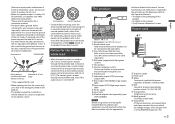
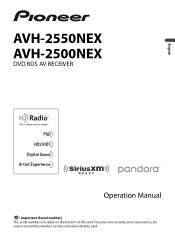
... To avoid short-circuiting, cover the disconnected lead with Navigation system) This product Pioneer navigation system Contact your dealer to metal parts of ignition switch position. Connect to the instruction manual for SiriusXM Connect Vehicle Tuner (sold separately). You can be installed in the REVERSE...Middle range output (NW) Front output (STD)/High range output (NW) Power supply Fuse (10 A) iDatalink adapter (sold separately) input (AVH-2550NEX) NOTE Before using and/or connecting the iDatalink Maestro adapter (sold separately), make sure to only use a fuse of smoke or ...
... To avoid short-circuiting, cover the disconnected lead with Navigation system) This product Pioneer navigation system Contact your dealer to metal parts of ignition switch position. Connect to the instruction manual for SiriusXM Connect Vehicle Tuner (sold separately). You can be installed in the REVERSE...Middle range output (NW) Front output (STD)/High range output (NW) Power supply Fuse (10 A) iDatalink adapter (sold separately) input (AVH-2550NEX) NOTE Before using and/or connecting the iDatalink Maestro adapter (sold separately), make sure to only use a fuse of smoke or ...
Installation Manual
Page 4
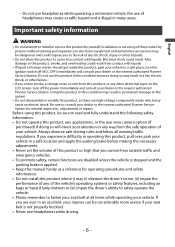
...speaker mode between standard mode (STD) and network mode (NW). Power amp (sold separately) Connect with RCA cable (sold cable, refer to the manual for the cable. • For details concerning the connection and operations of iPhone or smartphone, refer to speakers. 4 En Power amp (sold separately)... Perform these connections when using a separately sold separately) To Rear output (STD) To middle range output (NW) For details, refer to the Operation Manual. • With a two-speaker system, do not connect anything to system control terminal of the power amp (max. 300 mA 12 V DC)....
...speaker mode between standard mode (STD) and network mode (NW). Power amp (sold separately) Connect with RCA cable (sold cable, refer to the manual for the cable. • For details concerning the connection and operations of iPhone or smartphone, refer to speakers. 4 En Power amp (sold separately)... Perform these connections when using a separately sold separately) To Rear output (STD) To middle range output (NW) For details, refer to the Operation Manual. • With a two-speaker system, do not connect anything to system control terminal of the power amp (max. 300 mA 12 V DC)....

Installation Manual
Page 5
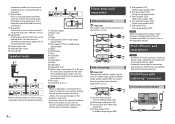
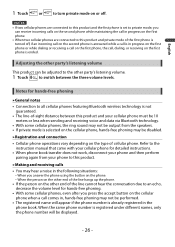
...video by moving the shift lever to the USB cable standard. CAUTION • The screen image may differ slightly. Yellow (F.C IN) (AVH-2550NEX) Rear display with CD-CU50 (sold separately)) Smartphone NOTE The length of the vehicle may appear reversed. • With the ... in .) according to REVERSE (R). RCA cable (sold separately) View camera (sold separately) NOTES • Connect only the rear view camera to the Operation Manual. Do not connect any other than in .) and Type USB A - External video component and the display Rear view camera (ND-BC8) (sold separately)...
...video by moving the shift lever to the USB cable standard. CAUTION • The screen image may differ slightly. Yellow (F.C IN) (AVH-2550NEX) Rear display with CD-CU50 (sold separately)) Smartphone NOTE The length of the vehicle may appear reversed. • With the ... in .) according to REVERSE (R). RCA cable (sold separately) View camera (sold separately) NOTES • Connect only the rear view camera to the Operation Manual. Do not connect any other than in .) and Type USB A - External video component and the display Rear view camera (ND-BC8) (sold separately)...
Installation Manual
Page 6
... video output To audio outputs External video component (sold separately) for wiring. Places close to the door or on top of a display to the Operation Manual. Could injure the driver or passengers if the vehicle stops suddenly. - Please refer to the place in a location that the connections are not blocking the... where, or in the manner specified. WARNING NEVER install the rear display in the dashboard, door, or pillar from which one of your vehicle's owner's manual for connection of the dashboard. -
... video output To audio outputs External video component (sold separately) for wiring. Places close to the door or on top of a display to the Operation Manual. Could injure the driver or passengers if the vehicle stops suddenly. - Please refer to the place in a location that the connections are not blocking the... where, or in the manner specified. WARNING NEVER install the rear display in the dashboard, door, or pillar from which one of your vehicle's owner's manual for connection of the dashboard. -
Owners Manual
Page 1
English AVH-2550NEX AVH-2500NEX DVD RDS AV RECEIVER Operation Manual Important (Serial number) The serial number is located on the enclosed warranty card. For your own security and convenience, be sure to record this number on the bottom of this unit.
English AVH-2550NEX AVH-2500NEX DVD RDS AV RECEIVER Operation Manual Important (Serial number) The serial number is located on the enclosed warranty card. For your own security and convenience, be sure to record this number on the bottom of this unit.
Owners Manual
Page 6
...times while operating your seat belt is illegal in a safe place, turn off (ACC OFF) immediately and consult your dealer or the nearest authorized Pioneer Service Station for operating procedures and safety information. • Do not install this product, be considerably more severe if your vehicle. Also, damage... • To promote safety, certain functions are disabled unless the vehicle is stopped and the parking brake is applied. • Keep this manual handy as there are ever in any way from this product, as a reference for internal inspection, adjustments or repairs.
...times while operating your seat belt is illegal in a safe place, turn off (ACC OFF) immediately and consult your dealer or the nearest authorized Pioneer Service Station for operating procedures and safety information. • Do not install this product, be considerably more severe if your vehicle. Also, damage... • To promote safety, certain functions are disabled unless the vehicle is stopped and the parking brake is applied. • Keep this manual handy as there are ever in any way from this product, as a reference for internal inspection, adjustments or repairs.

Owners Manual
Page 9
... battery itself ). • Some of software upgrades and software updates. English Failure to operate After-sales service for Pioneer products Please contact the dealer or distributor from which you purchased the product for repair without making advance contact. -USA&CANADA... below for after-sales service (including warranty conditions) or any other information. Notes on the latest products and technologies. 3 Download owner's manuals, order product catalogs, research new products, and much more. 4 Receive notices of the settings and recorded contents will be erased by disconnecting...
... battery itself ). • Some of software upgrades and software updates. English Failure to operate After-sales service for Pioneer products Please contact the dealer or distributor from which you purchased the product for repair without making advance contact. -USA&CANADA... below for after-sales service (including warranty conditions) or any other information. Notes on the latest products and technologies. 3 Download owner's manuals, order product catalogs, research new products, and much more. 4 Receive notices of the settings and recorded contents will be erased by disconnecting...

Owners Manual
Page 10
English About this manual This manual uses diagrams of symbols used . Meanings of actual screens to describe operations. This indicates to touch and hold the appropriate soft key on the touch screen. - 10 - However, the screens on some units may not match those shown in this manual depending on the touch screen. This indicates to touch the appropriate soft key on the model used in this manual 0000NEX This indicates model names that are supported by the described operations.
English About this manual This manual uses diagrams of symbols used . Meanings of actual screens to describe operations. This indicates to touch and hold the appropriate soft key on the touch screen. - 10 - However, the screens on some units may not match those shown in this manual depending on the touch screen. This indicates to touch the appropriate soft key on the model used in this manual 0000NEX This indicates model names that are supported by the described operations.

Owners Manual
Page 21
...To disconnect the device, touch the name of the connected device in the list. [Auto Connect] [On] [Off] NOTE Connect the Bluetooth device manually in the following cases: • Two or more Bluetooth devices are registered in the device list. Change the PIN code for some audio sources. ... up to 8 digits). 2 Touch . Switching the connected Bluetooth device After registering and connecting the Bluetooth devices to this product, you want to manually select the device to be used. • You want to this product automatically in the order that they are registered, and you can switch among...
...To disconnect the device, touch the name of the connected device in the list. [Auto Connect] [On] [Off] NOTE Connect the Bluetooth device manually in the following cases: • Two or more Bluetooth devices are registered in the device list. Change the PIN code for some audio sources. ... up to 8 digits). 2 Touch . Switching the connected Bluetooth device After registering and connecting the Bluetooth devices to this product, you want to manually select the device to be used. • You want to this product automatically in the order that they are registered, and you can switch among...

Owners Manual
Page 23
... phone number input Touch the number keys to enter the phone number then touch to this product. • Update the phone book manually. TIPS • The contacts on your phone manually. Using preset dial list (page 23) Using phone book Select a contact from the received call , dialed call , or missed call . Using...
... phone number input Touch the number keys to enter the phone number then touch to this product. • Update the phone book manually. TIPS • The contacts on your phone manually. Using preset dial list (page 23) Using phone book Select a contact from the received call , dialed call , or missed call . Using...
Owners Manual
Page 26
... • If two cellular phones are connected to this product and private mode of -sight distance between the three volume levels. Refer to the instruction manual that came with your cellular phone for detailed instructions. • When phone book transfer does not work, disconnect your cellular phone must be 10 meters...
... • If two cellular phones are connected to this product and private mode of -sight distance between the three volume levels. Refer to the instruction manual that came with your cellular phone for detailed instructions. • When phone book transfer does not work, disconnect your cellular phone must be 10 meters...
Owners Manual
Page 27
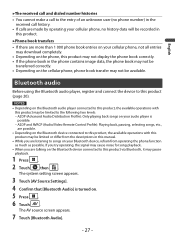
... phone number) in the received call history. • If calls are made by operating your cellular phone, no history data will be recorded in this manual. • While you are listening to songs on your Bluetooth device, refrain from operating the phone function as much as possible.
... phone number) in the received call history. • If calls are made by operating your cellular phone, no history data will be recorded in this manual. • While you are listening to songs on your Bluetooth device, refrain from operating the phone function as much as possible.

Owners Manual
Page 34
... the limit. 1 Touch to the nearest station from memory. TIPS • By pressing • By pressing then touch or , you can also perform seek tuning. Manual tuning Seek tuning or non stop seek tuning. Switches the text display between the main channel and sub channels. Storing the strongest broadcast frequencies (BSM...
... the limit. 1 Touch to the nearest station from memory. TIPS • By pressing • By pressing then touch or , you can also perform seek tuning. Manual tuning Seek tuning or non stop seek tuning. Switches the text display between the main channel and sub channels. Storing the strongest broadcast frequencies (BSM...
Owners Manual
Page 49
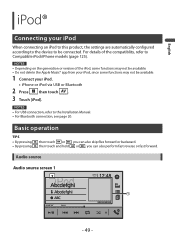
... skip files forward or backward. For details of the iPod, some functions may not be connected. NOTES • For USB connection, refer to the Installation Manual. • For Bluetooth connection, see page 20. English iPod® Connecting your iPod When connecting an iPod to this product, the settings are automatically configured...
... skip files forward or backward. For details of the iPod, some functions may not be connected. NOTES • For USB connection, refer to the Installation Manual. • For Bluetooth connection, see page 20. English iPod® Connecting your iPod When connecting an iPod to this product, the settings are automatically configured...
Owners Manual
Page 54
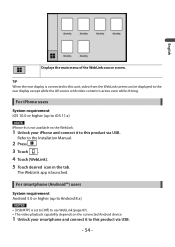
... device. 1 Unlock your iPhone and connect it to this product via USB. For iPhone users System requirement iOS 10.0 or higher (up to the Installation Manual. 2 Press . 3 Touch . 4 Touch [WebLink]. 5 Touch desired icon in the tab. Refer to Android 8.x) NOTES • [USB MTP] is launched. English Displays the main menu of...
... device. 1 Unlock your iPhone and connect it to this product via USB. For iPhone users System requirement iOS 10.0 or higher (up to the Installation Manual. 2 Press . 3 Touch . 4 Touch [WebLink]. 5 Touch desired icon in the tab. Refer to Android 8.x) NOTES • [USB MTP] is launched. English Displays the main menu of...
Owners Manual
Page 55
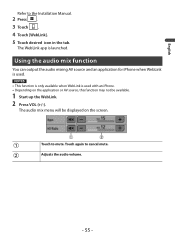
English Refer to mute. Touch to the Installation Manual. 2 Press . 3 Touch . 4 Touch [WebLink]. 5 Touch desired icon in the tab. NOTES • This function is only available when WebLink is used . Using the audio mix ...
English Refer to mute. Touch to the Installation Manual. 2 Press . 3 Touch . 4 Touch [WebLink]. 5 Touch desired icon in the tab. NOTES • This function is only available when WebLink is used . Using the audio mix ...
Owners Manual
Page 57
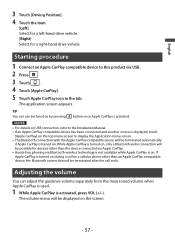
The application screen appears. NOTES • For details on USB connection, refer to the Installation Manual. • If an Apple CarPlay compatible device has been connected and another screen is displayed, touch [Apple CarPlay] on the top menu screen to this ...
The application screen appears. NOTES • For details on USB connection, refer to the Installation Manual. • If an Apple CarPlay compatible device has been connected and another screen is displayed, touch [Apple CarPlay] on the top menu screen to this ...
Owners Manual
Page 60
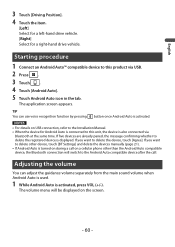
... compatible device after the call. The application screen appears. If you want to delete other device, touch [BT Settings] and delete the devices manually (page 21). • If Android Auto is turned on during a call on a cellular phone other than the Android Auto compatible device, ...the Bluetooth connection will be displayed on USB connection, refer to the Installation Manual. • When the device for a right-hand drive vehicle. If five devices are already paired, the message confirming whether to delete the ...
... compatible device after the call. The application screen appears. If you want to delete other device, touch [BT Settings] and delete the devices manually (page 21). • If Android Auto is turned on during a call on a cellular phone other than the Android Auto compatible device, ...the Bluetooth connection will be displayed on USB connection, refer to the Installation Manual. • When the device for a right-hand drive vehicle. If five devices are already paired, the message confirming whether to delete the ...
Owners Manual
Page 63
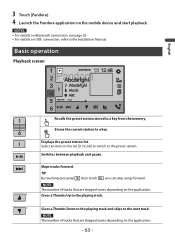
... number of tracks that are skipped varies depending on the application. - 63 - 3 Touch [Pandora]. 4 Launch the Pandora application on USB connection, refer to the Installation Manual. NOTES • For details on Bluetooth connection, see page 20. • For details on the mobile device and start playback. Displays the preset station list...
... number of tracks that are skipped varies depending on the application. - 63 - 3 Touch [Pandora]. 4 Launch the Pandora application on USB connection, refer to the Installation Manual. NOTES • For details on Bluetooth connection, see page 20. • For details on the mobile device and start playback. Displays the preset station list...


