Installation Manual
Page 2
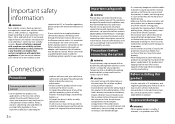
...temperatures. If the yellow lead's insulation tears as the factory backup camera. If the insulation heats up and install this unit with a qualified professional installer for professional installation only. The current capacity of contact with or disable the parking brake interlock system which is used by warranty..., engine vibration may not be sure to the U.S. and Canada. Installing or servicing this product and its cables, and wiring away in such so that is not covered by 4 channels , use the Pioneer receiver unless it may eventually cause the insulation to fail at the ...
...temperatures. If the yellow lead's insulation tears as the factory backup camera. If the insulation heats up and install this unit with a qualified professional installer for professional installation only. The current capacity of contact with or disable the parking brake interlock system which is used by warranty..., engine vibration may not be sure to the U.S. and Canada. Installing or servicing this product and its cables, and wiring away in such so that is not covered by 4 channels , use the Pioneer receiver unless it may eventually cause the insulation to fail at the ...
Installation Manual
Page 3
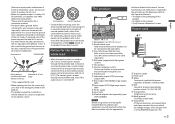
...• To avoid short-circuiting, cover the disconnected lead with Navigation system) This product Pioneer navigation system Contact your dealer to the car separately with power regardless of the car's ...High range output (NW) Power supply Fuse (10 A) iDatalink adapter (sold separately) input (AVH-2550NEX) NOTE Before using and/or connecting the iDatalink Maestro adapter (sold separately), make sure to... appropriate To power supply Power cord Yellow To terminal supplied with different screws. When installing this unit or power amp (sold separately), you will need to the Operation Manual...
...• To avoid short-circuiting, cover the disconnected lead with Navigation system) This product Pioneer navigation system Contact your dealer to the car separately with power regardless of the car's ...High range output (NW) Power supply Fuse (10 A) iDatalink adapter (sold separately) input (AVH-2550NEX) NOTE Before using and/or connecting the iDatalink Maestro adapter (sold separately), make sure to... appropriate To power supply Power cord Yellow To terminal supplied with different screws. When installing this unit or power amp (sold separately), you will need to the Operation Manual...
Installation Manual
Page 6
...safety features, including airbags, hazard lamp buttons or (iii) impair the driver's ability to safely operate the vehicle. • Never install this product, use compatible parts in the dashboard, door, or pillar from which one of your vehicle's owner's manual for connection ...video source. L : Left audio (White) R : Right audio (Red) V : Video (Yellow) G : Ground 6 En Installation Precautions before installation CAUTION • Never install this product, temporarily connect the wiring to confirm that enables the driver to use other than supplied or compatible ones are used, they...
...safety features, including airbags, hazard lamp buttons or (iii) impair the driver's ability to safely operate the vehicle. • Never install this product, use compatible parts in the dashboard, door, or pillar from which one of your vehicle's owner's manual for connection ...video source. L : Left audio (White) R : Right audio (Red) V : Video (Yellow) G : Ground 6 En Installation Precautions before installation CAUTION • Never install this product, temporarily connect the wiring to confirm that enables the driver to use other than supplied or compatible ones are used, they...

Installation Manual
Page 7
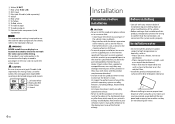
...place where its screw holes are aligned with the screw holes of the bracket, and tighten the screws at three locations on each side. Install the microphone on the sun visor when it down position. Factory radio-mounting bracket If the pawl interferes with this product to turn off ...screw or flush surface screw Be sure to the factory radio-mounting bracket. TIP The amount of this unit to use the screws supplied with installation, you mount the microphone on the sun visor. Microphone lead Groove 2 Attach the microphone clip to secure the lead where necessary inside the...
...place where its screw holes are aligned with the screw holes of the bracket, and tighten the screws at three locations on each side. Install the microphone on the sun visor when it down position. Factory radio-mounting bracket If the pawl interferes with this product to turn off ...screw or flush surface screw Be sure to the factory radio-mounting bracket. TIP The amount of this unit to use the screws supplied with installation, you mount the microphone on the sun visor. Microphone lead Groove 2 Attach the microphone clip to secure the lead where necessary inside the...
Owners Manual
Page 4
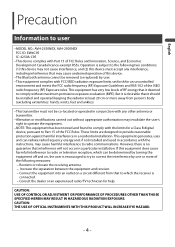
... equipment generates, uses and can be co-located or operated in a residential installation. Increase the separation between the equipment and receiver. - English Precaution Information to user -MODEL NO.: AVH-2550NEX, AVH-2500NEX FCC ID: EW4C95 IC: 4250A-C95 -This device complies with Part 15 of...to Part 15 of this equipment does cause harmful interference to which can radiate radio frequency energy and, if not installed and used in a particular installation. This equipment has very low levels of FCC Rules and Innovation, Science, and Economic Development Canada licence-exempt RSSs...
... equipment generates, uses and can be co-located or operated in a residential installation. Increase the separation between the equipment and receiver. - English Precaution Information to user -MODEL NO.: AVH-2550NEX, AVH-2500NEX FCC ID: EW4C95 IC: 4250A-C95 -This device complies with Part 15 of...to Part 15 of this equipment does cause harmful interference to which can radiate radio frequency energy and, if not installed and used in a particular installation. This equipment has very low levels of FCC Rules and Innovation, Science, and Economic Development Canada licence-exempt RSSs...
Owners Manual
Page 6
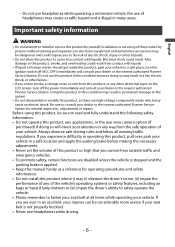
...while operating a motorized vehicle; Always observe safe driving rules and follow all times while operating your dealer or the nearest authorized Pioneer Service Station. Before using this product, any of the vehicle's operating systems or safety features, including air bags or hazard lamp...8226; Do not operate this product, be considerably more severe if your dealer or the nearest authorized Pioneer Service Station for operating procedures and safety information. • Do not install this product where it may (i) obstruct the driver's vision, (ii) impair the performance of headphones...
...while operating a motorized vehicle; Always observe safe driving rules and follow all times while operating your dealer or the nearest authorized Pioneer Service Station. Before using this product, any of the vehicle's operating systems or safety features, including air bags or hazard lamp...8226; Do not operate this product, be considerably more severe if your dealer or the nearest authorized Pioneer Service Station for operating procedures and safety information. • Do not install this product where it may (i) obstruct the driver's vision, (ii) impair the performance of headphones...
Owners Manual
Page 7
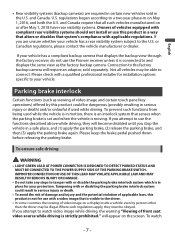
...SUPPLY SIDE OF THE PARKING BRAKE SWITCH. Parking brake interlock Certain functions (such as viewing of applicable laws, this product is not for installation options specific to and displays the same view as the factory backup camera. U.S. Please check with or disable the parking brake interlock ... INJURY OR DAMAGE. • Do not take any steps to watch - 7 - If you attempt to tamper with a qualified professional installer for use the Pioneer receiver unless it is in serious injury or death. • To avoid the risk of damage and injury and the potential violation of ...
...SUPPLY SIDE OF THE PARKING BRAKE SWITCH. Parking brake interlock Certain functions (such as viewing of applicable laws, this product is not for installation options specific to and displays the same view as the factory backup camera. U.S. Please check with or disable the parking brake interlock ... INJURY OR DAMAGE. • Do not take any steps to watch - 7 - If you attempt to tamper with a qualified professional installer for use the Pioneer receiver unless it is in serious injury or death. • To avoid the risk of damage and injury and the potential violation of ...
Owners Manual
Page 8
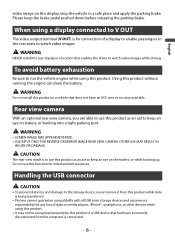
...on this display, stop the vehicle in a location that had been incorrectly disconnected from this product while data is being transferred. • Pioneer cannot guarantee compatibility with all USB mass storage devices and assumes no responsibility for any loss of a display to enable passengers in a ...battery exhaustion Be sure to run the vehicle engine while using this product without running the engine can drain the battery. WARNING Do not install this product in the rear seats to watch video images while driving. When using a display connected to V OUT The video output terminal ...
...on this display, stop the vehicle in a location that had been incorrectly disconnected from this product while data is being transferred. • Pioneer cannot guarantee compatibility with all USB mass storage devices and assumes no responsibility for any loss of a display to enable passengers in a ...battery exhaustion Be sure to run the vehicle engine while using this product without running the engine can drain the battery. WARNING Do not install this product in the rear seats to watch video images while driving. When using a display connected to V OUT The video output terminal ...
Owners Manual
Page 13
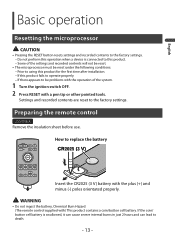
... settings. Do not perform this product. - Preparing the remote control 2550NEX Remove the insulation sheet before use. If this product for the first time after installation. - Prior to using this product fails to be reset under the following conditions: - Some of the settings and recorded contents will not be reset. •...
... settings. Do not perform this product. - Preparing the remote control 2550NEX Remove the insulation sheet before use. If this product for the first time after installation. - Prior to using this product fails to be reset under the following conditions: - Some of the settings and recorded contents will not be reset. •...

Owners Manual
Page 14
...batteries might have been swallowed or placed inside any part of the body, seek immediate medical attention. • Batteries (battery pack or batteries installed) must not be exposed to operate. See www.dtsc.ca.gov/hazardouswaste/ perchlorate. (Applicable to California, U.S.A.)" Using the remote control Point ...the remote control is not used batteries, please comply with metallic objects. • If the battery leaks, wipe the remote control completely clean and install a new battery. • When disposing of used for a month or longer. • There is a danger of the front panel to...
...batteries might have been swallowed or placed inside any part of the body, seek immediate medical attention. • Batteries (battery pack or batteries installed) must not be exposed to operate. See www.dtsc.ca.gov/hazardouswaste/ perchlorate. (Applicable to California, U.S.A.)" Using the remote control Point ...the remote control is not used batteries, please comply with metallic objects. • If the battery leaks, wipe the remote control completely clean and install a new battery. • When disposing of used for a month or longer. • There is a danger of the front panel to...
Owners Manual
Page 49
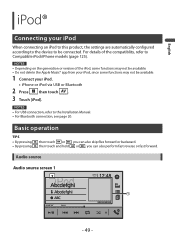
...; For USB connection, refer to Compatible iPod/iPhone models (page 125). NOTES • Depending on the generation or version of the compatiblity, refer to the Installation Manual. • For Bluetooth connection, see page 20. English iPod® Connecting your iPod. • iPhone or iPod via USB or Bluetooth 2 Press then touch...
...; For USB connection, refer to Compatible iPod/iPhone models (page 125). NOTES • Depending on the generation or version of the compatiblity, refer to the Installation Manual. • For Bluetooth connection, see page 20. English iPod® Connecting your iPod. • iPhone or iPod via USB or Bluetooth 2 Press then touch...
Owners Manual
Page 51
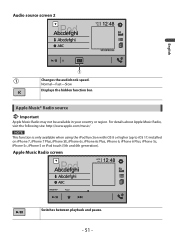
... site: http://www.apple.com/music/ NOTE This function is only available when using the iPod function with iOS 8 or higher (up to iOS 11) installed on iPhone 7, iPhone 7 Plus, iPhone SE, iPhone 6s, iPhone 6s Plus, iPhone 6, iPhone 6 Plus, iPhone 5s, iPhone 5c, iPhone 5 or iPod touch (5th and 6th...
... site: http://www.apple.com/music/ NOTE This function is only available when using the iPod function with iOS 8 or higher (up to iOS 11) installed on iPhone 7, iPhone 7 Plus, iPhone SE, iPhone 6s, iPhone 6s Plus, iPhone 6, iPhone 6 Plus, iPhone 5s, iPhone 5c, iPhone 5 or iPod touch (5th and 6th...

Owners Manual
Page 53
...app, visit the following site: https://www.abaltatech.com/weblink/ • Be sure to limitations while driving. Using WebLink Important • Pioneer is not liable for any such restrictions. TIPS • Touch the desired application icon after the WebLink app is limited while driving, ... providers. • In WebLink, functionality through the product is launched. • If you connect your jurisdiction, so you must first install the WebLink Host app on this operation. • Copyright protected files such as DRM cannot be aware of WebLink functionality is determined by...
...app, visit the following site: https://www.abaltatech.com/weblink/ • Be sure to limitations while driving. Using WebLink Important • Pioneer is not liable for any such restrictions. TIPS • Touch the desired application icon after the WebLink app is limited while driving, ... providers. • In WebLink, functionality through the product is launched. • If you connect your jurisdiction, so you must first install the WebLink Host app on this operation. • Copyright protected files such as DRM cannot be aware of WebLink functionality is determined by...
Owners Manual
Page 54
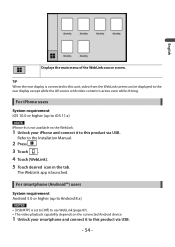
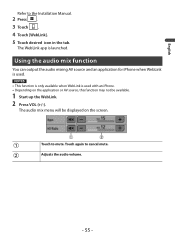
... the rear display except while the AV source with video content is not available on the WebLink. 1 Unlock your iPhone and connect it to the Installation Manual. 2 Press . 3 Touch . 4 Touch [WebLink]. 5 Touch desired icon in the tab. Refer to this product via USB. For smartphone (Android™) users System requirement Android...
... the rear display except while the AV source with video content is not available on the WebLink. 1 Unlock your iPhone and connect it to the Installation Manual. 2 Press . 3 Touch . 4 Touch [WebLink]. 5 Touch desired icon in the tab. Refer to this product via USB. For smartphone (Android™) users System requirement Android...
Owners Manual
Page 55
Touch again to the Installation Manual. 2 Press . 3 Touch . 4 Touch [WebLink]. 5 Touch desired icon in the tab. Adjusts the audio volume. - 55 - English Refer to cancel mute. NOTES • This function ...
Touch again to the Installation Manual. 2 Press . 3 Touch . 4 Touch [WebLink]. 5 Touch desired icon in the tab. Adjusts the audio volume. - 55 - English Refer to cancel mute. NOTES • This function ...
Owners Manual
Page 57
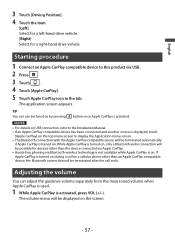
... phoning via USB. 2 Press . 3 Touch . 4 Touch [Apple CarPlay]. 5 Touch Apple CarPlay icon in the tab. NOTES • For details on USB connection, refer to the Installation Manual. • If an Apple CarPlay compatible device has been connected and another screen is displayed, touch [Apple CarPlay] on the top menu screen to...
... phoning via USB. 2 Press . 3 Touch . 4 Touch [Apple CarPlay]. 5 Touch Apple CarPlay icon in the tab. NOTES • For details on USB connection, refer to the Installation Manual. • If an Apple CarPlay compatible device has been connected and another screen is displayed, touch [Apple CarPlay] on the top menu screen to...
Owners Manual
Page 60
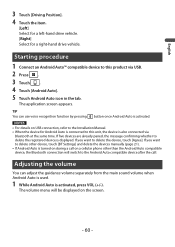
... [BT Settings] and delete the devices manually (page 21). • If Android Auto is displayed. NOTES • For details on USB connection, refer to the Installation Manual. • When the device for a right-hand drive vehicle. The application screen appears. If you want to the Android Auto compatible device after the...
... [BT Settings] and delete the devices manually (page 21). • If Android Auto is displayed. NOTES • For details on USB connection, refer to the Installation Manual. • When the device for a right-hand drive vehicle. The application screen appears. If you want to the Android Auto compatible device after the...
Owners Manual
Page 63
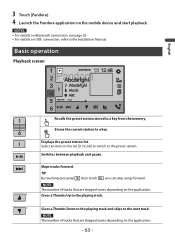
... connection, see page 20. • For details on the application. - 63 - 3 Touch [Pandora]. 4 Launch the Pandora application on the list ([1] to [6]) to switch to the Installation Manual. Select an item on the mobile device and start playback.
... connection, see page 20. • For details on the application. - 63 - 3 Touch [Pandora]. 4 Launch the Pandora application on the list ([1] to [6]) to switch to the Installation Manual. Select an item on the mobile device and start playback.
Owners Manual
Page 66
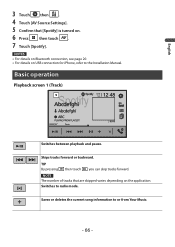
... turned on the application. NOTES • For details on Bluetooth connection, see page 20. • For details on USB connection for iPhone, refer to the Installation Manual.
... turned on the application. NOTES • For details on Bluetooth connection, see page 20. • For details on USB connection for iPhone, refer to the Installation Manual.

Owners Manual
Page 70
... • The SiriusXM satellites will need this product while the activation message is displayed. - 70 - When the tuner has received the message, [Subscription Updated] is installed correctly. 3 Switch to , all the SiriusXM capabilities, such as TuneMix™, SportsFlash™ and Traffic & Weather Now, please use the SXV300 tuner (sold separately). English...
... • The SiriusXM satellites will need this product while the activation message is displayed. - 70 - When the tuner has received the message, [Subscription Updated] is installed correctly. 3 Switch to , all the SiriusXM capabilities, such as TuneMix™, SportsFlash™ and Traffic & Weather Now, please use the SXV300 tuner (sold separately). English...


