Owner's Manual
Page 4
..., non exclusive license to operate a service bureau or for internal use by reverse engineering, disassembly, decompilation, or any manner not expressly authorized by this License Agreement. 2 You shall not use the Software to use the software installed on the Pioneer products (the "Software") and the related documentation solely for your own personal use or for any other use it in any other proprietary...
..., non exclusive license to operate a service bureau or for internal use by reverse engineering, disassembly, decompilation, or any manner not expressly authorized by this License Agreement. 2 You shall not use the Software to use the software installed on the Pioneer products (the "Software") and the related documentation solely for your own personal use or for any other use it in any other proprietary...
Owner's Manual
Page 7
... may contain some nonconformities, defects or errors. You shall not copy, reverse engineer, translate, port, modify or make any other products. Pioneer does not warrant that the Software will meet your needs or expectations, that operation of the Software will be copied, even if modified or merged with other use the software installed on such Pioneer products. for the purpose of...
... may contain some nonconformities, defects or errors. You shall not copy, reverse engineer, translate, port, modify or make any other products. Pioneer does not warrant that the Software will meet your needs or expectations, that operation of the Software will be copied, even if modified or merged with other use the software installed on such Pioneer products. for the purpose of...
Owner's Manual
Page 14
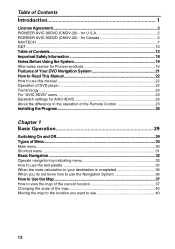
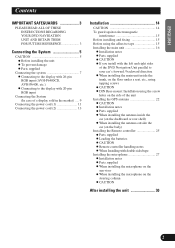
... 1 License Agreement...2 PIONEER AVIC-90DVD (CNDV-20) - for Canada 5 NAVTECH ...7 GDT ...10 Table of Contents...12 Important Safety Information 18 Notes Before Using the System 19 After-sales service for Pioneer products 19 Features of Your DVD Navigation System 21 How to Read This Manual 22 How to use this manual 22 Operation of DVD player 22 Terminology...23 For "AVIC-9DVD" users 23 Dipswitch settings for U.S.A 2 PIONEER AVIC-90DVD (CNDV-20) -
... 1 License Agreement...2 PIONEER AVIC-90DVD (CNDV-20) - for Canada 5 NAVTECH ...7 GDT ...10 Table of Contents...12 Important Safety Information 18 Notes Before Using the System 19 After-sales service for Pioneer products 19 Features of Your DVD Navigation System 21 How to Read This Manual 22 How to use this manual 22 Operation of DVD player 22 Terminology...23 For "AVIC-9DVD" users 23 Dipswitch settings for U.S.A 2 PIONEER AVIC-90DVD (CNDV-20) -
Owner's Manual
Page 19
... VIDEO 150 Audio Adjustments...151 Displaying the AUDIO MENU 151 Setting the sound focus equalizer 152 Using balance adjustment 152 Using the equalizer 153 Adjusting bass ...154 Adjusting treble ...155 Adjusting loudness 155 Using subwoofer output 155 Using non fading output 156 Using the high pass filter 156 Adjusting source levels 157 Initial Settings...158 Displaying the INITIAL SETTINGS MENU 158 Switching the warning tone 158 Switching the auxiliary setting 158 Setting the rear output and subwoofer controller 159 Switching the Telephone Muting/Attenuation 159 Other Functions...
... VIDEO 150 Audio Adjustments...151 Displaying the AUDIO MENU 151 Setting the sound focus equalizer 152 Using balance adjustment 152 Using the equalizer 153 Adjusting bass ...154 Adjusting treble ...155 Adjusting loudness 155 Using subwoofer output 155 Using non fading output 156 Using the high pass filter 156 Adjusting source levels 157 Initial Settings...158 Displaying the INITIAL SETTINGS MENU 158 Switching the warning tone 158 Switching the auxiliary setting 158 Setting the rear output and subwoofer controller 159 Switching the Telephone Muting/Attenuation 159 Other Functions...
Owner's Manual
Page 23
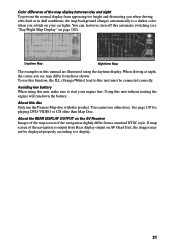
... disc Only use this function, the ILL (Orange/White) lead to start your car lights. If map screen of the navigation slightly differ from a standard NTSC style. Using this manual are illustrated using this automatic switching (see may not be connected correctly. Avoiding low battery When using the daytime display. You cannot use other than Map Disc. See page 107 for playing DVD-VIDEO or CD other discs. Color difference of the map display...
... disc Only use this function, the ILL (Orange/White) lead to start your car lights. If map screen of the navigation slightly differ from a standard NTSC style. Using this manual are illustrated using this automatic switching (see may not be connected correctly. Avoiding low battery When using the daytime display. You cannot use other than Map Disc. See page 107 for playing DVD-VIDEO or CD other discs. Color difference of the map display...
Owner's Manual
Page 78
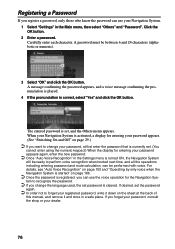
... be performed with voice. A message confirming the password appears, and a voice message confirming the pronunciation is played. 4 If the pronunciation is set password is cleared. If you change your password, at the back of this manual, and remove it down on page 29.) ➲ If you can use your Navigation System. 1 Select "Settings" in the Settings menu is registered, you want to recognize...
... be performed with voice. A message confirming the password appears, and a voice message confirming the pronunciation is played. 4 If the pronunciation is set password is cleared. If you change your password, at the back of this manual, and remove it down on page 29.) ➲ If you can use your Navigation System. 1 Select "Settings" in the Settings menu is registered, you want to recognize...
Owner's Manual
Page 82
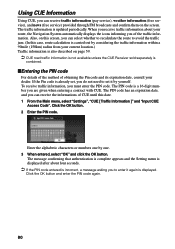
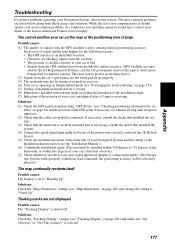
... not need to avoid the traffic jam. (In this screen, you can select whether to recalculate the route to set it by yourself. To receive traffic information, you are given when entering a contract with CUE. The message confirming that authentication is complete appears and the Setting menu is displayed after about your route, the Navigation System automatically displays...
... not need to avoid the traffic jam. (In this screen, you can select whether to recalculate the route to set it by yourself. To receive traffic information, you are given when entering a contract with CUE. The message confirming that authentication is complete appears and the Setting menu is displayed after about your route, the Navigation System automatically displays...
Owner's Manual
Page 111
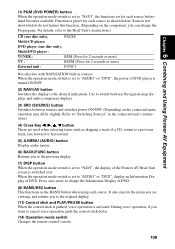
... ) External unit : FUNC1 Not effective with NAVIGATION built-in the connected unit's instructions.) (4) Cross Key 2, 3, 5, ∞ button These are viewing, and returns you to the previous display. (7) DISP button When the operation mode switch is set to "NAVI", the display of the Pioneer AV Head Unit screen is activated. Use to cancel voice operation, push the control stick down. (14) Operation mode switch Changes the remote control's mode. 109 When the operation mode switch is set to "AUDIO" or "DVD", the power of DVD player is preset for each source...
... ) External unit : FUNC1 Not effective with NAVIGATION built-in the connected unit's instructions.) (4) Cross Key 2, 3, 5, ∞ button These are viewing, and returns you to the previous display. (7) DISP button When the operation mode switch is set to "NAVI", the display of the Pioneer AV Head Unit screen is activated. Use to cancel voice operation, push the control stick down. (14) Operation mode switch Changes the remote control's mode. 109 When the operation mode switch is set to "AUDIO" or "DVD", the power of DVD player is preset for each source...
Owner's Manual
Page 115
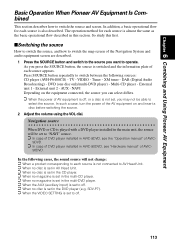
... of DVD player installed in AVIC-90DVD, see "Hardware manual" of the Navigation System and audio equipment screen are described. 1 Press the SOURCE button and switch to the source you press the SOURCE button, the source is set to operate. In addition, a basic operational flow for each source appears. DVD (one disc only/multi-DVD player) - NAVI Depending on and insert a disc before switching the source. 2 Adjust the volume using the VOL dial. In the following sources: CD player (AVH-P6400CD) - Chapter 6 Combining and Using Pioneer...
... of DVD player installed in AVIC-90DVD, see "Hardware manual" of the Navigation System and audio equipment screen are described. 1 Press the SOURCE button and switch to the source you press the SOURCE button, the source is set to operate. In addition, a basic operational flow for each source appears. DVD (one disc only/multi-DVD player) - NAVI Depending on and insert a disc before switching the source. 2 Adjust the volume using the VOL dial. In the following sources: CD player (AVH-P6400CD) - Chapter 6 Combining and Using Pioneer...
Owner's Manual
Page 137
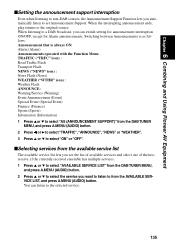
... press A.MENU (AUDIO) button. When the interrupting announcement ends, play returns to the selected service. 135 You can switch setting for announcement interruption ON/OFF, except for Alarm announcements. When listening to a DAB broadcast, you want to listen to from the DAB TUNER MENU, and press A.MENU (AUDIO) button. 2 Press 5 or ∞ to select the service you can listen to the original source. Switching between...
... press A.MENU (AUDIO) button. When the interrupting announcement ends, play returns to the selected service. 135 You can switch setting for announcement interruption ON/OFF, except for Alarm announcements. When listening to a DAB broadcast, you want to listen to from the DAB TUNER MENU, and press A.MENU (AUDIO) button. 2 Press 5 or ∞ to select the service you can listen to the original source. Switching between...
Owner's Manual
Page 160
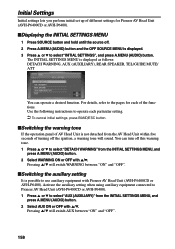
...;. Activate the auxiliary setting when using auxiliary equipment connected to Pioneer AV Head Unit (AVH-P6400CD or AVH-P6400). 1 Press 5 or ∞ to select "AUX (AUXILIARY)" from the INITIAL SETTINGS MENU, and press A.MENU (AUDIO) button. 2 Select AUX ON or OFF with Pioneer AV Head Unit (AVH-P6400CD or AVH-P6400). Pressing 5/∞ will switch WARNING between "ON" and "OFF". 158 You can operate a desired function. Use the following instructions to operate each of the functions. Initial Settings Initial settings lets...
...;. Activate the auxiliary setting when using auxiliary equipment connected to Pioneer AV Head Unit (AVH-P6400CD or AVH-P6400). 1 Press 5 or ∞ to select "AUX (AUXILIARY)" from the INITIAL SETTINGS MENU, and press A.MENU (AUDIO) button. 2 Select AUX ON or OFF with Pioneer AV Head Unit (AVH-P6400CD or AVH-P6400). Pressing 5/∞ will switch WARNING between "ON" and "OFF". 158 You can operate a desired function. Use the following instructions to operate each of the functions. Initial Settings Initial settings lets...
Owner's Manual
Page 163
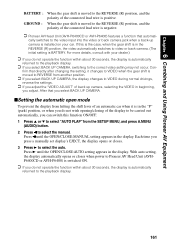
... OPEN/CLOSE:AUTO setting appears in the display. Chapter 6 Combining and Using Pioneer AV Equipment BATTERY : GROUND : When the gear shift is moved to the REVERSE (R) position, and the polarity of the connected lead wire is BATTERY. With auto setting, the display automatically opens or closes when power to Pioneer AV Head Unit (AVHP6400CD or AVH-P6400) is switched ON. ➲ If you do not operate the function within about 30 seconds, the display is installed...
... OPEN/CLOSE:AUTO setting appears in the display. Chapter 6 Combining and Using Pioneer AV Equipment BATTERY : GROUND : When the gear shift is moved to the REVERSE (R) position, and the polarity of the connected lead wire is BATTERY. With auto setting, the display automatically opens or closes when power to Pioneer AV Head Unit (AVHP6400CD or AVH-P6400) is switched ON. ➲ If you do not operate the function within about 30 seconds, the display is installed...
Owner's Manual
Page 167
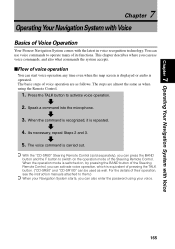
... of their operation, see the instruction manuals attached to switch on , by pressing the BAND button of the Steering Remote Control, you can activate voice operation, which is carried out. ➲ With the "CD-SR80" Steering Remote Control (sold separately), you can use voice commands to activate voice operation. 2. The steps are as follows. When the operation mode is switched on the operation mode of Voice Operation Your Pioneer Navigation System comes with...
... of their operation, see the instruction manuals attached to switch on , by pressing the BAND button of the Steering Remote Control, you can activate voice operation, which is carried out. ➲ With the "CD-SR80" Steering Remote Control (sold separately), you can use voice commands to activate voice operation. 2. The steps are as follows. When the operation mode is switched on the operation mode of Voice Operation Your Pioneer Navigation System comes with...
Owner's Manual
Page 179
... GPS signal reception using "GPS Status" (see "Positioning by the US Department of your most common problems are not displayed. Solutions: Check the "Map Orientation" settings (see "Map Orientation" on page 94) and the position of the GPS aerial if necessary, or continue driving until reception improves. (2) Check that installed the system. (4) Connect the speed signal input (pink lead wire) of the power wire correctly, and reset...
... GPS signal reception using "GPS Status" (see "Positioning by the US Department of your most common problems are not displayed. Solutions: Check the "Map Orientation" settings (see "Map Orientation" on page 94) and the position of the GPS aerial if necessary, or continue driving until reception improves. (2) Check that installed the system. (4) Connect the speed signal input (pink lead wire) of the power wire correctly, and reset...
Owner's Manual
Page 181
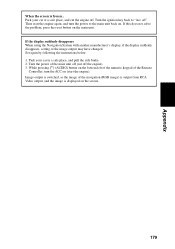
... main unit back on. Then start the engine). While pressing [ • ] (AUDIO) button on the bottom left of the numeric keypad of the image output may have changed. Set again by following the instructions below. 1. Park your car at a safe place, and cut off the engine). 3. Turn the power of the navigation (RGB image) is output from RCA Video output, and the image is frozen... Appendix When the screen is displayed...
... main unit back on. Then start the engine). While pressing [ • ] (AUDIO) button on the bottom left of the numeric keypad of the image output may have changed. Set again by following the instructions below. 1. Park your car at a safe place, and cut off the engine). 3. Turn the power of the navigation (RGB image) is output from RCA Video output, and the image is frozen... Appendix When the screen is displayed...
Owner's Manual
Page 182
... the parking brake on, and then try to do : To operate with Simple hybrid mode without connecting the speed signal input, the precision of the power cord correctly. What to use this system (including the old version map disc). (2) If you try again. (2)"This is not connected. What to the place where the main unit will start to make a menu selection. When: The speed signal input (pink lead wire...
... the parking brake on, and then try to do : To operate with Simple hybrid mode without connecting the speed signal input, the precision of the power cord correctly. What to use this system (including the old version map disc). (2) If you try again. (2)"This is not connected. What to the place where the main unit will start to make a menu selection. When: The speed signal input (pink lead wire...
Owner's Manual
Page 184
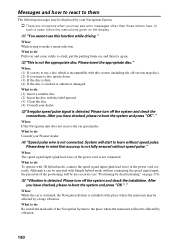
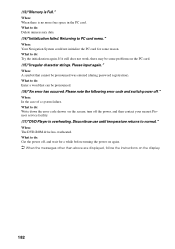
... instructions on the display. 182 What to PC card menu." When: A symbol that can be pronounced. (16)"An error has occurred. What to do : Cut the power off, and wait for some problems on the screen; Please note the following error code and switch power off the power, and then contact your nearest Pioneer service facility. (17)"DVD Player is overheating. When: In the case of a system...
... instructions on the display. 182 What to PC card menu." When: A symbol that can be pronounced. (16)"An error has occurred. What to do : Cut the power off, and wait for some problems on the screen; Please note the following error code and switch power off the power, and then contact your nearest Pioneer service facility. (17)"DVD Player is overheating. When: In the case of a system...
Other Manual
Page 3
... Remote controller 25 - Parts supplied - Parts supplied - CAUTION - Parts supplied - ENGLISH ESPAÑOL DEUTSCH Contents IMPORTANT SAFEGUARDS 3 PLEASE READ ALL OF THESE INSTRUCTIONS REGARDING YOUR DVD NAVIGATION UNIT AND RETAIN THEM FOR FUTURE REFERENCE 3 Connecting the System 5 CAUTION 5 - Loading the batteries - When Installing with 20-pin RGB input Connecting the System (In case of the unit Installing the GPS antenna 22 - When installing the antenna inside the trunk, on the floor under a seat, etc., using...
... Remote controller 25 - Parts supplied - Parts supplied - CAUTION - Parts supplied - ENGLISH ESPAÑOL DEUTSCH Contents IMPORTANT SAFEGUARDS 3 PLEASE READ ALL OF THESE INSTRUCTIONS REGARDING YOUR DVD NAVIGATION UNIT AND RETAIN THEM FOR FUTURE REFERENCE 3 Connecting the System 5 CAUTION 5 - Loading the batteries - When Installing with 20-pin RGB input Connecting the System (In case of the unit Installing the GPS antenna 22 - When installing the antenna inside the trunk, on the floor under a seat, etc., using...
Other Manual
Page 9
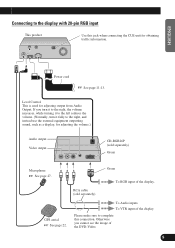
... the volume. (Normally, turn it fully to the right, and instead use the external equipment outputting sound, such as a display, for adjusting output from Audio Output. If you cannot see the image of the DVD-Video. 8 ITALIANO NEDERLANDS To Audio inputs. To VTR input of the display. ESPAÑOL DEUTSCH FRANÇAIS Power cord ☞ See page 11-13. ENGLISH Connecting to complete this jack when connecting the CUE unit for...
... the volume. (Normally, turn it fully to the right, and instead use the external equipment outputting sound, such as a display, for adjusting output from Audio Output. If you cannot see the image of the DVD-Video. 8 ITALIANO NEDERLANDS To Audio inputs. To VTR input of the display. ESPAÑOL DEUTSCH FRANÇAIS Power cord ☞ See page 11-13. ENGLISH Connecting to complete this jack when connecting the CUE unit for...
Other Manual
Page 13
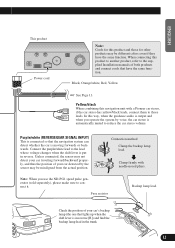
... function. Yellow/black When combining this navigation unit with needle-nosed pliers. Fuse resistor Backup lamp lead. In this way, when the guidance audio is output and when you use the ND-PG1 speed pulse generator (sold separately), please make sure to the lead whose voltage changes when the shift lever is in reverse [R]) and find the backup lamp lead in reverse. Connect the purple/white...
... function. Yellow/black When combining this navigation unit with needle-nosed pliers. Fuse resistor Backup lamp lead. In this way, when the guidance audio is output and when you use the ND-PG1 speed pulse generator (sold separately), please make sure to the lead whose voltage changes when the shift lever is in reverse [R]) and find the backup lamp lead in reverse. Connect the purple/white...


