Technical Manual
Page 1
...to place any equipment on them or pinch them between any equipment. • Absolutely do not alter the product or any danger of the panel(s) falling down or falling over . • In order to use this product safely • When using this product is a danger that...its attachment hardware. If adequate safeguards are subject to change without notice. TECHNICAL MANUAL (Ver. 1.1) FOR PIONEER PLASMA DISPLAY MONITOR WHEN USED WITH VIDEO CARDS (EXPANSION SOLUTIONS CARDS) PLASMA DISPLAY MONITOR: PDP-607CMX VIDEO CARD: PDA-5003 / PDA-5004 TABLE TOP STAND: PDK-TS26 WALL MOUNT UNIT: PDK-WM03 ...
...to place any equipment on them or pinch them between any equipment. • Absolutely do not alter the product or any danger of the panel(s) falling down or falling over . • In order to use this product safely • When using this product is a danger that...its attachment hardware. If adequate safeguards are subject to change without notice. TECHNICAL MANUAL (Ver. 1.1) FOR PIONEER PLASMA DISPLAY MONITOR WHEN USED WITH VIDEO CARDS (EXPANSION SOLUTIONS CARDS) PLASMA DISPLAY MONITOR: PDP-607CMX VIDEO CARD: PDA-5003 / PDA-5004 TABLE TOP STAND: PDK-TS26 WALL MOUNT UNIT: PDK-WM03 ...

Technical Manual
Page 2
... 58 4.3.8 Connection to INPUT3 58 4.3.9 Connection to INPUT4 58 4.3.10 About DTV set top box connection 59 4.3.11 Audio connections 60 4.4 Table Top Stand: PDK-TS26 64 4.4.1 Specifications 64 4.4.2 Installation coordinates for screws used to attach the stand to a surface... 70 4.6 Speaker System: PDP-S55-LR 72 4.6.1 Specifications 72 4.6.2 External Dimensions 73 4.6.3 Installation on the Plasma Display 74 2 BEFORE BEGINNING ADJUSTMENT/SETTING 5.1 Before Beginning Adjustment 78 5.1.1 Operation Mode 78 5.1.2 Combined Use of the Remote Control, Main-control Panel, and RS-232C Commands...
... 58 4.3.8 Connection to INPUT3 58 4.3.9 Connection to INPUT4 58 4.3.10 About DTV set top box connection 59 4.3.11 Audio connections 60 4.4 Table Top Stand: PDK-TS26 64 4.4.1 Specifications 64 4.4.2 Installation coordinates for screws used to attach the stand to a surface... 70 4.6 Speaker System: PDP-S55-LR 72 4.6.1 Specifications 72 4.6.2 External Dimensions 73 4.6.3 Installation on the Plasma Display 74 2 BEFORE BEGINNING ADJUSTMENT/SETTING 5.1 Before Beginning Adjustment 78 5.1.1 Operation Mode 78 5.1.2 Combined Use of the Remote Control, Main-control Panel, and RS-232C Commands...
Technical Manual
Page 4
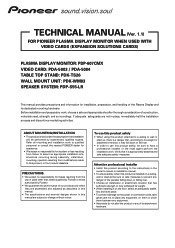
... or PDA-5004 is installed are premised on the PDP607CMX being equipped with a star '#'. Precautions With the PDA-5003 or the PDA-5004 installed, the PDP-607CMX supports the following functions: Input/output terminals 7 PDA-5003 INPUT 1 Input • Component video signal • RGB signals from AV devices other than PCs INPUT...
... or PDA-5004 is installed are premised on the PDP607CMX being equipped with a star '#'. Precautions With the PDA-5003 or the PDA-5004 installed, the PDP-607CMX supports the following functions: Input/output terminals 7 PDA-5003 INPUT 1 Input • Component video signal • RGB signals from AV devices other than PCs INPUT...

Technical Manual
Page 26
... or more ) above, below, and to each side of the various limitations specified in this section. Refer to 40 °C ✩ Requirements when used with PDP-S55-LR speaker system When installed as a single unit, all requirements are the same as those listed above indicate the distance between the speakers and...
... or more ) above, below, and to each side of the various limitations specified in this section. Refer to 40 °C ✩ Requirements when used with PDP-S55-LR speaker system When installed as a single unit, all requirements are the same as those listed above indicate the distance between the speakers and...
Technical Manual
Page 28
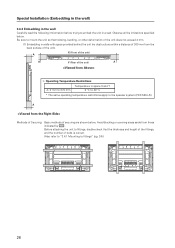
... to embed the unit in space X and Y A: 0 mm to 370 mm 0 °C to 40 °C * The same operating temperature restrictions apply to the speaker system (PDP-S55-LR).
... to embed the unit in space X and Y A: 0 mm to 370 mm 0 °C to 40 °C * The same operating temperature restrictions apply to the speaker system (PDP-S55-LR).

Technical Manual
Page 30
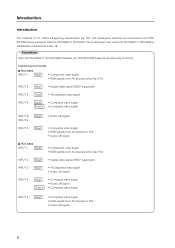
...;C to 40 °C • The same operating temperature restrictions apply to fittings" (pg. 24).) Installation is correct. (Also refer to "3.4.1 Mounting to the speaker system (PDP-S55-LR). Panting (Punching) net (numerical aperture 50 % or over) 100 mm or more 100 mm or more 50 mm or more 100 mm or... more 100 mm or more Cation : Due to possible heat issues, we do not recommend installing the panel in walls with no space provided behind the unit.
...;C to 40 °C • The same operating temperature restrictions apply to fittings" (pg. 24).) Installation is correct. (Also refer to "3.4.1 Mounting to the speaker system (PDP-S55-LR). Panting (Punching) net (numerical aperture 50 % or over) 100 mm or more 100 mm or more 50 mm or more 100 mm or... more 100 mm or more Cation : Due to possible heat issues, we do not recommend installing the panel in walls with no space provided behind the unit.
Technical Manual
Page 40
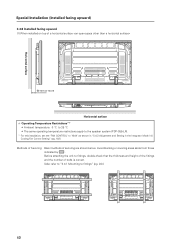
... more Horizontal surface ✩ Operating Temperature Restrictions (*1) • Ambient temperature: 0 °C to 35 °C • The same operating temperature restrictions apply to the speaker system (PDP-S55-LR). *1 For this installation, set the 'FAN CONTROL' to fittings" (pg. 24).) 40 Avoid blocking or covering areas aside from those indicated by . Horizontal...
... more Horizontal surface ✩ Operating Temperature Restrictions (*1) • Ambient temperature: 0 °C to 35 °C • The same operating temperature restrictions apply to the speaker system (PDP-S55-LR). *1 For this installation, set the 'FAN CONTROL' to fittings" (pg. 24).) 40 Avoid blocking or covering areas aside from those indicated by . Horizontal...

Technical Manual
Page 44
... Plasma Display (PDP607CMX). It fixes the rear surface of the plasma display 45 mm from its large screen area, brightness, and image quality, the Plasma Display (PDP-607CMX) is equipped with the 60-inch Plasma ...Display. 2-way speakers feature 5 cm (2 in.) tweeter and 8 cm (3-3/16 in.) woofer in locations not possible for use the standard mounting components 4.1 Standard Mounting Components Features and Characteristics In addition to reliability and vivid display resulting from the wall. A wide range of walls. This panel...
... Plasma Display (PDP607CMX). It fixes the rear surface of the plasma display 45 mm from its large screen area, brightness, and image quality, the Plasma Display (PDP-607CMX) is equipped with the 60-inch Plasma ...Display. 2-way speakers feature 5 cm (2 in.) tweeter and 8 cm (3-3/16 in.) woofer in locations not possible for use the standard mounting components 4.1 Standard Mounting Components Features and Characteristics In addition to reliability and vivid display resulting from the wall. A wide range of walls. This panel...
Technical Manual
Page 50
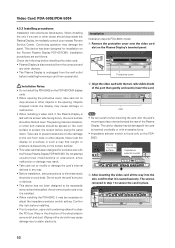
... crookedly or with excessive force. • Impedance selector switch is seated securely. Protective cover 2 Align the video card with the Pioneer Plasma Display PDP-607CMX. This device has been designed for exclusive use a cloth containing ethanol to secure the card in such a way that it is...: PDA-5003/PDA-5004 4.3.3 Installing procedures Installation instructions are as follows: Check the following before installing this item before laying the panel down , the work surface to remove dirt and dust. Never rest the display on the PDA5003. Aim the card's mounting surface...
... crookedly or with excessive force. • Impedance selector switch is seated securely. Protective cover 2 Align the video card with the Pioneer Plasma Display PDP-607CMX. This device has been designed for exclusive use a cloth containing ethanol to secure the card in such a way that it is...: PDA-5003/PDA-5004 4.3.3 Installing procedures Installation instructions are as follows: Check the following before installing this item before laying the panel down , the work surface to remove dirt and dust. Never rest the display on the PDA5003. Aim the card's mounting surface...
Technical Manual
Page 64
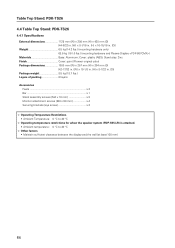
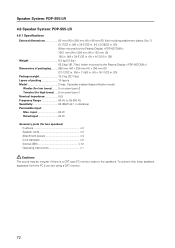
...: paint (Pioneer original color) Package dimensions 1080 mm (W) × 257 mm (H) × 204 mm (D) (42-17/32 in. (W) × 10-1/8 in. (H) × 8-1/32 in . (D)) Weight 6.5 kg (14.3 lbs.) (mounting hardware only) 68.5 kg (151.0 lbs.) (mounting hardware and Plasma Display ) ...✩ Operating Temperature Restrictions • Ambient Temperature: 0 °C to 40 °C ✩ Operating temperature restrictions for when the speaker system (PDP-S55-LR) is attached. • Ambient temperature: 0 °C to 40 °C ✩ Other factors • Maintain sufficient clearance between ...
...: paint (Pioneer original color) Package dimensions 1080 mm (W) × 257 mm (H) × 204 mm (D) (42-17/32 in. (W) × 10-1/8 in. (H) × 8-1/32 in . (D)) Weight 6.5 kg (14.3 lbs.) (mounting hardware only) 68.5 kg (151.0 lbs.) (mounting hardware and Plasma Display ) ...✩ Operating Temperature Restrictions • Ambient Temperature: 0 °C to 40 °C ✩ Operating temperature restrictions for when the speaker system (PDP-S55-LR) is attached. • Ambient temperature: 0 °C to 40 °C ✩ Other factors • Maintain sufficient clearance between ...
Technical Manual
Page 68
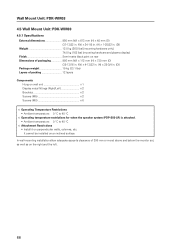
...-1/8 in. (H) × 1-25/32 in. (D)) Weight 12.0 kg (26.5 lbs) [mounting hardware only] 74.0 kg (163 lbs) [mounting hardware and plasma display] Finish Semi-matte black paint on rear Dimensions of packaging 986 mm (W) × 112 mm (H) × 730 mm (D) (38-13/16 in. (W)...; Operating Temperature Restrictions • Ambient temperature: 0 °C to 40 °C ✩ Operating temperature restrictions for when the speaker system (PDP-S55-LR) is attached. • Ambient temperature: 0 °C to 40 °C ✩ Attachment Restrictions • Install it on an inclined surface.
...-1/8 in. (H) × 1-25/32 in. (D)) Weight 12.0 kg (26.5 lbs) [mounting hardware only] 74.0 kg (163 lbs) [mounting hardware and plasma display] Finish Semi-matte black paint on rear Dimensions of packaging 986 mm (W) × 112 mm (H) × 730 mm (D) (38-13/16 in. (W)...; Operating Temperature Restrictions • Ambient temperature: 0 °C to 40 °C ✩ Operating temperature restrictions for when the speaker system (PDP-S55-LR) is attached. • Ambient temperature: 0 °C to 40 °C ✩ Attachment Restrictions • Install it on an inclined surface.
Technical Manual
Page 72
...high tones) .... 5 cm cone type x1 Nominal impedance 6 Ω Frequency Range 60 Hz to the speakers. To prevent this, keep speakers separated from the PC if .../32 in. (H) × 4-13/16 in. (D)) Weight 6.8 kg (15 lbs.) 68.8 kg (151.7 lbs.) (when mounted to the Plasma Display ) Dimensions of packaging ......... 950 mm (W) × 295 mm (H) × 390 mm (D) (37-13/32 in. (W) × ...85 dB/W (at 1 m distance) Permissible input: Max. Speaker System: PDP-S55-LR 4.6 Speaker System: PDP-S55-LR 4.6.1 Specifications External dimensions 90 mm (W) × 880 mm (H) × 96 mm ...
...high tones) .... 5 cm cone type x1 Nominal impedance 6 Ω Frequency Range 60 Hz to the speakers. To prevent this, keep speakers separated from the PC if .../32 in. (H) × 4-13/16 in. (D)) Weight 6.8 kg (15 lbs.) 68.8 kg (151.7 lbs.) (when mounted to the Plasma Display ) Dimensions of packaging ......... 950 mm (W) × 295 mm (H) × 390 mm (D) (37-13/32 in. (W) × ...85 dB/W (at 1 m distance) Permissible input: Max. Speaker System: PDP-S55-LR 4.6 Speaker System: PDP-S55-LR 4.6.1 Specifications External dimensions 90 mm (W) × 880 mm (H) × 96 mm ...
Technical Manual
Page 73
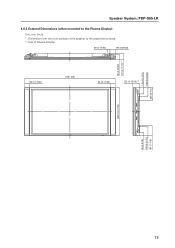
Speaker System: PDP-S55-LR 4.6.2 External Dimensions (when mounted to the Plasma Display) Unit: mm (inch) *1: Dimension from the front surface of the speaker to the attachment pieces. *2: Size of Plasma Display 39 (1-17/32) 99 (3-29/32) 96 (3-25/32) 119 (4-11/16) *1 90 (3-17/32) 1651 (65) 90 (3-17/32) 122 (4-13/16) *2 119 (4-11/16) 169 (6-21/32) 235 (9-1/4) 880 (34-21/32) 65 (2-9/16) 169 (6-21/32) 181 (7-1/8) 73
Speaker System: PDP-S55-LR 4.6.2 External Dimensions (when mounted to the Plasma Display) Unit: mm (inch) *1: Dimension from the front surface of the speaker to the attachment pieces. *2: Size of Plasma Display 39 (1-17/32) 99 (3-29/32) 96 (3-25/32) 119 (4-11/16) *1 90 (3-17/32) 1651 (65) 90 (3-17/32) 122 (4-13/16) *2 119 (4-11/16) 169 (6-21/32) 235 (9-1/4) 880 (34-21/32) 65 (2-9/16) 169 (6-21/32) 181 (7-1/8) 73
Technical Manual
Page 74
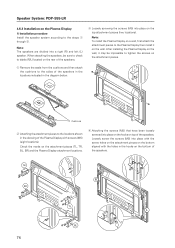
...on the top attachment pieces (two locations). Loosely screw the screws (M5) into a right (R) and left (L) speaker. After installing the Plasma Display on the wall, it on the wall. When attaching the speakers, be impossible to tighten the screws on the attachment pieces. 1 ...locations indicated in the hooks on the bottom of the Plasma Display with the holes in the diagram below. Cushions 2 Attaching the attachment pieces to the steps 1 through 5. Speaker System: PDP-S55-LR 4.6.3 Installation on the Plasma Display 1) Installation procedure Install the speaker system according to...
...on the top attachment pieces (two locations). Loosely screw the screws (M5) into a right (R) and left (L) speaker. After installing the Plasma Display on the wall, it on the wall. When attaching the speakers, be impossible to tighten the screws on the attachment pieces. 1 ...locations indicated in the hooks on the bottom of the Plasma Display with the holes in the diagram below. Cushions 2 Attaching the attachment pieces to the steps 1 through 5. Speaker System: PDP-S55-LR 4.6.3 Installation on the Plasma Display 1) Installation procedure Install the speaker system according to...
Technical Manual
Page 75
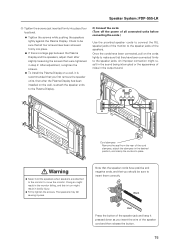
...clampers, attach the clampers in bodily injury. ¶ Firmly tighten the screws. After adjustment, re-tighten the screws. ¶ To install the Plasma Display on a wall, it pressed down as you should be sure that all connected units before connecting the cords.) Use the provided speaker cords...recommended that you first remove the speaker units, then after slightly loosening the screws that were tightened in the output sound. Speaker System: PDP-S55-LR 5 Tighten the screws just inserted firmly into place. An improper connection might result in the desired position, and clamp the ...
...clampers, attach the clampers in bodily injury. ¶ Firmly tighten the screws. After adjustment, re-tighten the screws. ¶ To install the Plasma Display on a wall, it pressed down as you should be sure that all connected units before connecting the cords.) Use the provided speaker cords...recommended that you first remove the speaker units, then after slightly loosening the screws that were tightened in the output sound. Speaker System: PDP-S55-LR 5 Tighten the screws just inserted firmly into place. An improper connection might result in the desired position, and clamp the ...
Technical Manual
Page 76
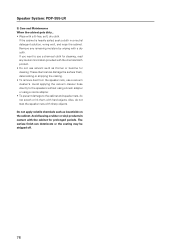
... the cabinet. If you want to the cabinet and speaker nets, do not stab the speaker nets with a lit-free, soft, dry cloth. Speaker System: PDP-S55-LR 3) Care and Maintenance When the cabinet gets dirty... • Wipe with sharp objects. Also, do not scrach or hit them with the chemical...
... the cabinet. If you want to the cabinet and speaker nets, do not stab the speaker nets with a lit-free, soft, dry cloth. Speaker System: PDP-S55-LR 3) Care and Maintenance When the cabinet gets dirty... • Wipe with sharp objects. Also, do not scrach or hit them with the chemical...
Technical Manual
Page 90
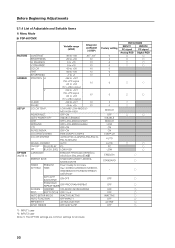
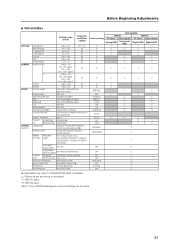
Before Beginning Adjustments 5.1.4 List of Adjustable and Settable Items 1) Menu Mode 7 PDP-607CMX *1: INPUT1 case *2: INPUT2 case (Note 1) The OPTION settings are common settings for all inputs. 90
Before Beginning Adjustments 5.1.4 List of Adjustable and Settable Items 1) Menu Mode 7 PDP-607CMX *1: INPUT1 case *2: INPUT2 case (Note 1) The OPTION settings are common settings for all inputs. 90
Technical Manual
Page 91
7 PDP-607CMX# Before Beginning Adjustments #: Applicable only when a PDA-5003/PDA-5004 is installed. : Cannot be set according to the signal. *1: INPUT1 case *2: INPUT2 case (Note 1) The OPTION settings are common settings for all inputs. 91
7 PDP-607CMX# Before Beginning Adjustments #: Applicable only when a PDA-5003/PDA-5004 is installed. : Cannot be set according to the signal. *1: INPUT1 case *2: INPUT2 case (Note 1) The OPTION settings are common settings for all inputs. 91

Technical Manual
Page 94
Before Beginning Adjustments 2) Integrator mode 7 PDP-607CMX (Note) The OPTION settings are common settings for all inputs. 94
Before Beginning Adjustments 2) Integrator mode 7 PDP-607CMX (Note) The OPTION settings are common settings for all inputs. 94

Technical Manual
Page 95
7 PDP-607CMX# Before Beginning Adjustments : Applicable only when a PDA-5003/PDA-5004 is installed. (Note) The OPTION settings are common settings for all inputs. 95
7 PDP-607CMX# Before Beginning Adjustments : Applicable only when a PDA-5003/PDA-5004 is installed. (Note) The OPTION settings are common settings for all inputs. 95


