Operating Instructions
Page 1
... in Japanese. Les caractéristiques, les spécifications d'alimentation, les accessoires et d'autres informations diffèrent d'un pays à l'autre. Plasma Display Écran à plasma PDP-507CMX PDP-607CMX Operating Instructions Mode d'emploi Contents related to system specifications, power requirements, accessories, and other information differ with respect to the instructions written...
... in Japanese. Les caractéristiques, les spécifications d'alimentation, les accessoires et d'autres informations diffèrent d'un pays à l'autre. Plasma Display Écran à plasma PDP-507CMX PDP-607CMX Operating Instructions Mode d'emploi Contents related to system specifications, power requirements, accessories, and other information differ with respect to the instructions written...
Operating Instructions
Page 6
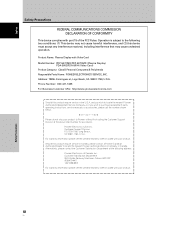
... contact the Customer Satisfaction Department at the above listed number for assistance. Customer Support Division P.O. Product Name: Plasma Display with Video Card Model Number: PDP-507CMX/PDP-607CMX (Plasma Display) PDA-5003/PDA-5004 (Video Card) Product Category: Class B Personal Computers & Peripherals Responsible Party Name: PIONEER ELECTRONICS SERVICE, INC. Operation is subject to locate the nearest...
... contact the Customer Satisfaction Department at the above listed number for assistance. Customer Support Division P.O. Product Name: Plasma Display with Video Card Model Number: PDP-507CMX/PDP-607CMX (Plasma Display) PDA-5003/PDA-5004 (Video Card) Product Category: Class B Personal Computers & Peripherals Responsible Party Name: PIONEER ELECTRONICS SERVICE, INC. Operation is subject to locate the nearest...
Operating Instructions
Page 7
English Contents Safety Precautions i Features 2 Before Proceeding 3 How to use this manual 3 Checking supplied accessories 5 Part Names and Functions 6 Main unit 6 Remote control unit 7 Connection panel (PDP-507CMX 9 Connection panel (PDP-607CMX 10 Installation and Connections 11 Installation of the unit 11 Connection to a personal computer 13 Audio connections 14 Power cord connection 15 How to...
English Contents Safety Precautions i Features 2 Before Proceeding 3 How to use this manual 3 Checking supplied accessories 5 Part Names and Functions 6 Main unit 6 Remote control unit 7 Connection panel (PDP-507CMX 9 Connection panel (PDP-607CMX 10 Installation and Connections 11 Installation of the unit 11 Connection to a personal computer 13 Audio connections 14 Power cord connection 15 How to...
Operating Instructions
Page 8
English Features ¶ Introduces newly developed Wide Plasma Panel The new wide high-precision plasma panel (1365x768 / 16:9) pushes the envelope of previous high-luminance panels, producing brighter, clearer images with higher contrast. ¶ ES ...*1 Aspect ratio and screen size appearance will differ depending on input signal. ¶ Free Installation Configuration - PDP-507CMX: While producing a large 50" screen image, the display is only 122 mm thick, and weighs in vertical arrangement. 4 Video card: ... ¶ Improved usability User convenience has been improved by Pioneer.
English Features ¶ Introduces newly developed Wide Plasma Panel The new wide high-precision plasma panel (1365x768 / 16:9) pushes the envelope of previous high-luminance panels, producing brighter, clearer images with higher contrast. ¶ ES ...*1 Aspect ratio and screen size appearance will differ depending on input signal. ¶ Free Installation Configuration - PDP-507CMX: While producing a large 50" screen image, the display is only 122 mm thick, and weighs in vertical arrangement. 4 Video card: ... ¶ Improved usability User convenience has been improved by Pioneer.
Operating Instructions
Page 12
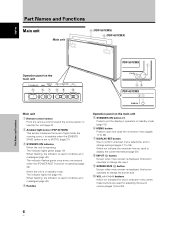
...used to indicate error messages (page 40). 4 Handles Operation panel on the main unit STANDBY/ON 5 DISPLAY MENU / SET 67 INPUT SCREEN SIZE - English Part Names and Functions Main unit Main unit 4 (PDP-507CMX) 4 (PDP-607CMX) Operation panel on the main unit 5 STANDBY/ON button ( ) Press... to put the display in standby mode: The indicator lights red (page 19). VOL + 89 0 PDP-507CMX 1 STANDBY ON 23 PDP-607CMX 31 Main unit 1 Remote control sensor...
...used to indicate error messages (page 40). 4 Handles Operation panel on the main unit STANDBY/ON 5 DISPLAY MENU / SET 67 INPUT SCREEN SIZE - English Part Names and Functions Main unit Main unit 4 (PDP-507CMX) 4 (PDP-607CMX) Operation panel on the main unit 5 STANDBY/ON button ( ) Press... to put the display in standby mode: The indicator lights red (page 19). VOL + 89 0 PDP-507CMX 1 STANDBY ON 23 PDP-607CMX 31 Main unit 1 Remote control sensor...
Operating Instructions
Page 15
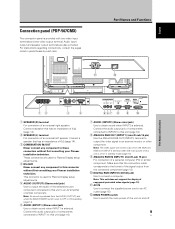
...the audio output jack of components connected to INPUT2 to these connectors without first consulting your Pioneer installation technician. Audio input/ output and speaker output terminals are used for Plasma Display setup adjustments. 4 RS-232C Never connect any component to this unit is off ...0 DIGITAL RGB (INPUT2) (DVI-D jack) Use to switch the main power of an external left speaker. English Connection panel (PDP-507CMX) The connection panel is selected. Part Names and Functions - = Part Names and Functions IN OUT COMBINATION RS-232C OUTPUT INPUT1 INPUT2 AUDIO ...
...the audio output jack of components connected to INPUT2 to these connectors without first consulting your Pioneer installation technician. Audio input/ output and speaker output terminals are used for Plasma Display setup adjustments. 4 RS-232C Never connect any component to this unit is off ...0 DIGITAL RGB (INPUT2) (DVI-D jack) Use to switch the main power of an external left speaker. English Connection panel (PDP-507CMX) The connection panel is selected. Part Names and Functions - = Part Names and Functions IN OUT COMBINATION RS-232C OUTPUT INPUT1 INPUT2 AUDIO ...
Operating Instructions
Page 16
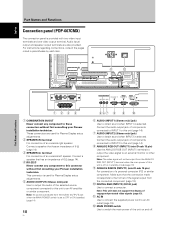
... terminal For connection of an external right speaker. English Part Names and Functions Connection panel (PDP-607CMX) The connection panel is produced from the connected component (page 13). 0 DIGITAL RGB (INPUT2) (...to this unit to obtain sound when INPUT2 is off . This connector is used for Plasma Display setup adjustments. 5 AUDIO (OUTPUT) (Stereo mini jack) Use to output the ... 0 6 AUDIO (INPUT1) (Stereo mini jack) Use to these connectors without first consulting your Pioneer installation technician. Connect a speaker that has an impedance of a personal computer (PC) or similar ...
... terminal For connection of an external right speaker. English Part Names and Functions Connection panel (PDP-607CMX) The connection panel is produced from the connected component (page 13). 0 DIGITAL RGB (INPUT2) (...to this unit to obtain sound when INPUT2 is off . This connector is used for Plasma Display setup adjustments. 5 AUDIO (OUTPUT) (Stereo mini jack) Use to output the ... 0 6 AUDIO (INPUT1) (Stereo mini jack) Use to these connectors without first consulting your Pioneer installation technician. Connect a speaker that has an impedance of a personal computer (PC) or similar ...

Operating Instructions
Page 18
a hole Bolt b hole* a hole Center line a hole b hole* Rear view diagram (PDP-507CMX) b hole* Air vents (fan) b hole* 12 mm to 9/16 in.) Side view diagram a hole a hole Center line Center line b hole* Rear view diagram (PDP-607CMX) * Only for speaker unit b hole* Installation and Connections 12 En to 18 mm (1/2 in . English Installation and Connections b hole* a hole a hole Air vents (fan) b hole* a hole Attaching surface a hole Center line Main unit Installation bracket, etc. to 11/16 in.) Bolt b hole 12 mm to 14 mm (1/2 in .
a hole Bolt b hole* a hole Center line a hole b hole* Rear view diagram (PDP-507CMX) b hole* Air vents (fan) b hole* 12 mm to 9/16 in.) Side view diagram a hole a hole Center line Center line b hole* Rear view diagram (PDP-607CMX) * Only for speaker unit b hole* Installation and Connections 12 En to 18 mm (1/2 in . English Installation and Connections b hole* a hole a hole Air vents (fan) b hole* a hole Attaching surface a hole Center line Main unit Installation bracket, etc. to 11/16 in.) Bolt b hole 12 mm to 14 mm (1/2 in .
Operating Instructions
Page 22
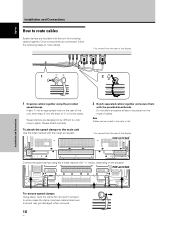
Speed clamps are designed to be placed on the ends of cables. To attach the speed clamps to fix the clamp. PDP-507CMX Connect the speed clamps using the provided speed clamps. Do not allow excessive stress to be difficult to undo once in place. Insert 1 into the ... 2 into an appropriate hole on the situation. In some cases the clamp may have deteriorated over time and may get damaged when removed. 16 En PDP-607CMX To remove speed clamps Using pliers, twist the clamp 90° and pull it outward. English Installation and Connections How to route cables Speed...
Speed clamps are designed to be placed on the ends of cables. To attach the speed clamps to fix the clamp. PDP-507CMX Connect the speed clamps using the provided speed clamps. Do not allow excessive stress to be difficult to undo once in place. Insert 1 into the ... 2 into an appropriate hole on the situation. In some cases the clamp may have deteriorated over time and may get damaged when removed. 16 En PDP-607CMX To remove speed clamps Using pliers, twist the clamp 90° and pull it outward. English Installation and Connections How to route cables Speed...
Operating Instructions
Page 37
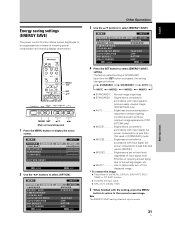
...N M G T. Normal image brightness ÷ STANDARD2 .... Brightness is controlled in accordance with input signal to produce easily viewed image. (PDP-507CMX only) ÷ AUTO Brightness is set automatically in [MODE1]. ÷ MODE3 Brightness is set at reducing screen aging due to burned lag...2 ÷ STANDARD1 .... MENU PICTURE SCREEN CONTRAST BRIGHTNESS H.ENHANCE V. VOL + MENU SET 5/∞ 2/3 Main unit operating panel 1 Press the MENU button to select [ENERGY SAVE] setting. Effective at fixed level, regardless of lowering power consumption and reducing display deterioration....
...N M G T. Normal image brightness ÷ STANDARD2 .... Brightness is controlled in accordance with input signal to produce easily viewed image. (PDP-507CMX only) ÷ AUTO Brightness is set automatically in [MODE1]. ÷ MODE3 Brightness is set at reducing screen aging due to burned lag...2 ÷ STANDARD1 .... MENU PICTURE SCREEN CONTRAST BRIGHTNESS H.ENHANCE V. VOL + MENU SET 5/∞ 2/3 Main unit operating panel 1 Press the MENU button to select [ENERGY SAVE] setting. Effective at fixed level, regardless of lowering power consumption and reducing display deterioration....
Operating Instructions
Page 43
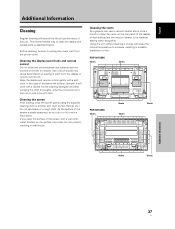
...vents on the surface may cause deterioration or peeling of paint from the power outlet. Use of the screen is described below. PDP-507CMX Vents Vents PDP-607CMX Vents Vents Vents Vents Vents Vents Additional Information 37 En Cleaning the screen After dusting, wipe the screen gently using the ...unplug the power cord from the display or remote control unit. Using the unit without cleaning it with a soft cloth. Cleaning the display panel body and remote control Do not under any circumstances use tissue or a rough cloth. Do not use solvents such as benzine or thinner for...
...vents on the surface may cause deterioration or peeling of paint from the power outlet. Use of the screen is described below. PDP-507CMX Vents Vents PDP-607CMX Vents Vents Vents Vents Vents Vents Additional Information 37 En Cleaning the screen After dusting, wipe the screen gently using the ...unplug the power cord from the display or remote control unit. Using the unit without cleaning it with a soft cloth. Cleaning the display panel body and remote control Do not under any circumstances use tissue or a rough cloth. Do not use solvents such as benzine or thinner for...
Operating Instructions
Page 47
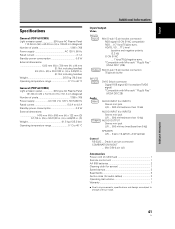
... 15 pin (socket connector) RGB signal (G ON SYNC compatible) RGB ... 0.7 Vp-p/75 Ω/no sync. English Specifications General (PDP-507CMX) Light emission panel 50V type AC Plasma Panel 110.36 cm (W) x 62.09 cm (H) x 126.63 cm (diagonal) Number of pixels 1365 x 768 Power supply AC ...) Light emission panel 60V type AC Plasma Panel 131.86 cm (W) x 74.19 cm (H) x 151.3 cm (diagonal) Number of pixels 1365 x 768 Power supply AC 100 V to 120 V, 50 Hz/60 Hz Rated current 5.8 A to 4.8 A Standby power consumption 0.8 W External dimensions 1470 mm (W) x 880 mm (H) x 122 mm (D) 57-7/8 in. ...
... 15 pin (socket connector) RGB signal (G ON SYNC compatible) RGB ... 0.7 Vp-p/75 Ω/no sync. English Specifications General (PDP-507CMX) Light emission panel 50V type AC Plasma Panel 110.36 cm (W) x 62.09 cm (H) x 126.63 cm (diagonal) Number of pixels 1365 x 768 Power supply AC ...) Light emission panel 60V type AC Plasma Panel 131.86 cm (W) x 74.19 cm (H) x 151.3 cm (diagonal) Number of pixels 1365 x 768 Power supply AC 100 V to 120 V, 50 Hz/60 Hz Rated current 5.8 A to 4.8 A Standby power consumption 0.8 W External dimensions 1470 mm (W) x 880 mm (H) x 122 mm (D) 57-7/8 in. ...


