
Owner's Manual
Page 2
... files 18 - Head unit 6 - Adjusting loudness 11 - Switching the auxiliary setting 12 Connections Connection diagram 14 Installation DIN front/rear mount 15 - Compressed audio compatibility 18 Specifications 20 Please read through this unit 3 After-sales service for Pioneer products 4 Visit our website 4 Protecting your unit from theft 4 - Power ON/OFF 7 -...Remote control 6 - Before You Start Information to User 3 For Canadian model 3 About this manual before using the product for the first time, to the radio 7 - Scanning tracks or folders 9 - Example of a hierarchy 18 -
... files 18 - Head unit 6 - Adjusting loudness 11 - Switching the auxiliary setting 12 Connections Connection diagram 14 Installation DIN front/rear mount 15 - Compressed audio compatibility 18 Specifications 20 Please read through this unit 3 After-sales service for Pioneer products 4 Visit our website 4 Protecting your unit from theft 4 - Power ON/OFF 7 -...Remote control 6 - Before You Start Information to User 3 For Canadian model 3 About this manual before using the product for the first time, to the radio 7 - Scanning tracks or folders 9 - Example of a hierarchy 18 -
Owner's Manual
Page 14
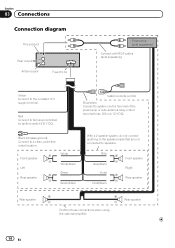
...-antenna relay control terminal (max. 300 mA 12 V DC). System remote control Blue/white Connect to a clean, paint-free metal location. Section 03 Connections Connection diagram This product Rear output Antenna jack Fuse (10 A) Power amp (sold separately) Connect with RCA cables (sold separately) Yellow Connect to the constant 12 V supply...
...-antenna relay control terminal (max. 300 mA 12 V DC). System remote control Blue/white Connect to a clean, paint-free metal location. Section 03 Connections Connection diagram This product Rear output Antenna jack Fuse (10 A) Power amp (sold separately) Connect with RCA cables (sold separately) Yellow Connect to the constant 12 V supply...


