
User manual
Page 11
... down box. About the VOIP321 Driver Once VOIP 321driver is installed and started . 3. Insert the installation CD into the PC's CD ROM (or DVDROM) drive. 2. Power up your base and connect your USB base on the handset to indicate your phone, please install the VOIP321 driver provided in the enclosed CD.... your current status. Start the VOIP 321driver by double clicking on the shortcut icon created on Setupwizard.exe. > If your desktop if it is loaded. 11 Simply select ALLOW THIS PROGRAM TO USE SKYPE and press OK. 4. For XP user, select Philips VOIP321 from Audio IN, Audio ...
... down box. About the VOIP321 Driver Once VOIP 321driver is installed and started . 3. Insert the installation CD into the PC's CD ROM (or DVDROM) drive. 2. Power up your base and connect your USB base on the handset to indicate your phone, please install the VOIP321 driver provided in the enclosed CD.... your current status. Start the VOIP 321driver by double clicking on the shortcut icon created on Setupwizard.exe. > If your desktop if it is loaded. 11 Simply select ALLOW THIS PROGRAM TO USE SKYPE and press OK. 4. For XP user, select Philips VOIP321 from Audio IN, Audio ...

User manual
Page 12
... icon will return the ABOUT page of your phone. Close the window when finished. • When finished, click CANCEL to retain audio driver selection. Please follow the steps below to adjust...Audio Devices. • Select the Audio tab. • To adjust the earpiece volume, select Philips VOIP321 from the Preferred device under Sound Recording. • Click the Volume button. • Adjust... audio path of VOIP 321 driver. For Windows XP users, • Click on the tray icon either to stop the VOIP 321 driver or to adjust the microphone volume, select USB audio Device from the...
... icon will return the ABOUT page of your phone. Close the window when finished. • When finished, click CANCEL to retain audio driver selection. Please follow the steps below to adjust...Audio Devices. • Select the Audio tab. • To adjust the earpiece volume, select Philips VOIP321 from the Preferred device under Sound Recording. • Click the Volume button. • Adjust... audio path of VOIP 321 driver. For Windows XP users, • Click on the tray icon either to stop the VOIP 321 driver or to adjust the microphone volume, select USB audio Device from the...
User manual
Page 13
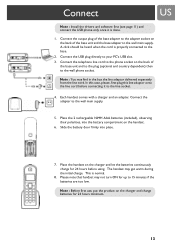
Connect US Note : Install the drivers and software first (see page 11) and connect the USB phone only once it to the wall phone socket. Connect the output plug of the base adapter to the adapter socket on the back of the base unit and to the plug (optional .... 6. Note : You may not turn ON for up to the wall main supply. Connect the adapter to your PC's USB slot. 3. This is normal. 8. Connect the telephone line cord to the phone socket on the charger and let the batteries continuously charge for 24 hours minimum. 13 The handset may get warm...
Connect US Note : Install the drivers and software first (see page 11) and connect the USB phone only once it to the wall phone socket. Connect the output plug of the base adapter to the adapter socket on the back of the base unit and to the plug (optional .... 6. Note : You may not turn ON for up to the wall main supply. Connect the adapter to your PC's USB slot. 3. This is normal. 8. Connect the telephone line cord to the phone socket on the charger and let the batteries continuously charge for 24 hours minimum. 13 The handset may get warm...

User manual
Page 31
...and press OK. The handset name can be composed of A-Z, 0-9, and space. 1. Set time Once the base is powered up to the PC and the USB driver is displayed. 4. However, you can be up and connected to 10 characters long and it can still adjust the clock manually. If you have more... clock in 24 hours format and press OK. Edit the handset name and press OK to turn off the alarm clock. 31 To adjust your phone a different name. Setting the alarm time 1. Select PERSONAL SET and press OK. 3. The current handset name is displayed. 4. Enter the alarm time using the ...
...and press OK. The handset name can be composed of A-Z, 0-9, and space. 1. Set time Once the base is powered up to the PC and the USB driver is displayed. 4. However, you can be up and connected to 10 characters long and it can still adjust the clock manually. If you have more... clock in 24 hours format and press OK. Edit the handset name and press OK to turn off the alarm clock. 31 To adjust your phone a different name. Setting the alarm time 1. Select PERSONAL SET and press OK. 3. The current handset name is displayed. 4. Enter the alarm time using the ...

User manual
Page 40
Start Skype if the VOIP 321 driver has not started on the PC and running properly. • Make sure the phone is setup correctly. • Wait for the remote party... • Turn on the PC. Bad audio quality (crackles, echo, etc.). Wait for 24 hours. The phone does not ring. Busy tone is flashing. The call waiting call . • Please contact your dealer to ...to see if you . • Check if the VOIP 321 driver is running on the ringer. • Take the handset off previously. • Check with your local phone company and select the correct flash duration. •...
Start Skype if the VOIP 321 driver has not started on the PC and running properly. • Make sure the phone is setup correctly. • Wait for the remote party... • Turn on the PC. Bad audio quality (crackles, echo, etc.). Wait for 24 hours. The phone does not ring. Busy tone is flashing. The call waiting call . • Please contact your dealer to ...to see if you . • Check if the VOIP 321 driver is running on the ringer. • Take the handset off previously. • Check with your local phone company and select the correct flash duration. •...

User manual
Page 43
... key 24 Delete last numbers dialed 28 Delete phonebook entry 23 Delete whole redial list 28 Deleting a voicemail 19 Dialing mode 33 Display contrast 33 Driver 11 E Earpiece volume,set 21 Edit phonebook entry 22 Electric, Magnetic and Electromagnetic Fields ("EMF") 41 End a call 20 End a Skype call 16 Environmental care...
... key 24 Delete last numbers dialed 28 Delete phonebook entry 23 Delete whole redial list 28 Deleting a voicemail 19 Dialing mode 33 Display contrast 33 Driver 11 E Earpiece volume,set 21 Edit phonebook entry 22 Electric, Magnetic and Electromagnetic Fields ("EMF") 41 End a call 20 End a Skype call 16 Environmental care...

Quick start guide
Page 1
... rechargeable NiMH AAA batteries, observing their power supply and additional rechargeable batteries. What else will be asked to: Connect USB plug O Connect the USB plug directly to the phone socket on the screen. O Remove the installation CD from the PC's CDROM drive. O Slide the battery door ...on the charger and charge batteries for the handset to the wall phone socket. O Before first use the Skype version provided on the installation CD for the handset to work properly. 2 Connect Once the drivers and sofware installed ! C Finish installation Go on following instructions on...
... rechargeable NiMH AAA batteries, observing their power supply and additional rechargeable batteries. What else will be asked to: Connect USB plug O Connect the USB plug directly to the phone socket on the screen. O Remove the installation CD from the PC's CDROM drive. O Slide the battery door ...on the charger and charge batteries for the handset to the wall phone socket. O Before first use the Skype version provided on the installation CD for the handset to work properly. 2 Connect Once the drivers and sofware installed ! C Finish installation Go on following instructions on...