
User manual (English)
Page 3
... makes no representations or warranties, either expressed or implied, with respect to the contents hereof and specifically disclaims any particular purpose. EN - Safety instructions Before operating the PhotoFrame, carefully read and follow the instructions below. • Retain this User Manual for any warranties, merchantability or fitness for future reference. • Read the safety and operating instructions carefully before using the product. Philips Digital PhotoFrame Copyright No part...
... makes no representations or warranties, either expressed or implied, with respect to the contents hereof and specifically disclaims any particular purpose. EN - Safety instructions Before operating the PhotoFrame, carefully read and follow the instructions below. • Retain this User Manual for any warranties, merchantability or fitness for future reference. • Read the safety and operating instructions carefully before using the product. Philips Digital PhotoFrame Copyright No part...
User manual (English)
Page 4
... of the LCD panel and is made with the PhotoFrame. This is a structural property of light (red, blue or green) may appear constantly on the power adapter cord. Strong impacts may be damaged and result in this product. Philips Digital PhotoFrame • Do not use this product. The metal contacts inside . • Do not insert objects other than compatible memory cards into the memory card slots...
... of the LCD panel and is made with the PhotoFrame. This is a structural property of light (red, blue or green) may appear constantly on the power adapter cord. Strong impacts may be damaged and result in this product. Philips Digital PhotoFrame • Do not use this product. The metal contacts inside . • Do not insert objects other than compatible memory cards into the memory card slots...
User manual (English)
Page 5
... view 3 Rear view 5 Operating the PhotoFrame 6 Using the control buttons 7 Using the remote control (These models only: SPF3480/G7, SPF3480X/G7, SPF3400/G7 and SPF3400C/G7 8 Replacing the remote control battery 10 Getting started 12 Step 1: Using the adjustable back stand 12 Step 2: Connecting to power 14 Step 3: First usage 15 Step 4: Basic setup 15 Selecting a language 15 Setting the date and time 16 Step 5: Inserting a memory card/USB flash drive 17 Compatible memory card formats 18 Step 6: Copying photos to internal memory 19 Step 7: Connecting the PhotoFrame to...
... view 3 Rear view 5 Operating the PhotoFrame 6 Using the control buttons 7 Using the remote control (These models only: SPF3480/G7, SPF3480X/G7, SPF3400/G7 and SPF3400C/G7 8 Replacing the remote control battery 10 Getting started 12 Step 1: Using the adjustable back stand 12 Step 2: Connecting to power 14 Step 3: First usage 15 Step 4: Basic setup 15 Selecting a language 15 Setting the date and time 16 Step 5: Inserting a memory card/USB flash drive 17 Compatible memory card formats 18 Step 6: Copying photos to internal memory 19 Step 7: Connecting the PhotoFrame to...
User manual (English)
Page 6
Philips Digital PhotoFrame Using other options in the PHOTO ALBUMS menu 34 Deleting photos 34 Rotating photos 35 Applying photo effects 36 Viewing photos 37 Running a slideshow by using the TIMELINE album 39 Using Smart Energy Saver 40 Using CLOCK (EZ Access button 42 Selecting a clock skin 42 Switching between Clock view and Slideshow view 43 Using SCRAPBOOK 44 Using SETTINGS 45 Date and Time page 46 General Settings page 47 Information page 48 Frequently asked questions 49 Regulation and compliance 51...
Philips Digital PhotoFrame Using other options in the PHOTO ALBUMS menu 34 Deleting photos 34 Rotating photos 35 Applying photo effects 36 Viewing photos 37 Running a slideshow by using the TIMELINE album 39 Using Smart Energy Saver 40 Using CLOCK (EZ Access button 42 Selecting a clock skin 42 Switching between Clock view and Slideshow view 43 Using SCRAPBOOK 44 Using SETTINGS 45 Date and Time page 46 General Settings page 47 Information page 48 Frequently asked questions 49 Regulation and compliance 51...
User manual (English)
Page 7
... following features: • Clear and bright display. • Enables you to display photos that are stored in the internal memory, a memory card or a USB flash drive. • Allows you to select a preferred power-saving option for bringing our Philips Digital PhotoFrame into your new Philips product, please read through this entire User Manual before use albums to manage and sort your photos easily. • Allows you to display photos in slideshow using the Smart Energy Saver™ feature...
... following features: • Clear and bright display. • Enables you to display photos that are stored in the internal memory, a memory card or a USB flash drive. • Allows you to select a preferred power-saving option for bringing our Philips Digital PhotoFrame into your new Philips product, please read through this entire User Manual before use albums to manage and sort your photos easily. • Allows you to display photos in slideshow using the Smart Energy Saver™ feature...
User manual (English)
Page 8
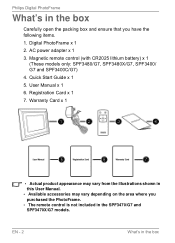
Magnetic remote control (with CR2025 lithium battery) x 1 (These models only: SPF3480/G7, SPF3480X/G7, SPF3400/ G7 and SPF3400C/G7) 4. Philips Digital PhotoFrame What's in the box Carefully open the packing box and ensure that you purchased the PhotoFrame. • The remote control is not included in the SPF3470/G7 and SPF3470X/G7 models. Digital PhotoFrame x 1 2. Quick Start Guide x 1 5. User Manual x 1 6. Registration Card x 1 7. Warranty Card x 1 • Actual product appearance may vary from the illustrations...
Magnetic remote control (with CR2025 lithium battery) x 1 (These models only: SPF3480/G7, SPF3480X/G7, SPF3400/ G7 and SPF3400C/G7) 4. Philips Digital PhotoFrame What's in the box Carefully open the packing box and ensure that you purchased the PhotoFrame. • The remote control is not included in the SPF3470/G7 and SPF3470X/G7 models. Digital PhotoFrame x 1 2. Quick Start Guide x 1 5. User Manual x 1 6. Registration Card x 1 7. Warranty Card x 1 • Actual product appearance may vary from the illustrations...
User manual (English)
Page 10
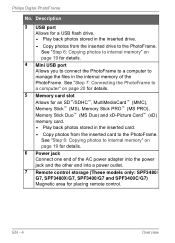
... 7: Connecting the PhotoFrame to manage the files in the internal memory of the AC power adapter into the power jack and the other end into a power outlet. 7 Remote control storage (These models only: SPF3480/ G7, SPF3480X/G7, SPF3400/G7 and SPF3400C/G7) Magnetic area for details. 6 Power jack Connect one end of the PhotoFrame. Philips Digital PhotoFrame No. See "Step 6: Copying photos to internal memory" on page 19 for details. 4 Mini USB port Allows you to connect the PhotoFrame...
... 7: Connecting the PhotoFrame to manage the files in the internal memory of the AC power adapter into the power jack and the other end into a power outlet. 7 Remote control storage (These models only: SPF3480/ G7, SPF3480X/G7, SPF3400/G7 and SPF3400C/G7) Magnetic area for details. 6 Power jack Connect one end of the PhotoFrame. Philips Digital PhotoFrame No. See "Step 6: Copying photos to internal memory" on page 19 for details. 4 Mini USB port Allows you to connect the PhotoFrame...
User manual (English)
Page 12
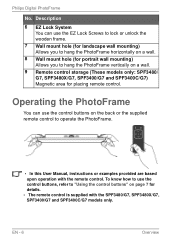
Philips Digital PhotoFrame No. To know how to use the control buttons on the back or the supplied remote control to operate the PhotoFrame. • In this User Manual, instructions or examples provided are based upon operation with the SPF3480/G7, SPF3480X/G7, SPF3400/G7 and SPF3400C/G7 models only. Operating the PhotoFrame You can use the EZ Lock Screws to lock or unlock the wooden frame. 7 Wall mount hole (for landscape wall...
Philips Digital PhotoFrame No. To know how to use the control buttons on the back or the supplied remote control to operate the PhotoFrame. • In this User Manual, instructions or examples provided are based upon operation with the SPF3480/G7, SPF3480X/G7, SPF3400/G7 and SPF3400C/G7 models only. Operating the PhotoFrame You can use the EZ Lock Screws to lock or unlock the wooden frame. 7 Wall mount hole (for landscape wall...
User manual (English)
Page 21
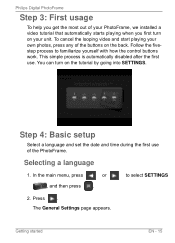
... the fivestep process to select SETTINGS 2. Step 4: Basic setup Select a language and set the date and time during the first use . Philips Digital PhotoFrame Step 3: First usage To help you first turn on your PhotoFrame, we installed a video tutorial that automatically starts playing when you get the most out of the buttons on the back. To cancel the looping video and start playing your own photos, press any of your unit...
... the fivestep process to select SETTINGS 2. Step 4: Basic setup Select a language and set the date and time during the first use . Philips Digital PhotoFrame Step 3: First usage To help you first turn on your PhotoFrame, we installed a video tutorial that automatically starts playing when you get the most out of the buttons on the back. To cancel the looping video and start playing your own photos, press any of your unit...
User manual (English)
Page 23
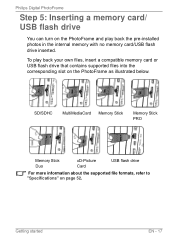
... a memory card/ USB flash drive You can turn on page 52. Getting started EN - 17 SD/SDHC MultiMediaCard Memory Stick Memory Stick PRO Memory Stick Duo xD-Picture Card USB flash drive For more information about the supported file formats, refer to "Specifications" on the PhotoFrame and play back your own files, insert a compatible memory card or USB flash drive that contains supported files into the corresponding slot on the PhotoFrame as illustrated below. To play back the pre-installed photos in the internal memory with...
... a memory card/ USB flash drive You can turn on page 52. Getting started EN - 17 SD/SDHC MultiMediaCard Memory Stick Memory Stick PRO Memory Stick Duo xD-Picture Card USB flash drive For more information about the supported file formats, refer to "Specifications" on the PhotoFrame and play back your own files, insert a compatible memory card or USB flash drive that contains supported files into the corresponding slot on the PhotoFrame as illustrated below. To play back the pre-installed photos in the internal memory with...
User manual (English)
Page 24
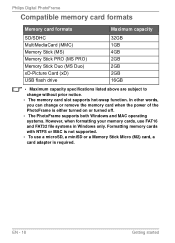
... Getting started Philips Digital PhotoFrame Compatible memory card formats Memory card formats Maximum capacity SD/SDHC MultiMediaCard (MMC) Memory Stick (MS) Memory Stick PRO (MS PRO) Memory Stick Duo (MS Duo) xD-Picture Card (xD) USB flash drive 32GB 1GB 4GB 2GB 2GB 2GB 16GB • Maximum capacity specifications listed above are subject to change or remove the memory card when the power of the PhotoFrame is either turned on or turned off. • The PhotoFrame supports both Windows and MAC operating systems...
... Getting started Philips Digital PhotoFrame Compatible memory card formats Memory card formats Maximum capacity SD/SDHC MultiMediaCard (MMC) Memory Stick (MS) Memory Stick PRO (MS PRO) Memory Stick Duo (MS Duo) xD-Picture Card (xD) USB flash drive 32GB 1GB 4GB 2GB 2GB 2GB 16GB • Maximum capacity specifications listed above are subject to change or remove the memory card when the power of the PhotoFrame is either turned on or turned off. • The PhotoFrame supports both Windows and MAC operating systems...
User manual (English)
Page 25
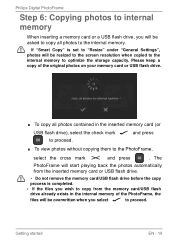
... view photos without copying them to the PhotoFrame, select the cross mark ✕ and press . The PhotoFrame will start playing back the photos automatically from the inserted memory card or USB flash drive. • Do not remove the memory card/USB flash drive before the copy process is set to "Resize" under "General Settings", photos will be resized to the screen resolution when copied to the internal memory to optimize the storage capacity. Getting started EN - 19 Philips Digital PhotoFrame Step 6: Copying photos to internal memory...
... view photos without copying them to the PhotoFrame, select the cross mark ✕ and press . The PhotoFrame will start playing back the photos automatically from the inserted memory card or USB flash drive. • Do not remove the memory card/USB flash drive before the copy process is set to "Resize" under "General Settings", photos will be resized to the screen resolution when copied to the internal memory to optimize the storage capacity. Getting started EN - 19 Philips Digital PhotoFrame Step 6: Copying photos to internal memory...
User manual (English)
Page 31
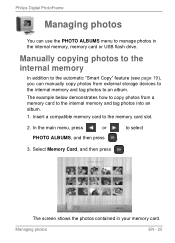
... how to copy photos from external storage devices to the internal memory and tag photos to an album. Select Memory Card, and then press . The screen shows the photos contained in the internal memory, memory card or USB flash drive. Insert a compatible memory card to select . 3. In the main menu, press or PHOTO ALBUMS, and then press to the memory card slot. 2. Philips Digital PhotoFrame Managing photos You can manually copy photos from a memory card to the internal memory and tag photos into an album. 1. Manually copying photos to the internal memory In addition...
... how to copy photos from external storage devices to the internal memory and tag photos to an album. Select Memory Card, and then press . The screen shows the photos contained in the internal memory, memory card or USB flash drive. Insert a compatible memory card to select . 3. In the main menu, press or PHOTO ALBUMS, and then press to the memory card slot. 2. Philips Digital PhotoFrame Managing photos You can manually copy photos from a memory card to the internal memory and tag photos into an album. 1. Manually copying photos to the internal memory In addition...

User manual (English)
Page 44
You can adjust the settings below. • Transition Effect: selects the transition effect you wish to apply to display the pop- The default transition effect "Pan & Zoom" does not allow customized interval settings. • Brightness: selects the level of screen brightness. • Contrast: selects the level of contrast. • Saturation: selects the level of saturation. EN - 38 Viewing photos Philips Digital PhotoFrame 3. To configure slideshow settings, press to the slideshow. • Slideshow Interval: selects the slideshow interval between photos. up menu.
You can adjust the settings below. • Transition Effect: selects the transition effect you wish to apply to display the pop- The default transition effect "Pan & Zoom" does not allow customized interval settings. • Brightness: selects the level of screen brightness. • Contrast: selects the level of contrast. • Saturation: selects the level of saturation. EN - 38 Viewing photos Philips Digital PhotoFrame 3. To configure slideshow settings, press to the slideshow. • Slideshow Interval: selects the slideshow interval between photos. up menu.

User manual (English)
Page 48
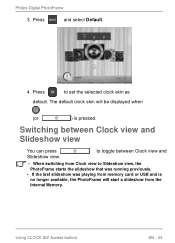
To set a default clock skin to select . 2. EN - 42 Using CLOCK (EZ Access button) In the main menu, press or CLOCK & CALENDAR, and then press to be displayed in Clock view, follow the steps below. 1. Philips Digital PhotoFrame Using CLOCK (EZ Access button) Selecting a clock skin The PhotoFrame provides various preloaded clock and calendar skins. Press or to select a desired skin.
To set a default clock skin to select . 2. EN - 42 Using CLOCK (EZ Access button) In the main menu, press or CLOCK & CALENDAR, and then press to be displayed in Clock view, follow the steps below. 1. Philips Digital PhotoFrame Using CLOCK (EZ Access button) Selecting a clock skin The PhotoFrame provides various preloaded clock and calendar skins. Press or to select a desired skin.
User manual (English)
Page 49
.... • If the last slideshow was playing from memory card or USB and is pressed. Switching between Clock view and • When switching from the Internal Memory. Using CLOCK (EZ Access button) EN - 43 The default clock skin will be displayed when (or ) is no longer available, the PhotoFrame will start a slideshow from Clock view to set the selected clock skin as default. Press and select Default. 4. Philips Digital PhotoFrame 3. to toggle between Clock view and Slideshow view You can press Slideshow view.
.... • If the last slideshow was playing from memory card or USB and is pressed. Switching between Clock view and • When switching from the Internal Memory. Using CLOCK (EZ Access button) EN - 43 The default clock skin will be displayed when (or ) is no longer available, the PhotoFrame will start a slideshow from Clock view to set the selected clock skin as default. Press and select Default. 4. Philips Digital PhotoFrame 3. to toggle between Clock view and Slideshow view You can press Slideshow view.

User manual (English)
Page 53
... external storage devices to the internal memory when using the Smart Copy feature. Normal Keeps the original file size. Using SETTINGS EN - 47 Reset Yes Returns all the settings back to display photos in Original original size or full screen. Language English French Spanish Sets up video tutorial for major features and functions. Philips Digital PhotoFrame General Settings page Item Option Description 1 2 Brightness 3 4 Allows you to select the level of the PhotoFrame. Resize Resizes the photos to save memory...
... external storage devices to the internal memory when using the Smart Copy feature. Normal Keeps the original file size. Using SETTINGS EN - 47 Reset Yes Returns all the settings back to display photos in Original original size or full screen. Language English French Spanish Sets up video tutorial for major features and functions. Philips Digital PhotoFrame General Settings page Item Option Description 1 2 Brightness 3 4 Allows you to select the level of the PhotoFrame. Resize Resizes the photos to save memory...
User manual (English)
Page 55
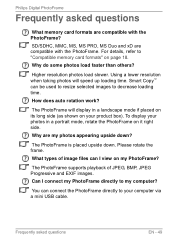
Smart Copy™ can be used to resize selected images to "Compatible memory card formats" on your computer via a mini USB cable. Why are compatible with the PhotoFrame? Frequently asked questions What memory card formats are compatible with the PhotoFrame. The PhotoFrame is placed upside down ? The PhotoFrame supports playback of image files can connect the PhotoFrame directly to my computer? Higher resolution photos load slower. How does auto rotation work? To display your photos in a landscape mode if placed on its long side...
Smart Copy™ can be used to resize selected images to "Compatible memory card formats" on your computer via a mini USB cable. Why are compatible with the PhotoFrame? Frequently asked questions What memory card formats are compatible with the PhotoFrame. The PhotoFrame is placed upside down ? The PhotoFrame supports playback of image files can connect the PhotoFrame directly to my computer? Higher resolution photos load slower. How does auto rotation work? To display your photos in a landscape mode if placed on its long side...
User manual (English)
Page 59
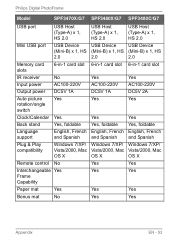
Philips Digital PhotoFrame Model SPF3470X/G7 SPF3480X/G7 SPF3400C/G7 USB port USB Host (Type-A) x 1, HS 2.0 USB Host (Type-A) x 1, HS 2.0 USB Host (Type-A) x 1, HS 2.0 Mini USB port USB Device USB Device USB Device (Mini-B) x 1, HS (Mini-B) x 1, HS (Mini-B) x 1, HS 2.0 2.0 2.0 Memory card slots 6-in-1 card slot 6-in-1 card slot 6-in-1 card slot IR receiver Input power Output power Auto picture rotation/angle switch No AC100-220V DC5V 1A Yes Yes AC100-220V DC5V 1A Yes Yes AC100-220V DC5V 2A Yes...
Philips Digital PhotoFrame Model SPF3470X/G7 SPF3480X/G7 SPF3400C/G7 USB port USB Host (Type-A) x 1, HS 2.0 USB Host (Type-A) x 1, HS 2.0 USB Host (Type-A) x 1, HS 2.0 Mini USB port USB Device USB Device USB Device (Mini-B) x 1, HS (Mini-B) x 1, HS (Mini-B) x 1, HS 2.0 2.0 2.0 Memory card slots 6-in-1 card slot 6-in-1 card slot 6-in-1 card slot IR receiver Input power Output power Auto picture rotation/angle switch No AC100-220V DC5V 1A Yes Yes AC100-220V DC5V 1A Yes Yes AC100-220V DC5V 2A Yes...
Leaflet
Page 2
... reserved. or their respective owners. www.philips.com Trademarks are subject to 70°C • Weight: 0.885 kg Power • Power consumption: 5 W • Power mode supported: AC powered Storage Media • USB: USB flash drive • SPF3400/G7 Issue date 2010-11-29 Version: 6.2.2 12 NC: 8670 000 69435 UPC: 6 09585 19954 5 © 2010 Koninklijke Philips Electronics N.V. Digital PhotoFrame 10.4" LCD Panel Brown Wood Frame Specifications Picture/Display • Panel Size: 10.4 inch • Aspect ratio: 4:3 •...
... reserved. or their respective owners. www.philips.com Trademarks are subject to 70°C • Weight: 0.885 kg Power • Power consumption: 5 W • Power mode supported: AC powered Storage Media • USB: USB flash drive • SPF3400/G7 Issue date 2010-11-29 Version: 6.2.2 12 NC: 8670 000 69435 UPC: 6 09585 19954 5 © 2010 Koninklijke Philips Electronics N.V. Digital PhotoFrame 10.4" LCD Panel Brown Wood Frame Specifications Picture/Display • Panel Size: 10.4 inch • Aspect ratio: 4:3 •...


