Leaflet
Page 1
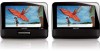
... from picture disc Enrich your AV entertainment experience • 7" TFT color LCD display in 16:9 wide screen format • Expand movie enjoyment with two widescreen LCDs Play your convenience • Car adaptor and mounting strap included • Full Resume on Power Loss • AC/DC adapter included • Stereo headphone jack for better personal music enjoyment Philips Portable DVD Player 7" LCD Dual screens PD7012 Enjoy...
... from picture disc Enrich your AV entertainment experience • 7" TFT color LCD display in 16:9 wide screen format • Expand movie enjoyment with two widescreen LCDs Play your convenience • Car adaptor and mounting strap included • Full Resume on Power Loss • AC/DC adapter included • Stereo headphone jack for better personal music enjoyment Philips Portable DVD Player 7" LCD Dual screens PD7012 Enjoy...
Leaflet
Page 2
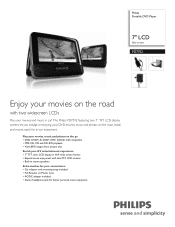
... the remote control. Portable DVD Player 7" LCD Dual screens Highlights PD7012/37 Specifications 7" TFT color LCD display(16:9) DVD, DVD+/-RW, (S)VCD, CD Picture/Display • Display screen type: LCD TFT • Diagonal screen size (inch): 7 inch • Resolution: 480(w)x234(H)x3(RGB) Sound • Output Power: 250mW RMS(built-in speakers) • Output power (RMS): 10mW RMS(earphone) • Signal to high-definition digital television. Car adaptor and mounting strap The Philips Portable DVD player is a shorthand term for a DVD drive...
... the remote control. Portable DVD Player 7" LCD Dual screens Highlights PD7012/37 Specifications 7" TFT color LCD display(16:9) DVD, DVD+/-RW, (S)VCD, CD Picture/Display • Display screen type: LCD TFT • Diagonal screen size (inch): 7 inch • Resolution: 480(w)x234(H)x3(RGB) Sound • Output Power: 250mW RMS(built-in speakers) • Output power (RMS): 10mW RMS(earphone) • Signal to high-definition digital television. Car adaptor and mounting strap The Philips Portable DVD player is a shorthand term for a DVD drive...
User manual
Page 4
... product. • Product repair and/or part replacement because of improper installation or maintenance, connections to improper voltage supply, power line surge, lightning damage, retained images or screen markings resulting from viewing fixed stationary content for extended periods, product cosmetic appearance items due to normal wear and tear, unauthorized repair or other cause not within the control of Philips. • Damage or...
... product. • Product repair and/or part replacement because of improper installation or maintenance, connections to improper voltage supply, power line surge, lightning damage, retained images or screen markings resulting from viewing fixed stationary content for extended periods, product cosmetic appearance items due to normal wear and tear, unauthorized repair or other cause not within the control of Philips. • Damage or...
User manual
Page 5
English Contents 1 Important 6 Important safety instructions 6 Notice 8 2 Your portable DVD player 10 Introduction 10 What's in the box 10 Overview of the main unit 11 Overview of the second screen 13 3 Get started 14 Preparation 14 Connect the second screen 15 Connect power 16 4 Use your player 17 Turn on 17 Select OSD language 17 Play discs 17 Play options 18 5 Adjust settings 19 Set the main unit 19 Set the second screen 20 6 Use more...
English Contents 1 Important 6 Important safety instructions 6 Notice 8 2 Your portable DVD player 10 Introduction 10 What's in the box 10 Overview of the main unit 11 Overview of the second screen 13 3 Get started 14 Preparation 14 Connect the second screen 15 Connect power 16 4 Use your player 17 Turn on 17 Select OSD language 17 Play discs 17 Play options 18 5 Adjust settings 19 Set the main unit 19 Set the second screen 20 6 Use more...

User manual
Page 6
... dry cloth. c Heed all instructions. g Do not block any heat sources such as radiators, heat registers, stoves, or other . e Do not use this apparatus during lightning storms or when unused for your outlet, consult an electrician for replacement of the polarized or grounding-type plug. h Do not install near water. k Only use caution when moving the...
... dry cloth. c Heed all instructions. g Do not block any heat sources such as radiators, heat registers, stoves, or other . e Do not use this apparatus during lightning storms or when unused for your outlet, consult an electrician for replacement of the polarized or grounding-type plug. h Do not install near water. k Only use caution when moving the...
User manual
Page 7
...volume can produce sounds in any way, such as marked on the apparatus (e.g. Servicing is not used for those that you always have easy access to the power cord, plug or adaptor to disconnect this apparatus. • Ensure that may be exposed to rain or moisture, does not operate normally, or has been dropped. English n Refer all batteries... apparatus away from direct sunlight, naked flames or heat. • Never look into the apparatus, the apparatus has been exposed to dripping or splashing. EN 7 o Battery usage CAUTION - Warning • Never remove the casing of ...
...volume can produce sounds in any way, such as marked on the apparatus (e.g. Servicing is not used for those that you always have easy access to the power cord, plug or adaptor to disconnect this apparatus. • Ensure that may be exposed to rain or moisture, does not operate normally, or has been dropped. English n Refer all batteries... apparatus away from direct sunlight, naked flames or heat. • Never look into the apparatus, the apparatus has been exposed to dripping or splashing. EN 7 o Battery usage CAUTION - Warning • Never remove the casing of ...
User manual
Page 8
... to adjust the volume as your hearing adapts. • Do not turn up the volume so high that are not expressly approved by a specialized company. Over time your equipment reasonably and take appropriate breaks. • Sound can also cause hearing loss. • Be sure to use your hearing 'comfort level' adapts to a safe level before your volume control at a low setting. •...
... to adjust the volume as your hearing adapts. • Do not turn up the volume so high that are not expressly approved by a specialized company. Over time your equipment reasonably and take appropriate breaks. • Sound can also cause hearing loss. • Be sure to use your hearing 'comfort level' adapts to a safe level before your volume control at a low setting. •...

User manual
Page 9
... making of unauthorized copies of copyprotected material, including computer programs, files, broadcasts and sound recordings, may be an infringement of copyrights and constitute a criminal offence.This equipment should not be recycled and reused. Please inform yourself about the local rules on the environment and human health. English Recycling Your product is covered by the European Directive...
... making of unauthorized copies of copyprotected material, including computer programs, files, broadcasts and sound recordings, may be an infringement of copyrights and constitute a criminal offence.This equipment should not be recycled and reused. Please inform yourself about the local rules on the environment and human health. English Recycling Your product is covered by the European Directive...

User manual
Page 10
... also select sound track, subtitle languages, and different angle of your product at www.philips. 2 Your portable DVD player Congratulations on DVD disc). com/welcome. You can play the following discs on the DVD player (including CD-R, CD-RW, DVD±R and DVD±RW): • DVD-Video • Video CD • Audio CD • MP3 CD • Discs with true cinema picture quality and stereo or multi-channel sound (depending on disc and playback set-up). To...
... also select sound track, subtitle languages, and different angle of your product at www.philips. 2 Your portable DVD player Congratulations on DVD disc). com/welcome. You can play the following discs on the DVD player (including CD-R, CD-RW, DVD±R and DVD±RW): • DVD-Video • Video CD • Audio CD • MP3 CD • Discs with true cinema picture quality and stereo or multi-channel sound (depending on disc and playback set-up). To...
User manual
Page 11
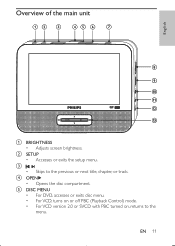
c, • Skips to the menu. d OPEN • Opens the disc compartment. e DISC MENU • For DVD, accesses or exits disc menu. • For VCD, turns on or off PBC (Playback Control) mode. • For VCD version 2.0 or SVCD with PBC turned on, returns to the previous or next title, chapter, or track. b SETUP • Accesses or exits the setup menu. EN 11 English Overview of the main unit a BRIGHTNESS • Adjusts screen brightness.
c, • Skips to the menu. d OPEN • Opens the disc compartment. e DISC MENU • For DVD, accesses or exits disc menu. • For VCD, turns on or off PBC (Playback Control) mode. • For VCD version 2.0 or SVCD with PBC turned on, returns to the previous or next title, chapter, or track. b SETUP • Accesses or exits the setup menu. EN 11 English Overview of the main unit a BRIGHTNESS • Adjusts screen brightness.

User manual
Page 12
... an entry or selection. • Starts, pauses or resumes disc play. • Stops disc play. 12 EN i VOL +/• Increases or decreases volume. j • Headphone jack. k AV OUT • Audio/video output jack. f OPTION • Accesses options relating to TV. l DC IN • Power supply socket. g AV MODE • Turns off DVD player. h ON/OFF • Turns on/off the front panel display when the player is connected to the current...
... an entry or selection. • Starts, pauses or resumes disc play. • Stops disc play. 12 EN i VOL +/• Increases or decreases volume. j • Headphone jack. k AV OUT • Audio/video output jack. f OPTION • Accesses options relating to TV. l DC IN • Power supply socket. g AV MODE • Turns off DVD player. h ON/OFF • Turns on/off the front panel display when the player is connected to the current...
User manual
Page 14
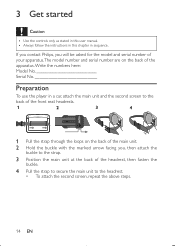
... 3 Position the main unit at the back of the apparatus.Write the numbers here: Model No Serial No Preparation To use the player in sequence. 3 Get started Caution • Use the controls only as stated in this user manual. • Always follow the instructions in this chapter in a car, attach the main unit and the second... screen to the back of the front seat headrests. 1 Pull the strap through the loops on the back of the main unit. 2 Hold the buckle with the marked arrow facing you, then attach the buckle to the headrest. • To attach the second screen, repeat the above...
... 3 Position the main unit at the back of the apparatus.Write the numbers here: Model No Serial No Preparation To use the player in sequence. 3 Get started Caution • Use the controls only as stated in this user manual. • Always follow the instructions in this chapter in a car, attach the main unit and the second... screen to the back of the front seat headrests. 1 Pull the strap through the loops on the back of the main unit. 2 Hold the buckle with the marked arrow facing you, then attach the buckle to the headrest. • To attach the second screen, repeat the above...

User manual
Page 16
... double-connector end of the AC cable to the voltage pointed on the main unit. 2 Connect the other end of the double-connector end of product damage! Never pull the cable. B: second screen; When you unplug the AC adapter, always pull the plug from the socket. Ensure that the power supply voltage corresponds to the DC...
... double-connector end of the AC cable to the voltage pointed on the main unit. 2 Connect the other end of the double-connector end of product damage! Never pull the cable. B: second screen; When you unplug the AC adapter, always pull the plug from the socket. Ensure that the power supply voltage corresponds to the DC...
User manual
Page 17
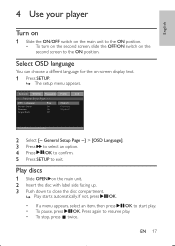
... play . • To pause, press /OK. Play discs 1 Slide OPEN on the second screen to start play . • To stop, press twice. Press again to exit. If not, press /OK. • If a menu appears, select an item, then press /OK to the ON position. EN 17 Select OSD language You can choose a diffrent language for the on-screen display text. 1 Press SETUP. » The setup menu appears. 2 Select...
... play . • To pause, press /OK. Play discs 1 Slide OPEN on the second screen to start play . • To stop, press twice. Press again to exit. If not, press /OK. • If a menu appears, select an item, then press /OK to the ON position. EN 17 Select OSD language You can choose a diffrent language for the on-screen display text. 1 Press SETUP. » The setup menu appears. 2 Select...
User manual
Page 18
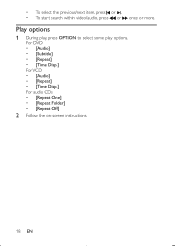
For DVD • [Audio] • [Subtitle] • [Repeat] • [Time Disp.] For VCD • [Audio] • [Repeat] • [Time Disp.] For audio CDs • [Repeat One] • [Repeat Folder] • [Repeat Off] 2 Follow the on-screen instructions. 18 EN • To select the previous/next item, press or . • To start search within video/audio, press or once or more. Play options 1 During play, press OPTION to select some play options.
For DVD • [Audio] • [Subtitle] • [Repeat] • [Time Disp.] For VCD • [Audio] • [Repeat] • [Time Disp.] For audio CDs • [Repeat One] • [Repeat Folder] • [Repeat Off] 2 Follow the on-screen instructions. 18 EN • To select the previous/next item, press or . • To start search within video/audio, press or once or more. Play options 1 During play, press OPTION to select some play options.
User manual
Page 19
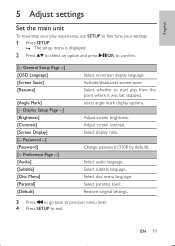
... screen saver. Select display ratio. Select disc menu language. Display Setup Page --] [Brightness] [Contrast] [Screen Display] [-- Select whether to start play experience, use SETUP to fine tune your play from the point where it was last stopped. select angle mark display options. Change password (3308 by default). Select audio language. EN 19 English 5 Adjust settings Set the main unit To maximize your settings. 1 Press SETUP. » The setup menu is displayed. 2 Press to select an option and press /OK to confirm. [-- Select subtitle language. General Setup...
... screen saver. Select display ratio. Select disc menu language. Display Setup Page --] [Brightness] [Contrast] [Screen Display] [-- Select whether to start play experience, use SETUP to fine tune your play from the point where it was last stopped. select angle mark display options. Change password (3308 by default). Select audio language. EN 19 English 5 Adjust settings Set the main unit To maximize your settings. 1 Press SETUP. » The setup menu is displayed. 2 Press to select an option and press /OK to confirm. [-- Select subtitle language. General Setup...

User manual
Page 21
Match the color of your player before connecting to any additional equipment. TV Not supplied Tip • To conserve energy, press AV MODE to turn off your player Connect additional equipment Caution • Turn off the front panel display. EN 21 You can connect the player to a TV or an amplifier to enjoy DVDs or Karaoke. English 6 Use more of the AV cables (the AV cable connected to TV is not supplied) with the jacks: the yellow cable is for the yellow video jack, the red/ white cable is for the red/white audio jacks.
Match the color of your player before connecting to any additional equipment. TV Not supplied Tip • To conserve energy, press AV MODE to turn off your player Connect additional equipment Caution • Turn off the front panel display. EN 21 You can connect the player to a TV or an amplifier to enjoy DVDs or Karaoke. English 6 Use more of the AV cables (the AV cable connected to TV is not supplied) with the jacks: the yellow cable is for the yellow video jack, the red/ white cable is for the red/white audio jacks.

User manual
Page 22
Connect power from the socket. Never pull the cable. 1 Connect the AC adaptor cable to the voltage pointed on the main unit. • the power outlet. 22 EN When you unplug the AC adaptor, always pull the plug from household source Caution • Risk of electric shock! Ensure that the power supply voltage corresponds to : • the DC IN jack on the back or the underside of the player. • Risk of product damage!
Connect power from the socket. Never pull the cable. 1 Connect the AC adaptor cable to the voltage pointed on the main unit. • the power outlet. 22 EN When you unplug the AC adaptor, always pull the plug from household source Caution • Risk of electric shock! Ensure that the power supply voltage corresponds to : • the DC IN jack on the back or the underside of the player. • Risk of product damage!
User manual
Page 23
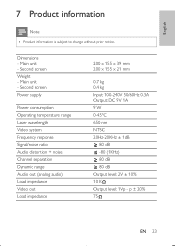
... - p ± 20% 75 EN 23 Dimensions - Second screen Power supply Power consumption Operating temperature range Laser wavelength Video system Frequency response Signal/noise ratio Audio distortion + noise Channel separation Dynamic range Audio out (analog audio) Load impedance Video out Load impedance 200 x 155 x 39 mm 200 x 155 x 21 mm 0.7 kg 0.4 kg Input: 100-240V 50/60Hz 0.3A Output: DC 9V 1A 9 W 0-45°C 650 nm NTSC...
... - p ± 20% 75 EN 23 Dimensions - Second screen Power supply Power consumption Operating temperature range Laser wavelength Video system Frequency response Signal/noise ratio Audio distortion + noise Channel separation Dynamic range Audio out (analog audio) Load impedance Video out Load impedance 200 x 155 x 39 mm 200 x 155 x 21 mm 0.7 kg 0.4 kg Input: 100-240V 50/60Hz 0.3A Output: DC 9V 1A 9 W 0-45°C 650 nm NTSC...
User manual
Page 24
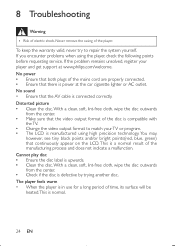
...; Change the video output format to repair the system yourself. 8 Troubleshooting Warning • Risk of the player. If you encounter problems when using high precision technology. If the problem remains unsolved, register your TV or program. • The LCD is connected correctly. No sound • Ensure that continuously appear on the LCD. You may, however, see tiny black points and/or bright points(red, blue...
...; Change the video output format to repair the system yourself. 8 Troubleshooting Warning • Risk of the player. If you encounter problems when using high precision technology. If the problem remains unsolved, register your TV or program. • The LCD is connected correctly. No sound • Ensure that continuously appear on the LCD. You may, however, see tiny black points and/or bright points(red, blue...


