User manual
Page 2
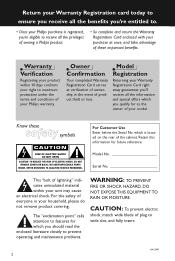
... Your completed Warranty Registration Card serves as the owner of your model. Model No Serial No This "bolt of lightning" indicates uninsulated material within 10 days confirms your right to maximum protection under the terms and conditions of your Philips warranty. NO USER-SERVICEABLE PARTS INSIDE. REFER SERVICING TO QUALIFIED SERVICE PERSONNEL. Retain this information for which is registered, you...
... Your completed Warranty Registration Card serves as the owner of your model. Model No Serial No This "bolt of lightning" indicates uninsulated material within 10 days confirms your right to maximum protection under the terms and conditions of your Philips warranty. NO USER-SERVICEABLE PARTS INSIDE. REFER SERVICING TO QUALIFIED SERVICE PERSONNEL. Retain this information for which is registered, you...

User manual
Page 4
... the apparatus, the apparatus has been exposed to the unit: ● Install all warnings. 4. Unplug this apparatus near any ventilation openings. Do not block any heat sources such as power-supply cord or plug is used for your outlet, consult an electrician for long periods of time. 14. Use only with the cart, stand, tripod, bracket, or table specifi...
... the apparatus, the apparatus has been exposed to the unit: ● Install all warnings. 4. Unplug this apparatus near any ventilation openings. Do not block any heat sources such as power-supply cord or plug is used for your outlet, consult an electrician for long periods of time. 14. Use only with the cart, stand, tripod, bracket, or table specifi...
User manual
Page 6
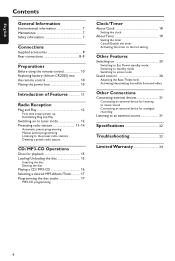
...Rear connections 8-9 Preparations Before using the remote control 10 Replacing battery (lithium CR2025) into the remote control 10 Placing the power box 10 Introduction of Features 11 Radio Reception Plug and Play 12 First time setup/power up Reinstalling Plug and Play Switching on to tuner mode 12 Presetting radio stations 13-14 Automatic preset programming Manual preset programming Listening to the preset radio stations Deleting a preset radio station CD/ MP3-CD Operations Discs for playback 15 Loading /Unloading the disc 15 Inserting the disc Ejecting the disc Playing a CD /MP3-CD...
...Rear connections 8-9 Preparations Before using the remote control 10 Replacing battery (lithium CR2025) into the remote control 10 Placing the power box 10 Introduction of Features 11 Radio Reception Plug and Play 12 First time setup/power up Reinstalling Plug and Play Switching on to tuner mode 12 Presetting radio stations 13-14 Automatic preset programming Manual preset programming Listening to the preset radio stations Deleting a preset radio station CD/ MP3-CD Operations Discs for playback 15 Loading /Unloading the disc 15 Inserting the disc Ejecting the disc Playing a CD /MP3-CD...
User manual
Page 7
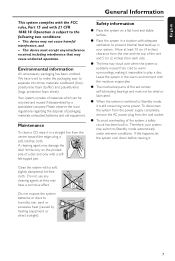
... . To disconnect the system from the power supply completely, remove the AC power plug from the wall socket. ● To avoid overheating of the system, a safety circuit has been built in a straight line from cold to warm surroundings, making it is suddenly moved from the centre toward the edge using a soft, lint-free cloth. Do not use any interference received, including interference that...
... . To disconnect the system from the power supply completely, remove the AC power plug from the wall socket. ● To avoid overheating of the system, a safety circuit has been built in a straight line from cold to warm surroundings, making it is suddenly moved from the centre toward the edge using a soft, lint-free cloth. Do not use any interference received, including interference that...
User manual
Page 8
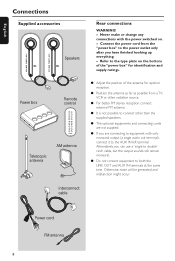
... can use a "single to double" cinch cable, but the output sounds still remain monaural. ● Do not connect equipment to both the LINE OUT and AUX IN terminals at the same time. Refer to the type plate on . - Otherwise, noise will be generated and malfunction might occur. English Connections Supplied accessories Speakers Power box Remote control Telescopic antenna AM antenna Rear connections WARNING! - interconnect cable Power cord FM antenna 8 Connect the power cord from...
... can use a "single to double" cinch cable, but the output sounds still remain monaural. ● Do not connect equipment to both the LINE OUT and AUX IN terminals at the same time. Refer to the type plate on . - Otherwise, noise will be generated and malfunction might occur. English Connections Supplied accessories Speakers Power box Remote control Telescopic antenna AM antenna Rear connections WARNING! - interconnect cable Power cord FM antenna 8 Connect the power cord from...
User manual
Page 10
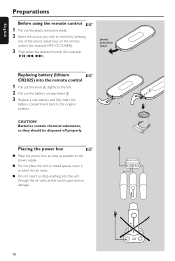
... ☞ Before using the remote control 1 Pull out the plastic protective sheet. 2 Select the source you wish to the original A position. B THIUM CR 202 10 Batteries contain chemical substances, so they should be disposed off properly. plastic protective sheet Replacing battery (lithium ☞ CR2025) into this unit through the air vents as possible to the power supply. ● Do...
... ☞ Before using the remote control 1 Pull out the plastic protective sheet. 2 Select the source you wish to the original A position. B THIUM CR 202 10 Batteries contain chemical substances, so they should be disposed off properly. plastic protective sheet Replacing battery (lithium ☞ CR2025) into this unit through the air vents as possible to the power supply. ● Do...
User manual
Page 11
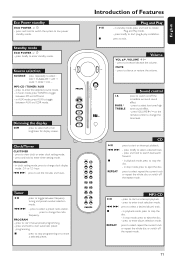
... selected source mode. - press to start plug & play installation. VOL SOURCE PLAY• PAUSE SEARCH STOP•EJECT Clock/Timer CLK/TIMER - in standby mode, press and hold to select repeat the current track or repeat the whole disc or switch off the repeat mode. press and hold to switch the system to increase/ decease the volume. press to low power standby mode. press to change the radio frequency. BASS / TREBLE press to switch on the remote control...
... selected source mode. - press to start plug & play installation. VOL SOURCE PLAY• PAUSE SEARCH STOP•EJECT Clock/Timer CLK/TIMER - in standby mode, press and hold to select repeat the current track or repeat the whole disc or switch off the repeat mode. press and hold to switch the system to increase/ decease the volume. press to low power standby mode. press to change the radio frequency. BASS / TREBLE press to switch on the remote control...
User manual
Page 12
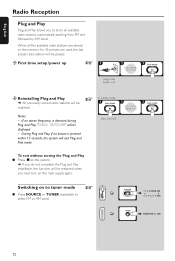
... MZ 1100 iR ➭ SOURCE ➔ ➠ CD ➔ TUNER-FM CDR AUX AM ➔ ➔ ➭ TUNER ➠ TUNER-FM î AM ➔ CD GRAPHIC THIS SIDE 12 If no button is detected during Plug and Play, "CHECK ANTENNA" will be displayed. - During Plug and Play, if no stereo frequency is pressed within 15 seconds, the system will be replaced. ☞ In standby mode, PLAY• PAUSE Notes: - When all available radio stations...
... MZ 1100 iR ➭ SOURCE ➔ ➠ CD ➔ TUNER-FM CDR AUX AM ➔ ➔ ➭ TUNER ➠ TUNER-FM î AM ➔ CD GRAPHIC THIS SIDE 12 If no button is detected during Plug and Play, "CHECK ANTENNA" will be displayed. - During Plug and Play, if no stereo frequency is pressed within 15 seconds, the system will be replaced. ☞ In standby mode, PLAY• PAUSE Notes: - When all available radio stations...
User manual
Page 13
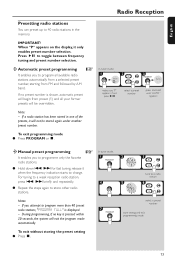
... a preset number store setting and exit programming mode 13 In tuner mode, Notes: - To exit programming mode ● Press PROGRAM or Ç. / select a preset number ➠ press and hold until "AUTO" appears ö Manual preset programming ☞ It enables you attempt to program more than 40 preset radio stations, "PROGRAM FULL" is pressed within 20 seconds, the system will exit the program mode automatically. To exit without storing the preset setting ● Press Ç. English Radio Reception Presetting radio stations...
... a preset number store setting and exit programming mode 13 In tuner mode, Notes: - To exit programming mode ● Press PROGRAM or Ç. / select a preset number ➠ press and hold until "AUTO" appears ö Manual preset programming ☞ It enables you attempt to program more than 40 preset radio stations, "PROGRAM FULL" is pressed within 20 seconds, the system will exit the program mode automatically. To exit without storing the preset setting ● Press Ç. English Radio Reception Presetting radio stations...

User manual
Page 15
All finalized audio CDR and audio CDRW discs - English Discs for playback This system is displayed, followed by total number of tracks and the playing time. Do not load more than one disc. ö Ejecting the disc ➜ All the programmed tracks will switch from the current mode to disc mode. - Notes: - Load the disc with MP3 tracks) maximum albums = 99 maximum titles = 999 (depending on filename length...
All finalized audio CDR and audio CDRW discs - English Discs for playback This system is displayed, followed by total number of tracks and the playing time. Do not load more than one disc. ö Ejecting the disc ➜ All the programmed tracks will switch from the current mode to disc mode. - Notes: - Load the disc with MP3 tracks) maximum albums = 99 maximum titles = 999 (depending on filename length...
User manual
Page 16
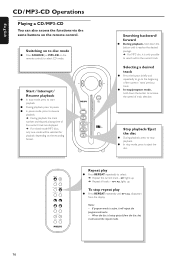
..., the track number and elapsed playing time of track selection. Switching on to disc mode ● Press SOURCE (or MP3-CD on the remote control. If program mode is only possible to search within the current track. RPT lights up . English CD / MP3-CD Operations Playing a CD / MP3-CD You can also access the functions via the same buttons on the remote control) to select CD mode. VOL VOL CD GRAPHIC THIS SIDE SOURCE PLAY• PAUSE...
..., the track number and elapsed playing time of track selection. Switching on to disc mode ● Press SOURCE (or MP3-CD on the remote control. If program mode is only possible to search within the current track. RPT lights up . English CD / MP3-CD Operations Playing a CD / MP3-CD You can also access the functions via the same buttons on the remote control) to select CD mode. VOL VOL CD GRAPHIC THIS SIDE SOURCE PLAY• PAUSE...
User manual
Page 17
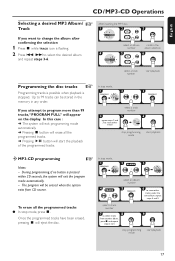
...; while TRACK icon is flashing. 2 Press S T to 5 stop programming mode start playback ☞ Programming the disc tracks Programming tracks is possible when playback is pressed within 20 seconds, the system will appear on the display. In stop mode, ➠ PROG 10:80 TRACK 01 / select a track number repeat steps 2 and 3 to select tracks from CD source. select a track number to store other tracks under...
...; while TRACK icon is flashing. 2 Press S T to 5 stop programming mode start playback ☞ Programming the disc tracks Programming tracks is possible when playback is pressed within 20 seconds, the system will appear on the display. In stop mode, ➠ PROG 10:80 TRACK 01 / select a track number repeat steps 2 and 3 to select tracks from CD source. select a track number to store other tracks under...
User manual
Page 18
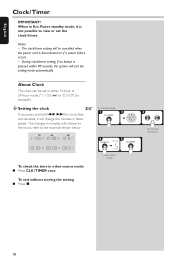
... clock/timer setting, if no button is disconnected or if a power failure occurs. - The changes in other source mode ● Press CLK /TIMER once. To exit without storing the setting ● Press Ç. English Clock / Timer IMPORTANT! Notes: - AMPM AMPM AMPM 11:59 î 12:00 î 12:01 23:59 î 00:00 î 00:01 ➠/ select clock mode To check the time...
... clock/timer setting, if no button is disconnected or if a power failure occurs. - The changes in other source mode ● Press CLK /TIMER once. To exit without storing the setting ● Press Ç. English Clock / Timer IMPORTANT! Notes: - AMPM AMPM AMPM 11:59 î 12:00 î 12:01 23:59 î 00:00 î 00:01 ➠/ select clock mode To check the time...
User manual
Page 19
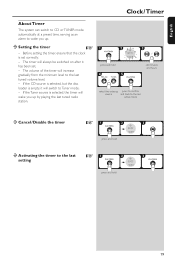
... timer will switch to the last tuned volume level. - The timer will wake you up by playing the last tuned radio station. / press and hold 5 / set minutes and hours select the wake up . ö Setting the timer ☞ - If the CD source is selected, but the disc loader is empty, it has been set correctly. - If the Tuner source is set . - English Clock / Timer About Timer The system can switch to CD or TUNER mode automatically at a preset time...
... timer will switch to the last tuned volume level. - The timer will wake you up by playing the last tuned radio station. / press and hold 5 / set minutes and hours select the wake up . ö Setting the timer ☞ - If the CD source is selected, but the disc loader is empty, it has been set correctly. - If the Tuner source is set . - English Clock / Timer About Timer The system can switch to CD or TUNER mode automatically at a preset time...
User manual
Page 20
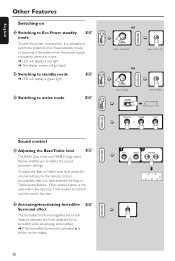
... SOURCE PLAY• PAUSE ECO POWER SEARCH STOP•EJECT MZ 1100 iR ➭ SOURCE ➠ CD ➔ TUNER-FM CDR AUX AM ➔ ➔ ➭ / / ➔ î Sound control ö Adjusting the Bass/Treble level ☞ The BASS (low tone) and TREBLE (high tone) feature enables you have selected the Bass or Treble sound feature. To adjust the Bass or Treble tone level, press the volume buttons on the display...
... SOURCE PLAY• PAUSE ECO POWER SEARCH STOP•EJECT MZ 1100 iR ➭ SOURCE ➠ CD ➔ TUNER-FM CDR AUX AM ➔ ➔ ➭ / / ➔ î Sound control ö Adjusting the Bass/Treble level ☞ The BASS (low tone) and TREBLE (high tone) feature enables you have selected the Bass or Treble sound feature. To adjust the Bass or Treble tone level, press the volume buttons on the display...

User manual
Page 21
... "AUX" when connecting to a TV, VCR or Laser Disc player. ➜ Select "CDR" when connecting to a CD recorder or DVD player. 2 Play the external device. ● When CDR mode is selected, any audio equipment connected to the LINE OUT terminals will not be muted. Refer to the operating instructions of your system. ☞ ö Connecting an external device for analogue recording Connect the "AUDIO IN" terminals of the external device (CD/tape recorder...
... "AUX" when connecting to a TV, VCR or Laser Disc player. ➜ Select "CDR" when connecting to a CD recorder or DVD player. 2 Play the external device. ● When CDR mode is selected, any audio equipment connected to the LINE OUT terminals will not be muted. Refer to the operating instructions of your system. ☞ ö Connecting an external device for analogue recording Connect the "AUDIO IN" terminals of the external device (CD/tape recorder...
User manual
Page 22
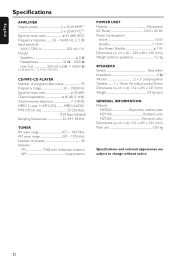
...) Sampling frequencies 32, 44.1, 48 kHz TUNER FM wave range 87.5 - 108 MHz AM wave range 530 - 1700 kHz Number of presets 40 Antenna FM 75 Ω wire /telescopic antenna AM Loop antenna POWER UNIT Material Polystyrene AC Power 120 V / 60 Hz Power Consumption Active 33 W Standby 10 W Eco Power Standby 1 W Dimensions (w x h x d) .... 238 x 68 x 158 (mm) Weight (without speakers 1.2 kg SPEAKERS System Bass reflex Impedance 8 Ω Woofer 2 x 3" polypropylene...
...) Sampling frequencies 32, 44.1, 48 kHz TUNER FM wave range 87.5 - 108 MHz AM wave range 530 - 1700 kHz Number of presets 40 Antenna FM 75 Ω wire /telescopic antenna AM Loop antenna POWER UNIT Material Polystyrene AC Power 120 V / 60 Hz Power Consumption Active 33 W Standby 10 W Eco Power Standby 1 W Dimensions (w x h x d) .... 238 x 68 x 158 (mm) Weight (without speakers 1.2 kg SPEAKERS System Bass reflex Impedance 8 Ω Woofer 2 x 3" polypropylene...
User manual
Page 23
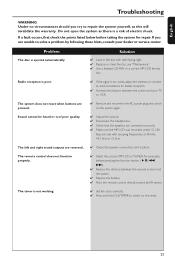
... between the remote control and the system. ✔ Replace the battery. ✔ Point the remote control directly toward the IR sensor. ✔ Set the clock correctly. ✔ Press and hold CLK/TIMER to repair the system yourself, as there is too weak, adjust the antenna or connect an external antenna for repair. Sound cannot be heard or is poor. English Troubleshooting WARNING Under no circumstances should you are reversed. Radio reception...
... between the remote control and the system. ✔ Replace the battery. ✔ Point the remote control directly toward the IR sensor. ✔ Set the clock correctly. ✔ Press and hold CLK/TIMER to repair the system yourself, as there is too weak, adjust the antenna or connect an external antenna for repair. Sound cannot be heard or is poor. English Troubleshooting WARNING Under no circumstances should you are reversed. Radio reception...

User manual
Page 24
... the product to a Philips factory service center (see enclosed list) or authorized service center for repair.When the product has been repaired, you must have proof of purchase to state/province. Philips is used for which vary from state/province to receive warranty service.A sales receipt or other than the country for commercial or institutional purposes. Please record below the model and serial numbers found on all replaced and repaired parts also...
... the product to a Philips factory service center (see enclosed list) or authorized service center for repair.When the product has been repaired, you must have proof of purchase to state/province. Philips is used for which vary from state/province to receive warranty service.A sales receipt or other than the country for commercial or institutional purposes. Please record below the model and serial numbers found on all replaced and repaired parts also...

Leaflet
Page 2
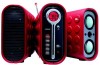
Emotive Micro standard product information amplifier • 50 watts Total Power • 2 x 25 watts RMS sound • Incredible Surround™ • Bass & Treble Control disc player • MP3-CD playback • Plays CD, CD-R, CD-RW & MP3 discs • CD repeat (track/disc) • Play modes (repeat/program) tuner • FM/AM Digital tuning with 40 presets • Plug & play for easy installation of radio stations MZ1100 loudspeaker boxes • 2-way Bass Reflex Speaker System • 3" full range woofers • Detachable grilles connections • Stereo headphones : ...
Emotive Micro standard product information amplifier • 50 watts Total Power • 2 x 25 watts RMS sound • Incredible Surround™ • Bass & Treble Control disc player • MP3-CD playback • Plays CD, CD-R, CD-RW & MP3 discs • CD repeat (track/disc) • Play modes (repeat/program) tuner • FM/AM Digital tuning with 40 presets • Plug & play for easy installation of radio stations MZ1100 loudspeaker boxes • 2-way Bass Reflex Speaker System • 3" full range woofers • Detachable grilles connections • Stereo headphones : ...


