User manual
Page 2
...the enclosed literature closely to maximum protection under the terms and conditions of your Philips warranty. CAUTION: To prevent electric shock, match wide blade of plug to receive all the privileges of owning a Philips product. • So complete and return the Warranty Registration Card enclosed with... insert. Return your Warranty Registration card today to ensure you receive all the benefits you're entitled to. • Once your Philips purchase is located on the rear of ownership in your unit may cause an electrical shock. Know these important benefits. Retain this information...
...the enclosed literature closely to maximum protection under the terms and conditions of your Philips warranty. CAUTION: To prevent electric shock, match wide blade of plug to receive all the privileges of owning a Philips product. • So complete and return the Warranty Registration Card enclosed with... insert. Return your Warranty Registration card today to ensure you receive all the benefits you're entitled to. • Once your Philips purchase is located on the rear of ownership in your unit may cause an electrical shock. Know these important benefits. Retain this information...
User manual
Page 3
... Remember, to the "family!" AYS REGIS NEEDED W ITHIN 10 D Visit our World Wide Web Site at http://www.philips.com TRATION Hurry! So please mail it to come. Dear Philips product owner: Thank you for many years to us right now! 3 What's more, your purchase guarantees you'll receive...happy with your total satisfaction. Sincerely, Lawrence J. As a member of the Philips "family," you can count on your purchase, and welcome to get the most from your Philips product, you must return your confidence in Philips.You've selected one of the best-built, best-backed products available today....
... Remember, to the "family!" AYS REGIS NEEDED W ITHIN 10 D Visit our World Wide Web Site at http://www.philips.com TRATION Hurry! So please mail it to come. Dear Philips product owner: Thank you for many years to us right now! 3 What's more, your purchase guarantees you'll receive...happy with your total satisfaction. Sincerely, Lawrence J. As a member of the Philips "family," you can count on your purchase, and welcome to get the most from your Philips product, you must return your confidence in Philips.You've selected one of the best-built, best-backed products available today....

User manual
Page 4
Do not defeat the safety purpose of time. 14. A grounding type plug has two blades and a third grounding prong. Unplug this apparatus near any ventilation openings. Keep these instructions. 2. Do not use attachments/accessories specified by the manufacturer or sold with one wider than the other apparatus (including amplifiers) that produce heat. 9. Do not install near water. 6. The wide blade or the third prong are provided for your outlet, consult an electrician for replacement of the obsolete outlet. 10.Protect the power cord from being walked on...
Do not defeat the safety purpose of time. 14. A grounding type plug has two blades and a third grounding prong. Unplug this apparatus near any ventilation openings. Keep these instructions. 2. Do not use attachments/accessories specified by the manufacturer or sold with one wider than the other apparatus (including amplifiers) that produce heat. 9. Do not install near water. 6. The wide blade or the third prong are provided for your outlet, consult an electrician for replacement of the obsolete outlet. 10.Protect the power cord from being walked on...
User manual
Page 6
English Contents General Information Environmental information 7 Maintenance 7 Safety information 7 Connections Supplied accessories 8 Rear connections 8-9 Preparations Before using the remote control 10 Replacing battery (lithium CR2025) into the remote control 10 Placing the power box 10 Introduction of Features 11 Radio Reception Plug and Play 12 First time setup/power up Reinstalling Plug and Play Switching on to tuner mode 12 Presetting radio stations 13-14 Automatic preset programming Manual preset programming Listening to the preset radio stations Deleting a preset radio ...
English Contents General Information Environmental information 7 Maintenance 7 Safety information 7 Connections Supplied accessories 8 Rear connections 8-9 Preparations Before using the remote control 10 Replacing battery (lithium CR2025) into the remote control 10 Placing the power box 10 Introduction of Features 11 Radio Reception Plug and Play 12 First time setup/power up Reinstalling Plug and Play Switching on to tuner mode 12 Presetting radio stations 13-14 Automatic preset programming Manual preset programming Listening to the preset radio stations Deleting a preset radio ...
User manual
Page 7
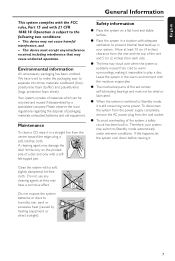
Operation is suddenly moved from the centre toward the edge using a soft, lint-free cloth. This device may damage the disc! Environmental information All unnecessary packaging has been omitted. Your system consists of a disc and only with adequate ventilation to prevent internal heat build-up in a straight line from cold to warm surroundings, making it in your system may have tried to make the packaging easy to Standby mode automatically under extreme conditions. Clean the system with 21 CFR 1040.10. A cleaning agent may not cause harmful interference, and - ...
Operation is suddenly moved from the centre toward the edge using a soft, lint-free cloth. This device may damage the disc! Environmental information All unnecessary packaging has been omitted. Your system consists of a disc and only with adequate ventilation to prevent internal heat build-up in a straight line from cold to warm surroundings, making it in your system may have tried to make the packaging easy to Standby mode automatically under extreme conditions. Clean the system with 21 CFR 1040.10. A cleaning agent may not cause harmful interference, and - ...
User manual
Page 8
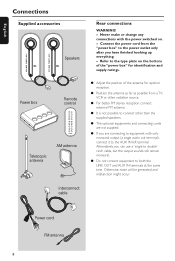
English Connections Supplied accessories Speakers Power box Remote control Telescopic antenna AM antenna Rear connections WARNING! - Refer to the type plate on . - Otherwise, noise will be generated and malfunction might occur. interconnect cable Power cord FM antenna 8 Never make or change any connections with only monaural output (a single audio out terminal), connect it to both the LINE OUT and AUX IN terminals at the same time. Alternatively, you have finished hooking up everything. - Connect the power cord from a TV, VCR or other radiation source. ● For better ...
English Connections Supplied accessories Speakers Power box Remote control Telescopic antenna AM antenna Rear connections WARNING! - Refer to the type plate on . - Otherwise, noise will be generated and malfunction might occur. interconnect cable Power cord FM antenna 8 Never make or change any connections with only monaural output (a single audio out terminal), connect it to both the LINE OUT and AUX IN terminals at the same time. Alternatively, you have finished hooking up everything. - Connect the power cord from a TV, VCR or other radiation source. ● For better ...

User manual
Page 9
English Connections alternative FM antenna connection FM ANTENNA AM PHONES AUX IN R L R L LINE OUT TO POWER UNIT AM FM ANTENNA ➠ ➠ ➠➠ 9
English Connections alternative FM antenna connection FM ANTENNA AM PHONES AUX IN R L R L LINE OUT TO POWER UNIT AM FM ANTENNA ➠ ➠ ➠➠ 9
User manual
Page 10
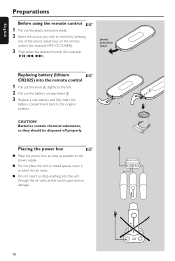
Placing the power box ☞ ● Place the power box as close as this could cause serious damage. B THIUM CR 202 10 Batteries contain chemical substances, so they should be disposed off properly. 5 ➠ LI English Preparations ☞ Before using the remote control 1 Pull out the plastic protective sheet. 2 Select the source you wish to the power supply. ● Do not place this unit in closed spaces, cover it or block the air vents. ● Do not insert or drop anything into the remote control 1 Pull out the knob A slightly to the left. 2 Pull out the ...
Placing the power box ☞ ● Place the power box as close as this could cause serious damage. B THIUM CR 202 10 Batteries contain chemical substances, so they should be disposed off properly. 5 ➠ LI English Preparations ☞ Before using the remote control 1 Pull out the plastic protective sheet. 2 Select the source you wish to the power supply. ● Do not place this unit in closed spaces, cover it or block the air vents. ● Do not insert or drop anything into the remote control 1 Pull out the knob A slightly to the left. 2 Pull out the ...
User manual
Page 11
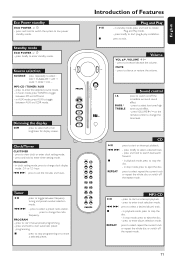
Source selection SOURCE press repeatedly to enter the selected source mode. - press to select : CD ™ TUNER-FM ™ AM ™ AUX ™ CDR ™ CD ... press to set the minutes and hours. S T press to view clock or enter clock setting mode. - press to enter album selection mode. BASS / TREBLE press to switch on the remote control to change the tone level. Tuner ÉÅ press to enter timer setting mode. press to increase/ decease the volume. English Eco Power standby ECO POWER or y - MP3-CD / TUNER / AUX - PROGRAM - hour. CD ...
Source selection SOURCE press repeatedly to enter the selected source mode. - press to select : CD ™ TUNER-FM ™ AM ™ AUX ™ CDR ™ CD ... press to set the minutes and hours. S T press to view clock or enter clock setting mode. - press to enter album selection mode. BASS / TREBLE press to switch on the remote control to change the tone level. Tuner ÉÅ press to enter timer setting mode. press to increase/ decease the volume. English Eco Power standby ECO POWER or y - MP3-CD / TUNER / AUX - PROGRAM - hour. CD ...
User manual
Page 12
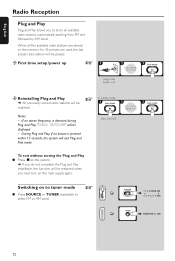
... ANTENNA" will be restarted when you to select FM or AM band. ☞ VOL VOL SOURCE PLAY• PAUSE ECO POWER SEARCH STOP•EJECT MZ 1100 iR ➭ SOURCE ➔ ➠ CD ➔ TUNER-FM CDR AUX AM ➔ ➔ ➭ TUNER ➠ TUNER-FM î AM ➔ CD GRAPHIC THIS...
... ANTENNA" will be restarted when you to select FM or AM band. ☞ VOL VOL SOURCE PLAY• PAUSE ECO POWER SEARCH STOP•EJECT MZ 1100 iR ➭ SOURCE ➔ ➠ CD ➔ TUNER-FM CDR AUX AM ➔ ➔ ➭ TUNER ➠ TUNER-FM î AM ➔ CD GRAPHIC THIS...
User manual
Page 13
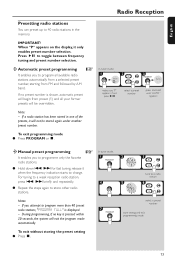
English Radio Reception Presetting radio stations You can preset up to 40 radio stations in one of the presets, it will not be overridden. To exit without storing the preset setting ● Press Ç. In tuner mode, ➠ 99 80 P 01 make sure "P" appears, if not pressÉÅ. To exit programming mode ● Press PROGRAM or Ç. / select a preset number ➠ press and hold until "AUTO" appears ö Manual preset programming ☞ It enables you attempt to program all your former presets will begin from preset (1) and all available radio stations ...
English Radio Reception Presetting radio stations You can preset up to 40 radio stations in one of the presets, it will not be overridden. To exit without storing the preset setting ● Press Ç. In tuner mode, ➠ 99 80 P 01 make sure "P" appears, if not pressÉÅ. To exit programming mode ● Press PROGRAM or Ç. / select a preset number ➠ press and hold until "AUTO" appears ö Manual preset programming ☞ It enables you attempt to program all your former presets will begin from preset (1) and all available radio stations ...
User manual
Page 14
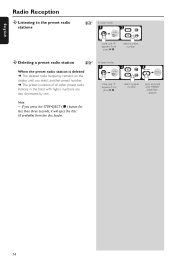
If you select another preset number. ➜ The preset numbers of all other preset radio stations in the band with higher numbers are also decreased by one. ➠ 99 80 P 01 make sure "P" appears, if not pressÉÅ. English Radio Reception ö Listening to the preset radio stations ☞ In tuner mode, ➠ 99 80 / P 01 make sure "P" appears, if not pressÉÅ. select a preset number ö Deleting a preset radio station ☞ In tuner mode, When the preset radio station is deleted ➜ The deleted radio frequency remains on the display ...
If you select another preset number. ➜ The preset numbers of all other preset radio stations in the band with higher numbers are also decreased by one. ➠ 99 80 P 01 make sure "P" appears, if not pressÉÅ. English Radio Reception ö Listening to the preset radio stations ☞ In tuner mode, ➠ 99 80 / P 01 make sure "P" appears, if not pressÉÅ. select a preset number ö Deleting a preset radio station ☞ In tuner mode, When the preset radio station is deleted ➜ The deleted radio frequency remains on the display ...

User manual
Page 15
MP3-CDs (CD-ROMs with the label side facing right. - Do not load more than one disc. ö Ejecting the disc ➜ All the programmed tracks will switch from the current mode to disc mode. - Notes: - For MP3 disc, the disc reading time may exceed 10 seconds due to play : - Load the disc with MP3 tracks) maximum albums = 99 maximum titles = 999 (depending on filename length) ISO9660/Joliet or UDF1.5 format Bitrates = 32-256 kpbs, variable bitrates ID3 tags = V1.1, V2.2, V2.3, V2.4 CD/ MP3-CD Operations Loading/Unloading the disc WARNING! - All pre-recorded audio ...
MP3-CDs (CD-ROMs with the label side facing right. - Do not load more than one disc. ö Ejecting the disc ➜ All the programmed tracks will switch from the current mode to disc mode. - Notes: - For MP3 disc, the disc reading time may exceed 10 seconds due to play : - Load the disc with MP3 tracks) maximum albums = 99 maximum titles = 999 (depending on filename length) ISO9660/Joliet or UDF1.5 format Bitrates = 32-256 kpbs, variable bitrates ID3 tags = V1.1, V2.2, V2.3, V2.4 CD/ MP3-CD Operations Loading/Unloading the disc WARNING! - All pre-recorded audio ...
User manual
Page 16
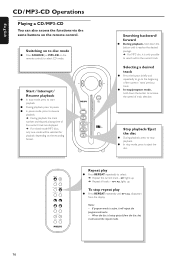
If program mode is active, it will repeat the programmed tracks. - When the disc is only possible to resume playback. ➜ During playback, the track number and elapsed playing time of track selection. English CD / MP3-CD Operations Playing a CD / MP3-CD You can also access the functions via the same buttons on the recording format. RPT ALL lights up . ➜ Repeat all tracks - Notes: - VOL VOL CD GRAPHIC THIS SIDE SOURCE PLAY• PAUSE SEARCH STOP•EJECT 8cm DISC ECO POWER iR Searching backward/ forward ● During playback, hold down the button ...
If program mode is active, it will repeat the programmed tracks. - When the disc is only possible to resume playback. ➜ During playback, the track number and elapsed playing time of track selection. English CD / MP3-CD Operations Playing a CD / MP3-CD You can also access the functions via the same buttons on the recording format. RPT ALL lights up . ➜ Repeat all tracks - Notes: - VOL VOL CD GRAPHIC THIS SIDE SOURCE PLAY• PAUSE SEARCH STOP•EJECT 8cm DISC ECO POWER iR Searching backward/ forward ● During playback, hold down the button ...
User manual
Page 17
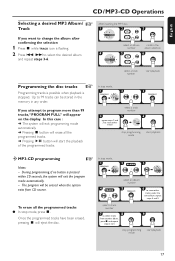
After inserting the MP3 disc, ALBUM TRACK 01 01 / select an album number ALBUM TRACK / 01 01 confirm the album selection select a track number start the playback of the programmed tracks. Once the programmed tracks have been erased, pressing Ç will be erased when the system exits from another album, pressÇ and repeat steps 2 to 99 tracks can be stored in the memory in any order. In this case : ➜ The system will exit programming mode automatically. ➜ Pressing Ç button will erase all the programmed tracks ● In stop mode, ➠ ...
After inserting the MP3 disc, ALBUM TRACK 01 01 / select an album number ALBUM TRACK / 01 01 confirm the album selection select a track number start the playback of the programmed tracks. Once the programmed tracks have been erased, pressing Ç will be erased when the system exits from another album, pressÇ and repeat steps 2 to 99 tracks can be stored in the memory in any order. In this case : ➜ The system will exit programming mode automatically. ➜ Pressing Ç button will erase all the programmed tracks ● In stop mode, ➠ ...
User manual
Page 18
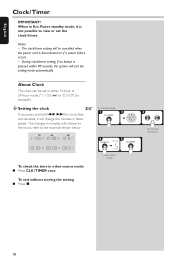
The clock/timer setting will be set in minutes will rollover to the hours, refer to view or set minutes and hours 18 The changes in either 12-hour or 24-hour mode ("11:59 PM" or "23:59", for example). ö Setting the clock ☞ In standby mode, If you press and hold S T for more than two seconds, it is not possible to the example shown below. set the clock/ timer. During clock/timer setting, if no button is disconnected or if a power failure occurs. - AMPM AMPM AMPM 11:59 î 12:00 î 12:01 23:59 î 00:00 î 00:01 ➠/ select clock mode To...
The clock/timer setting will be set in minutes will rollover to the hours, refer to view or set minutes and hours 18 The changes in either 12-hour or 24-hour mode ("11:59 PM" or "23:59", for example). ö Setting the clock ☞ In standby mode, If you press and hold S T for more than two seconds, it is not possible to the example shown below. set the clock/ timer. During clock/timer setting, if no button is disconnected or if a power failure occurs. - AMPM AMPM AMPM 11:59 î 12:00 î 12:01 23:59 î 00:00 î 00:01 ➠/ select clock mode To...
User manual
Page 19
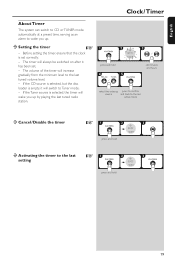
If the CD source is selected, but the disc loader is empty, it has been set. - Before setting the timer, ensure that the clock is selected, the timer will switch to the last setting ☞ ➠ press and hold 5 / set correctly. - If the Tuner source is set minutes and hours select the wake up press to confirm source and back to the last active mode ö Cancel /Disable the timer ☞ ➠ press and hold ö Activating the timer to Tuner mode. - English Clock / Timer About Timer The system can switch to CD or TUNER mode automatically at a ...
If the CD source is selected, but the disc loader is empty, it has been set. - Before setting the timer, ensure that the clock is selected, the timer will switch to the last setting ☞ ➠ press and hold 5 / set correctly. - If the Tuner source is set minutes and hours select the wake up press to confirm source and back to the last active mode ö Cancel /Disable the timer ☞ ➠ press and hold ö Activating the timer to Tuner mode. - English Clock / Timer About Timer The system can switch to CD or TUNER mode automatically at a ...
User manual
Page 20
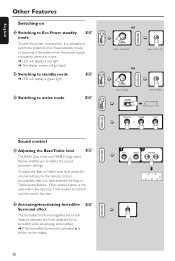
... and hold ➭ press and hold OR VOL VOL CD GRAPHIC THIS SIDE SOURCE PLAY• PAUSE ECO POWER SEARCH STOP•EJECT MZ 1100 iR ➭ ECO POWER press briefly ➭ press briefly ➔ VOL VOL CD GRAPHIC THIS SIDE SOURCE PLAY• PAUSE ECO ...POWER SEARCH STOP•EJECT MZ 1100 iR ➭ SOURCE ➠ CD ➔ TUNER-FM CDR AUX AM ➔ ➔ ➭ / / ➔ î Sound control ö Adjusting ...
... and hold ➭ press and hold OR VOL VOL CD GRAPHIC THIS SIDE SOURCE PLAY• PAUSE ECO POWER SEARCH STOP•EJECT MZ 1100 iR ➭ ECO POWER press briefly ➭ press briefly ➔ VOL VOL CD GRAPHIC THIS SIDE SOURCE PLAY• PAUSE ECO ...POWER SEARCH STOP•EJECT MZ 1100 iR ➭ SOURCE ➠ CD ➔ TUNER-FM CDR AUX AM ➔ ➔ ➭ / / ➔ î Sound control ö Adjusting ...

User manual
Page 21
..., any audio equipment connected to the LINE OUT terminals will not be muted. VOL VOL SOURCE PLAY• PAUSE ECO POWER SEARCH STOP•EJECT MZ 1100 iR ➭ ➭ SOURCE ➠ CD ➔ TUNER-FM CDR AUX AM ➔ ➔ AUX ➠ AUX î CDR 21 All the sound control features...
..., any audio equipment connected to the LINE OUT terminals will not be muted. VOL VOL SOURCE PLAY• PAUSE ECO POWER SEARCH STOP•EJECT MZ 1100 iR ➭ ➭ SOURCE ➠ CD ➔ TUNER-FM CDR AUX AM ➔ ➔ AUX ➠ AUX î CDR 21 All the sound control features...
User manual
Page 22
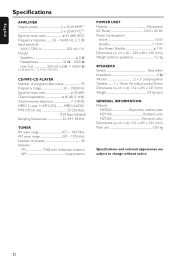
English Specifications AMPLIFIER Output power 2 x 25 W RMS(1 2 x 20 W FTC(1) Signal-to-noise ratio 67 dBA (IEC) Frequency response ......... 50 - 16000 Hz, ± 3 dB Input sensitivity AUX / CDR In 500 mV / 1V Output Speakers 8 Ω Headphones 32 Ω - 1000 Ω Line Out 500 mV ±2dB, > 22000 Ω (1) (8 Ω, 60 Hz - 12.5 kHz, 10% THD) CD/MP3-CD PLAYER Number of programmable tracks 99 Frequency range 20 - 20000 Hz Signal-to-noise ratio 80 dBA Channel separation 60 dB (1 kHz) Total harmonic distortion 0.003% MPEG 1 Layer 3 (MP3-CD MPEG AUDIO MP3-CD bit rate ...
English Specifications AMPLIFIER Output power 2 x 25 W RMS(1 2 x 20 W FTC(1) Signal-to-noise ratio 67 dBA (IEC) Frequency response ......... 50 - 16000 Hz, ± 3 dB Input sensitivity AUX / CDR In 500 mV / 1V Output Speakers 8 Ω Headphones 32 Ω - 1000 Ω Line Out 500 mV ±2dB, > 22000 Ω (1) (8 Ω, 60 Hz - 12.5 kHz, 10% THD) CD/MP3-CD PLAYER Number of programmable tracks 99 Frequency range 20 - 20000 Hz Signal-to-noise ratio 80 dBA Channel separation 60 dB (1 kHz) Total harmonic distortion 0.003% MPEG 1 Layer 3 (MP3-CD MPEG AUDIO MP3-CD bit rate ...