Leaflet
Page 3
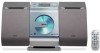
... or their respective owners. Trademarks are subject to change without notice. Specifications are the property of Koninklijke Philips Electronics N.V. Micro Hi-Fi System Specifications MCM276R/37 Sound • Output Power: 10W Total Power • Output power (RMS): 2 x 5 W • Sound Enhancement: Dynamic Bass...color: Blue • Eco Power Standby: 1 watt Accessories • Included Accessories: Screws for wall mounting x2, AM/FM Antenna • Remote control: 24-key with battery • Cradle: Cradle and adaptors for GoGear and iPod (Optional) • Quick start guide: Eng,Spa,...
... or their respective owners. Trademarks are subject to change without notice. Specifications are the property of Koninklijke Philips Electronics N.V. Micro Hi-Fi System Specifications MCM276R/37 Sound • Output Power: 10W Total Power • Output power (RMS): 2 x 5 W • Sound Enhancement: Dynamic Bass...color: Blue • Eco Power Standby: 1 watt Accessories • Included Accessories: Screws for wall mounting x2, AM/FM Antenna • Remote control: 24-key with battery • Cradle: Cradle and adaptors for GoGear and iPod (Optional) • Quick start guide: Eng,Spa,...
User manual
Page 8
English Contents General Information Supplied accessories 9 Environmental information 9 Safety information 9 Controls Controls on the set 10 Remote control 11-12 Installation Placing MCM276R 12 Mounting stand onto the set Mounting MCM276R onto walls Rear connections 13-14 Speaker connections Antenna connections Connecting an additional appliance .......... 14-15 Connecting a USB device Connecting a docking cradle Using...
English Contents General Information Supplied accessories 9 Environmental information 9 Safety information 9 Controls Controls on the set 10 Remote control 11-12 Installation Placing MCM276R 12 Mounting stand onto the set Mounting MCM276R onto walls Rear connections 13-14 Speaker connections Antenna connections Connecting an additional appliance .......... 14-15 Connecting a USB device Connecting a docking cradle Using...
User manual
Page 9
... Standby mode, it is placed in a very damp room, moisture may condense on a flat, hard and stable surface. ● Place the system in your system. remote control (with the FDA/DHHS Rule 21 CFR Subchapter J in the system until normal playback is switched to excessive moisture, rain, sand or heat sources...
... Standby mode, it is placed in a very damp room, moisture may condense on a flat, hard and stable surface. ● Place the system in your system. remote control (with the FDA/DHHS Rule 21 CFR Subchapter J in the system until normal playback is switched to excessive moisture, rain, sand or heat sources...
User manual
Page 10
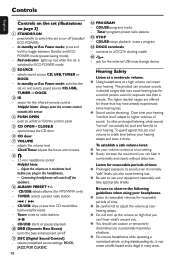
..., POP, CLASSIC 10 @ PROGRAM - connects to your equipment reasonably and take appropriate breaks. The higher decibel ranges are offered for the infrared remote control Helpful hints: Always point the remote control towards this , set your volume to ECO POWER mode 2 SOURCE - So after prolonged listening, what 's around you can't hear what sounds...
..., POP, CLASSIC 10 @ PROGRAM - connects to your equipment reasonably and take appropriate breaks. The higher decibel ranges are offered for the infrared remote control Helpful hints: Always point the remote control towards this , set your volume to ECO POWER mode 2 SOURCE - So after prolonged listening, what 's around you can't hear what sounds...

User manual
Page 11
...- TUNER - selects continuous playback 0 DSC (Digital Sound Control) - Controls English Remote control / % 1 2 3 $ # 4 @ 5 ! 6 0 7 9 8 Notes for more than 2 seconds) - CD - selects random playback 9 REPEAT - no function on this set on the remote control (for example CD, TUNER). - First select the source you wish to toggle...switches the timer on /off (standby/ ECO POWER); - In standby or Eco Power mode: press and hold for remote control: - selects DOCK source - switches the sound off - turns the bass enhancement on /off temporarily 7 RDS/NEWS -
...- TUNER - selects continuous playback 0 DSC (Digital Sound Control) - Controls English Remote control / % 1 2 3 $ # 4 @ 5 ! 6 0 7 9 8 Notes for more than 2 seconds) - CD - selects random playback 9 REPEAT - no function on this set on the remote control (for example CD, TUNER). - First select the source you wish to toggle...switches the timer on /off (standby/ ECO POWER); - In standby or Eco Power mode: press and hold for remote control: - selects DOCK source - switches the sound off - turns the bass enhancement on /off temporarily 7 RDS/NEWS -
User manual
Page 16
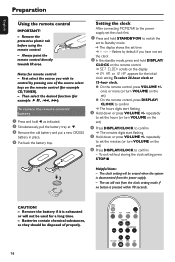
...: - To replace the remote controls' battery 1 Press and hold 1 as indicated. 2 Simultaneously, pull the battery tray at 4. 3 Remove the old battery and put a new CR2025 battery in place. 4 Put back the battery tray. 2 Setting the clock After connecting MCM276R to control by pressing one of properly.... 16 Remove the protective plastic tab before using the remote control. - To select 24-hour clock or 12-hour clock, ● On the...
...: - To replace the remote controls' battery 1 Press and hold 1 as indicated. 2 Simultaneously, pull the battery tray at 4. 3 Remove the old battery and put a new CR2025 battery in place. 4 Put back the battery tray. 2 Setting the clock After connecting MCM276R to control by pressing one of properly.... 16 Remove the protective plastic tab before using the remote control. - To select 24-hour clock or 12-hour clock, ● On the...
User manual
Page 17
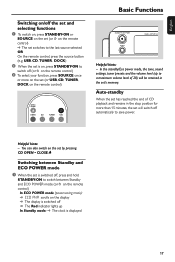
... power mode, the tone, sound settings, tuner presets and the volume level (up In Standby mode: ➜ The clock is switched off (or y on the remote control) 3 To select your function, press SOURCE once or more than 15 minutes, the set switches to the last source selected OR On the... remote control, press the source button (e.g. Helpful hints: - You can also switch on the set by pressing CD OPEN • CLOSEç Switching between Standby and ...
... power mode, the tone, sound settings, tuner presets and the volume level (up In Standby mode: ➜ The clock is switched off (or y on the remote control) 3 To select your function, press SOURCE once or more than 15 minutes, the set switches to the last source selected OR On the... remote control, press the source button (e.g. Helpful hints: - You can also switch on the set by pressing CD OPEN • CLOSEç Switching between Standby and ...

User manual
Page 18
.../ MUTE You can : - press MUTE again; - Notes: - Playback continues without switching off the set or by pressing VOLUME +/on the remote control ➜ VOL and the actual value (between the clock display and the playback display. English Basic Functions Volume control Volume adjustment ● Adjust... is the minimum volume level ➜ VOL MAX is activated Displaying the clock ● During playback, press DISPLAY/CLOCK on the remote control repeatedly to switch off the sound ➜ MUTE appears. When playing MP3 files, you can temporarily switch off the sound without...
.../ MUTE You can : - press MUTE again; - Notes: - Playback continues without switching off the set or by pressing VOLUME +/on the remote control ➜ VOL and the actual value (between the clock display and the playback display. English Basic Functions Volume control Volume adjustment ● Adjust... is the minimum volume level ➜ VOL MAX is activated Displaying the clock ● During playback, press DISPLAY/CLOCK on the remote control repeatedly to switch off the sound ➜ MUTE appears. When playing MP3 files, you can temporarily switch off the sound without...
User manual
Page 19
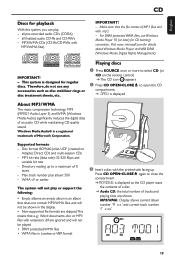
... Media Audio) significantly reduces the digital data of 8 levels - Directory nesting up . microsoft.com for regular discs. Disc format ISO9660, Joliet, UDF (created on the remote control) ➜ The CD icon appears 2 Press CD OPEN•CLOSEç to a maximum of an audio CD while maintaining CD quality sound. Max. all...
... Media Audio) significantly reduces the digital data of 8 levels - Directory nesting up . microsoft.com for regular discs. Disc format ISO9660, Joliet, UDF (created on the remote control) ➜ The CD icon appears 2 Press CD OPEN•CLOSEç to a maximum of an audio CD while maintaining CD quality sound. Max. all...

User manual
Page 22
... and contains various track information such as the track´s title or the artist´s name. ● During playback, press DISPLAY/CLOCK repeatedly on the remote control ➜ Display show title name, album name and ID3 tag information Helpful hints: - Complete the ID3 tag information with your MP3/WMA encoder software...
... and contains various track information such as the track´s title or the artist´s name. ● During playback, press DISPLAY/CLOCK repeatedly on the remote control ➜ Display show title name, album name and ID3 tag information Helpful hints: - Complete the ID3 tag information with your MP3/WMA encoder software...
User manual
Page 23
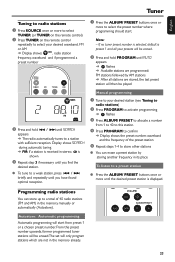
English Tuner Tuning to radio stations 1 Press SOURCE once or more to select TUNER (or TUNER on the remote control) 2 Press TUNER on the remote control repeatedly to select your desired station (see Tuning to radio stations) 2 Press PROGRAM to activate programming ➜ flashes 3 Press ALBUM/ PRESET to allocate a number ...
English Tuner Tuning to radio stations 1 Press SOURCE once or more to select TUNER (or TUNER on the remote control) 2 Press TUNER on the remote control repeatedly to select your desired station (see Tuning to radio stations) 2 Press PROGRAM to activate programming ➜ flashes 3 Press ALBUM/ PRESET to allocate a number ...

User manual
Page 25
... files as --if they are not in English. File names or ID3 tags will be displayed as you do with the albums/tracks on the remote control) ➜ The icon appears - English 1 Check the USB device has been properly connected. (See Installation: Connecting an additional appliance) 2 Press SOURCE once or more...
... files as --if they are not in English. File names or ID3 tags will be displayed as you do with the albums/tracks on the remote control) ➜ The icon appears - English 1 Check the USB device has been properly connected. (See Installation: Connecting an additional appliance) 2 Press SOURCE once or more...

User manual
Page 27
...table player in ports of the matching type. Charging iPod battery using the docking cable and RCA to 3.5mm jack converter (as shown on the remote to select DOCK source. 3 Playback starts automatically.You can select available features (such as play/pause, skip track, fast forward/backward) during playback.... before selecting DOCK source. ➜ On the display, "GoGear" is displayed if Philips GoGear is connected, or "iPod" is displayed if iPod is connected. 2 Press SOURCE on the front panel of the MCM276R Micro Hi-Fi System repeatedly or DOCK on the last page). ➜ Make sure to ...
...table player in ports of the matching type. Charging iPod battery using the docking cable and RCA to 3.5mm jack converter (as shown on the remote to select DOCK source. 3 Playback starts automatically.You can select available features (such as play/pause, skip track, fast forward/backward) during playback.... before selecting DOCK source. ➜ On the display, "GoGear" is displayed if Philips GoGear is connected, or "iPod" is displayed if iPod is connected. 2 Press SOURCE on the front panel of the MCM276R Micro Hi-Fi System repeatedly or DOCK on the last page). ➜ Make sure to ...

User manual
Page 28
...OFF" appears To deactivate the sleep timer, press SLEEP again ➜ The icon disappears or Press STANDBY-ON to switch off . ● On the remote control, press SLEEP repeatedly to select the desired time period options (in minutes): ➜ Display shows in sequence: Sleep 90, 75, 60, 45,...will switch on (volume level: max. 20) Note: - no USB device is connected when the selected source is deactivated The set (or y on the remote control) Helpful hints: - repeatedly to confirm ➜ The hours digits start flashing 6 Hold down or press VOLUME +/- The set time if - The SLEEP...
...OFF" appears To deactivate the sleep timer, press SLEEP again ➜ The icon disappears or Press STANDBY-ON to switch off . ● On the remote control, press SLEEP repeatedly to select the desired time period options (in minutes): ➜ Display shows in sequence: Sleep 90, 75, 60, 45,...will switch on (volume level: max. 20) Note: - no USB device is connected when the selected source is deactivated The set (or y on the remote control) Helpful hints: - repeatedly to confirm ➜ The hours digits start flashing 6 Hold down or press VOLUME +/- The set time if - The SLEEP...
User manual
Page 31
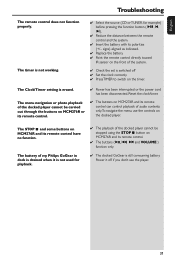
...2; , ¡1, 2™ and VOLUME ) function only. ✔ The docked GoGear is still comsuming battery. The battery of my Philips GoGear in dock is switched off if you don't use the controls on MCM276R and its remote control can control playback of the docked player cannot be stopped using the STOP 9 button on... directly toward IR sensor on the front of the docked player cannot be carried out through the buttons on MCM276R or its remote control. ✔ The buttons on the timer. The timer is erased. ✔ Power has been interrupted or the power cord has been disconnected....
...2; , ¡1, 2™ and VOLUME ) function only. ✔ The docked GoGear is still comsuming battery. The battery of my Philips GoGear in dock is switched off if you don't use the controls on MCM276R and its remote control can control playback of the docked player cannot be stopped using the STOP 9 button on... directly toward IR sensor on the front of the docked player cannot be carried out through the buttons on MCM276R or its remote control. ✔ The buttons on the timer. The timer is erased. ✔ Power has been interrupted or the power cord has been disconnected....

Quick start guide
Page 1
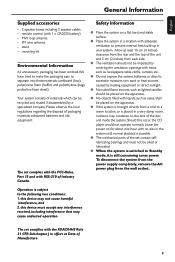
Stand FM antenna 140mm (5.51") Quick Start Guide Mounting kit (1x template, 2 x screws) Quick start guide Step A Install Step B Prepare Step C Enjoy / AM antenna User Manual Remote control with 1 x CR2025 battery User manual You should find these items upon opening the box. MCM 276R Quick Start Guide What's in the Box?
Stand FM antenna 140mm (5.51") Quick Start Guide Mounting kit (1x template, 2 x screws) Quick start guide Step A Install Step B Prepare Step C Enjoy / AM antenna User Manual Remote control with 1 x CR2025 battery User manual You should find these items upon opening the box. MCM 276R Quick Start Guide What's in the Box?

Quick start guide
Page 3
...the CD compartment 3 / Insert a disc with MP3/WMA files) 1 Press SOURCE once or more b. Prepare Setting the clock 1 Press and hold DISPLAY/CLOCK on the remote control ➜ 12 HR or 24 HR appears for the initial clock setting. Press DISPLAY/CLOCK to Standby mode ➜ The display shows the set... time flashes by pressing one of the source select keys on the remote control (DISC or TUNER, for example). - repeatedly to set the clock 2 In the standby mode, press and hold STANDBY-ON y to switch the set...
...the CD compartment 3 / Insert a disc with MP3/WMA files) 1 Press SOURCE once or more b. Prepare Setting the clock 1 Press and hold DISPLAY/CLOCK on the remote control ➜ 12 HR or 24 HR appears for the initial clock setting. Press DISPLAY/CLOCK to Standby mode ➜ The display shows the set... time flashes by pressing one of the source select keys on the remote control (DISC or TUNER, for example). - repeatedly to set the clock 2 In the standby mode, press and hold STANDBY-ON y to switch the set...
Quick start guide
Page 4
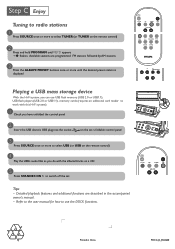
... to select TUNER (or TUNER on a CD 5 Press STANDBY-ON y to select USB (or USB on the remote control) 4 / Play the USB's audio files as you do with the albums/tracks on the remote control) 2 Press and hold PROGRAM until the desired preset station is displayed Playing a USB mass storage device With...
... to select TUNER (or TUNER on a CD 5 Press STANDBY-ON y to select USB (or USB on the remote control) 4 / Play the USB's audio files as you do with the albums/tracks on the remote control) 2 Press and hold PROGRAM until the desired preset station is displayed Playing a USB mass storage device With...


