
User Guide
Page 2
... focus and size of the image 11 Adjusting the vertical and horizontal angle of the projector 11 To raise the projector 11 To lower the projector 11 Keystone correction 11 Moving/transporting the projector 11 Preparation 11 Moving/transporting the projector 11 Inserting the batteries in the remote control 12 4. Introduction 4 Packaging contents 4 Optional ... a computer 14 PC/Macintosh 14 Connecting to video equipment 15-16 CVBS (Video) 15 S-VHS (S-Video) 15 Scart connection 15 Component/HDTV (YPbPr/ YCbCr) 16 Philips Multimedia Projector 2 English User guide bCool XG1 Index > 1.
... focus and size of the image 11 Adjusting the vertical and horizontal angle of the projector 11 To raise the projector 11 To lower the projector 11 Keystone correction 11 Moving/transporting the projector 11 Preparation 11 Moving/transporting the projector 11 Inserting the batteries in the remote control 12 4. Introduction 4 Packaging contents 4 Optional ... a computer 14 PC/Macintosh 14 Connecting to video equipment 15-16 CVBS (Video) 15 S-VHS (S-Video) 15 Scart connection 15 Component/HDTV (YPbPr/ YCbCr) 16 Philips Multimedia Projector 2 English User guide bCool XG1 Index > 1.

User Guide
Page 3
Operation 17-23 Preparation 17 General 17 Messages 17 General explanation 17 Feedback messages 17 Some examples 17 On Screen Display Menu 18-23 Menu tree 18-19 General explanation 20 Computer adjustments 21 Picture adjustments 21 Video series adjustments 21 Picture adjustments 21 General adjustments 22-23 Features adjustments 22 Setup adjustments 23 6. Maintenance 24-26 Cleaning 24 Cleaning the cabinet 24 Cleaning the lens 24 Lamp 25 Lamp replacement 25 Resetting the lamplife time 26 7.Troubleshooting 27-29 Philips Multimedia Projector 3 English User guide bCool XG1 Index < 5.
Operation 17-23 Preparation 17 General 17 Messages 17 General explanation 17 Feedback messages 17 Some examples 17 On Screen Display Menu 18-23 Menu tree 18-19 General explanation 20 Computer adjustments 21 Picture adjustments 21 Video series adjustments 21 Picture adjustments 21 General adjustments 22-23 Features adjustments 22 Setup adjustments 23 6. Maintenance 24-26 Cleaning 24 Cleaning the cabinet 24 Cleaning the lens 24 Lamp 25 Lamp replacement 25 Resetting the lamplife time 26 7.Troubleshooting 27-29 Philips Multimedia Projector 3 English User guide bCool XG1 Index < 5.

User Guide
Page 4
... protection and prolonged operation of the most sophisticated and reliable products on your purchase of one of your projector. 6 LASER LLEeFftT Mouse RIGigHhtT VOolume Menu OK AV Mute Standby On Source D-Freeze D-Zoom Projector - Lens cap Laser pointer remote control + batteries 2 x Alkaline 1.5 V Mains Lead Audio minijack...set up Card and Safety Sheet Cd-rom (with Projection Assistant, Warranty card, SecurityMax, User Guide, Spec. sheet and more.) Philips Multimedia Projector 4 English User guide bCool XG1 Introduction > Congratulations on the market today. 1.
... protection and prolonged operation of the most sophisticated and reliable products on your purchase of one of your projector. 6 LASER LLEeFftT Mouse RIGigHhtT VOolume Menu OK AV Mute Standby On Source D-Freeze D-Zoom Projector - Lens cap Laser pointer remote control + batteries 2 x Alkaline 1.5 V Mains Lead Audio minijack...set up Card and Safety Sheet Cd-rom (with Projection Assistant, Warranty card, SecurityMax, User Guide, Spec. sheet and more.) Philips Multimedia Projector 4 English User guide bCool XG1 Introduction > Congratulations on the market today. 1.

User Guide
Page 5
1. RCA/M1 component video adaptor cable - 8670 953 17009 • LCA5318/00 - rom) - 3122 435 91181 Philips Multimedia Projector 5 English User guide bCool XG1 Introduction < Optional accessories The following accessories are available via our Service organisation only: • Laser pointer remote Control -... - 8670 953 17009 Service accessories The following accessories are available via the dealer from which you purchased your Philips projector: • LCA3125/00 - 180W replacement lamp - 8670 931 25009 • LCA2218/00 - Ceiling mount - 8670 922 18009 • LCA5317...
1. RCA/M1 component video adaptor cable - 8670 953 17009 • LCA5318/00 - rom) - 3122 435 91181 Philips Multimedia Projector 5 English User guide bCool XG1 Introduction < Optional accessories The following accessories are available via our Service organisation only: • Laser pointer remote Control -... - 8670 953 17009 Service accessories The following accessories are available via the dealer from which you purchased your Philips projector: • LCA3125/00 - 180W replacement lamp - 8670 931 25009 • LCA2218/00 - Ceiling mount - 8670 922 18009 • LCA5317...
User Guide
Page 6
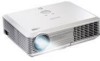
...automatically adjust frequency, tracking, horizontal and vertical position. Zoomring 9 To adjust the size of the Power/Standby mode. Philips Multimedia Projector 6 English User guide bCool XG1 lights up red in the menu when the menu is cooling down and left/right button operation. blinks red when ...the projector is on mode: - Functional overview 12 8 ^ Menu OK Source Auto Image 9 0 Lamp Temp. 76 3 4! 5 Controls > % @# $ Menu 1 To...
...automatically adjust frequency, tracking, horizontal and vertical position. Zoomring 9 To adjust the size of the Power/Standby mode. Philips Multimedia Projector 6 English User guide bCool XG1 lights up red in the menu when the menu is cooling down and left/right button operation. blinks red when ...the projector is on mode: - Functional overview 12 8 ^ Menu OK Source Auto Image 9 0 Lamp Temp. 76 3 4! 5 Controls > % @# $ Menu 1 To...

User Guide
Page 7
Lamp compartment $ Horizontal adjuster % To adjust a possible oblique displayed picture. Keystone corrections To correct picture distortion of the projector. 2. Functional overview 12 8 ^ Menu OK Source Auto Image 9 0 Lamp Temp. 76 3 4! 5 Controls < % @# $ Mains inlet socket ! To connect the projector to the mains. Elevator button @ Elevator foot # To adjust the vertical angle of the vertical keystone type by internal scaling. keys ^ Philips Multimedia Projector 7 English User guide bCool XG1
Lamp compartment $ Horizontal adjuster % To adjust a possible oblique displayed picture. Keystone corrections To correct picture distortion of the projector. 2. Functional overview 12 8 ^ Menu OK Source Auto Image 9 0 Lamp Temp. 76 3 4! 5 Controls < % @# $ Mains inlet socket ! To connect the projector to the mains. Elevator button @ Elevator foot # To adjust the vertical angle of the vertical keystone type by internal scaling. keys ^ Philips Multimedia Projector 7 English User guide bCool XG1
User Guide
Page 8
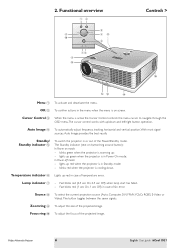
... computer when you make the USB connection. OK 0 To confirm actions in or out of your pc when USB connection has been made. - Philips Multimedia Projector 8 English User guide bCool XG1 Mouse Left/Right 2 Function as the Left and Right mouse keys of the Power/Standby mode. Functional overview ! 2 3 4 8 5 6 @ 6 Laser Left MOUSE Right VOLUME...
... computer when you make the USB connection. OK 0 To confirm actions in or out of your pc when USB connection has been made. - Philips Multimedia Projector 8 English User guide bCool XG1 Mouse Left/Right 2 Function as the Left and Right mouse keys of the Power/Standby mode. Functional overview ! 2 3 4 8 5 6 @ 6 Laser Left MOUSE Right VOLUME...
User Guide
Page 9
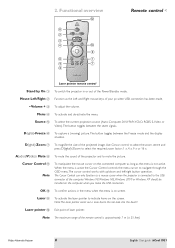
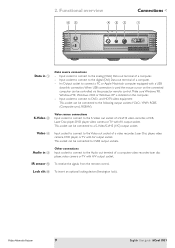
... to the Video out socket of a S-VHS video recorder, a VCR, Laser Disc player, DVD player, video camera or TV with AV output socket. Philips Multimedia Projector 9 English User guide bCool XG1 Make sure Windows 98, Windows ME, Windows 2000 or Windows XP is used the mouse cursor on the computer. - Input socket to connect.... - Audio in 1 Data source connections - Input socket to connect to DVD- When USB connection is installed on the connected computer can be controlled via the projector remote control. 2.
... to the Video out socket of a S-VHS video recorder, a VCR, Laser Disc player, DVD player, video camera or TV with AV output socket. Philips Multimedia Projector 9 English User guide bCool XG1 Make sure Windows 98, Windows ME, Windows 2000 or Windows XP is used the mouse cursor on the computer. - Input socket to connect.... - Audio in 1 Data source connections - Input socket to connect to DVD- When USB connection is installed on the connected computer can be controlled via the projector remote control. 2.

User Guide
Page 10
...number of viewers and the size of the projector, check the Projection Assistant application on , the Standby indicator lights up for 15 minutes, the projector automatically switches to use the projector for 20 seconds. - Philips Multimedia Projector 5 To switch off the mains supply completely... make sure that the viewers cannot watch into the projector light beam. • Choose a screen size suitable for several seconds. 4 Press the Standby button twice to Standby). 10 English User guide bCool XG1 The projector will appear for more information on the projection properties ...
...number of viewers and the size of the projector, check the Projection Assistant application on , the Standby indicator lights up for 15 minutes, the projector automatically switches to use the projector for 20 seconds. - Philips Multimedia Projector 5 To switch off the mains supply completely... make sure that the viewers cannot watch into the projector light beam. • Choose a screen size suitable for several seconds. 4 Press the Standby button twice to Standby). 10 English User guide bCool XG1 The projector will appear for more information on the projection properties ...
User Guide
Page 11
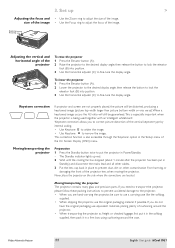
...Philips Multimedia Projector 11 English User guide bCool XG1 To lower the projector A B 1 Press the Elevator button (A). The Standby indicator lights up > Adjusting the focus and • Use the Zoom ring to prevent dust, dirt or other contamination from harming or damaging the front of the projector lens when moving the projector. Moving/transporting the projector... image occurs the 4:3 ratio will be sure to narrow the image. Moving/transporting the projector The projector contains many glass and precision parts. This correction function is being used together with an ...
...Philips Multimedia Projector 11 English User guide bCool XG1 To lower the projector A B 1 Press the Elevator button (A). The Standby indicator lights up > Adjusting the focus and • Use the Zoom ring to prevent dust, dirt or other contamination from harming or damaging the front of the projector lens when moving the projector. Moving/transporting the projector... image occurs the 4:3 ratio will be sure to narrow the image. Moving/transporting the projector The projector contains many glass and precision parts. This correction function is being used together with an ...
User Guide
Page 12
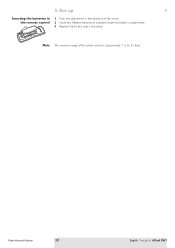
Note The maximum range of the arrow. 2 Install two Alkaline batteries as indicated inside the battery compartment. 3 Replace the lid and snap it into place. Philips Multimedia Projector 12 English User guide bCool XG1 3. Set up < Inserting the batteries in the remote control 1 Push and slide the lid in the direction of the remote control is approximately 7 m (± 25 feet).
Note The maximum range of the arrow. 2 Install two Alkaline batteries as indicated inside the battery compartment. 3 Replace the lid and snap it into place. Philips Multimedia Projector 12 English User guide bCool XG1 3. Set up < Inserting the batteries in the remote control 1 Push and slide the lid in the direction of the remote control is approximately 7 m (± 25 feet).
User Guide
Page 13
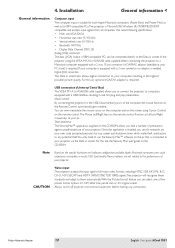
... Control on the remote control.The Mouse Left/Right keys on the Remote Control automatically gets installed. Philips Multimedia Projector 13 English User guide bCool XG1 Installation General information < General information Computer input The computer input is suitable for both Apple Macintosh computers... video formats, including NTSC 3.58, 4.43, PAL B, G, D, H, I, N, M, SECAM and HDTV (480i/P, 576P, 720P, 1080i) signals.The projector will recognize these standards and adapt to a Macintosh computer equipped with a 2 row, 15 pin connector a VGA/MAC adaptor (available at your pc. Note...
... Control on the remote control.The Mouse Left/Right keys on the Remote Control automatically gets installed. Philips Multimedia Projector 13 English User guide bCool XG1 Installation General information < General information Computer input The computer input is suitable for both Apple Macintosh computers... video formats, including NTSC 3.58, 4.43, PAL B, G, D, H, I, N, M, SECAM and HDTV (480i/P, 576P, 720P, 1080i) signals.The projector will recognize these standards and adapt to a Macintosh computer equipped with a 2 row, 15 pin connector a VGA/MAC adaptor (available at your pc. Note...

User Guide
Page 14
... 2, to the Data (out) socket of the computer. 3 Connect the USB connector (3) to fit the capability of the projector. • If required you can now manipulate the mouse cursor on the computer and on the screen, using the USB connection...control. For this, use the Audio minijack to the Data in socket of the computer. - Philips Multimedia Projector 14 English User guide bCool XG1 Installation Connecting to a computer > VViiddeeoo AAuuddiioo iinn SS--VViiddeeoo DDaattaa iinn Projector 1 43 Audio out USB 2 COMPUTER Mac/PC Data out PC/Macintosh 1 Connect connector 1 ...
... 2, to the Data (out) socket of the computer. 3 Connect the USB connector (3) to fit the capability of the projector. • If required you can now manipulate the mouse cursor on the computer and on the screen, using the USB connection...control. For this, use the Audio minijack to the Data in socket of the computer. - Philips Multimedia Projector 14 English User guide bCool XG1 Installation Connecting to a computer > VViiddeeoo AAuuddiioo iinn SS--VViiddeeoo DDaattaa iinn Projector 1 43 Audio out USB 2 COMPUTER Mac/PC Data out PC/Macintosh 1 Connect connector 1 ...
User Guide
Page 15
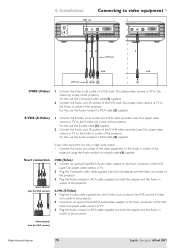
...(Video) 1 Connect the Video (out) socket of a VCR, Laser Disc player, video camera or TV to the S-Video (in socket of the projector. For this , use the Composite video cable (1) supplied. 2 Connect the Audio out L/R sockets of the VCR, Laser Disc player, video camera or...this , use the Audio minijack to the Audio in socket of the projector, using the Audio minijack to minijack cable (4) supplied Scart connection Scart adapter (not for USA version) Philips Multimedia Projector 15 English User guide bCool XG1 If your video equipment has only a single audio output: • Connect...
...(Video) 1 Connect the Video (out) socket of a VCR, Laser Disc player, video camera or TV to the S-Video (in socket of the projector. For this , use the Composite video cable (1) supplied. 2 Connect the Audio out L/R sockets of the VCR, Laser Disc player, video camera or...this , use the Audio minijack to the Audio in socket of the projector, using the Audio minijack to minijack cable (4) supplied Scart connection Scart adapter (not for USA version) Philips Multimedia Projector 15 English User guide bCool XG1 If your video equipment has only a single audio output: • Connect...
User Guide
Page 16
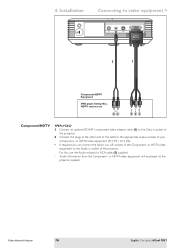
... plugs at the other end of the cable to the Data in socket of the projector. Audio information from the Component- or HDTV-video equipment will be played via the projector speaker. Philips Multimedia Projector 16 English User guide bCool XG1 For this, use the Audio minijack to video equipment > VViiddeeoo AAuuddiioo iinn SS--VViiddeeoo DDaattaa...
... plugs at the other end of the cable to the Data in socket of the projector. Audio information from the Component- or HDTV-video equipment will be played via the projector speaker. Philips Multimedia Projector 16 English User guide bCool XG1 For this, use the Audio minijack to video equipment > VViiddeeoo AAuuddiioo iinn SS--VViiddeeoo DDaattaa...

User Guide
Page 17
...,YCbCr, RGBS, S-Video or Video). Suggestion(s) to solve the problem are displayed in the 'Setup' menu. 3 Switch on the projector. When the projection lamp is changed in the top right corner of the screen.They are displayed in the lower part of the screen....The problem is activated. Video selected as source, S-Video selected as source, YcbCr selected as Philips Multimedia Projector Computer selected as source 17 English User guide bCool XG1 Feedback messages Feedback messages are displayed in the centre of the message display.These messages cannot be ...
...,YCbCr, RGBS, S-Video or Video). Suggestion(s) to solve the problem are displayed in the 'Setup' menu. 3 Switch on the projector. When the projection lamp is changed in the top right corner of the screen.They are displayed in the lower part of the screen....The problem is activated. Video selected as source, S-Video selected as source, YcbCr selected as Philips Multimedia Projector Computer selected as source 17 English User guide bCool XG1 Feedback messages Feedback messages are displayed in the centre of the message display.These messages cannot be ...

User Guide
Page 18
...via On Screen Displays and with help of Menu, OK and Cursor Control on the projector or the remote control. However, you to adjust the various projector settings (for both Computer and Video). Philips Multimedia Projector 18 English User guide bCool XG1 For explanation and operation see next pages. COMPUTER MODE Main menu Sub menu Setting... PIP PIP location Zoom Freeze Child lock Sleep timer Off On OK 1x, 4x, 9x, 16x Off On Off On 0 min. 180 min. The projector menu screens allow you can adjust these settings to standard settings at the factory. Lamp Temp. 5.
...via On Screen Displays and with help of Menu, OK and Cursor Control on the projector or the remote control. However, you to adjust the various projector settings (for both Computer and Video). Philips Multimedia Projector 18 English User guide bCool XG1 For explanation and operation see next pages. COMPUTER MODE Main menu Sub menu Setting... PIP PIP location Zoom Freeze Child lock Sleep timer Off On OK 1x, 4x, 9x, 16x Off On Off On 0 min. 180 min. The projector menu screens allow you can adjust these settings to standard settings at the factory. Lamp Temp. 5.

User Guide
Page 19
Fra. Por. Chi. - 50 50 B AB Auto Computer DVI YPbPr YCbCr RGBS S-Video Video OK 4:3 16:9 Letter box Pan & Scan 4:3 original 0 23 Description Off On OK Off On Philips Multimedia Projector 19 English User guide bCool XG1 5. Operation On Screen Display Menu > Menu tree GENERAL ADJUSTMENTS/SETTINGS Main menu Sub menu Setting AB AB A Setup Language Keystone Mirror Source Factory settings Picture format Volume System information Feedback Lamp counter Smart Dimmer Eng. Esp. Ita. Deu. Ned.
Fra. Por. Chi. - 50 50 B AB Auto Computer DVI YPbPr YCbCr RGBS S-Video Video OK 4:3 16:9 Letter box Pan & Scan 4:3 original 0 23 Description Off On OK Off On Philips Multimedia Projector 19 English User guide bCool XG1 5. Operation On Screen Display Menu > Menu tree GENERAL ADJUSTMENTS/SETTINGS Main menu Sub menu Setting AB AB A Setup Language Keystone Mirror Source Factory settings Picture format Volume System information Feedback Lamp counter Smart Dimmer Eng. Esp. Ita. Deu. Ned.
User Guide
Page 20
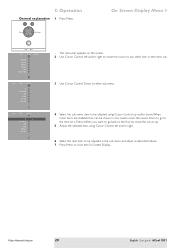
... Cursor Control Down to enter sub menu. 4 Select the sub menu item to close the On Screen Display. Operation General explanation Menu OK 1 Press Menu. Philips Multimedia Projector 20 English User guide bCool XG1
... Cursor Control Down to enter sub menu. 4 Select the sub menu item to close the On Screen Display. Operation General explanation Menu OK 1 Press Menu. Philips Multimedia Projector 20 English User guide bCool XG1

User Guide
Page 21
...The following 'Picture' adjustments can now be made . Sharpness controls the contour impression of the projected text; - Philips Multimedia Projector 21 English User guide bCool XG1 Picture adjustments • Press Menu and select 'Picture' in the menu bar.The following 'Picture' adjustments can now... be sure to match the frequency of the display; - When connecting the projector to the instructions under 'General explanation': ...
...The following 'Picture' adjustments can now be made . Sharpness controls the contour impression of the projected text; - Philips Multimedia Projector 21 English User guide bCool XG1 Picture adjustments • Press Menu and select 'Picture' in the menu bar.The following 'Picture' adjustments can now... be sure to match the frequency of the display; - When connecting the projector to the instructions under 'General explanation': ...
