
User Guide
Page 2
... focus and size of the image 11 Adjusting the vertical and horizontal angle of the projector 11 To raise the projector 11 To lower the projector 11 Keystone correction 11 Moving/transporting the projector 11 Preparation 11 Moving/transporting the projector 11 Inserting the batteries in the remote control 12 4. Installation 13-16 General information... a computer 14 PC/Macintosh 14 Connecting to video equipment 15-16 CVBS (Video) 15 S-VHS (S-Video) 15 Scart connection 15 Component/HDTV (YPbPr/ YCbCr) 16 Philips Multimedia Projector 2 English User guide bCool XG1 Index > 1.
... focus and size of the image 11 Adjusting the vertical and horizontal angle of the projector 11 To raise the projector 11 To lower the projector 11 Keystone correction 11 Moving/transporting the projector 11 Preparation 11 Moving/transporting the projector 11 Inserting the batteries in the remote control 12 4. Installation 13-16 General information... a computer 14 PC/Macintosh 14 Connecting to video equipment 15-16 CVBS (Video) 15 S-VHS (S-Video) 15 Scart connection 15 Component/HDTV (YPbPr/ YCbCr) 16 Philips Multimedia Projector 2 English User guide bCool XG1 Index > 1.

User Guide
Page 3
Maintenance 24-26 Cleaning 24 Cleaning the cabinet 24 Cleaning the lens 24 Lamp 25 Lamp replacement 25 Resetting the lamplife time 26 7.Troubleshooting 27-29 Philips Multimedia Projector 3 English User guide bCool XG1 Operation 17-23 Preparation 17 General 17 Messages 17 General explanation 17 Feedback messages 17 Some examples 17 On Screen Display Menu 18-23 Menu tree 18-19 General explanation 20 Computer adjustments 21 Picture adjustments 21 Video series adjustments 21 Picture adjustments 21 General adjustments 22-23 Features adjustments 22 Setup adjustments 23 6. Index < 5.
Maintenance 24-26 Cleaning 24 Cleaning the cabinet 24 Cleaning the lens 24 Lamp 25 Lamp replacement 25 Resetting the lamplife time 26 7.Troubleshooting 27-29 Philips Multimedia Projector 3 English User guide bCool XG1 Operation 17-23 Preparation 17 General 17 Messages 17 General explanation 17 Feedback messages 17 Some examples 17 On Screen Display Menu 18-23 Menu tree 18-19 General explanation 20 Computer adjustments 21 Picture adjustments 21 Video series adjustments 21 Picture adjustments 21 General adjustments 22-23 Features adjustments 22 Setup adjustments 23 6. Index < 5.

User Guide
Page 4
We are provided to help you years of information about your projector. 6 LASER LLEeFftT Mouse RIGigHhtT VOolume Menu OK AV Mute Standby On Source D-Freeze D-Zoom Projector - Packaging contents Please confirm that the following items are packed in the projector box.They are sure that, used properly, it is a ... RCA cable S-Video cable VESA M1-A to keep this manual handy, as it will bring you use or set up your projector. 1. For your projector, please read the enclosed Safety Sheet. sheet and more.) Philips Multimedia Projector 4 English User guide bCool XG1
We are provided to help you years of information about your projector. 6 LASER LLEeFftT Mouse RIGigHhtT VOolume Menu OK AV Mute Standby On Source D-Freeze D-Zoom Projector - Packaging contents Please confirm that the following items are packed in the projector box.They are sure that, used properly, it is a ... RCA cable S-Video cable VESA M1-A to keep this manual handy, as it will bring you use or set up your projector. 1. For your projector, please read the enclosed Safety Sheet. sheet and more.) Philips Multimedia Projector 4 English User guide bCool XG1

User Guide
Page 5
rom) - 3122 435 91181 Philips Multimedia Projector 5 English User guide bCool XG1 RCA/M1 component video adaptor cable - 8670 953 17009 • LCA5318/00 - DVI + USB/M1 adaptor cable - 8670 953 17009 Service accessories The following accessories are available via the dealer from which you purchased your Philips projector: • LCA3125/00 - 180W replacement lamp - 8670 931...
rom) - 3122 435 91181 Philips Multimedia Projector 5 English User guide bCool XG1 RCA/M1 component video adaptor cable - 8670 953 17009 • LCA5318/00 - DVI + USB/M1 adaptor cable - 8670 953 17009 Service accessories The following accessories are available via the dealer from which you purchased your Philips projector: • LCA3125/00 - 180W replacement lamp - 8670 931...
User Guide
Page 6
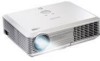
... toggles between the seven signals. lights up ; - With most signal sources, Auto Image provides the best results Standby/ Standby indicator 5 To switch the projector in case of fan error. Functional overview 12 8 ^ Menu OK Source Auto Image 9 0 Lamp Temp. 76 3 4! 5 Controls > % ...image. lights up green when the projector is active the Cursor Control controls the menu cursor to navigate through the OSD menu.The cursor control works with up red in Power On mode; Philips Multimedia Projector 6 English User guide bCool XG1 2. Temperature indicator 6 Lights up...
... toggles between the seven signals. lights up ; - With most signal sources, Auto Image provides the best results Standby/ Standby indicator 5 To switch the projector in case of fan error. Functional overview 12 8 ^ Menu OK Source Auto Image 9 0 Lamp Temp. 76 3 4! 5 Controls > % ...image. lights up green when the projector is active the Cursor Control controls the menu cursor to navigate through the OSD menu.The cursor control works with up red in Power On mode; Philips Multimedia Projector 6 English User guide bCool XG1 2. Temperature indicator 6 Lights up...

User Guide
Page 7
Elevator button @ Elevator foot # To adjust the vertical angle of the vertical keystone type by internal scaling. Functional overview 12 8 ^ Menu OK Source Auto Image 9 0 Lamp Temp. 76 3 4! 5 Controls < % @# $ Mains inlet socket ! Keystone corrections To correct picture distortion of the projector. keys ^ Philips Multimedia Projector 7 English User guide bCool XG1 Lamp compartment $ Horizontal adjuster % To adjust a possible oblique displayed picture. 2. To connect the projector to the mains.
Elevator button @ Elevator foot # To adjust the vertical angle of the vertical keystone type by internal scaling. Functional overview 12 8 ^ Menu OK Source Auto Image 9 0 Lamp Temp. 76 3 4! 5 Controls < % @# $ Mains inlet socket ! Keystone corrections To correct picture distortion of the projector. keys ^ Philips Multimedia Projector 7 English User guide bCool XG1 Lamp compartment $ Horizontal adjuster % To adjust a possible oblique displayed picture. 2. To connect the projector to the mains.
User Guide
Page 8
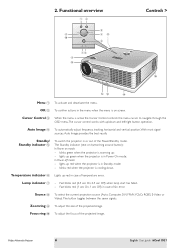
... pointer @ Exit point of the projected image. A(udio)/V(ideo) Mute 8 To mute the sound of your pc when USB connection has been made. - Philips Multimedia Projector 8 English User guide bCool XG1 Functional overview ! 2 3 4 8 5 6 @ 6 Laser Left MOUSE Right VOLUME MENU OK AV MUTE Stand by On SOURCE D-FREEZE D-ZOOM 0 9 1 7 Remote control < Laser pointer remote control...
... pointer @ Exit point of the projected image. A(udio)/V(ideo) Mute 8 To mute the sound of your pc when USB connection has been made. - Philips Multimedia Projector 8 English User guide bCool XG1 Functional overview ! 2 3 4 8 5 6 @ 6 Laser Left MOUSE Right VOLUME MENU OK AV MUTE Stand by On SOURCE D-FREEZE D-ZOOM 0 9 1 7 Remote control < Laser pointer remote control...
User Guide
Page 9
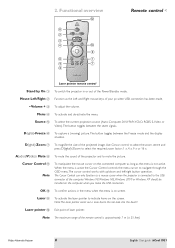
...computer. - Make sure Windows 98, Windows ME, Windows 2000 or Windows XP is used the mouse cursor on the computer. - Philips Multimedia Projector 9 English User guide bCool XG1 Input socket to connect to the Audio out terminal of a computer, video recorder, laser disc player, video camera or TV with...sockets. and HDTV-video equipment This socket can be connected to a S-Video/S-VHS (Y/C) output socket. This socket can be controlled via the projector remote control. IR sensor 5 To receive the signals from the remote control. Input socket to connect to the Video out socket of a...
...computer. - Make sure Windows 98, Windows ME, Windows 2000 or Windows XP is used the mouse cursor on the computer. - Philips Multimedia Projector 9 English User guide bCool XG1 Input socket to connect to the Audio out terminal of a computer, video recorder, laser disc player, video camera or TV with...sockets. and HDTV-video equipment This socket can be connected to a S-Video/S-VHS (Y/C) output socket. This socket can be controlled via the projector remote control. IR sensor 5 To receive the signals from the remote control. Input socket to connect to the Video out socket of a...

User Guide
Page 10
...the start-up for front projection.You can change to Standby (Auto Standby). Set up green after the projector has been switched to the wall socket. - Philips Multimedia Projector 5 To switch off the mains supply completely, disconnect the mains lead. The Standby indicator starts blinking green... mains lead, make sure that the viewers cannot watch into the projectors Mains inlet socket and connect it to Standby). 10 English User guide bCool XG1 When no signal inputs are not going to switch the projector back into Standby mode. The Standby indicator lights up . Switching on...
...the start-up for front projection.You can change to Standby (Auto Standby). Set up green after the projector has been switched to the wall socket. - Philips Multimedia Projector 5 To switch off the mains supply completely, disconnect the mains lead. The Standby indicator starts blinking green... mains lead, make sure that the viewers cannot watch into the projectors Mains inlet socket and connect it to Standby). 10 English User guide bCool XG1 When no signal inputs are not going to switch the projector back into Standby mode. The Standby indicator lights up . Switching on...
User Guide
Page 11
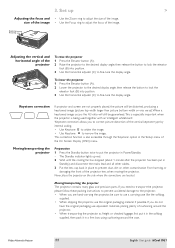
... • Use Keystone to widen the image. • Use Keystone to adjust the size of the image. Philips Multimedia Projector 11 English User guide bCool XG1 Zoom ring Focus ring Adjusting the vertical and horizontal angle of the On Screen Display (OSD) menu. To lower... the projector A B 1 Press the Elevator button (A). Keystone correction If projector and screen are located. The Standby indicator lights up > Adjusting the...
... • Use Keystone to widen the image. • Use Keystone to adjust the size of the image. Philips Multimedia Projector 11 English User guide bCool XG1 Zoom ring Focus ring Adjusting the vertical and horizontal angle of the On Screen Display (OSD) menu. To lower... the projector A B 1 Press the Elevator button (A). Keystone correction If projector and screen are located. The Standby indicator lights up > Adjusting the...
User Guide
Page 12
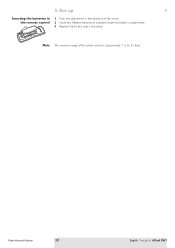
Note The maximum range of the arrow. 2 Install two Alkaline batteries as indicated inside the battery compartment. 3 Replace the lid and snap it into place. Set up < Inserting the batteries in the remote control 1 Push and slide the lid in the direction of the remote control is approximately 7 m (± 25 feet). Philips Multimedia Projector 12 English User guide bCool XG1 3.
Note The maximum range of the arrow. 2 Install two Alkaline batteries as indicated inside the battery compartment. 3 Replace the lid and snap it into place. Set up < Inserting the batteries in the remote control 1 Push and slide the lid in the direction of the remote control is approximately 7 m (± 25 feet). Philips Multimedia Projector 12 English User guide bCool XG1 3.
User Guide
Page 13
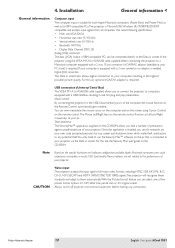
... external equipment before making any potential thief.You only need to VGA/USB cable supplied. Philips Multimedia Projector 13 English User guide bCool XG1 Theft deterrence The SecurityMax™ application, supplied on the specific hardware and software configuration available, Apple... cursor on the computer and on the Remote Control automatically gets installed. You can select one of your projector. CAUTION Video input The projector accepts the input signal of all computers that is required. Installation General information < General information Computer input ...
... external equipment before making any potential thief.You only need to VGA/USB cable supplied. Philips Multimedia Projector 13 English User guide bCool XG1 Theft deterrence The SecurityMax™ application, supplied on the specific hardware and software configuration available, Apple... cursor on the computer and on the Remote Control automatically gets installed. You can select one of your projector. CAUTION Video input The projector accepts the input signal of all computers that is required. Installation General information < General information Computer input ...

User Guide
Page 14
.... - The display settings of the computer will then be changed to the Audio in socket of your projector. 2 Connect connector 2, to the Data (out) socket of the projector. • If required you can now manipulate the mouse cursor on the computer and on the screen,...the projector speaker. • When switching on, first switch on the projector and then the PC. You can connect the Audio out socket of the computer to fit the capability of the computer. 3 Connect the USB connector (3) to minijack cable (4) supplied. - Philips Multimedia Projector 14 English User guide bCool XG1 4.
.... - The display settings of the computer will then be changed to the Audio in socket of your projector. 2 Connect connector 2, to the Data (out) socket of the projector. • If required you can now manipulate the mouse cursor on the computer and on the screen,...the projector speaker. • When switching on, first switch on the projector and then the PC. You can connect the Audio out socket of the computer to fit the capability of the computer. 3 Connect the USB connector (3) to minijack cable (4) supplied. - Philips Multimedia Projector 14 English User guide bCool XG1 4.
User Guide
Page 15
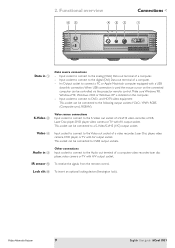
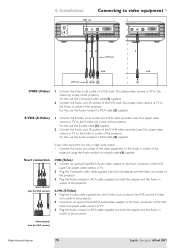
... or TV. 2 Plug the Composite video cable supplied into both the adapter and the Video (in socket of the projector. Installation Connecting to video equipment > CVBS only VViiddeeoo AAuuddiioo iinn SS--VViiddeeoo DDaattaa iinn VViiddeeoo AAuuddiioo iinn SS--VViiddeeoo DDaattaa...projector. 4. For this , use the Composite video cable (1) supplied. 2 Connect the Audio out L/R sockets of the VCR, Laser Disc player, video camera or TV to minijack cable (4) supplied Scart connection Scart adapter (not for USA version) Philips Multimedia Projector 15 English User guide bCool XG1...
... or TV. 2 Plug the Composite video cable supplied into both the adapter and the Video (in socket of the projector. Installation Connecting to video equipment > CVBS only VViiddeeoo AAuuddiioo iinn SS--VViiddeeoo DDaattaa iinn VViiddeeoo AAuuddiioo iinn SS--VViiddeeoo DDaattaa...projector. 4. For this , use the Composite video cable (1) supplied. 2 Connect the Audio out L/R sockets of the VCR, Laser Disc player, video camera or TV to minijack cable (4) supplied Scart connection Scart adapter (not for USA version) Philips Multimedia Projector 15 English User guide bCool XG1...
User Guide
Page 16
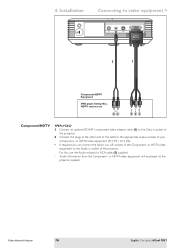
.../HDTV YPbPr, YCbCr 1 Connect an optional RCA/M1 component video adaptor cable (1) to the Data in socket of the projector. 2 Connect the plugs at the other end of the cable to the Audio in socket of your Component- or HDTV...projector. or HDTV-video equipment (Pr,Y, Pb / Cr,Y, Cb). • If required you can connect the Audio out L/R sockets of the Component- Audio information from the Component- Installation Connecting to RCA cable (2) supplied. - or HDTV-video equipment will be played via the projector speaker. Philips Multimedia Projector 16 English User guide bCool XG1...
.../HDTV YPbPr, YCbCr 1 Connect an optional RCA/M1 component video adaptor cable (1) to the Data in socket of the projector. 2 Connect the plugs at the other end of the cable to the Audio in socket of your Component- or HDTV...projector. or HDTV-video equipment (Pr,Y, Pb / Cr,Y, Cb). • If required you can connect the Audio out L/R sockets of the Component- Audio information from the Component- Installation Connecting to RCA cable (2) supplied. - or HDTV-video equipment will be played via the projector speaker. Philips Multimedia Projector 16 English User guide bCool XG1...

User Guide
Page 17
A feedback message appears on the projector. when A/V Mute is set to switch on the screen, indicating the selected source. 5. Note When only one input source is changed in the 'Setup' menu. 3 ... of the message display.These messages cannot be changed ; - Video selected as source, S-Video selected as source, YcbCr selected as Philips Multimedia Projector Computer selected as source 17 English User guide bCool XG1 Source selection can be suppressed. Feedback messages Feedback messages are connected, the source with the highest priority will only be selected...
A feedback message appears on the projector. when A/V Mute is set to switch on the screen, indicating the selected source. 5. Note When only one input source is changed in the 'Setup' menu. 3 ... of the message display.These messages cannot be changed ; - Video selected as source, S-Video selected as source, YcbCr selected as Philips Multimedia Projector Computer selected as source 17 English User guide bCool XG1 Source selection can be suppressed. Feedback messages Feedback messages are connected, the source with the highest priority will only be selected...

User Guide
Page 18
However, you to adjust the various projector settings (for both Computer and Video). Lamp Temp. Operation On Screen Display Menu > Menu Source Menu tree OK Auto Image All video and data adjustments ... done via On Screen Displays and with help of Menu, OK and Cursor Control on the projector or the remote control. The projector is set to suit your own preferences. Philips Multimedia Projector 18 English User guide bCool XG1 The projector menu screens allow you can adjust these settings to standard settings at the factory. For explanation...
However, you to adjust the various projector settings (for both Computer and Video). Lamp Temp. Operation On Screen Display Menu > Menu Source Menu tree OK Auto Image All video and data adjustments ... done via On Screen Displays and with help of Menu, OK and Cursor Control on the projector or the remote control. The projector is set to suit your own preferences. Philips Multimedia Projector 18 English User guide bCool XG1 The projector menu screens allow you can adjust these settings to standard settings at the factory. For explanation...

User Guide
Page 19
Fra. Chi. - 50 50 B AB Auto Computer DVI YPbPr YCbCr RGBS S-Video Video OK 4:3 16:9 Letter box Pan & Scan 4:3 original 0 23 Description Off On OK Off On Philips Multimedia Projector 19 English User guide bCool XG1 5. Deu. Ita. Por. Operation On Screen Display Menu > Menu tree GENERAL ADJUSTMENTS/SETTINGS Main menu Sub menu Setting AB AB A Setup Language Keystone Mirror Source Factory settings Picture format Volume System information Feedback Lamp counter Smart Dimmer Eng. Esp. Ned.
Fra. Chi. - 50 50 B AB Auto Computer DVI YPbPr YCbCr RGBS S-Video Video OK 4:3 16:9 Letter box Pan & Scan 4:3 original 0 23 Description Off On OK Off On Philips Multimedia Projector 19 English User guide bCool XG1 5. Deu. Ita. Por. Operation On Screen Display Menu > Menu tree GENERAL ADJUSTMENTS/SETTINGS Main menu Sub menu Setting AB AB A Setup Language Keystone Mirror Source Factory settings Picture format Volume System information Feedback Lamp counter Smart Dimmer Eng. Esp. Ned.
User Guide
Page 20
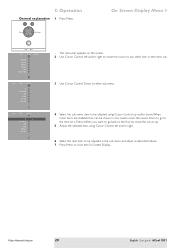
Source Auto Image On Screen Display Menu > Lamp Temp. - Philips Multimedia Projector 20 English User guide bCool XG1 The menu bar appears on the screen. 2 Use Cursor Control left and/or right. 6 Select the next item to be adjusted in the sub menu ...
Source Auto Image On Screen Display Menu > Lamp Temp. - Philips Multimedia Projector 20 English User guide bCool XG1 The menu bar appears on the screen. 2 Use Cursor Control left and/or right. 6 Select the next item to be adjusted in the sub menu ...

User Guide
Page 21
... menu bar.The following 'Picture' adjustments can now be made . Brightness adjusts brightness of the picture: - Colour tracking adjusts the degamma settings. Philips Multimedia Projector 21 English User guide bCool XG1 Contrast adjusts the overall contrast intensity; - Colour Temperature adjusts the colour temperature.The higher the temperature the cooler the screen will look.The...
... menu bar.The following 'Picture' adjustments can now be made . Brightness adjusts brightness of the picture: - Colour tracking adjusts the degamma settings. Philips Multimedia Projector 21 English User guide bCool XG1 Contrast adjusts the overall contrast intensity; - Colour Temperature adjusts the colour temperature.The higher the temperature the cooler the screen will look.The...
