
User Guide
Page 3
... Electronics Company One Philips Drive Knoxville, TN 37914 Telephone (1888) 873-4672 Packaging contents Please confirm that to help . FCC Warning: To assure continued compliance, use or set up your projector. Also, any interference received, including interference that may cause undesired operation. Audio/Video...antenna. - Connect the equipment into an outlet on the market today. Note: Save energy! Please put the projector in the projector box. Projector - Scart/RCA Audio Video adapter (not for help you years of this equipment in a residential area is ...
... Electronics Company One Philips Drive Knoxville, TN 37914 Telephone (1888) 873-4672 Packaging contents Please confirm that to help . FCC Warning: To assure continued compliance, use or set up your projector. Also, any interference received, including interference that may cause undesired operation. Audio/Video...antenna. - Connect the equipment into an outlet on the market today. Note: Save energy! Please put the projector in the projector box. Projector - Scart/RCA Audio Video adapter (not for help you years of this equipment in a residential area is ...
User Guide
Page 4
...only from overheating, these openings must not be done with a mounting kit approved by PHILIPS, as this projector, observe the following conditions: A. Follow all of any service or repairs to the projector, ask the service technician to perform a routine safety check to the unit. Do not...it from the type of any cable systems. This will often require extensive work by the operating instructions; Never spill liquid into the projector. Quick stops, excessive force, and uneven surfaces may become too hot if the filter is provided. 9. The bottom opening should not...
...only from overheating, these openings must not be done with a mounting kit approved by PHILIPS, as this projector, observe the following conditions: A. Follow all of any service or repairs to the projector, ask the service technician to perform a routine safety check to the unit. Do not...it from the type of any cable systems. This will often require extensive work by the operating instructions; Never spill liquid into the projector. Quick stops, excessive force, and uneven surfaces may become too hot if the filter is provided. 9. The bottom opening should not...
User Guide
Page 5
... Audio Output Line output for data input only and accessible in the next paragraph. 6. Ceiling Mount and Rear Screen projection The projector is not active. High reliability and excellent brightness The Philips UHP lamp guarantees long life, excellent brightness over the entire picture. 5 The standard OSD language is applicable for connecting external...
... Audio Output Line output for data input only and accessible in the next paragraph. 6. Ceiling Mount and Rear Screen projection The projector is not active. High reliability and excellent brightness The Philips UHP lamp guarantees long life, excellent brightness over the entire picture. 5 The standard OSD language is applicable for connecting external...
User Guide
Page 6
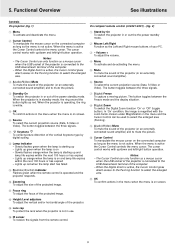
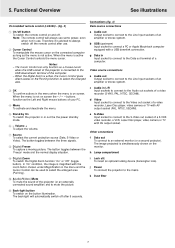
... up - On compact remote control (LC4341/4331) - (fig. 2) 1 Stand by digital scaling. 8 Lamp indicator - Functional Overview See illustrations Controls On projector (fig. 1) 1 Menu To activate and deactivate the menu. 2 Cursor Control To manipulate the mouse cursor on the connected computer as long as a mouse ...cursor when the USB socket of the projector (or an externally connected sound amplifier). 6 Source To select the current projection source (Data, S-Video or Video). The Cursor Control ...
... up - On compact remote control (LC4341/4331) - (fig. 2) 1 Stand by digital scaling. 8 Lamp indicator - Functional Overview See illustrations Controls On projector (fig. 1) 1 Menu To activate and deactivate the menu. 2 Cursor Control To manipulate the mouse cursor on the connected computer as long as a mouse ...cursor when the USB socket of the projector (or an externally connected sound amplifier). 6 Source To select the current projection source (Data, S-Video or Video). The Cursor Control ...
User Guide
Page 7
... the - / - - The Cursor Control can be used to select the enlarged area (Panning). 0 A(udio)/V(ideo) Mute To mute the sound of the projector (or an externally connected sound amplifier) and to mute the picture. g Data in Input socket to connect to the Video out socket of a computer. d ...automatically switch off . Other connections f Data out To connect to the mains. buttons function as a mouse cursor when the USB socket of the projector is active, the Cursor Control gives direct access to the Panning function to the Audio out sockets of an amplifier or stereo system. 3 OK...
... the - / - - The Cursor Control can be used to select the enlarged area (Panning). 0 A(udio)/V(ideo) Mute To mute the sound of the projector (or an externally connected sound amplifier) and to mute the picture. g Data in Input socket to connect to the Video out socket of a computer. d ...automatically switch off . Other connections f Data out To connect to the mains. buttons function as a mouse cursor when the USB socket of the projector is active, the Cursor Control gives direct access to the Panning function to the Audio out sockets of an amplifier or stereo system. 3 OK...
User Guide
Page 8
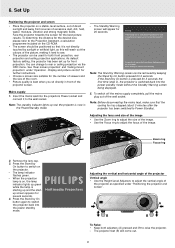
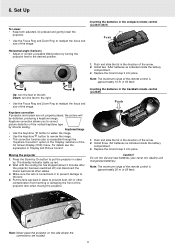
... have to wait 1 minute before you sit directly in the Power/Standby mode. - The lamp indicator flashes green. - PHILIPS Multimedia Projectors Adjusting the vertical and horizontal angle of the projector Vertical angle • Use the Height/Level Adjusters to adjust the focus of the wall socket. The...Volume Lamp RC Keystone Menu OK Zoom ring Focus ring 2. When the projection lamp is on, the lamp indicator lights up red, the projector is switched back into the power standby mode without the Standby Warning screen being displayed. 5. Press OK key to Power Standby). Note:...
... have to wait 1 minute before you sit directly in the Power/Standby mode. - The lamp indicator flashes green. - PHILIPS Multimedia Projectors Adjusting the vertical and horizontal angle of the projector Vertical angle • Use the Height/Level Adjusters to adjust the focus of the wall socket. The...Volume Lamp RC Keystone Menu OK Zoom ring Focus ring 2. When the projection lamp is on, the lamp indicator lights up red, the projector is switched back into the power standby mode without the Standby Warning screen being displayed. 5. Press OK key to Power Standby). Note:...
User Guide
Page 9
... Ring to the desired position. 1. The standby indicator lights up red. 2. Wait until the cooling fan has stopped (about 3 minutes after the projector has been switched off) and disconnect the mains lead and all other contamination from harming or damaging the front of the vertical keystone type by... turning the projector feet to readjust the focus and size of the arrow. 2. Down: turn the feet to prevent dust, dirt or other cables. 3. Push...
... Ring to the desired position. 1. The standby indicator lights up red. 2. Wait until the cooling fan has stopped (about 3 minutes after the projector has been switched off) and disconnect the mains lead and all other contamination from harming or damaging the front of the vertical keystone type by... turning the projector feet to readjust the focus and size of the arrow. 2. Down: turn the feet to prevent dust, dirt or other cables. 3. Push...
User Guide
Page 10
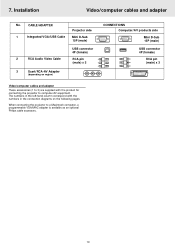
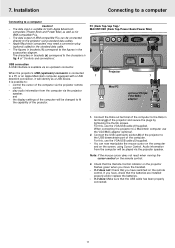
... Mini D-Sub 15P (male) USB connector 4P (female) RCA pin (male) x 3 3 Scart/RCA-AV Adapter (depending on the following pages. When connecting the projector to computer/AV equipment. Installation Video/computer cables and adapter No. The numbers in the left-hand column correspond with the numbers in the connection ... 15P (male) USB connector 4P (female) RCA pin (male) x 3 Video/computer cables and adapter These accessories (1 to 3) are supplied with the product for connecting the projector to a Macintosh computer, a programmable VGA/MAC adapter is available as an optional...
... Mini D-Sub 15P (male) USB connector 4P (female) RCA pin (male) x 3 3 Scart/RCA-AV Adapter (depending on the following pages. When connecting the projector to computer/AV equipment. Installation Video/computer cables and adapter No. The numbers in the left-hand column correspond with the numbers in the connection ... 15P (male) USB connector 4P (female) RCA pin (male) x 3 Video/computer cables and adapter These accessories (1 to 3) are supplied with the product for connecting the projector to a Macintosh computer, a programmable VGA/MAC adapter is available as an optional...
User Guide
Page 11
...The characters in fig. 4 of IBM compatible PCs can now manipulate the mouse cursor on the computer and on the remote control: 3. Projector 1 1 Mac/PC USB optional Philips VGA/MAC adapter DDaattaa oouutt A 1. For this , use the VGA/USB cable (1) supplied. Check that the Remote Control indicator on ...the projector flashes green when you have switched on the remote control. If it does not: Check that you have , check ...
...The characters in fig. 4 of IBM compatible PCs can now manipulate the mouse cursor on the computer and on the remote control: 3. Projector 1 1 Mac/PC USB optional Philips VGA/MAC adapter DDaattaa oouutt A 1. For this , use the VGA/USB cable (1) supplied. Check that the Remote Control indicator on ...the projector flashes green when you have switched on the remote control. If it does not: Check that you have , check ...
User Guide
Page 12
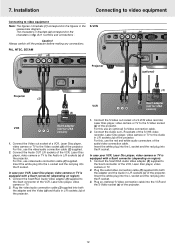
... and the red plug into both the adapter and the Audio in brackets (1) correspond to the Scart connector of the projector. Plug the video/audio connection cable (2) supplied into the R socket. Installation Connecting to video equipment Connecting to video equipment...optional) S-vVideo connection cable. 2. Connect the Scart/RCA Audio Video adapter (3) supplied to the figures in RL Video S-Video DDaatataoiunt DDaattaaoinut Projector (2) (optional) Projector (2) (3) S-Video VCR Video out R Audio L out Scart adapter S-Video (not for USA version) (3) VCR RL Audio RL out...
... and the red plug into both the adapter and the Audio in brackets (1) correspond to the Scart connector of the projector. Plug the video/audio connection cable (2) supplied into the R socket. Installation Connecting to video equipment Connecting to video equipment...optional) S-vVideo connection cable. 2. Connect the Scart/RCA Audio Video adapter (3) supplied to the figures in RL Video S-Video DDaatataoiunt DDaattaaoinut Projector (2) (optional) Projector (2) (3) S-Video VCR Video out R Audio L out Scart adapter S-Video (not for USA version) (3) VCR RL Audio RL out...
User Guide
Page 13
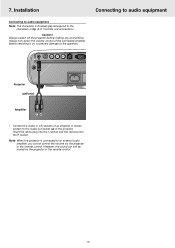
... control of the connected amplifier before making any connections. Always switch off the projector before switching it on, to prevent damage to an external audio amplifier, you cannot control the volume via the projector or the remote control. 13 Caution! Connecting to audio equipment (a) Audio out... USB RL Audio in RL Video S-Video DDaatataoiunt Projector (optional) Amplifier L Audio R in • Connect the Audio in L/R sockets of an amplifier or stereo system to the characters in brackets...
... control of the connected amplifier before making any connections. Always switch off the projector before switching it on, to prevent damage to an external audio amplifier, you cannot control the volume via the projector or the remote control. 13 Caution! Connecting to audio equipment (a) Audio out... USB RL Audio in RL Video S-Video DDaatataoiunt Projector (optional) Amplifier L Audio R in • Connect the Audio in L/R sockets of an amplifier or stereo system to the characters in brackets...

User Guide
Page 14
...plugs by tightening the thumb screws. For this , use an optional monitor cable. When connecting the projector to the Data in RL Video S-Video DDaatataoiunt (g) DDaattaaoinut Projector (1) Mac/PC (optional) USB DDaattaa oouutt AAuuddiioo oouutt 14 Always switch off PC, external monitor and... projector before making any connections. 1. For further details on the projector: • Connect the Audio in fig. 4 of the computer to a Macintosh computer use the VGA/USB ...
...plugs by tightening the thumb screws. For this , use an optional monitor cable. When connecting the projector to the Data in RL Video S-Video DDaatataoiunt (g) DDaattaaoinut Projector (1) Mac/PC (optional) USB DDaattaa oouutt AAuuddiioo oouutt 14 Always switch off PC, external monitor and... projector before making any connections. 1. For further details on the projector: • Connect the Audio in fig. 4 of the computer to a Macintosh computer use the VGA/USB ...
User Guide
Page 15
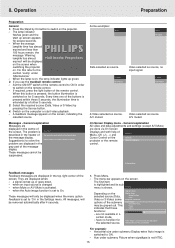
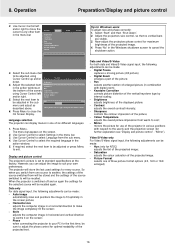
When the average PHILIPS lamplife time has almost expired and less than 100 hours remain, the message 'Warning: lamplife has almost Multimedia Projectors expired' will only be displayed on the screen when switching the projector on the selected source (Data, Video or S-Video) some options of ... 8. Operation Preparation Preparation General 1. If required, press the light button of Menu, OK (-/- -) and Menubar Cursor Control on the projector. - Set the ON/OFF switch of the remote control to ON in the header of the screen. The problem is used to ...
When the average PHILIPS lamplife time has almost expired and less than 100 hours remain, the message 'Warning: lamplife has almost Multimedia Projectors expired' will only be displayed on the screen when switching the projector on the selected source (Data, Video or S-Video) some options of ... 8. Operation Preparation Preparation General 1. If required, press the light button of Menu, OK (-/- -) and Menubar Cursor Control on the projector. - Set the ON/OFF switch of the remote control to ON in the header of the screen. The problem is used to ...
User Guide
Page 16
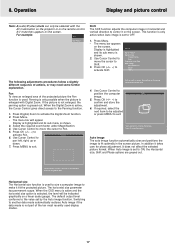
...- 'Mirror'). Hue (only for maximum brightness of the picture; - Select 'Start' and then 'Shut down . Now adjust the projectors phase control for NTSC) adjusts the tint of the displayed picture; - Use Cursor Control to will be adjusted or press Menu to close...exit. The menu bar appears on the screen; - Saturation adjusts the colour saturation of six different languages. 1. Language selection The projector can display menus in combination with respect to standard specifications at Sharpness Hue the bottom of the projected text. Pan selects another ,...
...- 'Mirror'). Hue (only for maximum brightness of the picture; - Select 'Start' and then 'Shut down . Now adjust the projectors phase control for NTSC) adjusts the tint of the displayed picture; - Use Cursor Control to will be adjusted or press Menu to close...exit. The menu bar appears on the screen; - Saturation adjusts the colour saturation of six different languages. 1. Language selection The projector can display menus in combination with respect to standard specifications at Sharpness Hue the bottom of the projected text. Pan selects another ,...
User Guide
Page 17
... Digital Zoom Magnification Pan... Phase activate Shift. If the picture is not enlarged, the panning option is enlarged with the AV mute button on the projector or on the screen. Use Cursor Control to move the cursor to Pan. 5. Use Cursor Control to the value set by the Auto image function...
... Digital Zoom Magnification Pan... Phase activate Shift. If the picture is not enlarged, the panning option is enlarged with the AV mute button on the projector or on the screen. Use Cursor Control to move the cursor to Pan. 5. Use Cursor Control to the value set by the Auto image function...
User Guide
Page 18
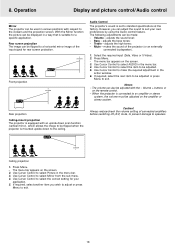
...menu. 4. Use Cursor Control to select the item to an amplifier or stereo system, the volume must be adjusted. 5. When the projector is suitable for your own preferences by using the Audio control feature. Press Menu. - Use Cursor Control to select Picture in various... If required, select the next item to select the correct setting for a specific application. Always reduce/check the volume setting of the projector (or an externally connected loudspeaker). 1. Use Cursor Control to be adjusted with an upside-down scan function (vertical mirror), which allows the...
...menu. 4. Use Cursor Control to select the item to an amplifier or stereo system, the volume must be adjusted. 5. When the projector is suitable for your own preferences by using the Audio control feature. Press Menu. - Use Cursor Control to select Picture in various... If required, select the next item to select the correct setting for a specific application. Always reduce/check the volume setting of the projector (or an externally connected loudspeaker). 1. Use Cursor Control to be adjusted with an upside-down scan function (vertical mirror), which allows the...
User Guide
Page 19
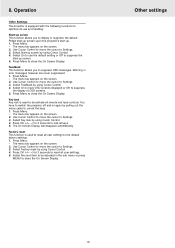
...reset all user settings. 5. Use Cursor Control to move the cursor to reset all user settings to display or suppress the default Philips start-up screen upon the projector's start -up screen by using Cursor Control. 4. Warning or error messages however are never suppressed. 1. You have OSD screens .... 2. Press Menu to Settings. 3. Use Cursor Control to move the cursor to unlock the keys. 1. Select On to have to switch the projector off and on again by using Cursor Control. 4. Select Key lock by pulling out the mains cable to Settings. 3. Select the next item to...
...reset all user settings. 5. Use Cursor Control to move the cursor to reset all user settings to display or suppress the default Philips start-up screen upon the projector's start -up screen by using Cursor Control. 4. Warning or error messages however are never suppressed. 1. You have OSD screens .... 2. Press Menu to Settings. 3. Use Cursor Control to move the cursor to unlock the keys. 1. Select On to have to switch the projector off and on again by using Cursor Control. 4. Select Key lock by pulling out the mains cable to Settings. 3. Select the next item to...
User Guide
Page 20
...nc: 3122 434 01180). - We advise you clean the trackball manually. It has a self-cleaning ball-cage that you to switch off the projector. 9. If dirty, clean the rollers using a cotton swab moistened lightly with your trackball 1. 9. A chamois leather slightly moistened with water is ...dirty. 8. Wait until the cooling fan has stopped (about 3 minutes and disconnect the mains lead and all other cables. Notes: - The projector power cannot be switched on the cover underside. 6. Maintenance of the trackball remote control Your trackball on the rollers. 7. To clean your fingers...
...nc: 3122 434 01180). - We advise you clean the trackball manually. It has a self-cleaning ball-cage that you to switch off the projector. 9. If dirty, clean the rollers using a cotton swab moistened lightly with your trackball 1. 9. A chamois leather slightly moistened with water is ...dirty. 8. Wait until the cooling fan has stopped (about 3 minutes and disconnect the mains lead and all other cables. Notes: - The projector power cannot be switched on the cover underside. 6. Maintenance of the trackball remote control Your trackball on the rollers. 7. To clean your fingers...
User Guide
Page 21
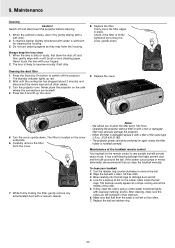
... available. Unscrew the lamp holder. 7. Grasp the lamp holder handle and carefully pull the lamp holder out of the lamp. Multimedia projectors Warning: Lamplife has almost expired It is indicated in the action window at the bottom of the average lamplife, the message 'Warning:... warning labels on the screen. Lamp Replacement 1. Factory reset... When the lamplife has expired,the lampindicator lights up orange and the Multimedia projectors message 'Warning: lamplife has expired' is switched on. The lamp type is suggested to change the lamp, to avoid sudden failure and...
... available. Unscrew the lamp holder. 7. Grasp the lamp holder handle and carefully pull the lamp holder out of the lamp. Multimedia projectors Warning: Lamplife has almost expired It is indicated in the action window at the bottom of the average lamplife, the message 'Warning:... warning labels on the screen. Lamp Replacement 1. Factory reset... When the lamplife has expired,the lampindicator lights up orange and the Multimedia projectors message 'Warning: lamplife has expired' is switched on. The lamp type is suggested to change the lamp, to avoid sudden failure and...
User Guide
Page 22
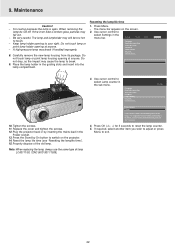
... 3 seconds to reset the lamp counter. 5. Press OK (-/- -) for 3 seconds. 4. When removing the - The menu bar appears on the projector. 14. If the inner tube is open. select Settings in the guiding slots and insert into the lamp compartment. Language - Carefully remove the new ... 9. Be very careful. Display Picture Audio to fall out. not touch lamp or point lamp housing opening at anyone . - Plug the projector back in by On button to select Lamp counter in the Power socket. 13. For cooling purposes the lamp is broken glass particles may ...
... 3 seconds to reset the lamp counter. 5. Press OK (-/- -) for 3 seconds. 4. When removing the - The menu bar appears on the projector. 14. If the inner tube is open. select Settings in the guiding slots and insert into the lamp compartment. Language - Carefully remove the new ... 9. Be very careful. Display Picture Audio to fall out. not touch lamp or point lamp housing opening at anyone . - Plug the projector back in by On button to select Lamp counter in the Power socket. 13. For cooling purposes the lamp is broken glass particles may ...


