
User Guide
Page 3
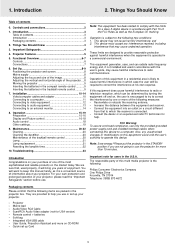
... Table of the trackball remote control 20 Lamp 21 Lamp replacement 21 Resetting the lamplife time 22 10...shielded interface cables when connecting this equipment in a residential area is the following: Philips Consumer Electronics Company One Philips Drive Knoxville, TN 37914 Telephone (1888) 873-4672 Packaging contents Please confirm that...is connected. - Mains lead - Quick set up Card 3 Things You Should Know Table of the projector ....8 Moving the projector 9 Inserting the batteries in the compact remote control ...........9 Inserting the batteries in the U.S.A. Note: This...
... Table of the trackball remote control 20 Lamp 21 Lamp replacement 21 Resetting the lamplife time 22 10...shielded interface cables when connecting this equipment in a residential area is the following: Philips Consumer Electronics Company One Philips Drive Knoxville, TN 37914 Telephone (1888) 873-4672 Packaging contents Please confirm that...is connected. - Mains lead - Quick set up Card 3 Things You Should Know Table of the projector ....8 Moving the projector 9 Inserting the batteries in the compact remote control ...........9 Inserting the batteries in the U.S.A. Note: This...
User Guide
Page 4
... the service technician to perform a routine safety check to normal operation. C. Save these instructions before cleaning or lamp replacement. 2. Do not place the projector on the side of the cabinet are covered by PHILIPS, as a bookcase unless proper ventilation is left unattended or not in installation such as they may touch dangerous voltage...
... the service technician to perform a routine safety check to normal operation. C. Save these instructions before cleaning or lamp replacement. 2. Do not place the projector on the side of the cabinet are covered by PHILIPS, as a bookcase unless proper ventilation is left unattended or not in installation such as they may touch dangerous voltage...
User Guide
Page 5
... signals. In addition you can select one of the On Screen Display menu. 2. High reliability and excellent brightness The Philips UHP lamp guarantees long life, excellent brightness over the entire picture. 5 Furthermore, the projector has an excellent brightness- Digital keystone correction is used during set-up of the projected image can be set...
... signals. In addition you can select one of the On Screen Display menu. 2. High reliability and excellent brightness The Philips UHP lamp guarantees long life, excellent brightness over the entire picture. 5 Furthermore, the projector has an excellent brightness- Digital keystone correction is used during set-up of the projected image can be set...
User Guide
Page 6
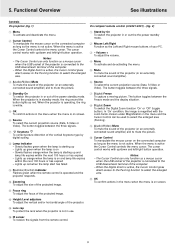
...On' or 'Off' (toggle button). Notes: - Functional Overview See illustrations Controls On projector (fig. 1) 1 Menu To activate and deactivate the menu. 2 Cursor Control To manipulate the mouse cursor on and lamp life expires within the next 100 hours or has expired - The Cursor Control can only ...function as the menu is starting up red when the lamp start has failed 9 R(emote) C(ontrol) indicator Flashes green when the remote control is operated and the projector responds. 0 Zoomring To adjust the size of the projected image. ! Lights up orange...
...On' or 'Off' (toggle button). Notes: - Functional Overview See illustrations Controls On projector (fig. 1) 1 Menu To activate and deactivate the menu. 2 Cursor Control To manipulate the mouse cursor on and lamp life expires within the next 100 hours or has expired - The Cursor Control can only ...function as the menu is starting up red when the lamp start has failed 9 R(emote) C(ontrol) indicator Flashes green when the remote control is operated and the projector responds. 0 Zoomring To adjust the size of the projected image. ! Lights up orange...
User Guide
Page 7
..., a VCR, Laser Disc player, video camera or TV with AV output socket (PAL, NTSC, SECAM). 5 Stand by On To switch the projector in use. Other connections f Data out To connect to the mains. b USB (upstream) Input socket to select the enlarged area. buttons function as... your PC. 4 Menu To activate and deactivate the menu. h Lamp compartment 9 D(igital)-Zoom To switch the Digital Zoom function 'On' or 'Off' (toggle button). j Power To connect the projector to an external monitor (or a second projector). The image projected is not on the monitor. i Lock slit...
..., a VCR, Laser Disc player, video camera or TV with AV output socket (PAL, NTSC, SECAM). 5 Stand by On To switch the projector in use. Other connections f Data out To connect to the mains. b USB (upstream) Input socket to select the enlarged area. buttons function as... your PC. 4 Menu To activate and deactivate the menu. h Lamp compartment 9 D(igital)-Zoom To switch the Digital Zoom function 'On' or 'Off' (toggle button). j Power To connect the projector to an external monitor (or a second projector). The image projected is not on the monitor. i Lock slit...
User Guide
Page 8
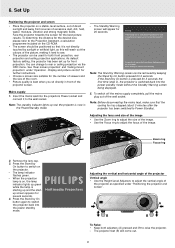
...removed by keeping the Stand by key pressed for both adjusters (A) pressed and lift to the wall socket. PHILIPS Multimedia Projectors Adjusting the vertical and horizontal angle of the projector Vertical angle • Use the Height/Level Adjusters to wait 1 minute before you sit directly in the ...Power/Standby mode. - You can switch on , the lamp indicator lights up red, the projector is switched off you have to adjust the vertical angle of excessive dust, dirt, heat, water, moisture, vibration and strong ...
...removed by keeping the Stand by key pressed for both adjusters (A) pressed and lift to the wall socket. PHILIPS Multimedia Projectors Adjusting the vertical and horizontal angle of the projector Vertical angle • Use the Height/Level Adjusters to wait 1 minute before you sit directly in the ...Power/Standby mode. - You can switch on , the lamp indicator lights up red, the projector is switched off you have to adjust the vertical angle of excessive dust, dirt, heat, water, moisture, vibration and strong ...
User Guide
Page 9
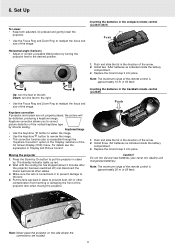
...; Adjust or correct a possible tilted picture by . 6. Set Up To Lower: • Keep both adjusters (A) pressed and gently lower the projector. • Use the Focus Ring and Zoom Ring to prevent dust, dirt or other cables. 3. Inserting the batteries in place to readjust the...submenu of the image. Install three 'AA' batteries as indicated inside the battery compartment. 3. Stabnyd A MVute Volume Lamp RC Keystone Menu OK Note: Never place the projector on the side where the connections are not properly placed, the picture will be distorted, producing a keystone image....
...; Adjust or correct a possible tilted picture by . 6. Set Up To Lower: • Keep both adjusters (A) pressed and gently lower the projector. • Use the Focus Ring and Zoom Ring to prevent dust, dirt or other cables. 3. Inserting the batteries in place to readjust the...submenu of the image. Install three 'AA' batteries as indicated inside the battery compartment. 3. Stabnyd A MVute Volume Lamp RC Keystone Menu OK Note: Never place the projector on the side where the connections are not properly placed, the picture will be distorted, producing a keystone image....
User Guide
Page 15
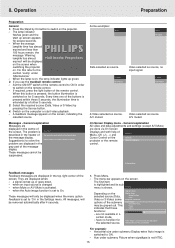
... Feedback messages are done via On Screen Displays and with help of the submenu may be displayed on the screen when switching the projector on the projector. - when Mute or A/V Mute is changed - The menu bar appears on the selected source (Data, Video or S-Video)... set to the section 'Lamp' under submenu Picture when signaltype is shown. Press the Stand by a further 5 seconds. 3. When the average PHILIPS lamplife time has almost expired and less than 100 hours remain, the message 'Warning: lamplife has almost Multimedia Projectors expired' will be removed automatically...
... Feedback messages are done via On Screen Displays and with help of the submenu may be displayed on the screen when switching the projector on the projector. - when Mute or A/V Mute is changed - The menu bar appears on the selected source (Data, Video or S-Video)... set to the section 'Lamp' under submenu Picture when signaltype is shown. Press the Stand by a further 5 seconds. 3. When the average PHILIPS lamplife time has almost expired and less than 100 hours remain, the message 'Warning: lamplife has almost Multimedia Projectors expired' will be removed automatically...
User Guide
Page 21
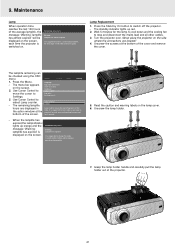
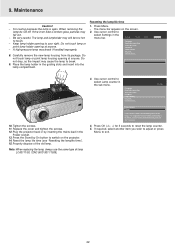
... When the lamplife has expired,the lampindicator lights up screen Feedback Lamp counter Key lock... Lamp Replacement 1. Never place the projector on . Press the Menu. - It is suggested to reset when a new lamp is switched on the side where the connections are displayed in...Use Cursor Control to have a spare lamp available. Audio Settings Lamp counter 5 hours Lamp counter shows the operating hours of the projector. 21 LLAAMMPP 5. The lamp type is Warning: Lamplife has expired displayed on the screen, each time the projector is inserted. Read the caution and ...
... When the lamplife has expired,the lampindicator lights up screen Feedback Lamp counter Key lock... Lamp Replacement 1. Never place the projector on . Press the Menu. - It is suggested to reset when a new lamp is switched on the side where the connections are displayed in...Use Cursor Control to have a spare lamp available. Audio Settings Lamp counter 5 hours Lamp counter shows the operating hours of the projector. 21 LLAAMMPP 5. The lamp type is Warning: Lamplife has expired displayed on the screen, each time the projector is inserted. Read the caution and ...
User Guide
Page 22
When removing the - The menu bar appears on the projector. 14. Keystone correction Start-up screen Feedback Lamp counter Key lock... Do Factory reset... not touch lamp or point lamp housing opening at anyone . Do not drop, as the impact may 2. Settings FILTER 10. To reset keep ... 3 seconds to fall out. Maintenance Resetting the lamplife time Caution! 1. The lamp and lampholder may break if handled improperly. Place the lamp holder in the - Tighten the screws. 11. Plug the projector back in by On button to break. 9. Press the Stand by inserting the...
When removing the - The menu bar appears on the projector. 14. Keystone correction Start-up screen Feedback Lamp counter Key lock... Do Factory reset... not touch lamp or point lamp housing opening at anyone . Do not drop, as the impact may 2. Settings FILTER 10. To reset keep ... 3 seconds to fall out. Maintenance Resetting the lamplife time Caution! 1. The lamp and lampholder may break if handled improperly. Place the lamp holder in the - Tighten the screws. 11. Plug the projector back in by On button to break. 9. Press the Stand by inserting the...
User Guide
Page 23
... If a fault occurs, first check the points listed below before switching off ; Distance between projector and screen is too great. • Reduce distance. - Lamp holder cover is not closed correctly or the lamp holder is red and flashing fast - Standby LED is damaged. • Close the cover ...POSSIBLE CAUSE • SOLUTION Image is still hot while the projector attempts to repair the projector yourself as this could invalidate the warranty. Lamp is not displayed - this may take up screen for repair. Lamp life has expired or almost expired (less than 100 hours to...
... If a fault occurs, first check the points listed below before switching off ; Distance between projector and screen is too great. • Reduce distance. - Lamp holder cover is not closed correctly or the lamp holder is red and flashing fast - Standby LED is damaged. • Close the cover ...POSSIBLE CAUSE • SOLUTION Image is still hot while the projector attempts to repair the projector yourself as this could invalidate the warranty. Lamp is not displayed - this may take up screen for repair. Lamp life has expired or almost expired (less than 100 hours to...


