
User Manual
Page 2
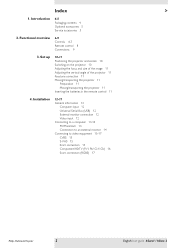
... projector 10 Adjusting the focus and size of the image 11 Adjusting the vertical angle of the projector 11 Keystone correction 11 Moving/transporting the projector 11 Preparation 11 Moving/transporting the projector 11 Inserting the batteries in the remote control 11 4. Introduction 4-5 Packaging contents 4 Optional accessories 5 Service accessories 5 2. Installation 12-17 General information 12 Computer input 12 Universal Serial Bus (USB) 12 External monitor connection 12 Video input 12 Connecting...
... projector 10 Adjusting the focus and size of the image 11 Adjusting the vertical angle of the projector 11 Keystone correction 11 Moving/transporting the projector 11 Preparation 11 Moving/transporting the projector 11 Inserting the batteries in the remote control 11 4. Introduction 4-5 Packaging contents 4 Optional accessories 5 Service accessories 5 2. Installation 12-17 General information 12 Computer input 12 Universal Serial Bus (USB) 12 External monitor connection 12 Video input 12 Connecting...
User Manual
Page 3
... lens 28 Cleaning the dust filter 28 Lamp 29 Lamp replacement 29-30 Resetting the lamplife time 30 7.Troubleshooting 31-34 Philips Multimedia Projector 3 English User guide bSure1 / bSure 2 Index < 5. Operation 18-27 Preparation 18 General 18 Messages 18 General explanation 18 Feedback messages 18 Some examples 18 On Screen Display Menu 19-27 Menu tree 19-20 General explanation 21 Computer adjustments 22-23 Display adjustments 22 Some examples 22 Digital Zoom/Magnification 22 Auto image 22 Horizontal size...
... lens 28 Cleaning the dust filter 28 Lamp 29 Lamp replacement 29-30 Resetting the lamplife time 30 7.Troubleshooting 31-34 Philips Multimedia Projector 3 English User guide bSure1 / bSure 2 Index < 5. Operation 18-27 Preparation 18 General 18 Messages 18 General explanation 18 Feedback messages 18 Some examples 18 On Screen Display Menu 19-27 Menu tree 19-20 General explanation 21 Computer adjustments 22-23 Display adjustments 22 Some examples 22 Digital Zoom/Magnification 22 Auto image 22 Horizontal size...
User Manual
Page 6
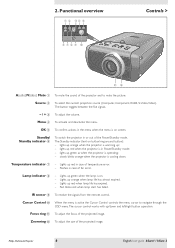
... projected image. Fast blinks red when lamp start has failed. To adjust the focus of the Power/Standby mode. Source 2 To select the current projection source (Computer, Component, RGBS, S-Video,Video). Standby/ Standby indicator 6 To switch the projector in case of the projector and to navigate through the OSD menu.The cursor control works with up green when the lamp is in case of the projected image. lights up red when the projector is on button/ring around button): - Temperature indicator 7 - Menu 4 To activate and deactivate the menu. lights...
... projected image. Fast blinks red when lamp start has failed. To adjust the focus of the Power/Standby mode. Source 2 To select the current projection source (Computer, Component, RGBS, S-Video,Video). Standby/ Standby indicator 6 To switch the projector in case of the projector and to navigate through the OSD menu.The cursor control works with up green when the lamp is in case of the projected image. lights up red when the projector is on button/ring around button): - Temperature indicator 7 - Menu 4 To activate and deactivate the menu. lights...
User Manual
Page 8
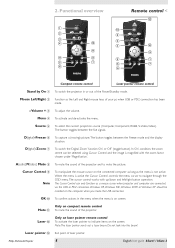
... when projector and computer are connected via the USB or PS/2 connectors. Source 5 To select the current projection source (Computer, Component, RGBS, S-Video,Video). The button toggles between the Freeze mode and the display situation. Windows 98, Windows ME, Windows 2000 or Windows XP should be selected using Cursor Control and the image is active the Cursor Control controls the menu cursor to navigate through the OSD menu.The cursor control works with the zoom...
... when projector and computer are connected via the USB or PS/2 connectors. Source 5 To select the current projection source (Computer, Component, RGBS, S-Video,Video). The button toggles between the Freeze mode and the display situation. Windows 98, Windows ME, Windows 2000 or Windows XP should be selected using Cursor Control and the image is active the Cursor Control controls the menu cursor to navigate through the OSD menu.The cursor control works with the zoom...
User Manual
Page 10
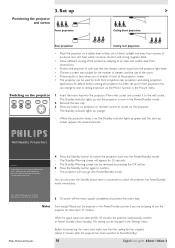
... socket. - Switching on the projector again to allow adequate time for more than 15 minutes. The projector will appear for 30 minutes, the projector automatically switches to switch the projector into Power/Standby mode immediately. As default factory setting, the projector has been set up orange. - The Standby indicator lights up for front projection.You can be used for the number of viewers and the size of the projector screen. • The projector can be changed in the 'Picture' menu.
... socket. - Switching on the projector again to allow adequate time for more than 15 minutes. The projector will appear for 30 minutes, the projector automatically switches to switch the projector into Power/Standby mode immediately. As default factory setting, the projector has been set up orange. - The Standby indicator lights up for front projection.You can be used for the number of viewers and the size of the projector screen. • The projector can be changed in the 'Picture' menu.
User Manual
Page 12
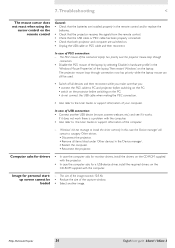
... own code protected personal start-up screen and shutdown timer which make theft unattractive to them automatically.With the 'Picture format' feature you take a number of precautions against unauthorized use of IBM compatible PCs can be connected to a Macintosh computer equipped with a USB interface, resulting in Power/Standby or Off mode. Philips Multimedia Projector 12 English User guide bSure1 / bSure 2 4. Installation General information < General information Computer input The computer input is...
... own code protected personal start-up screen and shutdown timer which make theft unattractive to them automatically.With the 'Picture format' feature you take a number of precautions against unauthorized use of IBM compatible PCs can be connected to a Macintosh computer equipped with a USB interface, resulting in Power/Standby or Off mode. Philips Multimedia Projector 12 English User guide bSure1 / bSure 2 4. Installation General information < General information Computer input The computer input is...
User Manual
Page 14
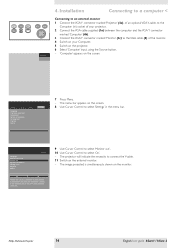
...out'. 10 Use Cursor Control to select 'On'. - The image projected is connected to the VGA cable (5) of the monitor. 4 Switch on the screen. Philips Multimedia Projector 14 English User guide bSure1 / bSure 2 Factory reset Key lock (more ) Audio Settings 7 Press Menu. - AV Mute Stand by Source Lamp Temp Menu OK Computer 4. The projector will indicate the necessity to select 'Settings' in ) socket of your Computer. 5 Switch on the projector. 6 Select 'Computer' input, using the Source button. - 'Computer' appears on your projector. 2 Connect the VGA cable supplied (1a) between...
...out'. 10 Use Cursor Control to select 'On'. - The image projected is connected to the VGA cable (5) of the monitor. 4 Switch on the screen. Philips Multimedia Projector 14 English User guide bSure1 / bSure 2 Factory reset Key lock (more ) Audio Settings 7 Press Menu. - AV Mute Stand by Source Lamp Temp Menu OK Computer 4. The projector will indicate the necessity to select 'Settings' in ) socket of your Computer. 5 Switch on the projector. 6 Select 'Computer' input, using the Source button. - 'Computer' appears on your projector. 2 Connect the VGA cable supplied (1a) between...
User Manual
Page 18
... the message display. Messages Fan error The projector will be changed ; - a signal comes up orange. - When more input sources are displayed in the 'Settings' menu. 3 Switch on , the Standby indicator lights up screen (when enabled) appears for repair. Computer Video No signal S-Video A/V Muted Component video A/V Muted Computer selected as source Philips Multimedia Projector Video selected as source, no input signal 18 S-Video selected as source, A/V muted Component selected as source A/V muted English User guide bSure1 / bSure 2 When only one input source is connected...
... the message display. Messages Fan error The projector will be changed ; - a signal comes up orange. - When more input sources are displayed in the 'Settings' menu. 3 Switch on , the Standby indicator lights up screen (when enabled) appears for repair. Computer Video No signal S-Video A/V Muted Component video A/V Muted Computer selected as source Philips Multimedia Projector Video selected as source, no input signal 18 S-Video selected as source, A/V muted Component selected as source A/V muted English User guide bSure1 / bSure 2 When only one input source is connected...
User Manual
Page 19
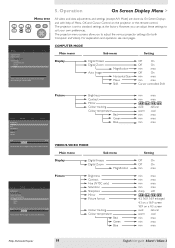
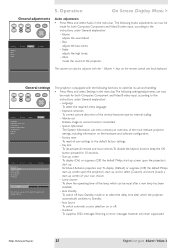
... Control on a 4:3 screen vivid natural warm cool min max min max min max Philips Multimedia Projector 19 English User guide bSure1 / bSure 2 Press OK key to adjust the various projector settings (for both Computer and Video). The projector menu screens allow you can adjust these settings to standard settings at the factory. Display Picture Digital Freeze Digital Zoom Magnification Auto Image Horizontal size Phase Shift . . . Picture Brightness Contrast Mirror Colour tracking Colour temperature Red Green Blue VIDEO/S-VIDEO MODE Main menu Sub menu Display Digital...
... Control on a 4:3 screen vivid natural warm cool min max min max min max Philips Multimedia Projector 19 English User guide bSure1 / bSure 2 Press OK key to adjust the various projector settings (for both Computer and Video). The projector menu screens allow you can adjust these settings to standard settings at the factory. Display Picture Digital Freeze Digital Zoom Magnification Auto Image Horizontal size Phase Shift . . . Picture Brightness Contrast Mirror Colour tracking Colour temperature Red Green Blue VIDEO/S-VIDEO MODE Main menu Sub menu Display Digital...
User Manual
Page 20
... Factory reset Key lock Start-up . Por. Ita. Chi. Deu. Philips Multimedia Projector 20 English User guide bSure1 / bSure 2 Off On OK OK OK (3 sec.) Off On Default, Off, Custom, Load OK (3 sec.) Off 15 30 45 60 120 Off On Off On Display Picture (previous) Start-up screen Lamp counter Auto Standby Auto Source Feedback Audio Settings Off On The Start-up screen can be shown or suppressed during start-up screen For bSure2 Brilliance projectors only Lamp counter Auto Standby Auto Source...
... Factory reset Key lock Start-up . Por. Ita. Chi. Deu. Philips Multimedia Projector 20 English User guide bSure1 / bSure 2 Off On OK OK OK (3 sec.) Off On Default, Off, Custom, Load OK (3 sec.) Off 15 30 45 60 120 Off On Off On Display Picture (previous) Start-up screen Lamp counter Auto Standby Auto Source Feedback Audio Settings Off On The Start-up screen can be shown or suppressed during start-up screen For bSure2 Brilliance projectors only Lamp counter Auto Standby Auto Source...
User Manual
Page 21
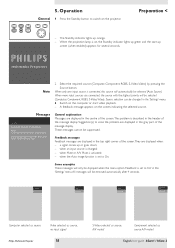
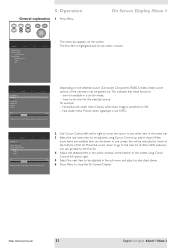
... may be indicated by Source Lamp Temp Menu OK On Screen Display Menu > Display Picture Digital Freeze Digital Zoom Magnification Auto Image Horizontal size Phase Shift . . . Horizontal size under menu 'Picture' when signaltype is not NTSC. Operation General explanation 1 Press Menu. Hue under menu 'Display' when Auto image is shown. AV Mute Stand by 'more ) Audio Settings min max Move pointer left and/or right. 5 Select the next item to close the On Screen 'Display'. Philips Multimedia Projector 21 English User guide bSure1 / bSure 2 For...
... may be indicated by Source Lamp Temp Menu OK On Screen Display Menu > Display Picture Digital Freeze Digital Zoom Magnification Auto Image Horizontal size Phase Shift . . . Horizontal size under menu 'Picture' when signaltype is not NTSC. Operation General explanation 1 Press Menu. Hue under menu 'Display' when Auto image is shown. AV Mute Stand by 'more ) Audio Settings min max Move pointer left and/or right. 5 Select the next item to close the On Screen 'Display'. Philips Multimedia Projector 21 English User guide bSure1 / bSure 2 For...
User Manual
Page 22
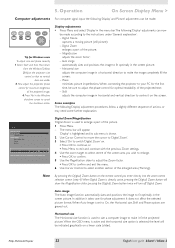
... the image to enlarge a part of the picture. 1 Press Menu. - When Auto Image is shown. 2 Use Cursor Control to move the cursor to 'Digital Zoom'. 3 Select 'On' to switch 'Digital Zoom' on Digital Zoom is used to adjust the phase control for maximum brightness of the enlarged area ('Panning'). AV Mute Stand by Source Lamp Temp Menu OK Tip for Windows users To adjust size and phase correctly 1 Select 'Start' and then 'Shut down' from the Windows Taskbar. 2 Adjust the projectors size control...
... the image to enlarge a part of the picture. 1 Press Menu. - When Auto Image is shown. 2 Use Cursor Control to move the cursor to 'Digital Zoom'. 3 Select 'On' to switch 'Digital Zoom' on Digital Zoom is used to adjust the phase control for maximum brightness of the enlarged area ('Panning'). AV Mute Stand by Source Lamp Temp Menu OK Tip for Windows users To adjust size and phase correctly 1 Select 'Start' and then 'Shut down' from the Windows Taskbar. 2 Adjust the projectors size control...
User Manual
Page 25
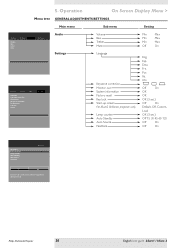
... projector's start up and to Standby; - Auto Source To switch automatic source selection on second monitor connected; - The following settings/adjustments can be made for both Computer, Component and Video/S-video input, according to select the delay time after which can now be reset after a new lamp has been installed; - Mute mutes the sound of the vertical keystone type by Source Lamp Temp Menu OK Display Picture Language Keystone correction Monitor out System information... Factory reset Key lock (more) Audio Settings Display Picture (previous) Start...
... projector's start up and to Standby; - Auto Source To switch automatic source selection on second monitor connected; - The following settings/adjustments can be made for both Computer, Component and Video/S-video input, according to select the delay time after which can now be reset after a new lamp has been installed; - Mute mutes the sound of the vertical keystone type by Source Lamp Temp Menu OK Display Picture Language Keystone correction Monitor out System information... Factory reset Key lock (more) Audio Settings Display Picture (previous) Start...

User Manual
Page 26
... (new) Custom image. Capture complete. Press Ok to resize the capture window. Operation On Screen Display Menu > Loading your own personal start -up screen by Source Lamp Temp Menu OK Display Picture Language Keystone correction Monitor out System information... You can load any image as long as start -up screen Lamp counter Auto Standby Auto Source Feedback Audio Settings Default Off DefCauuslttom Load... For this see 'Resetting the projector' hereafter. AV Mute Stand by using Cursor Control. 4 Select Load if you what part...
... (new) Custom image. Capture complete. Press Ok to resize the capture window. Operation On Screen Display Menu > Loading your own personal start -up screen by Source Lamp Temp Menu OK Display Picture Language Keystone correction Monitor out System information... You can load any image as long as start -up screen Lamp counter Auto Standby Auto Source Feedback Audio Settings Default Off DefCauuslttom Load... For this see 'Resetting the projector' hereafter. AV Mute Stand by using Cursor Control. 4 Select Load if you what part...
User Manual
Page 29
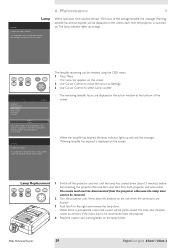
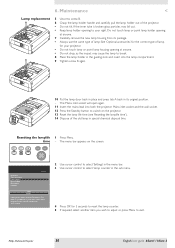
... can be removed. 2 Turn the projector over. AV Mute Source Menu OK The mains lead must be disconnected from the projector otherwise the lamp door Stand by Source Lamp Temp Menu OK Display Picture (previous) Start-up screen Lamp counter Auto standby Auto source Feedback Audio Settings Lamp 5 Hours Lamp counter shows the operating hours of the lamp. The lamp type is displayed on the screen. It is suggested to reset when a new lamp is switched on.The lamp indicator lights up red and the message 'Warning: lamplife has expired' is indicated in the...
... can be removed. 2 Turn the projector over. AV Mute Source Menu OK The mains lead must be disconnected from the projector otherwise the lamp door Stand by Source Lamp Temp Menu OK Display Picture (previous) Start-up screen Lamp counter Auto standby Auto source Feedback Audio Settings Lamp 5 Hours Lamp counter shows the operating hours of the lamp. The lamp type is displayed on the screen. It is suggested to reset when a new lamp is switched on.The lamp indicator lights up red and the message 'Warning: lamplife has expired' is indicated in the...
User Manual
Page 30
... reset keep OK key pressed for 3 seconds. 2 Use cursor control to select 'Settings' in the menu bar. 3 Use cursor control to select 'Lamp counter' in special chemical disposal bins. Do not touch lamp or point lamp holder opening to switch on the screen. A 13 Reset the lamp life time (see 'Resetting the lamplife time'). 14 Dispose of the lamp. The menu bar appears on the projector. AV Mute Stand by Source Lamp Temp Menu OK Display Picture (previous) Start-up screen Lamp counter Auto standby Auto source Feedback Audio Settings Lamp 0 hours Lamp counter...
... reset keep OK key pressed for 3 seconds. 2 Use cursor control to select 'Settings' in the menu bar. 3 Use cursor control to select 'Lamp counter' in special chemical disposal bins. Do not touch lamp or point lamp holder opening to switch on the screen. A 13 Reset the lamp life time (see 'Resetting the lamplife time'). 14 Dispose of the lamp. The menu bar appears on the projector. AV Mute Stand by Source Lamp Temp Menu OK Display Picture (previous) Start-up screen Lamp counter Auto standby Auto source Feedback Audio Settings Lamp 0 hours Lamp counter...
User Manual
Page 31
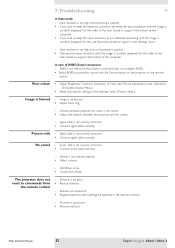
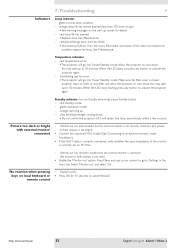
...the On Screen Display menu. • Reset all settings to repair the projector yourself as follows Problem - Read as this use the 'Keystone correction' option in the 'Settings' menu. Lamp holder cover is not closed correctly or the lamp holder is damaged. • Install the filter holder correctly (see 'Display adjustment' under 'Maintenance'). - Signal cable not correctly connected. • Connect signal cable correctly. - In Component Video mode - 'Auto Image' has not selected the correct settings for repair. Philips Multimedia Projector 31 English User guide bSure1 / bSure...
...the On Screen Display menu. • Reset all settings to repair the projector yourself as follows Problem - Read as this use the 'Keystone correction' option in the 'Settings' menu. Lamp holder cover is not closed correctly or the lamp holder is damaged. • Install the filter holder correctly (see 'Display adjustment' under 'Maintenance'). - Signal cable not correctly connected. • Connect signal cable correctly. - In Component Video mode - 'Auto Image' has not selected the correct settings for repair. Philips Multimedia Projector 31 English User guide bSure1 / bSure...
User Manual
Page 32
... computer. Signal cable is not focused. • Adjust focus ring. - For this, use 'Keystone correction' option in the remote control'). - The projector does not react to keep the input resolution as projection source with the Source button on the projector or the remote control. 7.Troubleshooting > In Data mode - Poor colour • Adjust 'Brightness', 'Contrast', 'Saturation' or 'Hue' (see 'Inserting the batteries in the 'Settings' menu. - Image is not correctly connected. • Connect signal cable correctly. RGBS is not selected or Auto Source is...
... computer. Signal cable is not focused. • Adjust focus ring. - For this, use 'Keystone correction' option in the remote control'). - The projector does not react to keep the input resolution as projection source with the Source button on the projector or the remote control. 7.Troubleshooting > In Data mode - Poor colour • Adjust 'Brightness', 'Contrast', 'Saturation' or 'Hue' (see 'Inserting the batteries in the 'Settings' menu. - Image is not correctly connected. • Connect signal cable correctly. RGBS is not selected or Auto Source is...
User Manual
Page 33
... warning messages on both displays is closed properly; No reaction when pressing keys on Standby button/ring around Standby button) - Temperature indicator - this may take up screen for 10 seconds to go into Power/Standby mode. red: standby mode. - slow blinking (orange): cooling down ; See 'Maintenance'. - Reconnect and restart. Allow the projector to 'Settings' in the menu bar. clean air inlets or dust filter and allow the projector to activate the projector again. - When the LED stops flashing...
... warning messages on both displays is closed properly; No reaction when pressing keys on Standby button/ring around Standby button) - Temperature indicator - this may take up screen for 10 seconds to go into Power/Standby mode. red: standby mode. - slow blinking (orange): cooling down ; See 'Maintenance'. - Reconnect and restart. Allow the projector to 'Settings' in the menu bar. clean air inlets or dust filter and allow the projector to activate the projector again. - When the LED stops flashing...
User Manual
Page 34
In case of USB connection: • Connect another image. Philips Multimedia Projector 34 English User guide bSure1 / bSure 2 7.Troubleshooting < The mouse cursor does not react when using the cursor control on the remote control General: • Check that both projector and computer are installed properly in the 'Device manager'. • Restart the computer. • Reconnect the projector. The projector mouse loop through connection. • Disable the PS/2 mouse of the laptop by selecting...
In case of USB connection: • Connect another image. Philips Multimedia Projector 34 English User guide bSure1 / bSure 2 7.Troubleshooting < The mouse cursor does not react when using the cursor control on the remote control General: • Check that both projector and computer are installed properly in the 'Device manager'. • Restart the computer. • Reconnect the projector. The projector mouse loop through connection. • Disable the PS/2 mouse of the laptop by selecting...


