
User Manual
Page 2
... the projector and screen 10 Switching on the projector 10 Adjusting the focus and size of the image 11 Adjusting the vertical angle of the projector 11 Keystone correction 11 Moving/transporting the projector 11 Preparation 11 Moving/transporting the projector 11 Inserting the batteries in the remote control 11 4. Installation 12-17 General information 12 Computer input 12 Universal Serial Bus (USB) 12 External monitor connection 12 Video input 12 Connecting to...
... the projector and screen 10 Switching on the projector 10 Adjusting the focus and size of the image 11 Adjusting the vertical angle of the projector 11 Keystone correction 11 Moving/transporting the projector 11 Preparation 11 Moving/transporting the projector 11 Inserting the batteries in the remote control 11 4. Installation 12-17 General information 12 Computer input 12 Universal Serial Bus (USB) 12 External monitor connection 12 Video input 12 Connecting to...
User Manual
Page 3
... Cleaning the lens 28 Cleaning the dust filter 28 Lamp 29 Lamp replacement 29-30 Resetting the lamplife time 30 7.Troubleshooting 31-34 Philips Multimedia Projector 3 English User guide bSure1 / bSure 2 Operation 18-27 Preparation 18 General 18 Messages 18 General explanation 18 Feedback messages 18 Some examples 18 On Screen Display Menu 19-27 Menu tree 19-20 General explanation 21 Computer adjustments 22-23 Display adjustments 22 Some examples 22 Digital Zoom/Magnification 22 Auto image 22 Horizontal size...
... Cleaning the lens 28 Cleaning the dust filter 28 Lamp 29 Lamp replacement 29-30 Resetting the lamplife time 30 7.Troubleshooting 31-34 Philips Multimedia Projector 3 English User guide bSure1 / bSure 2 Operation 18-27 Preparation 18 General 18 Messages 18 General explanation 18 Feedback messages 18 Some examples 18 On Screen Display Menu 19-27 Menu tree 19-20 General explanation 21 Computer adjustments 22-23 Display adjustments 22 Some examples 22 Digital Zoom/Magnification 22 Auto image 22 Horizontal size...
User Manual
Page 6
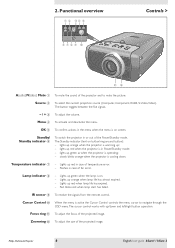
lights up green when the lamp is on. - Lamp indicator 8 - Lights up red when the projector is active the Cursor Control controls the menu cursor to mute the picture. Fast blinks red when lamp start has failed. Cursor Control 0 When the menu is in Power/Standby mode; - To adjust the focus of the projected image. Zoomring @ To adjust the size of the projected image. Philips Multimedia Projector 6 English User guide bSure1 / bSure 2 The Standby indicator (text on screen. IR sensor 9 To receive the signals from the remote control. The button toggles between the...
lights up green when the lamp is on. - Lamp indicator 8 - Lights up red when the projector is active the Cursor Control controls the menu cursor to mute the picture. Fast blinks red when lamp start has failed. Cursor Control 0 When the menu is in Power/Standby mode; - To adjust the focus of the projected image. Zoomring @ To adjust the size of the projected image. Philips Multimedia Projector 6 English User guide bSure1 / bSure 2 The Standby indicator (text on screen. IR sensor 9 To receive the signals from the remote control. The button toggles between the...
User Manual
Page 8
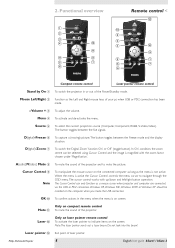
... the USB connection. Menu 4 To activate and de-activate the menu. The button toggles between the Freeze mode and the display situation. Windows 98, Windows ME, Windows 2000 or Windows XP should be selected using Cursor Control and the image is active the Cursor Control controls the menu cursor to mute the picture. Philips Multimedia Projector 8 English User guide bSure1 / bSure 2 Volume + 3 To adjust the volume. A(udio)/V(ideo) Mute 8 To mute the sound of the projector and...
... the USB connection. Menu 4 To activate and de-activate the menu. The button toggles between the Freeze mode and the display situation. Windows 98, Windows ME, Windows 2000 or Windows XP should be selected using Cursor Control and the image is active the Cursor Control controls the menu cursor to mute the picture. Philips Multimedia Projector 8 English User guide bSure1 / bSure 2 Volume + 3 To adjust the volume. A(udio)/V(ideo) Mute 8 To mute the sound of the projector and...
User Manual
Page 10
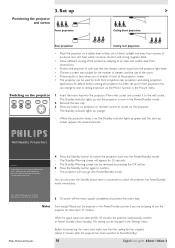
... - PHILIPS Multimedia Projectors Warning If the projector is now in the Power/Standby mode. 2 Remove the lens cap. 3 Press any button on the projector AV Mute Stand by key again to confirm. - Press stand-by Source Lamp Temp Menu OK 1 Insert the mains lead into the projectors Mains inlet socket and connect it to switch the projector back into Power/Standby mode. Philips Multimedia Projector 10 English User guide bSure1 / bSure 2 Set up > Positioning the projector SCREEN and screen SCREEN Front projection SCREEN Ceiling front projection SCREEN Rear projection...
... - PHILIPS Multimedia Projectors Warning If the projector is now in the Power/Standby mode. 2 Remove the lens cap. 3 Press any button on the projector AV Mute Stand by key again to confirm. - Press stand-by Source Lamp Temp Menu OK 1 Insert the mains lead into the projectors Mains inlet socket and connect it to switch the projector back into Power/Standby mode. Philips Multimedia Projector 10 English User guide bSure1 / bSure 2 Set up > Positioning the projector SCREEN and screen SCREEN Front projection SCREEN Ceiling front projection SCREEN Rear projection...
User Manual
Page 12
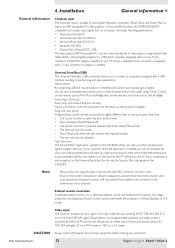
... adapt to your projector. Mouse control: By connecting USB, the mouse function on the CD-ROM. Once the application is installed, you to connect to the projector.The image projected is simultaneously shown on the specific hardware and software configuration available, Apple Macintosh computer users could experience incomplete or erratic USB -functionality.These problems are not related to a Macintosh computer equipped with a USB interface, resulting in Power/Standby...
... adapt to your projector. Mouse control: By connecting USB, the mouse function on the CD-ROM. Once the application is installed, you to connect to the projector.The image projected is simultaneously shown on the specific hardware and software configuration available, Apple Macintosh computer users could experience incomplete or erratic USB -functionality.These problems are not related to a Macintosh computer equipped with a USB interface, resulting in Power/Standby...
User Manual
Page 14
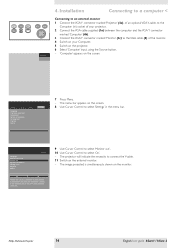
... to connect the Y-cable. 11 Switch on the screen. 8 Use Cursor Control to select 'Settings' in ) socket of your Computer. 5 Switch on the projector. 6 Select 'Computer' input, using the Source button. - 'Computer' appears on the monitor. Philips Multimedia Projector 14 English User guide bSure1 / bSure 2 Display Picture Language Keystone correction Monitor out System information... Display Picture Language Kestone correction Monitor out System information... The image projected is simultaneously shown on the screen. Factory reset Key lock (more ) Audio Settings...
... to connect the Y-cable. 11 Switch on the screen. 8 Use Cursor Control to select 'Settings' in ) socket of your Computer. 5 Switch on the projector. 6 Select 'Computer' input, using the Source button. - 'Computer' appears on the monitor. Philips Multimedia Projector 14 English User guide bSure1 / bSure 2 Display Picture Language Keystone correction Monitor out System information... Display Picture Language Kestone correction Monitor out System information... The image projected is simultaneously shown on the screen. Factory reset Key lock (more ) Audio Settings...
User Manual
Page 18
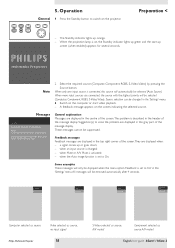
... green and the start video playback. - General explanation Messages are displayed in the 'Settings' menu. 3 Switch on , the Standby indicator lights up screen (when enabled) appears for repair. when the Auto image function is set to solve the problem are displayed in the centre of the screen.The problem is changed in the gray part of the message display. A feedback message appears on the projector. when an input source is described in the 'Settings' menu. when Mute or A/V Mute is connected...
... green and the start video playback. - General explanation Messages are displayed in the 'Settings' menu. 3 Switch on , the Standby indicator lights up screen (when enabled) appears for repair. when the Auto image function is set to solve the problem are displayed in the centre of the screen.The problem is changed in the gray part of the message display. A feedback message appears on the projector. when an input source is described in the 'Settings' menu. when Mute or A/V Mute is connected...
User Manual
Page 19
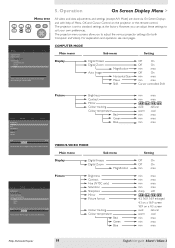
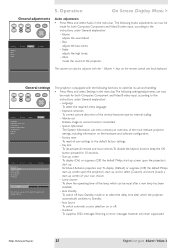
... Cursor Control on a 4:3 screen vivid natural warm cool min max min max min max Philips Multimedia Projector 19 English User guide bSure1 / bSure 2 Audio Settings Shift is set to adjust the various projector settings (for both Computer and Video). Operation On Screen Display Menu > AV Mute Stand by Source Lamp Temp Menu tree Menu OK All video and data adjustments and settings (except A/V Mute) are done via On Screen Displays and with help of the image. Display Picture (previous) Picture format Colour tracking Colour temperature Red Green Blue Audio Settings min...
... Cursor Control on a 4:3 screen vivid natural warm cool min max min max min max Philips Multimedia Projector 19 English User guide bSure1 / bSure 2 Audio Settings Shift is set to adjust the various projector settings (for both Computer and Video). Operation On Screen Display Menu > AV Mute Stand by Source Lamp Temp Menu tree Menu OK All video and data adjustments and settings (except A/V Mute) are done via On Screen Displays and with help of the image. Display Picture (previous) Picture format Colour tracking Colour temperature Red Green Blue Audio Settings min...
User Manual
Page 20
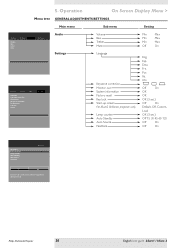
...Factory reset Key lock Start-up . 5. Chi. Philips Multimedia Projector 20 English User guide bSure1 / bSure 2 Operation On Screen Display Menu > Menu tree GENERAL ADJUSTMENTS/SETTINGS Main menu Sub menu Setting Display Volume Bass Treble Mute Picture Audio Settings Audio Settings Display Picture Language Keystone correction Monitor out System information... Fra. Esp. Off On OK OK OK (3 sec.) Off On Default, Off, Custom, Load OK (3 sec.) Off 15 30 45 60 120 Off On Off On Display Picture (previous) Start-up screen Lamp counter Auto Standby Auto Source...
...Factory reset Key lock Start-up . 5. Chi. Philips Multimedia Projector 20 English User guide bSure1 / bSure 2 Operation On Screen Display Menu > Menu tree GENERAL ADJUSTMENTS/SETTINGS Main menu Sub menu Setting Display Volume Bass Treble Mute Picture Audio Settings Audio Settings Display Picture Language Keystone correction Monitor out System information... Fra. Esp. Off On OK OK OK (3 sec.) Off On Default, Off, Custom, Load OK (3 sec.) Off 15 30 45 60 120 Off On Off On Display Picture (previous) Start-up screen Lamp counter Auto Standby Auto Source...
User Manual
Page 21
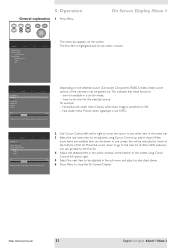
... indicated by Source Lamp Temp Menu OK On Screen Display Menu > Display Picture Digital Freeze Digital Zoom Magnification Auto Image Horizontal size Phase Shift . . . Display Picture Brightness Contrast Hue Saturation Sharpness Mirror (more ' at the bottom of the list. Move the cursor down . Hue under menu 'Display' when Auto image is switched to the first list. 4 Adjust the selected item in one screen, this will be greyed out.This indicates that these functions: - Philips Multimedia Projector 21 English User guide bSure1 / bSure...
... indicated by Source Lamp Temp Menu OK On Screen Display Menu > Display Picture Digital Freeze Digital Zoom Magnification Auto Image Horizontal size Phase Shift . . . Display Picture Brightness Contrast Hue Saturation Sharpness Mirror (more ' at the bottom of the list. Move the cursor down . Hue under menu 'Display' when Auto image is switched to the first list. 4 Adjust the selected item in one screen, this will be greyed out.This indicates that these functions: - Philips Multimedia Projector 21 English User guide bSure1 / bSure...
User Manual
Page 22
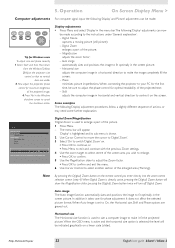
... captures a moving picture (still picture); - Auto image automatically sizes and positions the image to fit optimally in horizontal and vertical direction to enlarge part of the picture. 1 Press Menu. - Audio Settings off Digital Zoom. In addition it fit the projected picture. Magnification adjusts the zoom factor; - Operation On Screen Display Menu > Computer adjustments For computer signal input, the following 'Display' adjustment procedures, follow a slightly different sequence of the projected text; - AV Mute Stand by Source Lamp Temp Menu OK Tip for...
... captures a moving picture (still picture); - Auto image automatically sizes and positions the image to fit optimally in horizontal and vertical direction to enlarge part of the picture. 1 Press Menu. - Audio Settings off Digital Zoom. In addition it fit the projected picture. Magnification adjusts the zoom factor; - Operation On Screen Display Menu > Computer adjustments For computer signal input, the following 'Display' adjustment procedures, follow a slightly different sequence of the projected text; - AV Mute Stand by Source Lamp Temp Menu OK Tip for...
User Manual
Page 25
... Auto Standby mode or to the default factory settings; - Auto Source To switch automatic source selection on the hardware and software configuration; - Warning or error messages however are never suppressed. The projector is equipped with the - Key lock To de-activate all user settings to select the delay time after a new lamp has been installed; - The volume can be made for both Computer, Component and Video/S-video input, according to select (Custom) and store (Load) a start...
... Auto Standby mode or to the default factory settings; - Auto Source To switch automatic source selection on the hardware and software configuration; - Warning or error messages however are never suppressed. The projector is equipped with the - Key lock To de-activate all user settings to select the delay time after a new lamp has been installed; - The volume can be made for both Computer, Component and Video/S-video input, according to select (Custom) and store (Load) a start...

User Manual
Page 26
... window (red oblong) shows you what part of the image will be captured. Capture complete. Please reset projector. AV Mute Stand by using Cursor Control. 4 Select Load if you wish to resize the capture window in order to make the image fit in the window.You can use Cursor Control to adjust the size of the image and may take up screen Lamp counter Auto Standby Auto Source Feedback Audio Settings Default Off DefCauuslttom Load... Display Picture (previous) Start...
... window (red oblong) shows you what part of the image will be captured. Capture complete. Please reset projector. AV Mute Stand by using Cursor Control. 4 Select Load if you wish to resize the capture window in order to make the image fit in the window.You can use Cursor Control to adjust the size of the image and may take up screen Lamp counter Auto Standby Auto Source Feedback Audio Settings Default Off DefCauuslttom Load... Display Picture (previous) Start...
User Manual
Page 29
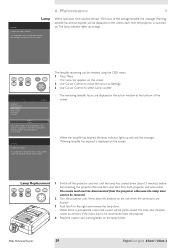
... message 'Warning: lamplife has almost expired' will be displayed on the screen, each time the projector is switched on.The lamp indicator lights up screen Lamp counter Auto standby Auto source Feedback Audio Settings Lamp 5 Hours Lamp counter shows the operating hours of the screen. - When the lamplife has expired, the lamp indicator lights up red and the message 'Warning: lamplife has expired' is not disconnected from the projector. 4 Read the caution and warning labels on the screen. The lamp door therefore cannot be checked using the OSD menu...
... message 'Warning: lamplife has almost expired' will be displayed on the screen, each time the projector is switched on.The lamp indicator lights up screen Lamp counter Auto standby Auto source Feedback Audio Settings Lamp 5 Hours Lamp counter shows the operating hours of the screen. - When the lamplife has expired, the lamp indicator lights up red and the message 'Warning: lamplife has expired' is not disconnected from the projector. 4 Read the caution and warning labels on the screen. The lamp door therefore cannot be checked using the OSD menu...
User Manual
Page 30
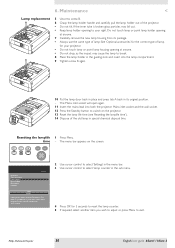
... reset when a new lamp is broken glass particles may cause the lamp to your projector. • Do not touch lamp or point lamp housing opening to break. 8 Place the lamp holder in special chemical disposal bins. AV Mute Stand by Source Lamp Temp Menu OK Display Picture (previous) Start-up screen Lamp counter Auto standby Auto source Feedback Audio Settings Lamp 0 hours Lamp counter shows the operating hours of the projector. • Do not tilt. 6. To reset keep OK key pressed for 3 seconds. 2 Use cursor control...
... reset when a new lamp is broken glass particles may cause the lamp to your projector. • Do not touch lamp or point lamp housing opening to break. 8 Place the lamp holder in special chemical disposal bins. AV Mute Stand by Source Lamp Temp Menu OK Display Picture (previous) Start-up screen Lamp counter Auto standby Auto source Feedback Audio Settings Lamp 0 hours Lamp counter shows the operating hours of the projector. • Do not tilt. 6. To reset keep OK key pressed for 3 seconds. 2 Use cursor control...
User Manual
Page 31
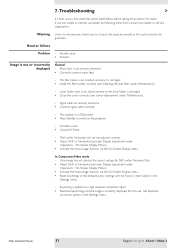
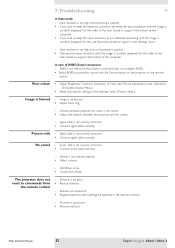
... 'Cleaning the dust filter' under 'Maintenance'). - In Component Video mode - 'Auto Image' has not selected the correct settings for repair. Mains lead is not or incorrectly displayed General - The projector is damaged. • Close the cover correctly (see 'Display adjustment' under 'Operation' - 'On Screen Display Menu'). • Activate the 'Auto-image' function via the On Screen Display menu. • Reset all settings to the default factory settings with the 'Factory reset' option in the 'Settings' menu. Philips Multimedia Projector 31 English User guide bSure1 / bSure...
... 'Cleaning the dust filter' under 'Maintenance'). - In Component Video mode - 'Auto Image' has not selected the correct settings for repair. Mains lead is not or incorrectly displayed General - The projector is damaged. • Close the cover correctly (see 'Display adjustment' under 'Operation' - 'On Screen Display Menu'). • Activate the 'Auto-image' function via the On Screen Display menu. • Reset all settings to the default factory settings with the 'Factory reset' option in the 'Settings' menu. Philips Multimedia Projector 31 English User guide bSure1 / bSure...
User Manual
Page 32
... commands from the remote control - 7.Troubleshooting > In Data mode - Picture rolls - Audio cable is blurred - For this , use 'Keystone correction' option in the 'Settings' menu ('Factory reset'). In case of the computer. RGBS is not selected or Auto Source is activated (does not recognize RGBS). • Select RGBS as it is, decrease keystoning until the image is too great. • Reduce distance. - Image is not correctly connected. • Connect audio cable correctly. - No sound - Distance is correctly displayed...
... commands from the remote control - 7.Troubleshooting > In Data mode - Picture rolls - Audio cable is blurred - For this , use 'Keystone correction' option in the 'Settings' menu ('Factory reset'). In case of the computer. RGBS is not selected or Auto Source is activated (does not recognize RGBS). • Select RGBS as it is, decrease keystoning until the image is too great. • Reduce distance. - Image is not correctly connected. • Connect audio cable correctly. - No sound - Distance is correctly displayed...
User Manual
Page 33
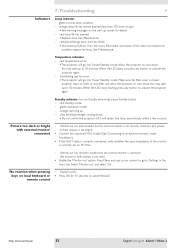
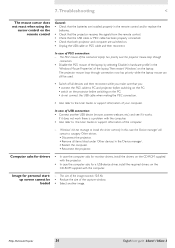
... the filter cover is too dark). • Enable the 'Monitor out' option. Standby indicator (text on both displays is closed properly; Press Menu and use cursor control to go into Power/Standby mode. If this may take up screen for 10 seconds to 'Settings' in the menu bar. When the LED goes out press any button to 30 minutes. green: operation mode. - green: normal lamp condition. - red (fast blinking): lamp start up to activate the projector...
... the filter cover is too dark). • Enable the 'Monitor out' option. Standby indicator (text on both displays is closed properly; Press Menu and use cursor control to go into Power/Standby mode. If this may take up screen for 10 seconds to 'Settings' in the menu bar. When the LED goes out press any button to 30 minutes. green: operation mode. - green: normal lamp condition. - red (fast blinking): lamp start up to activate the projector...
User Manual
Page 34
... size of USB connection: • Connect another image. 7.Troubleshooting < The mouse cursor does not react when using the cursor control on the remote control General: • Check that the batteries are installed properly in the remote control and/or replace the batteries. • Check that the projector receives the signals from the remote control. • Check that the USB cable or PS/2 cable has been properly connected. • Check that you: • connect the PS/2 cable to the User Guide...
... size of USB connection: • Connect another image. 7.Troubleshooting < The mouse cursor does not react when using the cursor control on the remote control General: • Check that the batteries are installed properly in the remote control and/or replace the batteries. • Check that the projector receives the signals from the remote control. • Check that the USB cable or PS/2 cable has been properly connected. • Check that you: • connect the PS/2 cable to the User Guide...

