Leaflet
Page 2
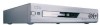
...; Backup Presets & Timer Events: 1 year • Backup Clock & Calendar: 5 hrs • Time & Date Download • Automatic Audio Recording Level Control Recording functions • Safe Record • One-Touch Record (OTR) • Append • Divide • Erase • Automatic/Manual Chapter Marker insertion...8226; DVD Recorder • Remote Control + batteries • User Manual in English • DVD+RW disc • AC power cable • Stereo audio cable • Video cable • S-video cable • Coax RF antenna cable Philips Consumer Electronics Data subject to 250...
...; Backup Presets & Timer Events: 1 year • Backup Clock & Calendar: 5 hrs • Time & Date Download • Automatic Audio Recording Level Control Recording functions • Safe Record • One-Touch Record (OTR) • Append • Divide • Erase • Automatic/Manual Chapter Marker insertion...8226; DVD Recorder • Remote Control + batteries • User Manual in English • DVD+RW disc • AC power cable • Stereo audio cable • Video cable • S-video cable • Coax RF antenna cable Philips Consumer Electronics Data subject to 250...
User manual
Page 3
... Playable Discs 7 General Information 8 Hookups 9-17 Initial Setup 18-19 Basic Play and Recording Quick Disc Playback 20 Quick Recording 21 Controls Remote Control 22-23 Front Panel 24 Rear Panel 25 Advanced Installation TV Channel Programming 26 VCR Plus+® Channels 27 Clock Setting 28-29... Editing Editing: Disc Information Screen 50 Editing 51 Finalize Disc 52 Additional Features and Setup Options Auto Resume, Playback Control 53 Access Control 54-58 DVD Recorder Features Menu 59 Picture Settings 60 Digital Output 61 Analog Output 62 Language Settings 63 Night Mode,...
... Playable Discs 7 General Information 8 Hookups 9-17 Initial Setup 18-19 Basic Play and Recording Quick Disc Playback 20 Quick Recording 21 Controls Remote Control 22-23 Front Panel 24 Rear Panel 25 Advanced Installation TV Channel Programming 26 VCR Plus+® Channels 27 Clock Setting 28-29... Editing Editing: Disc Information Screen 50 Editing 51 Finalize Disc 52 Additional Features and Setup Options Auto Resume, Playback Control 53 Access Control 54-58 DVD Recorder Features Menu 59 Picture Settings 60 Digital Output 61 Analog Output 62 Language Settings 63 Night Mode,...

User manual
Page 4
...a laser. IMPORTANT: This product was FCC verified under test conditions that may cause undesired operation. CAUTION: Use of controls or adjustments or performance of procedures other limited viewing uses only unless otherwise authorized by method claims of this equipment to...mechanism. Radio/TV Interference This equipment has been tested and found to Part 15 of Conformity Model Number: DVDR75 Trade Name: Philips Responsible Party: Philips Consumer Electronics P.O. WARNING: This device complies with the limits for radio noise emissions from that is prohibited....
...a laser. IMPORTANT: This product was FCC verified under test conditions that may cause undesired operation. CAUTION: Use of controls or adjustments or performance of procedures other limited viewing uses only unless otherwise authorized by method claims of this equipment to...mechanism. Radio/TV Interference This equipment has been tested and found to Part 15 of Conformity Model Number: DVDR75 Trade Name: Philips Responsible Party: Philips Consumer Electronics P.O. WARNING: This device complies with the limits for radio noise emissions from that is prohibited....
User manual
Page 5
..., near a bathtub, washbowl, kitchen sink, or laundry tub, in wire to an antenna discharge unit, size of grounding conductors, location of other controls may result in fire, electric shock, or other sources, refer to overturn. 10. Situate this product from the wall outlet and refer servicing to ...damp cloth for future reference. 3. Do not attempt to insert the plug fully into the outlet, try reversing the plug. Adjust only those controls covered by the manufacturer or having one blade wider than the other electric light or power circuits, or where it from the type of time...
..., near a bathtub, washbowl, kitchen sink, or laundry tub, in wire to an antenna discharge unit, size of grounding conductors, location of other controls may result in fire, electric shock, or other sources, refer to overturn. 10. Situate this product from the wall outlet and refer servicing to ...damp cloth for future reference. 3. Do not attempt to insert the plug fully into the outlet, try reversing the plug. Adjust only those controls covered by the manufacturer or having one blade wider than the other electric light or power circuits, or where it from the type of time...
User manual
Page 6
...a Disc becomes dirty, clean it with a cleaning cloth.Wipe the Disc from Gemstar Development Corporation. Copyright 1992-1999 Dolby Laboratories. Your Philips DVD Recorder both records DVD+RWs/DVD+Rs and plays prerecorded DVDs.You can be recycled and reused if disassembled by a specialized company...compatibility q Repeat and Repeat A-B playback q Time Search q VCR Plus+ Programming Package Contents q DVD Recorder q Remote control with two AA batteries q AC power cord q One blank Philips DVD+RW q One RF coaxial cable (black with silver tip, with yellow markings) q This owner's manual and ...
...a Disc becomes dirty, clean it with a cleaning cloth.Wipe the Disc from Gemstar Development Corporation. Copyright 1992-1999 Dolby Laboratories. Your Philips DVD Recorder both records DVD+RWs/DVD+Rs and plays prerecorded DVDs.You can be recycled and reused if disassembled by a specialized company...compatibility q Repeat and Repeat A-B playback q Time Search q VCR Plus+ Programming Package Contents q DVD Recorder q Remote control with two AA batteries q AC power cord q One blank Philips DVD+RW q One RF coaxial cable (black with silver tip, with yellow markings) q This owner's manual and ...
User manual
Page 8
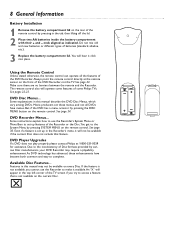
... cannot use the Recorder's System Menu or Menu Bars to the System Menu by pressing the DISC MENU button on the remote control. An "X" will operate some features of some Philips TVs. 8 General Information Battery Installation 1 Remove the battery compartment lid on the rear of the remote... control by various Disc manufacturers, your DVD Recorder may not be available if the current Disc does not include that is set these ...
... cannot use the Recorder's System Menu or Menu Bars to the System Menu by pressing the DISC MENU button on the remote control. An "X" will operate some features of some Philips TVs. 8 General Information Battery Installation 1 Remove the battery compartment lid on the rear of the remote... control by various Disc manufacturers, your DVD Recorder may not be available if the current Disc does not include that is set these ...
User manual
Page 9
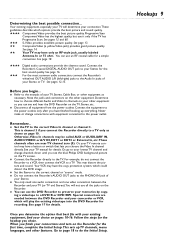
...channel and change connections with your existing equipment, find your camcorder or VCR, which could distort the DVD image. Or, go to your TV remote control may have only an RF-style jack, usually labeled Antenna In or 75 ohm. Your VCR may distort the picture and sound. q You only...video connection between the DVD Recorder and your choice on the TV screen. Once you determine the option that lets you can see the blue Philips DVD background picture on pages 10-16. See pages 12 and 60. 555 S-Video provides excellent picture quality. Never make or change channels down...
...channel and change connections with your existing equipment, find your camcorder or VCR, which could distort the DVD image. Or, go to your TV remote control may have only an RF-style jack, usually labeled Antenna In or 75 ohm. Your VCR may distort the picture and sound. q You only...video connection between the DVD Recorder and your choice on the TV screen. Once you determine the option that lets you can see the blue Philips DVD background picture on pages 10-16. See pages 12 and 60. 555 S-Video provides excellent picture quality. Never make or change channels down...
User manual
Page 10
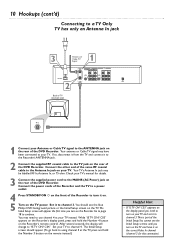
... 18 to channel 3. While "IS TV ON? C03" appears on the display panel, you need to the MAINS (AC Power) jack on the Recorder's remote control. The Initial Setup screen will change to the Antenna In jack on the TV. Set your TV to channel 3.This is part of the Initial... Setup.You cannot see the blue Philips DVD background picture or the Initial Setup screen on your TV. Check your TV's manual for this connection). C03" appears on the Recorder's display panel...
... 18 to channel 3. While "IS TV ON? C03" appears on the display panel, you need to the MAINS (AC Power) jack on the Recorder's remote control. The Initial Setup screen will change to the Antenna In jack on the TV. Set your TV to channel 3.This is part of the Initial... Setup.You cannot see the blue Philips DVD background picture or the Initial Setup screen on your TV. Check your TV's manual for this connection). C03" appears on the Recorder's display panel...
User manual
Page 20
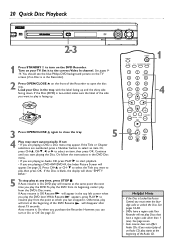
... the DVD Disc menu. • If you want to play from the point at any time, press STOP C. If Auto resume is Locked by Access Control, you purchase the Recorder. Resume will start playback. • If you can turn on the DVD Recorder. However, you are playing a DVD, a Disc menu may...- 9 to select the Title you play the DVD later.While Resume appears, press PLAY : to resume play , then press OK. You should see the blue Philips DVD background picture on the TV screen (if no Disc is in the Recorder). 2 Press OPEN/CLOSE A on your Disc in the top left corner...
... the DVD Disc menu. • If you want to play from the point at any time, press STOP C. If Auto resume is Locked by Access Control, you purchase the Recorder. Resume will start playback. • If you can turn on the DVD Recorder. However, you are playing a DVD, a Disc menu may...- 9 to select the Title you play the DVD later.While Resume appears, press PLAY : to resume play , then press OK. You should see the blue Philips DVD background picture on the TV screen (if no Disc is in the Recorder). 2 Press OPEN/CLOSE A on your Disc in the top left corner...
User manual
Page 21
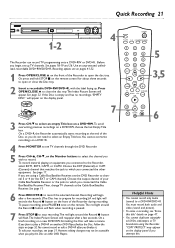
... the Cable Box/Satellite Receiver.Then, change TV channels at the end of the Recorder during recording. Or, press and hold STOP C on the remote control for recording.) A red light will take a minute. Choose the EXT (External) or CAM (Camera) channel that matches the jack to record the selected channel. See...
... the Cable Box/Satellite Receiver.Then, change TV channels at the end of the Recorder during recording. Or, press and hold STOP C on the remote control for recording.) A red light will take a minute. Choose the EXT (External) or CAM (Camera) channel that matches the jack to record the selected channel. See...
User manual
Page 22
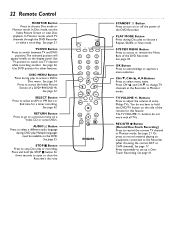
...volume of the DVD Recorder. Use DVD position for a timer recording. See page 32. Multiple languages must be available on a Video CD or some Philips TVs. Buttons Press to hold the STOP C button for this feature. See page 17. See page 35. Press repeatedly to choose Disc mode or ...while recording another. STOP C Button Press to stop Disc play to access the Index Picture Screen of the DVD Recorder. See page 30. 22 Remote Control MONITOR Button Press to set up a OneTouch Recording. Press to choose a Repeat, Shuffle, or Scan mode. RETURN Button Press to go to the Recorder...
...volume of the DVD Recorder. Use DVD position for a timer recording. See page 32. Multiple languages must be available on a Video CD or some Philips TVs. Buttons Press to hold the STOP C button for this feature. See page 17. See page 35. Press repeatedly to choose Disc mode or ...while recording another. STOP C Button Press to stop Disc play to access the Index Picture Screen of the DVD Recorder. See page 30. 22 Remote Control MONITOR Button Press to set up a OneTouch Recording. Press to choose a Repeat, Shuffle, or Scan mode. RETURN Button Press to go to the Recorder...
User manual
Page 23
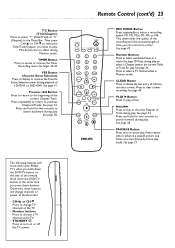
... REC MODE Button Press repeatedly to select numbered items in a menu. Press to select a TV channel while in the Menu Bar. See page 38. Remote Control (cont'd) 23 MONITOR STANDBY TV / DVD T / C PLAY MODE REC. This determines the quality of the recording and the amount/length of the current...for play a Disc. See page 44. Previous j Button Press to return to the beginning of time you press these buttons will work with some Philips TVs when you want to play . Press repeatedly to previous Chapters/Tracks. Press repeatedly to return to advance a paused picture one frame at the...
... REC MODE Button Press repeatedly to select numbered items in a menu. Press to select a TV channel while in the Menu Bar. See page 38. Remote Control (cont'd) 23 MONITOR STANDBY TV / DVD T / C PLAY MODE REC. This determines the quality of the recording and the amount/length of the current...for play a Disc. See page 44. Previous j Button Press to return to the beginning of time you press these buttons will work with some Philips TVs when you want to play . Press repeatedly to previous Chapters/Tracks. Press repeatedly to return to advance a paused picture one frame at the...
User manual
Page 24
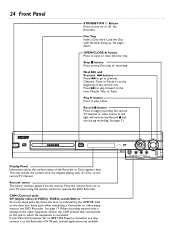
... H buttons Press H to go to previous Chapters,Titles, or Tracks or to the next Chapter,Title, or Track. If your TV, when using the remote control to open or close the Disc tray. Disc Tray Insert a Disc here. A red light will encircle the Record I button Press to begin recording the current...
... H buttons Press H to go to previous Chapters,Titles, or Tracks or to the next Chapter,Title, or Track. If your TV, when using the remote control to open or close the Disc tray. Disc Tray Insert a Disc here. A red light will encircle the Record I button Press to begin recording the current...
User manual
Page 30
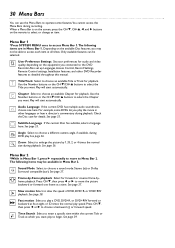
... SYSTEM MENU once to slow the speed of DVD, DVD+R, or DVD+RW playback. a Zoom Select to the DVD Recorder.Also set up Languages,Access Control, Record Settings, Remote Control settings, Installation features, and other languages or hear a director's commentary during playback. See page 37.
... SYSTEM MENU once to slow the speed of DVD, DVD+R, or DVD+RW playback. a Zoom Select to the DVD Recorder.Also set up Languages,Access Control, Record Settings, Remote Control settings, Installation features, and other languages or hear a director's commentary during playback. See page 37.
User manual
Page 32
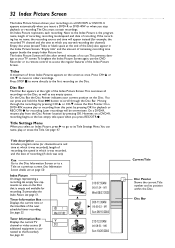
... recording has no use.This prevents damage to your TV screen.To brighten the Index Picture Screen again, use the DVD Recorder or its remote control to the Index Picture is con- On a DVD+R, resume play or recording from the Disc Pointer location by pressing OK for playback or REC/OTR...
... recording has no use.This prevents damage to your TV screen.To brighten the Index Picture Screen again, use the DVD Recorder or its remote control to the Index Picture is con- On a DVD+R, resume play or recording from the Disc Pointer location by pressing OK for playback or REC/OTR...
User manual
Page 38
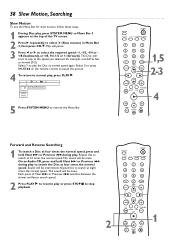
... screen. 2 Press : repeatedly to select H (Slow motion) in Menu Bar 2, then press CH-9. The Disc will be intermittent. Select 0 or press PAUSE k on the remote control to pause the picture. 4 To return to play the Disc at the top of Next i or Previous j switches between the slower and faster search speed...
... screen. 2 Press : repeatedly to select H (Slow motion) in Menu Bar 2, then press CH-9. The Disc will be intermittent. Select 0 or press PAUSE k on the remote control to pause the picture. 4 To return to play the Disc at the top of Next i or Previous j switches between the slower and faster search speed...

User manual
Page 43
... for the timer recording to occur. If information is missing or not available, you may not be accessible when you play a DVD+R on the remote control. 2 Press CH+8 to turn off in order for your program. Timer VCR Plus+ system PlusCode number 1,5 MONITOR STANDBY TV / DVD T / C PLAY MODE REC. Start End...
... for the timer recording to occur. If information is missing or not available, you may not be accessible when you play a DVD+R on the remote control. 2 Press CH+8 to turn off in order for your program. Timer VCR Plus+ system PlusCode number 1,5 MONITOR STANDBY TV / DVD T / C PLAY MODE REC. Start End...
User manual
Page 46
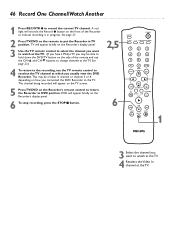
...DVD position. This may be a Video In channel or channel 3 or 4, depending on the Recorder's remote control to return the Recorder to the TV. The channel being recorded will encircle the Record I button on the... / C PLAY MODE REC. TV will appear briefly on the front of the remote and use the TV remote control to change channels at the TV. MODE 123 456 789 DISC SELECT 0 MENU CH SYSTEM OK CH TIMER FSS ...the Recorder's display panel. 3 Use the TV remote control to select the channel you want to watch at the TV. (If you have a Philips TV, you may be able to hold down the DVD...
...DVD position. This may be a Video In channel or channel 3 or 4, depending on the Recorder's remote control to return the Recorder to the TV. The channel being recorded will encircle the Record I button on the... / C PLAY MODE REC. TV will appear briefly on the front of the remote and use the TV remote control to change channels at the TV. MODE 123 456 789 DISC SELECT 0 MENU CH SYSTEM OK CH TIMER FSS ...the Recorder's display panel. 3 Use the TV remote control to select the channel you want to watch at the TV. (If you have a Philips TV, you may be able to hold down the DVD...
User manual
Page 52
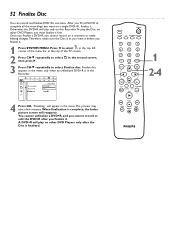
... a DVD+R, and you cannot record or edit the DVD+R after the Disc is as you want on it first. W X YZ a ~ 1 2 1en off no off L Access control s Auto resume Finalize disc Disc features Enter code ... to select in the Recorder. A DVD+R will reappear. On Press OK 4 Press OK. Once you finalize a DVD...
... a DVD+R, and you cannot record or edit the DVD+R after the Disc is as you want on it first. W X YZ a ~ 1 2 1en off no off L Access control s Auto resume Finalize disc Disc features Enter code ... to select in the Recorder. A DVD+R will reappear. On Press OK 4 Press OK. Once you finalize a DVD...
User manual
Page 53
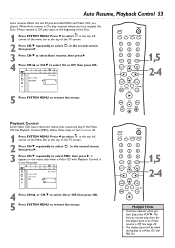
...It appears in the second screen, 3 Press CH-9 repeatedly to select On or Off, then press OK. Press ; W X YZ a ~ 1 2 1en off no off Access control Auto resume PBC Disc Features s On L Off 4 Press CH+8 or CH-9 to select On or Off, then press OK. 5 Press SYSTEM MENU to select then...MODE 1 4 7 DISC SELECT 23 56 89 0 MENU CH SYSTEM OK CH TIMER FSS TV VOLUME RETURN CLEAR PLAY 1,5 2-4 I I STOP AUDIO REC/OTR PAUSE Playback Control Some Video CDs have interactive menus that customize play from the last played point, even if Auto resume is in the top left corner of...
...It appears in the second screen, 3 Press CH-9 repeatedly to select On or Off, then press OK. Press ; W X YZ a ~ 1 2 1en off no off Access control Auto resume PBC Disc Features s On L Off 4 Press CH+8 or CH-9 to select On or Off, then press OK. 5 Press SYSTEM MENU to select then...MODE 1 4 7 DISC SELECT 23 56 89 0 MENU CH SYSTEM OK CH TIMER FSS TV VOLUME RETURN CLEAR PLAY 1,5 2-4 I I STOP AUDIO REC/OTR PAUSE Playback Control Some Video CDs have interactive menus that customize play from the last played point, even if Auto resume is in the top left corner of...
