
Leaflet
Page 1
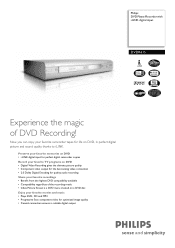
... Progressive Scan component video for optimized image quality • Coaxial connection ensures a reliable digital output Philips DVD Player/Recorder with i.LINK digital input DVDR615 Experience the magic of the recording mode • Index Picture Screen is a DVD menu created on a DVD disc Enjoy your ...favorite camcorder tapes for life on DVD • Digital Video Recording gives the ultimate picture quality • Component video output...
... Progressive Scan component video for optimized image quality • Coaxial connection ensures a reliable digital output Philips DVD Player/Recorder with i.LINK digital input DVDR615 Experience the magic of the recording mode • Index Picture Screen is a DVD menu created on a DVD disc Enjoy your ...favorite camcorder tapes for life on DVD • Digital Video Recording gives the ultimate picture quality • Component video output...

Leaflet
Page 2
...x 65 mm • Set weight: 3.5 kg • Packaging dimensions (W x H x D): 518 x 159 x 383 mm • Weight incl. www.philips.com Philips DVD Recorders store audio in all rec modes Index Picture Screen The Index Picture Screen is a DVD menu created on every DVD+R/RW disc that is...antenna in / TV out, S-Video in a noticeably sharper picture. i.LINK is created instantaneously, using the maximum resolution. DVD Player/Recorder with i.LINK digital input DVDR615/37 Specifications Picture/Display • Aspect ratio: 4:3, 16:9 • D/A converter: 10 bit, 54 MHz • A/D converter...
...x 65 mm • Set weight: 3.5 kg • Packaging dimensions (W x H x D): 518 x 159 x 383 mm • Weight incl. www.philips.com Philips DVD Recorders store audio in all rec modes Index Picture Screen The Index Picture Screen is a DVD menu created on every DVD+R/RW disc that is...antenna in / TV out, S-Video in a noticeably sharper picture. i.LINK is created instantaneously, using the maximum resolution. DVD Player/Recorder with i.LINK digital input DVDR615/37 Specifications Picture/Display • Aspect ratio: 4:3, 16:9 • D/A converter: 10 bit, 54 MHz • A/D converter...

User manual
Page 1
Need help at www.p4c.philips.com or call 1-800-PHILIPS (744-5477) while with your Philips product more enjoyable. Make your Quick-Use Guide and/or Owner's Manual first for choosing Philips. If you have read your instructions and still need assistance, you for quick tips that make using your product. DVD Recorder DVDR615 User manual Thank you may access our online help fast? Read your own DVD DVDR610_615_37_Engfinal434 1 1 8/16/04, 4:03 PM 3139 246 14221
Need help at www.p4c.philips.com or call 1-800-PHILIPS (744-5477) while with your Philips product more enjoyable. Make your Quick-Use Guide and/or Owner's Manual first for choosing Philips. If you have read your instructions and still need assistance, you for quick tips that make using your product. DVD Recorder DVDR615 User manual Thank you may access our online help fast? Read your own DVD DVDR610_615_37_Engfinal434 1 1 8/16/04, 4:03 PM 3139 246 14221
User manual
Page 4
... PROGRESSIVE SCAN PICTURE PROBLEMS, IT IS RECOMMENDED THAT THE USER SWITCH THE CONNECTION TO THE 'STANDARD DEFINITION' OUTPUT. p4c.philips.com for future reference. Retain this laser product. DO NOT STARE INTO BEAM. VARO! Due to complete. IF THERE...JA SUOJALUKITUS OHITETTAESSA OLET ALTTIINANAKYMATTOMAALLE LASERSATEILYLLE. ALA KATSO SATEESEEN. OSYNLIG LASERSTRÅLNING NÄR DENNA DEL ÄR ÖPPNAD. DVD RECORDER DVDR615 Serial No 4 DVDR610_615_37_Engfinal434 4 8/16/04, 4:03 PM 3139 246 14221 Français: Cet appareil numérique n'emet...
... PROGRESSIVE SCAN PICTURE PROBLEMS, IT IS RECOMMENDED THAT THE USER SWITCH THE CONNECTION TO THE 'STANDARD DEFINITION' OUTPUT. p4c.philips.com for future reference. Retain this laser product. DO NOT STARE INTO BEAM. VARO! Due to complete. IF THERE...JA SUOJALUKITUS OHITETTAESSA OLET ALTTIINANAKYMATTOMAALLE LASERSATEILYLLE. ALA KATSO SATEESEEN. OSYNLIG LASERSTRÅLNING NÄR DENNA DEL ÄR ÖPPNAD. DVD RECORDER DVDR615 Serial No 4 DVDR610_615_37_Engfinal434 4 8/16/04, 4:03 PM 3139 246 14221 Français: Cet appareil numérique n'emet...
User manual
Page 5
... with professional quality features from your favorite listings magazine. and is offered only for the personal, noncommercial use as used for DVD recorders.To use it, enter the programming number associated with the U.S. DVDR610_615_37_Engfinal434 5 5 8/16/04, 4:03 PM 3139 246 14221 ...this number in your video. This connection is used by Macrovision Corporation and other rights owners. English Special Functions Your PHILIPS DVD recorder has a number of special functions that is protected by method claims of certain US patent and other intellectual property rights...
... with professional quality features from your favorite listings magazine. and is offered only for the personal, noncommercial use as used for DVD recorders.To use it, enter the programming number associated with the U.S. DVDR610_615_37_Engfinal434 5 5 8/16/04, 4:03 PM 3139 246 14221 ...this number in your video. This connection is used by Macrovision Corporation and other rights owners. English Special Functions Your PHILIPS DVD recorder has a number of special functions that is protected by method claims of certain US patent and other intellectual property rights...
User manual
Page 6
... to operate the system 22 Using the alphanumeric keypad to enter the characters 22 Front Panel 23 Jacks behind the flap 23 Installing the DVD Recorder First Installation 24-25 TV channel programming 26 Automatic TV channel search 26 Setting favorite TV channels 26 Setting up VCR Plus+® channels 27...
... to operate the system 22 Using the alphanumeric keypad to enter the characters 22 Front Panel 23 Jacks behind the flap 23 Installing the DVD Recorder First Installation 24-25 TV channel programming 26 Automatic TV channel search 26 Setting favorite TV channels 26 Setting up VCR Plus+® channels 27...

User manual
Page 7
... and software registration 42-43 Timer Recording Introduction 44 Programming recordings 44-45 Programming recording from a Satellite Receiver/Cable Box 45 Programming recordings with VCR Plus+® System 46 Changing a programmed recording ...... 47 Deleting a programmed recording ........ 47 Editing/Finalizing Recording About editing 48 Color coded buttons... album 55 Deleting an album 55 Deleting picture in an album 55 Changing the slide show settings 56 Protecting the recorded disc 56 System Menu - Setup Accessing to the Setup options 59 System 59-60 Time-date 60 Analog channels...
... and software registration 42-43 Timer Recording Introduction 44 Programming recordings 44-45 Programming recording from a Satellite Receiver/Cable Box 45 Programming recordings with VCR Plus+® System 46 Changing a programmed recording ...... 47 Deleting a programmed recording ........ 47 Editing/Finalizing Recording About editing 48 Color coded buttons... album 55 Deleting an album 55 Deleting picture in an album 55 Changing the slide show settings 56 Protecting the recorded disc 56 System Menu - Setup Accessing to the Setup options 59 System 59-60 Time-date 60 Analog channels...
User manual
Page 8
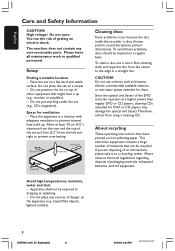
...cleaning CDs intended for DVD or CD players may damage the optical unit (laser).Therefore, refrain from the rear and the top of the DVD recorder operates at least 10 cm (4.5") clearance from using a cleaning CD. CAUTION! Since the optical unit (laser) of the set on a ... that can be exposed to prevent overheating. 10cm (4.5") 5cm (2.3") 10cm (4.5") 5cm (2.3") Cleaning discs Some problems occur because the disc inside the recorder is dirty (frozen picture, sound disruptions, picture distortions). Apparatus shall not be recycled. Do not place any user-serviceable parts. You run the...
...cleaning CDs intended for DVD or CD players may damage the optical unit (laser).Therefore, refrain from the rear and the top of the DVD recorder operates at least 10 cm (4.5") clearance from using a cleaning CD. CAUTION! Since the optical unit (laser) of the set on a ... that can be exposed to prevent overheating. 10cm (4.5") 5cm (2.3") 10cm (4.5") 5cm (2.3") Cleaning discs Some problems occur because the disc inside the recorder is dirty (frozen picture, sound disruptions, picture distortions). Apparatus shall not be recycled. Do not place any user-serviceable parts. You run the...
User manual
Page 9
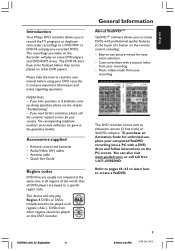
... software. Refer to pages 41~43 to learn how to create a YesDVD. Helpful Hints: - If you have to be finalized before using your recording. Audio/Video (AV) cables - ALL 1 General Information About YesDVDTM YesDVD™ software allows you to create DVDs with an evaluation version (3 free...they can also visit www.yesdvd.com, or call the customer support service for easy scene selection. - English Introduction Your Philips DVD recorder allows you make on the Recorder will only play Region 1 DVDs or DVDs manufactured to be played in all regions ('ALL'.) DVDs from other regions ...
... software. Refer to pages 41~43 to learn how to create a YesDVD. Helpful Hints: - If you have to be finalized before using your recording. Audio/Video (AV) cables - ALL 1 General Information About YesDVDTM YesDVD™ software allows you to create DVDs with an evaluation version (3 free...they can also visit www.yesdvd.com, or call the customer support service for easy scene selection. - English Introduction Your Philips DVD recorder allows you make on the Recorder will only play Region 1 DVDs or DVDs manufactured to be played in all regions ('ALL'.) DVDs from other regions ...
User manual
Page 10
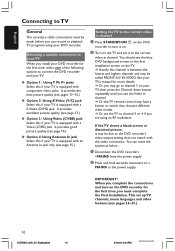
... programs using your TV, then press the Channel down button repeatedly until you complete the connections and turn it may be due to the DVD recorder's video output setting does not match with a S-Video (SVHS) jack. It provides excellent picture quality (see page 13.) G Option 3: Using ...the TV to the correct video-in channel. Selecting a suitable connection to your TV When you can reset the system as below : 1 Disconnect the DVD recorder's ~MAINS from the power supply. 2 Press and hold ∞ while reconnect it to channel 3 or 4 if you are using an RF modulator. G...
... programs using your TV, then press the Channel down button repeatedly until you complete the connections and turn it may be due to the DVD recorder's video output setting does not match with a S-Video (SVHS) jack. It provides excellent picture quality (see page 13.) G Option 3: Using ...the TV to the correct video-in channel. Selecting a suitable connection to your TV When you can reset the system as below : 1 Disconnect the DVD recorder's ~MAINS from the power supply. 2 Press and hold ∞ while reconnect it to channel 3 or 4 if you are using an RF modulator. G...
User manual
Page 11
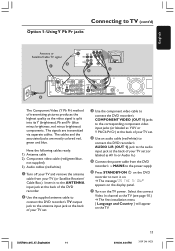
... video cable (red/green/blue, not supplied) 3) Audio cables (red/white) 1 Turn off your TV set . 3 Use the component video cable to connect the DVD recorder's COMPONENT VIDEO (OUT 1) jacks to the audio input jack at the back of transmitting pictures produces the highest quality as YUV or Y Pb/Cb Pr... output jack to the antenna input jack at the back of your TV set . 4 Use an audio cable (red/white) to connect the DVD recorder's AUDIO L/R (OUT 1) jack to the corresponding component video input jacks (or labeled as the video signal is split into its Y (brightness), Pb and Pr (blue ...
... video cable (red/green/blue, not supplied) 3) Audio cables (red/white) 1 Turn off your TV set . 3 Use the component video cable to connect the DVD recorder's COMPONENT VIDEO (OUT 1) jacks to the audio input jack at the back of transmitting pictures produces the highest quality as YUV or Y Pb/Cb Pr... output jack to the antenna input jack at the back of your TV set . 4 Use an audio cable (red/white) to connect the DVD recorder's AUDIO L/R (OUT 1) jack to the corresponding component video input jacks (or labeled as the video signal is split into its Y (brightness), Pb and Pr (blue ...
User manual
Page 13
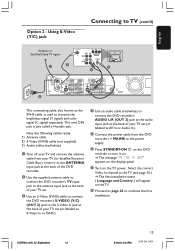
... input jack to the antenna input jack at the back of your TV set. 3 Use an S-Video (SVHS) cable to connect the DVD recorder's S-VIDEO (Y/C) (OUT 2) jack to the S-Video In jack at the back of your TV set (or labeled as S-Video In or SVHS.) 4 Use an audio ...cable (red/white) to connect the DVD recorder's AUDIO L/R (OUT 2) jack to the audio input jack at the TV (see page 10.) ➜ The first installation menu { Language and Country } will appear on...
... input jack to the antenna input jack at the back of your TV set. 3 Use an S-Video (SVHS) cable to connect the DVD recorder's S-VIDEO (Y/C) (OUT 2) jack to the S-Video In jack at the back of your TV set (or labeled as S-Video In or SVHS.) 4 Use an audio ...cable (red/white) to connect the DVD recorder's AUDIO L/R (OUT 2) jack to the audio input jack at the TV (see page 10.) ➜ The first installation menu { Language and Country } will appear on...
User manual
Page 14
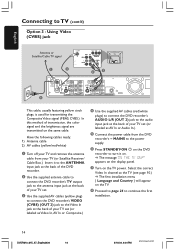
... of your TV set (or labeled as Video In,AV In or Composite.) 4 Use the supplied AV cables (red/white plugs) to connect the DVD recorder's AUDIO L/R (OUT 2) jack to continue the first installation. 14 DVDR610_615_37_Engfinal434 14 8/16/04, 4:04 PM 3139 246 14221 Have the following cables ready: 1) ...Antenna cable 2) AV cables (yellow/red/white) 1 Turn off your TV set . 3 Use the supplied AV cables (yellow plug) to connect the DVD recorder's VIDEO (CVBS) (OUT 2) jack to the Video In jack at the back of transmission, the color signal and the brightness signal are transmitted on the...
... of your TV set (or labeled as Video In,AV In or Composite.) 4 Use the supplied AV cables (red/white plugs) to connect the DVD recorder's AUDIO L/R (OUT 2) jack to continue the first installation. 14 DVDR610_615_37_Engfinal434 14 8/16/04, 4:04 PM 3139 246 14221 Have the following cables ready: 1) ...Antenna cable 2) AV cables (yellow/red/white) 1 Turn off your TV set . 3 Use the supplied AV cables (yellow plug) to connect the DVD recorder's VIDEO (CVBS) (OUT 2) jack to the Video In jack at the back of transmission, the color signal and the brightness signal are transmitted on the...

User manual
Page 15
... set to follow that of your TV (or Satellite Receiver/Cable Box.) Insert it to the ANTENNA input jack at the back of the DVD recorder. English Option 4 : Using Antenna jacks only Connecting to TV (cont'd) Antenna or TV Satellite/Cable TV signal 1 2 3 Use this type of connection, you ...jacks. Have the following cable ready: 1) Antenna cable 1 Turn off your TV and remove the antenna cable from the DVD recorder's ~ MAINS to the power supply. 4 Press STANDBY-ON 2 on the DVD recorder to turn it on. ➜ The message 'IS THE TV ON?' To toggle between channel 3 and 4, hold down...
... set to follow that of your TV (or Satellite Receiver/Cable Box.) Insert it to the ANTENNA input jack at the back of the DVD recorder. English Option 4 : Using Antenna jacks only Connecting to TV (cont'd) Antenna or TV Satellite/Cable TV signal 1 2 3 Use this type of connection, you ...jacks. Have the following cable ready: 1) Antenna cable 1 Turn off your TV and remove the antenna cable from the DVD recorder's ~ MAINS to the power supply. 4 Press STANDBY-ON 2 on the DVD recorder to turn it on. ➜ The message 'IS THE TV ON?' To toggle between channel 3 and 4, hold down...
User manual
Page 16
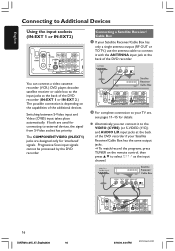
.... Satellite Receiver/ Cable Box 2 For complete connection to your Satellite Receiver/Cable Box has the same output jacks. ➜ To watch/record the programs, press TUNER on the capabilities of the additional devices. The COMPONENTVIDEO (IN-EXT1) jacks are used for connecting to external devices... 'EXT1' as the input channel. Progressive Scan input signals cannot be processed by the DVD recorder. You can connect it with the ANTENNA input jack at the back of the DVD recorder. Switching between S-Video input and Video (CVBS) input takes place automatically. English Connecting to...
.... Satellite Receiver/ Cable Box 2 For complete connection to your Satellite Receiver/Cable Box has the same output jacks. ➜ To watch/record the programs, press TUNER on the capabilities of the additional devices. The COMPONENTVIDEO (IN-EXT1) jacks are used for connecting to external devices... 'EXT1' as the input channel. Progressive Scan input signals cannot be processed by the DVD recorder. You can connect it with the ANTENNA input jack at the back of the DVD recorder. Switching between S-Video input and Video (CVBS) input takes place automatically. English Connecting to...

User manual
Page 17
...-EXT1) input jacks to the corresponding component video output jacks on the VCR/DVD player. 2 Use an audio cable (red/white) to connect the DVD recorder's AUDIO L/R (IN-EXT1) input jacks to select 'EXT1' as the input channel. VCR/DVD player Y Pr Pb COMPONENT VIDEO OUT Before start operating,... control, then press 3 4 to the TV set. VCR/DVD player Y Pr Pb COMPONENT VIDEO OUT Option 2 1 Use a S-video cable to connect the DVD recorder's S-VIDEO (Y/C) (IN-EXT2) input jack to the corresponding S-VHS output jack on the VCR/DVD player (as the input channel. Before start operating, press TUNER...
...-EXT1) input jacks to the corresponding component video output jacks on the VCR/DVD player. 2 Use an audio cable (red/white) to connect the DVD recorder's AUDIO L/R (IN-EXT1) input jacks to select 'EXT1' as the input channel. VCR/DVD player Y Pr Pb COMPONENT VIDEO OUT Before start operating,... control, then press 3 4 to the TV set. VCR/DVD player Y Pr Pb COMPONENT VIDEO OUT Option 2 1 Use a S-video cable to connect the DVD recorder's S-VIDEO (Y/C) (IN-EXT2) input jack to the corresponding S-VHS output jack on the VCR/DVD player (as the input channel. Before start operating, press TUNER...

User manual
Page 18
... has only a single video output (Composite Video, CVBS.) It provides good picture quality. 1 Use a S-video cable to connect the DVD recorder's S-VIDEO input jack to the i.LINK standard. Before start operating, select 'CAM1' as the input channel. Before start operating, select 'CAM... camcorder. Option 2: Using S-VIDEO In or VIDEO In jack Use S-VIDEO connection if you can use the front jacks to copy camcorder recordings. For recording, see pages 39~40. English Connecting Additional Devices (cont'd) Connecting a camcorder to the appropriate DV output jack on the camcorder. G ...
... has only a single video output (Composite Video, CVBS.) It provides good picture quality. 1 Use a S-video cable to connect the DVD recorder's S-VIDEO input jack to the i.LINK standard. Before start operating, select 'CAM1' as the input channel. Before start operating, select 'CAM... camcorder. Option 2: Using S-VIDEO In or VIDEO In jack Use S-VIDEO connection if you can use the front jacks to copy camcorder recordings. For recording, see pages 39~40. English Connecting Additional Devices (cont'd) Connecting a camcorder to the appropriate DV output jack on the camcorder. G ...
User manual
Page 19
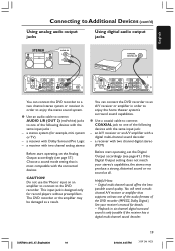
... strong, distorted sound or no sound at least one of the following devices with the connected devices. You can connect the DVD recorder to a two channel stereo system or receiver in order to enjoy the home theater system's surround sound capabilities. You will need... of the following devices with Dolby Surround Pro Logic - Helpful Hints: - Playback in six-channel digital surround sound is designed only for record players without preamplifiers. a receiver with a digital multi-channel sound decoder - DVDR610_615_37_Engfinal434 19 19 8/16/04, 4:05 PM 3139 246 14221...
... strong, distorted sound or no sound at least one of the following devices with the connected devices. You can connect the DVD recorder to a two channel stereo system or receiver in order to enjoy the home theater system's surround sound capabilities. You will need... of the following devices with Dolby Surround Pro Logic - Helpful Hints: - Playback in six-channel digital surround sound is designed only for record players without preamplifiers. a receiver with a digital multi-channel sound decoder - DVDR610_615_37_Engfinal434 19 19 8/16/04, 4:05 PM 3139 246 14221...
User manual
Page 20
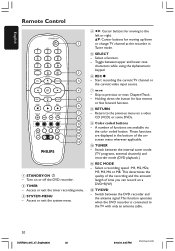
... for moving up/down the button for fast reverse or fast forward function. 8 RETURN - These functions are available via the color coded button. Select a recording speed : M1, M2, M2x, M3, M4, M6 or M8. Turn on a video CD (VCD) or some DVDs. 9 Color coded buttons -... Switch between the internal tuner mode (TV programs, external channels) and recorder mode (DVD playback.) ! Access or exit the timer recording menu. 3 SYSTEM-MENU - Return to the TV with only an antenna cable. 20 DVDR610_615_37_Engfinal434 20 8/16/04, 4:05 PM...
... for moving up/down the button for fast reverse or fast forward function. 8 RETURN - These functions are available via the color coded button. Select a recording speed : M1, M2, M2x, M3, M4, M6 or M8. Turn on a video CD (VCD) or some DVDs. 9 Color coded buttons -... Switch between the internal tuner mode (TV programs, external channels) and recorder mode (DVD playback.) ! Access or exit the timer recording menu. 3 SYSTEM-MENU - Return to the TV with only an antenna cable. 20 DVDR610_615_37_Engfinal434 20 8/16/04, 4:05 PM...
User manual
Page 21
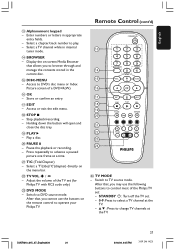
... 21 21 8/16/04, 4:05 PM 3139 246 14221 Pause the playback or recording. - Press repeatedly to advance a paused picture one frame at the TV. Switch to DVD's disc menu or Index Picture screen of the Philips TV set (for Philips TV with RC5 code only.) £ DVD MODE - Display the on-screen... Media Browser that allows you to operate your Philips TV. 13 14 15 CH+ 16 17 CH- 18 19 20 21 22 23 24 ≤ TV MODE - STANDBY 2: Turn off the TV set. - 0-9: Press ...
... 21 21 8/16/04, 4:05 PM 3139 246 14221 Pause the playback or recording. - Press repeatedly to advance a paused picture one frame at the TV. Switch to DVD's disc menu or Index Picture screen of the Philips TV set (for Philips TV with RC5 code only.) £ DVD MODE - Display the on-screen... Media Browser that allows you to operate your Philips TV. 13 14 15 CH+ 16 17 CH- 18 19 20 21 22 23 24 ≤ TV MODE - STANDBY 2: Turn off the TV set. - 0-9: Press ...


