
Leaflet
Page 1
... camcorder copies Record your favorite recordings • Benefit from the highest DVD compatibility available • Compatibility regardless of DVD Recording! Philips DVD Player/Recorder with i.LINK digital input DVDR615 Experience the magic of the recording mode • Index Picture Screen is a DVD menu created on DVD, in perfect digital picture and sound quality thanks to i.LINK. Now...
... camcorder copies Record your favorite recordings • Benefit from the highest DVD compatibility available • Compatibility regardless of DVD Recording! Philips DVD Player/Recorder with i.LINK digital input DVDR615 Experience the magic of the recording mode • Index Picture Screen is a DVD menu created on DVD, in perfect digital picture and sound quality thanks to i.LINK. Now...

Leaflet
Page 2
...and video signals via a single cable.With i.LINK Digital Video input you want to watch. www.philips.com i.LINK is used on regular DVD players. DVD+RW highest compatibility Compatibility in their respective owners. A full image is also accessible on digital home ...the field with the even lines, both fields are the property of Koninklijke Philips Electronics N.V. Because the video signal on the disc and navigate to change without notice. DVD Player/Recorder with i.LINK digital input DVDR615/37 Specifications Picture/Display • Aspect ratio: 4:3, 16:9 • ...
...and video signals via a single cable.With i.LINK Digital Video input you want to watch. www.philips.com i.LINK is used on regular DVD players. DVD+RW highest compatibility Compatibility in their respective owners. A full image is also accessible on digital home ...the field with the even lines, both fields are the property of Koninklijke Philips Electronics N.V. Because the video signal on the disc and navigate to change without notice. DVD Player/Recorder with i.LINK digital input DVDR615/37 Specifications Picture/Display • Aspect ratio: 4:3, 16:9 • ...

User manual
Page 1
DVD Recorder DVDR615 User manual Thank you may access our online help fast? If you have read your instructions and still need assistance, you for quick tips that make using your Quick-Use Guide and/or Owner's Manual first for choosing Philips. Read your Philips product more enjoyable. Need help at www.p4c.philips.com or call 1-800-PHILIPS (744-5477) while with your own DVD DVDR610_615_37_Engfinal434 1 1 8/16/04, 4:03 PM 3139 246 14221 Make your product.
DVD Recorder DVDR615 User manual Thank you may access our online help fast? If you have read your instructions and still need assistance, you for quick tips that make using your Quick-Use Guide and/or Owner's Manual first for choosing Philips. Read your Philips product more enjoyable. Need help at www.p4c.philips.com or call 1-800-PHILIPS (744-5477) while with your own DVD DVDR610_615_37_Engfinal434 1 1 8/16/04, 4:03 PM 3139 246 14221 Make your product.
User manual
Page 4
... le Brouillage Radioélectrique édicté par le Ministère des Communications du Canada. DANGER:IANVVOISIIDBLEDLIRAESCERT RADIATION WHEN OPEN. p4c.philips.com for future reference. This warning label is located on the rearside and inside this information for software upgarde. 'CONSUMERS SHOULD NOTE THAT NOT... "Dolby" and the double-D symbol are trademarks of procedures other than herein may require a playability enhancement or upgrade. DO NOT STARE INTO BEAM. DVD RECORDER DVDR615 Serial No 4 DVDR610_615_37_Engfinal434 4 8/16/04, 4:03 PM 3139 246 14221
... le Brouillage Radioélectrique édicté par le Ministère des Communications du Canada. DANGER:IANVVOISIIDBLEDLIRAESCERT RADIATION WHEN OPEN. p4c.philips.com for future reference. This warning label is located on the rearside and inside this information for software upgarde. 'CONSUMERS SHOULD NOTE THAT NOT... "Dolby" and the double-D symbol are trademarks of procedures other than herein may require a playability enhancement or upgrade. DO NOT STARE INTO BEAM. DVD RECORDER DVDR615 Serial No 4 DVDR610_615_37_Engfinal434 4 8/16/04, 4:03 PM 3139 246 14221
User manual
Page 5
... Manager', you . This is protected by method claims of certain US patent and other recordings.This helps to automatically create DVDs with professional quality features from your favorite listings magazine. The VCR Plus+® system is registered with your television program.You... on this number in your video. Patent and Trademark Office as characterized by digital video (DV) camcorders. English Special Functions Your PHILIPS DVD recorder has a number of special functions that is a simple programming system for three (3) free YesDVD discs, with visual menu, chapters...
... Manager', you . This is protected by method claims of certain US patent and other recordings.This helps to automatically create DVDs with professional quality features from your favorite listings magazine. The VCR Plus+® system is registered with your television program.You... on this number in your video. Patent and Trademark Office as characterized by digital video (DV) camcorders. English Special Functions Your PHILIPS DVD recorder has a number of special functions that is a simple programming system for three (3) free YesDVD discs, with visual menu, chapters...
User manual
Page 6
... ...... 15 Connecting to Additional Devices Using the input jacks (IN-EXT 1 or IN-EXT2 16 Connecting a Satellite Receiver/ Cable Box 16 Connecting a VCR/DVD player 17 Connecting a camcorder to the front jacks 18 Option 1: Using DV In jack 18 Option 2: Using S-VIDEO In or VIDEO In jack 18 Using... to operate the system 22 Using the alphanumeric keypad to enter the characters 22 Front Panel 23 Jacks behind the flap 23 Installing the DVD Recorder First Installation 24-25 TV channel programming 26 Automatic TV channel search 26 Setting favorite TV channels 26 Setting up VCR Plus+®...
... ...... 15 Connecting to Additional Devices Using the input jacks (IN-EXT 1 or IN-EXT2 16 Connecting a Satellite Receiver/ Cable Box 16 Connecting a VCR/DVD player 17 Connecting a camcorder to the front jacks 18 Option 1: Using DV In jack 18 Option 2: Using S-VIDEO In or VIDEO In jack 18 Using... to operate the system 22 Using the alphanumeric keypad to enter the characters 22 Front Panel 23 Jacks behind the flap 23 Installing the DVD Recorder First Installation 24-25 TV channel programming 26 Automatic TV channel search 26 Setting favorite TV channels 26 Setting up VCR Plus+®...

User manual
Page 7
... Recording About editing 48 Color coded buttons functions 48 Index Picture screen 48 Changing the disc/title name 49 Making the editing compatible (DVD+RW 49 Finalizing disc (DVD+R 49 Video editing 50 Hiding unwanted chapter 50 Editing chapter (merge/split/hide 51 Editing title (divide/append/ index picture 51-52 Deleting...
... Recording About editing 48 Color coded buttons functions 48 Index Picture screen 48 Changing the disc/title name 49 Making the editing compatible (DVD+RW 49 Finalizing disc (DVD+R 49 Video editing 50 Hiding unwanted chapter 50 Editing chapter (merge/split/hide 51 Editing title (divide/append/ index picture 51-52 Deleting...
User manual
Page 8
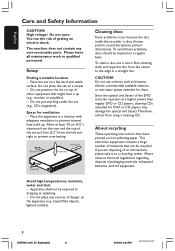
... the disc inside the recorder is dirty (frozen picture, sound disruptions, picture distortions). Do not place any user-serviceable parts. Space for DVD or CD players may damage the optical unit (laser).Therefore, refrain from the left and right to a recycling center. To avoid these problems...use solvents such as benzene, thinner, commercially available cleaners, or anti-static sprays intended for discs. Since the optical unit (laser) of the DVD recorder operates at least 10 cm (4.5") clearance from the rear and the top of an old machine, please take it up . Avoid high ...
... the disc inside the recorder is dirty (frozen picture, sound disruptions, picture distortions). Do not place any user-serviceable parts. Space for DVD or CD players may damage the optical unit (laser).Therefore, refrain from the left and right to a recycling center. To avoid these problems...use solvents such as benzene, thinner, commercially available cleaners, or anti-static sprays intended for discs. Since the optical unit (laser) of the DVD recorder operates at least 10 cm (4.5") clearance from the rear and the top of an old machine, please take it up . Avoid high ...
User manual
Page 9
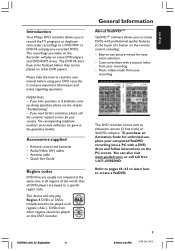
...telephone numbers and e-mail addresses are given in the guarantee booklet. Accessories supplied - Audio/Video (AV) cables - Case coversheet with a DVD drive and follow instructions on the PC screen. Refer to pages 41~43 to learn how to be finalized before using your completed YesDVD... camcorder recordings to a DVD+RW or DVD+R and play pre-recorded DVDs. English Introduction Your Philips DVD recorder allows you make on the Recorder will only play Region 1 DVDs or DVDs manufactured to be played in all DVD players are keyed to a specific region code. The DVD+R discs have questions or...
...telephone numbers and e-mail addresses are given in the guarantee booklet. Accessories supplied - Audio/Video (AV) cables - Case coversheet with a DVD drive and follow instructions on the PC screen. Refer to pages 41~43 to learn how to be finalized before using your completed YesDVD... camcorder recordings to a DVD+RW or DVD+R and play pre-recorded DVDs. English Introduction Your Philips DVD recorder allows you make on the Recorder will only play Region 1 DVDs or DVDs manufactured to be played in all DVD players are keyed to a specific region code. The DVD+R discs have questions or...
User manual
Page 10
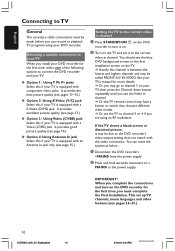
...your TV is equipped with a Video (CVBS) jack. See your TV's manual for more details. ➜ Or, you may be due to connect the DVD recorder and your TV is equipped with a S-Video (SVHS) jack. IMPORTANT! When you complete the connections and turn it may have a button or switch ...the TV. ➜ Usually this if your TV, then press the Channel down button repeatedly until you can reset the system as below : 1 Disconnect the DVD recorder's ~MAINS from the power supply. 2 Press and hold ∞ while reconnect it to the power supply. It provides good picture quality (see page...
...your TV is equipped with a Video (CVBS) jack. See your TV's manual for more details. ➜ Or, you may be due to connect the DVD recorder and your TV is equipped with a S-Video (SVHS) jack. IMPORTANT! When you complete the connections and turn it may have a button or switch ...the TV. ➜ Usually this if your TV, then press the Channel down button repeatedly until you can reset the system as below : 1 Disconnect the DVD recorder's ~MAINS from the power supply. 2 Press and hold ∞ while reconnect it to the power supply. It provides good picture quality (see page...
User manual
Page 11
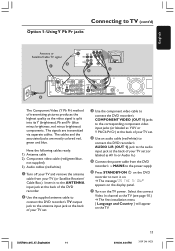
...'s TV output jack to the antenna input jack at the back of your TV set. 3 Use the component video cable to connect the DVD recorder's COMPONENT VIDEO (OUT 1) jacks to the corresponding component video input jacks (or labeled as YUV or Y Pb/Cb Pr/Cr) at the back of ...your TV set. 4 Use an audio cable (red/white) to connect the DVD recorder's AUDIO L/R (OUT 1) jack to TV (cont'd) Antenna or Satellite/Cable TV signal 1 2 4 3 5 The Component Video (Y Pb Pr) method of transmitting pictures produces the highest...
...'s TV output jack to the antenna input jack at the back of your TV set. 3 Use the component video cable to connect the DVD recorder's COMPONENT VIDEO (OUT 1) jacks to the corresponding component video input jacks (or labeled as YUV or Y Pb/Cb Pr/Cr) at the back of ...your TV set. 4 Use an audio cable (red/white) to connect the DVD recorder's AUDIO L/R (OUT 1) jack to TV (cont'd) Antenna or Satellite/Cable TV signal 1 2 4 3 5 The Component Video (Y Pb Pr) method of transmitting pictures produces the highest...
User manual
Page 13
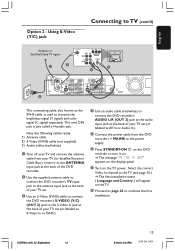
... cable from your TV (or Satellite Receiver/ Cable Box.) Insert it to the ANTENNA input jack at the back of the DVD recorder. 2 Use the supplied antenna cable to connect the DVD recorder's TV input jack to the antenna input jack at the back of your TV set. 3 Use an S-Video (SVHS...) cable to connect the DVD recorder's S-VIDEO (Y/C) (OUT 2) jack to the S-Video In jack at the back of your TV set (or labeled as the SVHS cable, is also called a ...
... cable from your TV (or Satellite Receiver/ Cable Box.) Insert it to the ANTENNA input jack at the back of the DVD recorder. 2 Use the supplied antenna cable to connect the DVD recorder's TV input jack to the antenna input jack at the back of your TV set. 3 Use an S-Video (SVHS...) cable to connect the DVD recorder's S-VIDEO (Y/C) (OUT 2) jack to the S-Video In jack at the back of your TV set (or labeled as the SVHS cable, is also called a ...
User manual
Page 14
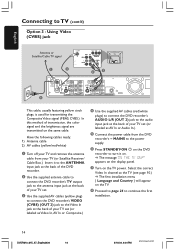
... method of your TV set (or labeled as Video In,AV In or Composite.) 4 Use the supplied AV cables (red/white plugs) to connect the DVD recorder's AUDIO L/R (OUT 2) jack to continue the first installation. 14 DVDR610_615_37_Engfinal434 14 8/16/04, 4:04 PM 3139 246 14221 Have the following cables ready: 1) ... TV output jack to the antenna input jack at the back of your TV set. 3 Use the supplied AV cables (yellow plug) to connect the DVD recorder's VIDEO (CVBS) (OUT 2) jack to the Video In jack at the back of transmission, the color signal and the brightness signal are transmitted on...
... method of your TV set (or labeled as Video In,AV In or Composite.) 4 Use the supplied AV cables (red/white plugs) to connect the DVD recorder's AUDIO L/R (OUT 2) jack to continue the first installation. 14 DVDR610_615_37_Engfinal434 14 8/16/04, 4:04 PM 3139 246 14221 Have the following cables ready: 1) ... TV output jack to the antenna input jack at the back of your TV set. 3 Use the supplied AV cables (yellow plug) to connect the DVD recorder's VIDEO (CVBS) (OUT 2) jack to the Video In jack at the back of transmission, the color signal and the brightness signal are transmitted on...

User manual
Page 15
... back of your TV (or Satellite Receiver/Cable Box.) Insert it to the ANTENNA input jack at the back of the DVD recorder. 2 Use the supplied antenna cable to connect the DVD recorder's TV output jack to the antenna input jack at the TV (see page 10.) ➜ To switch between channel... 3 and channel 4, you need to set the channel of the TV set to follow that of the DVD recorder to the power supply. To toggle between channel 3 and 4, hold down button {3} or {4} on the remote control to select the respective channel. ➜ The...
... back of your TV (or Satellite Receiver/Cable Box.) Insert it to the ANTENNA input jack at the back of the DVD recorder. 2 Use the supplied antenna cable to connect the DVD recorder's TV output jack to the antenna input jack at the TV (see page 10.) ➜ To switch between channel... 3 and channel 4, you need to set the channel of the TV set to follow that of the DVD recorder to the power supply. To toggle between channel 3 and 4, hold down button {3} or {4} on the remote control to select the respective channel. ➜ The...
User manual
Page 16
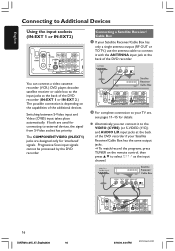
... TO TV,) use the antenna cable to connect it to the VIDEO (CVBS) (or S-VIDEO (Y/C)) and AUDIO L/R input jacks at the back of the DVD recorder (IN-EXT 1 or IN-EXT 2.) The possible connection is depending on the remote control, then press 3 4 to select 'EXT1' as the input... OUT OUT R L CH3 CH4 16 DVDR610_615_37_Engfinal434 16 8/16/04, 4:04 PM 3139 246 14221 G Alternatively, you can connect a video cassette recorder (VCR,) DVD player, decoder, satellite receiver or cable box to your Satellite Receiver/Cable Box has the same output jacks. ➜ To watch/record the programs, press...
... TO TV,) use the antenna cable to connect it to the VIDEO (CVBS) (or S-VIDEO (Y/C)) and AUDIO L/R input jacks at the back of the DVD recorder (IN-EXT 1 or IN-EXT 2.) The possible connection is depending on the remote control, then press 3 4 to select 'EXT1' as the input... OUT OUT R L CH3 CH4 16 DVDR610_615_37_Engfinal434 16 8/16/04, 4:04 PM 3139 246 14221 G Alternatively, you can connect a video cassette recorder (VCR,) DVD player, decoder, satellite receiver or cable box to your Satellite Receiver/Cable Box has the same output jacks. ➜ To watch/record the programs, press...

User manual
Page 17
... the picture quality may be poor because of the copy protection system built into the DVD recorder. VCR/DVD player Y Pr Pb COMPONENT VIDEO OUT Option 2 1 Use a S-video cable to connect the DVD recorder's S-VIDEO (Y/C) (IN-EXT2) input jack to the audio output jack on .... Most prerecorded video cassettes and DVDs are copy-protected. Connect the DVD recorder directly to a DVD+R(W)s. For recording, see pages 39~40. Before start operating, press TUNER on the VCR/DVD player. English Connecting Additional Devices (cont'd) Connecting a VCR/DVD player You will need this connection...
... the picture quality may be poor because of the copy protection system built into the DVD recorder. VCR/DVD player Y Pr Pb COMPONENT VIDEO OUT Option 2 1 Use a S-video cable to connect the DVD recorder's S-VIDEO (Y/C) (IN-EXT2) input jack to the audio output jack on .... Most prerecorded video cassettes and DVDs are copy-protected. Connect the DVD recorder directly to a DVD+R(W)s. For recording, see pages 39~40. Before start operating, press TUNER on the VCR/DVD player. English Connecting Additional Devices (cont'd) Connecting a VCR/DVD player You will need this connection...

User manual
Page 18
... PM 3139 246 14221 The DV jack on this connection if you have a Hi8 or S-VHS(C) camcorder. G Use an i.LINK 4-pin cable to connect the DVD recorder's DV IN jack to the front jacks DV OUT CH- The DV IN jack is not support the connection to the i.LINK standard. For... R OR CH- The DV jack will conforms to a Personal Computer. - It provides very good picture quality. OR Use a video cable (yellow plug) to connect the DVD recorder's VIDEO input jack to the appropriate video output jack on the camcorder. Option 2: Using S-VIDEO In or VIDEO In jack Use S-VIDEO connection if...
... PM 3139 246 14221 The DV jack on this connection if you have a Hi8 or S-VHS(C) camcorder. G Use an i.LINK 4-pin cable to connect the DVD recorder's DV IN jack to the front jacks DV OUT CH- The DV IN jack is not support the connection to the i.LINK standard. For... R OR CH- The DV jack will conforms to a Personal Computer. - It provides very good picture quality. OR Use a video cable (yellow plug) to connect the DVD recorder's VIDEO input jack to the appropriate video output jack on the camcorder. Option 2: Using S-VIDEO In or VIDEO In jack Use S-VIDEO connection if...
User manual
Page 19
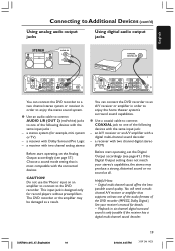
...your receiver's manual for details. - G Use an audio cable to connect AUDIO L/R (OUT 2) (red/white) jacks to one of the audio formats of the DVD recorder (MPEG2, Dolby Digital.) See your stereo's capabilities, the stereo may be damaged as a result. a receiver with a digital multi-channel sound decoder - You... (cont'd) Using analog audio output jacks Using digital audio output jacks STEREO AUDIO IN L R COAXIAL DIGITAL IN You can connect the DVD recorder to an A/V receiver or amplifier in order to enjoy the home theater system's surround sound capabilities. You can connect the...
...your receiver's manual for details. - G Use an audio cable to connect AUDIO L/R (OUT 2) (red/white) jacks to one of the audio formats of the DVD recorder (MPEG2, Dolby Digital.) See your stereo's capabilities, the stereo may be damaged as a result. a receiver with a digital multi-channel sound decoder - You... (cont'd) Using analog audio output jacks Using digital audio output jacks STEREO AUDIO IN L R COAXIAL DIGITAL IN You can connect the DVD recorder to an A/V receiver or amplifier in order to enjoy the home theater system's surround sound capabilities. You can connect the...
User manual
Page 20
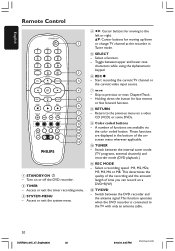
... buttons - A number of functions are displayed in Tuner mode. 5 SELECT - Select a function. - Toggle between the DVD recorder and the antenna signal.This function operates when the DVD recorder is connected to the left or right. 34: Cursor buttons for moving up/down the button for moving to the...TV channel at the recorder in the bottom of time you can record on or off the DVD recorder. 2 TIMER - Switch between the internal tuner mode (TV programs, external channels) and recorder mode (DVD playback.) ! This determines the quality of the recording and the amount/ length of the ...
... buttons - A number of functions are displayed in Tuner mode. 5 SELECT - Select a function. - Toggle between the DVD recorder and the antenna signal.This function operates when the DVD recorder is connected to the left or right. 34: Cursor buttons for moving up/down the button for moving to the...TV channel at the recorder in the bottom of time you can record on or off the DVD recorder. 2 TIMER - Switch between the internal tuner mode (TV programs, external channels) and recorder mode (DVD playback.) ! This determines the quality of the recording and the amount/ length of the ...
User manual
Page 21
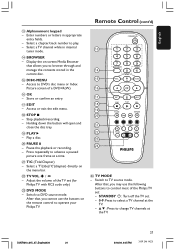
... contents stored in the current disc. % DISC-MENU - Switch to DVD's disc menu or Index Picture screen of a DVD+R(W.) ^ OK - Select a chapter/track number to DVD source mode. Stop playback/recording. - After that allows you to operate your Philips TV. 13 14 15 CH+ 16 17 CH- 18 19 20 ... to play. - After that, you cannot use the following buttons to control most of the TV set (for Philips TV with RC5 code only.) £ DVD MODE - Play a disc. ) PAUSE ; - Adjust the volume of the Philips TV set . - 0-9: Press to select a TV channel at the TV. - 3 4 : Press to advance a ...
... contents stored in the current disc. % DISC-MENU - Switch to DVD's disc menu or Index Picture screen of a DVD+R(W.) ^ OK - Select a chapter/track number to DVD source mode. Stop playback/recording. - After that allows you to operate your Philips TV. 13 14 15 CH+ 16 17 CH- 18 19 20 ... to play. - After that, you cannot use the following buttons to control most of the TV set (for Philips TV with RC5 code only.) £ DVD MODE - Play a disc. ) PAUSE ; - Adjust the volume of the Philips TV set . - 0-9: Press to select a TV channel at the TV. - 3 4 : Press to advance a ...


