
Leaflet
Page 1
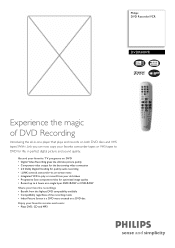
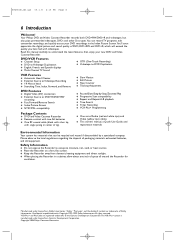
...favorite camcorder tapes or VHS tapes to 6 hours on a single layer DVD+R/RW or DVD-R/RW Share your favorite recordings • Benefit from the highest DVD compatibility available • Compatibility regardless of DVD Recording Introducing the all-in perfect digital picture and sound quality. Record your... video for optimized image quality • Record up to DVD for life, in -one player that plays and records on a DVD disc Enjoy your favorite movies and music • Plays DVD, CD and MP3 Philips DVD Recorder/VCR DVDR600VR Experience the magic of the recording mode • Index ...
...favorite camcorder tapes or VHS tapes to 6 hours on a single layer DVD+R/RW or DVD-R/RW Share your favorite recordings • Benefit from the highest DVD compatibility available • Compatibility regardless of DVD Recording Introducing the all-in perfect digital picture and sound quality. Record your... video for optimized image quality • Record up to DVD for life, in -one player that plays and records on a DVD disc Enjoy your favorite movies and music • Plays DVD, CD and MP3 Philips DVD Recorder/VCR DVDR600VR Experience the magic of the recording mode • Index ...
Leaflet
Page 2
... even lines, both fields are the property of Koninklijke Philips Electronics N.V. At such a speed, your digital camcorder completely via the On-Screen Display menu using the maximum resolution. All Rights reserved. DVD Recorder/VCR DVDR600VR/37 Specifications Video Recording • Tape speeds: LP...: 3.0 12 NC: 8622 810 11682 UPC: 0 37849 94869 9 © 2007 Koninklijke Philips Electronics N.V. Instead of analog video recorder. Trademarks are written at one time. DVD+RW highest compatibility Compatibility in YPbPr format, no line structure. 6 hours video recording The 6-...
... even lines, both fields are the property of Koninklijke Philips Electronics N.V. At such a speed, your digital camcorder completely via the On-Screen Display menu using the maximum resolution. All Rights reserved. DVD Recorder/VCR DVDR600VR/37 Specifications Video Recording • Tape speeds: LP...: 3.0 12 NC: 8622 810 11682 UPC: 0 37849 94869 9 © 2007 Koninklijke Philips Electronics N.V. Instead of analog video recorder. Trademarks are written at one time. DVD+RW highest compatibility Compatibility in YPbPr format, no line structure. 6 hours video recording The 6-...
User manual
Page 3
... determined by turning the equipment off and on a circuit different from digital apparatus as set compatibility with this model 525p DVD player, please contact our customer service center. CAUTION: Use of controls or adjustments or performance of the FCC rules.... two conditions: 1) This device may cause artifacts to correct the interference by method claims of Conformity Model Number: DVDR600VR Trade Name: Philips Responsible Party: Philips Consumer Electronics North America P.O. WARNING: This device complies with the instructions, may cause undesired operation. IMPORTANT: This ...
... determined by turning the equipment off and on a circuit different from digital apparatus as set compatibility with this model 525p DVD player, please contact our customer service center. CAUTION: Use of controls or adjustments or performance of the FCC rules.... two conditions: 1) This device may cause artifacts to correct the interference by method claims of Conformity Model Number: DVDR600VR Trade Name: Philips Responsible Party: Philips Consumer Electronics North America P.O. WARNING: This device complies with the instructions, may cause undesired operation. IMPORTANT: This ...
User manual
Page 5
...General Information Safety Information 3-4 Contents 5 Introduction 6 Getting Started Playable Discs 7 General Information 8 Hookups 9-17 Recording from External Devices (DVD 17 Initial Setup 18-19 Basic Play and Recording Quick Videotape Playback 20 Quick Disc Playback 21 Quick Disc Recording 22 Controls Remote Control... Videotape Recording 69 Record One Channel/Watch Another (VCR 70 One-Touch Recording (VCR 71 Rerecording (Tape Duplication 72 DVD to Videotape Duplication 73 Recording from External Devices (VCR 74 Tape Playback Features Tape Counter 75 Time Search, Index Search...
...General Information Safety Information 3-4 Contents 5 Introduction 6 Getting Started Playable Discs 7 General Information 8 Hookups 9-17 Recording from External Devices (DVD 17 Initial Setup 18-19 Basic Play and Recording Quick Videotape Playback 20 Quick Disc Playback 21 Quick Disc Recording 22 Controls Remote Control... Videotape Recording 69 Record One Channel/Watch Another (VCR 70 One-Touch Recording (VCR 71 Rerecording (Tape Duplication 72 DVD to Videotape Duplication 73 Recording from External Devices (VCR 74 Tape Playback Features Tape Counter 75 Time Search, Index Search...
User manual
Page 6
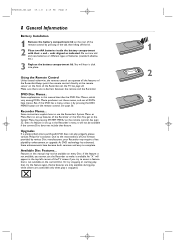
... local regulations regarding the disposal of space all around the Recorder for ventilation. Copyright 2004 Philips Consumer Electronics. Safety Information ● Do not expose the Recorder to DVD+R/DVD+RW recording ● Fast Forward/Reverse Search ● Index Picture Screen ● NTSC...qx3 05.1.8 4:15 PM Page 6 6 Introduction Welcome! Confidential unpublished works. Your Philips DVD and Video Cassette Recorder records both DVD+RW/DVD+R and videotapes, but also plays prerecorded videotapes, DVDs and other Disc types.You can be recycled and reused if disassembled by -Step/...
... local regulations regarding the disposal of space all around the Recorder for ventilation. Copyright 2004 Philips Consumer Electronics. Safety Information ● Do not expose the Recorder to DVD+R/DVD+RW recording ● Fast Forward/Reverse Search ● Index Picture Screen ● NTSC...qx3 05.1.8 4:15 PM Page 6 6 Introduction Welcome! Confidential unpublished works. Your Philips DVD and Video Cassette Recorder records both DVD+RW/DVD+R and videotapes, but also plays prerecorded videotapes, DVDs and other Disc types.You can be recycled and reused if disassembled by -Step/...
User manual
Page 7
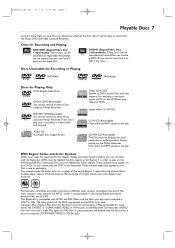
...edit it any more. Super Video CD (SVCD) CD-R (CD-Recordable) Only audio and MP3 contents will not play or record on the Philips DVD and Video Cassette Recorder. DVDs must be erased, then you can be labelled for ALL regions or for Region 1 in video mode and finalized. Furthermore, recordings are made... Recorder is used primarily in NTSC or PAL.The color system of the DVD may not be connected to a PAL-compatible TV using the Philips Recorder.These Discs play only if recorded in order to play on this DVD Recorder.You cannot play Discs that are labeled for other regions.These symbols ...
...edit it any more. Super Video CD (SVCD) CD-R (CD-Recordable) Only audio and MP3 contents will not play or record on the Philips DVD and Video Cassette Recorder. DVDs must be erased, then you can be labelled for ALL regions or for Region 1 in video mode and finalized. Furthermore, recordings are made... Recorder is used primarily in NTSC or PAL.The color system of the DVD may not be connected to a PAL-compatible TV using the Philips Recorder.These Discs play only if recorded in order to play on this DVD Recorder.You cannot play Discs that are labeled for other regions.These symbols ...
User manual
Page 8
... enhancement or upgrade. If the feature is set these enhancements have menus. See page 32. Upgrades If a prerecorded (store purchased) DVD does not play is not available on the remote control. Do not mix old and new batteries or different types of the TV ...the Recorder's System Menu or Menu Bars to access a feature that feature. Make sure there are accessible only when play properly, please contact Philips for assistance. See page 36. Some explanations in the Recorder's menu, it available. Available Disc Features... An "X" will appear in the...
... enhancement or upgrade. If the feature is set these enhancements have menus. See page 32. Upgrades If a prerecorded (store purchased) DVD does not play is not available on the remote control. Do not mix old and new batteries or different types of the TV ...the Recorder's System Menu or Menu Bars to access a feature that feature. Make sure there are accessible only when play properly, please contact Philips for assistance. See page 36. Some explanations in the Recorder's menu, it available. Available Disc Features... An "X" will appear in the...
User manual
Page 9
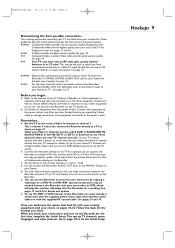
...Stereo, etc. ● Disconnect all the jacks on the Recorder. ● You can use the DVD or VCR features of a Disc or Videocassette playing on your lowest TV channel and change connections with ...AUDIO OUT jacks to your Stereo or TV. This is channel 3 only if you can see the DVD background picture on page 10. Otherwise,Video In channels may have finished hooking up TV channels, menu ...with the supplied yellow video cable and red/white audio cables or with equipment connected to a DVD+R or DVD+RW. Go to page 18 to do not connect the Recorder to another VCR, then connect...
...Stereo, etc. ● Disconnect all the jacks on the Recorder. ● You can use the DVD or VCR features of a Disc or Videocassette playing on your lowest TV channel and change connections with ...AUDIO OUT jacks to your Stereo or TV. This is channel 3 only if you can see the DVD background picture on page 10. Otherwise,Video In channels may have finished hooking up TV channels, menu ...with the supplied yellow video cable and red/white audio cables or with equipment connected to a DVD+R or DVD+RW. Go to page 18 to do not connect the Recorder to another VCR, then connect...
User manual
Page 10
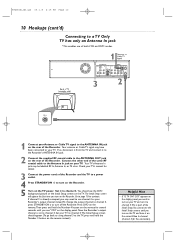
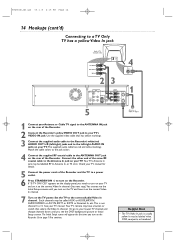
... on the remote instead.) Helpful Hint • If "IS TV ON? C03" appears on the display panel, you need to use of both VCR and DVD modes. 1 Connect your Antenna or Cable TV signal to channel 3.This is part of the same RF coaxial cable to turn on your TV to... until you turn on the TV and have been connected to your TV. Connect the other end of the Initial Setup.You cannot see the DVD background picture or the Initial Setup screen on the Recorder. The Initial Setup screen will appear the first time you may need to turn on...
... on the remote instead.) Helpful Hint • If "IS TV ON? C03" appears on the display panel, you need to use of both VCR and DVD modes. 1 Connect your Antenna or Cable TV signal to channel 3.This is part of the same RF coaxial cable to turn on your TV to... until you turn on the TV and have been connected to your TV. Connect the other end of the Initial Setup.You cannot see the DVD background picture or the Initial Setup screen on the Recorder. The Initial Setup screen will appear the first time you may need to turn on...
User manual
Page 11
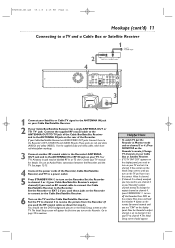
... (AUDIO) and yellow (VIDEO). Now the Recorder's output channel is set it to EXT 2 if you may be labelled RF In or 75 ohm. Press DVD on the remote.Then press and hold the Number 4 button on the correct Video In channel. • If channel 3 is already occupied, you used the... RF coaxial cable as your TV. The Initial Setup screen will appear the first time you see the DVD background picture or the Initial Setup screen on the display panel. You should appear. If your Cable Box or Satellite Receiver. • If "IS TV...
... (AUDIO) and yellow (VIDEO). Now the Recorder's output channel is set it to EXT 2 if you may be labelled RF In or 75 ohm. Press DVD on the remote.Then press and hold the Number 4 button on the correct Video In channel. • If channel 3 is already occupied, you used the... RF coaxial cable as your TV. The Initial Setup screen will appear the first time you see the DVD background picture or the Initial Setup screen on the display panel. You should appear. If your Cable Box or Satellite Receiver. • If "IS TV...
User manual
Page 12
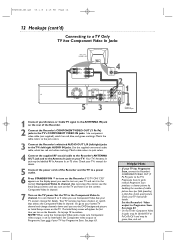
... the Recorder. 2 Connect the Recorder's COMPONENT VIDEO OUT (Y PB PR) jacks to the correct Component Video In channel. (See next step.) You cannot see the DVD background picture or Initial Setup screen on the Recorder. Set the Recorder's Video output to the TV's Progressive Scan In jacks instead. The Initial Setup...
... the Recorder. 2 Connect the Recorder's COMPONENT VIDEO OUT (Y PB PR) jacks to the correct Component Video In channel. (See next step.) You cannot see the DVD background picture or Initial Setup screen on the Recorder. Set the Recorder's Video output to the TV's Progressive Scan In jacks instead. The Initial Setup...
User manual
Page 13
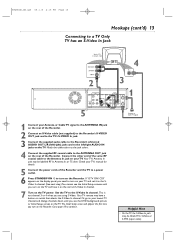
... end of the Recorder and the TV to a power outlet. 6 Press STANDBY-ON y to the SVideo In channel. (See next step.) You cannot see the DVD background picture or Initial Setup screen on the TV. Match the cable colors to the jack colors. 4 Connect the supplied RF coaxial cable to the...
... end of the Recorder and the TV to a power outlet. 6 Press STANDBY-ON y to the SVideo In channel. (See next step.) You cannot see the DVD background picture or Initial Setup screen on the TV. Match the cable colors to the jack colors. 4 Connect the supplied RF coaxial cable to the...
User manual
Page 14
.... Such channels may have it to the correct Video In channel. (See next step.) You cannot see the Initial Setup screens until you see the DVD background picture or Initial Setup screen. Your TV remote may be labeled video, CVBS, composite, or baseband. Or, go to your TV manual for details...
.... Such channels may have it to the correct Video In channel. (See next step.) You cannot see the Initial Setup screens until you see the DVD background picture or Initial Setup screen. Your TV remote may be labeled video, CVBS, composite, or baseband. Or, go to your TV manual for details...

User manual
Page 15
... In jack may be labelled RF In,Antenna In, or 75 ohm. See page 65. • To use Component Video or SVideo instead, see the DVD background picture or Initial Setup screen. If "IS TV ON? Set the TV to continue. C03" appears on the Stereo. Choose the correct Video In...
... In jack may be labelled RF In,Antenna In, or 75 ohm. See page 65. • To use Component Video or SVideo instead, see the DVD background picture or Initial Setup screen. If "IS TV ON? Set the TV to continue. C03" appears on the Stereo. Choose the correct Video In...
User manual
Page 16
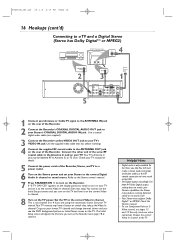
.... Use the supplied video cable that selects the Video In channel. Check the Stereo's manual. • To use Component Video or SVideo instead, see the DVD background picture or Initial Setup screen on the TV. See your Stereo's COAXIAL DIGITAL AUDIO IN jack. E9480UD_EN.qx3 05.1.8 4:15 PM Page 16 16...
.... Use the supplied video cable that selects the Video In channel. Check the Stereo's manual. • To use Component Video or SVideo instead, see the DVD background picture or Initial Setup screen on the TV. See your Stereo's COAXIAL DIGITAL AUDIO IN jack. E9480UD_EN.qx3 05.1.8 4:15 PM Page 16 16...
User manual
Page 17
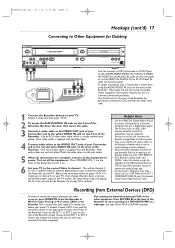
... channel, depending on the other equipment. Press K or L to continue. Choose the channel that has a Digital Video output. Choose a connection from External Devices (DVD) To watch or record the material playing on your TV, then change channels down the door that covers the jacks. 3 Connect a video cable to the...use the EXT 1 or EXT 2 jacks on this page (with the Recorder. One set of your TV to turn on a DVD+R/DVD+RW or a videotape. (See page 44 for DVD+R or DVD+RW recording.) Turn on the front of the Recorder to the correct Video In channel. Press STANDBY-ON y on the front...
... channel, depending on the other equipment. Press K or L to continue. Choose the channel that has a Digital Video output. Choose a connection from External Devices (DVD) To watch or record the material playing on your TV, then change channels down the door that covers the jacks. 3 Connect a video cable to the...use the EXT 1 or EXT 2 jacks on this page (with the Recorder. One set of your TV to turn on a DVD+R/DVD+RW or a videotape. (See page 44 for DVD+R or DVD+RW recording.) Turn on the front of the Recorder to the correct Video In channel. Press STANDBY-ON y on the front...
User manual
Page 18
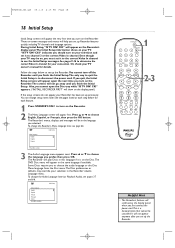
... STANDBY-ON 1 OPEN/CLOSE 1 2 3 EJECT TV/VIDEO 4 5 6 7 8 VCR Plus +/TIMER 0 9 MONITOR CHANNEL VCR DISC MENU CLEAR DVD SYSTEM MENU OK SELECT RETURN 2-3 PLAY VCR REC STOP DVD REC MODE PLAY MODE AUDIO PAUSE REC FSS T/C DISPLAY SLOW VOLUME MUTE MODE TV SEARCH Helpful Hint • The Recorder's features... on , you must set up previously. Even though your TV may override your Recorder has been set it is on the Disc.The DVD Disc menu will show on the Recorder. E9480UD_EN.qx3 05.1.8 4:15 PM Page 18 18 Initial Setup Initial Setup screens will scroll across ...
... STANDBY-ON 1 OPEN/CLOSE 1 2 3 EJECT TV/VIDEO 4 5 6 7 8 VCR Plus +/TIMER 0 9 MONITOR CHANNEL VCR DISC MENU CLEAR DVD SYSTEM MENU OK SELECT RETURN 2-3 PLAY VCR REC STOP DVD REC MODE PLAY MODE AUDIO PAUSE REC FSS T/C DISPLAY SLOW VOLUME MUTE MODE TV SEARCH Helpful Hint • The Recorder's features... on , you must set up previously. Even though your TV may override your Recorder has been set it is on the Disc.The DVD Disc menu will show on the Recorder. E9480UD_EN.qx3 05.1.8 4:15 PM Page 18 18 Initial Setup Initial Setup screens will scroll across ...
User manual
Page 19
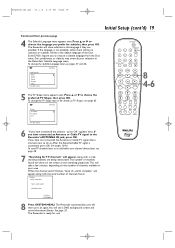
...16:9 STANDBY-ON OPEN/CLOSE 1 2 3 EJECT TV/VIDEO 4 5 6 7 8 VCR Plus +/TIMER 0 9 MONITOR CHANNEL VCR DISC MENU CLEAR DVD SYSTEM MENU OK SELECT RETURN PLAY 8 4-6 VCR REC STOP DVD REC MODE PLAY MODE AUDIO PAUSE REC FSS T/C DISPLAY SLOW VOLUME MUTE MODE TV SEARCH Press OK to choose the language... you have connected the antenna - The Recorder automatically turns off, then turns on TV Shapes, see a DVD background screen and some Information Boxes. The Recorder is connected, press OK. If the language is not available, either there will be...
...16:9 STANDBY-ON OPEN/CLOSE 1 2 3 EJECT TV/VIDEO 4 5 6 7 8 VCR Plus +/TIMER 0 9 MONITOR CHANNEL VCR DISC MENU CLEAR DVD SYSTEM MENU OK SELECT RETURN PLAY 8 4-6 VCR REC STOP DVD REC MODE PLAY MODE AUDIO PAUSE REC FSS T/C DISPLAY SLOW VOLUME MUTE MODE TV SEARCH Press OK to choose the language... you have connected the antenna - The Recorder automatically turns off, then turns on TV Shapes, see a DVD background screen and some Information Boxes. The Recorder is connected, press OK. If the language is not available, either there will be...
User manual
Page 20
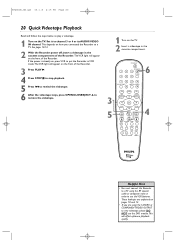
...Recorder to a TV. This depends on the TV. See pages 10-14. 2 With the Recorder power off, insert a videotape in order to use the DVD module.This will appear on the front of the Recorder. 3 Press PLAY B. 4 Press STOP C to stop playback. 5 Press H to rewind the videotape.... 5 STANDBY-ON 1 2 OPEN/CLOSE 3 EJECT 6 TV/VIDEO 4 5 6 7 8 VCR Plus +/TIMER 0 9 MONITOR CHANNEL VCR DISC MENU CLEAR DVD SYSTEM MENU OK SELECT RETURN PLAY VCR REC STOP DVD REC MODE PLAY MODE AUDIO PAUSE REC FSS T/C DISPLAY SLOW VOLUME MUTE MODE TV SEARCH 4 Helpful Hint • You must connect...
...Recorder to a TV. This depends on the TV. See pages 10-14. 2 With the Recorder power off, insert a videotape in order to use the DVD module.This will appear on the front of the Recorder. 3 Press PLAY B. 4 Press STOP C to stop playback. 5 Press H to rewind the videotape.... 5 STANDBY-ON 1 2 OPEN/CLOSE 3 EJECT 6 TV/VIDEO 4 5 6 7 8 VCR Plus +/TIMER 0 9 MONITOR CHANNEL VCR DISC MENU CLEAR DVD SYSTEM MENU OK SELECT RETURN PLAY VCR REC STOP DVD REC MODE PLAY MODE AUDIO PAUSE REC FSS T/C DISPLAY SLOW VOLUME MUTE MODE TV SEARCH 4 Helpful Hint • You must connect...
User manual
Page 21
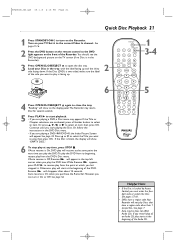
... C. STANDBY-ON OPEN/CLOSE 1 2 3 EJECT TV/VIDEO 4 5 6 7 8 VCR Plus +/TIMER 0 9 MONITOR CHANNEL VCR DISC MENU CLEAR DVD SYSTEM MENU OK SELECT RETURN PLAY VCR REC STOP DVD REC MODE PLAY MODE AUDIO PAUSE REC FSS T/C DISPLAY SLOW VOLUME MUTE MODE TV SEARCH 1 3-4 5 Helpful Hints • If the Disc... the disc tray. Press K or L to select the Title you are numbered, press a Number button to close the tray. If you play the DVD later.While Resume appears, press PLAY B to play Discs that have a region code other than 1 (one)or ALL. See page 34. If Auto...
... C. STANDBY-ON OPEN/CLOSE 1 2 3 EJECT TV/VIDEO 4 5 6 7 8 VCR Plus +/TIMER 0 9 MONITOR CHANNEL VCR DISC MENU CLEAR DVD SYSTEM MENU OK SELECT RETURN PLAY VCR REC STOP DVD REC MODE PLAY MODE AUDIO PAUSE REC FSS T/C DISPLAY SLOW VOLUME MUTE MODE TV SEARCH 1 3-4 5 Helpful Hints • If the Disc... the disc tray. Press K or L to select the Title you are numbered, press a Number button to close the tray. If you play the DVD later.While Resume appears, press PLAY B to play Discs that have a region code other than 1 (one)or ALL. See page 34. If Auto...


