
Leaflet
Page 2
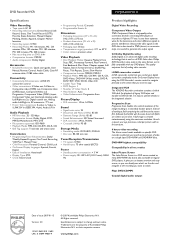
... Playback Modes: Resume Playback from Stop, PBC, Framestep Forward, Fast Forward, Fast Backward, Disc Menu, Chapter repeat, A-B Repeat, Search forward/reverse, Shuffle Play, Pause, Title Repeat, Zoom, Slow Motion • Compression formats: MPEG2, MPEG1 • Playback Media: MP3-CD, CD-RW, CD-R, CD, DVD-Video, DVD-RW (Video mode), DVD-R, DVD+RW, DVD, SVCD, Video CD • Loader Type: Tray • DVD Region: 1 • Number of Video Heads: 4 • Head Cleaner: Auto • Video Enhancement: Progressive Scan Picture/Display • D/A converter: 10 bit, 54 MHz Sound • Signal...
... Playback Modes: Resume Playback from Stop, PBC, Framestep Forward, Fast Forward, Fast Backward, Disc Menu, Chapter repeat, A-B Repeat, Search forward/reverse, Shuffle Play, Pause, Title Repeat, Zoom, Slow Motion • Compression formats: MPEG2, MPEG1 • Playback Media: MP3-CD, CD-RW, CD-R, CD, DVD-Video, DVD-RW (Video mode), DVD-R, DVD+RW, DVD, SVCD, Video CD • Loader Type: Tray • DVD Region: 1 • Number of Video Heads: 4 • Head Cleaner: Auto • Video Enhancement: Progressive Scan Picture/Display • D/A converter: 10 bit, 54 MHz Sound • Signal...
User manual
Page 4
... wall outlet before operating the product. 2. Lightning - For added protection for this product, ask the service technician to perform safety checks to your home, consult your obsolete outlet. Never spill liquid of power supply to determine that the product is not used for cleaning. 6. Opening or removing covers may expose you to cords at right. 15. Adjust only those controls covered by the...
... wall outlet before operating the product. 2. Lightning - For added protection for this product, ask the service technician to perform safety checks to your home, consult your obsolete outlet. Never spill liquid of power supply to determine that the product is not used for cleaning. 6. Opening or removing covers may expose you to cords at right. 15. Adjust only those controls covered by the...
User manual
Page 5
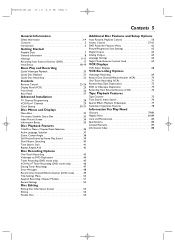
... Clock Setting 30-31 Disc Menus and Displays Menu Bars 32 On-screen Symbols, Status Box 33 Index Picture Screen 34 Information Boxes 35 Disc Playback Features Title/Disc Menus, Chapter/Track Selection 36 Audio Language, Subtitles 37 Zoom, Camera Angle 38 Still Picture/Frame-by-Frame Play, Sound 39 Slow Motion, Searching 40 Time Search, Scan 41 Repeat, Repeat A-B 42 Disc Recording Options One-Touch Recording 43 Videotape to DVD Duplication 44 Timer Recording (DVD mode only 45 VCR Plus+® Timer Recording (DVD mode only 46 Erasing Timer Recordings 47 Error Messages...
... Clock Setting 30-31 Disc Menus and Displays Menu Bars 32 On-screen Symbols, Status Box 33 Index Picture Screen 34 Information Boxes 35 Disc Playback Features Title/Disc Menus, Chapter/Track Selection 36 Audio Language, Subtitles 37 Zoom, Camera Angle 38 Still Picture/Frame-by-Frame Play, Sound 39 Slow Motion, Searching 40 Time Search, Scan 41 Repeat, Repeat A-B 42 Disc Recording Options One-Touch Recording 43 Videotape to DVD Duplication 44 Timer Recording (DVD mode only 45 VCR Plus+® Timer Recording (DVD mode only 46 Erasing Timer Recordings 47 Error Messages...
User manual
Page 11
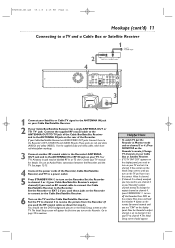
.... Check your TV manual for step 3). Set the Recorder to EXT 2 if you see "C04" on the display panel. Now the Recorder's output channel is already occupied, you turn on the Recorder. See pages 12-15. 4 Connect the power cords of the Recorder, Cable Box/Satellite Receiver, and TV to a power outlet. 5 Press STANDBY/ON y to turn on the Recorder. Press DVD on the remote.Then press and hold the Number 4 button on the remote...
.... Check your TV manual for step 3). Set the Recorder to EXT 2 if you see "C04" on the display panel. Now the Recorder's output channel is already occupied, you turn on the Recorder. See pages 12-15. 4 Connect the power cords of the Recorder, Cable Box/Satellite Receiver, and TV to a power outlet. 5 Press STANDBY/ON y to turn on the Recorder. Press DVD on the remote.Then press and hold the Number 4 button on the remote...
User manual
Page 17
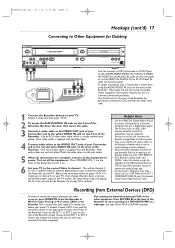
... page (with the Recorder.) 4 Connect audio cables to the AUDIO OUT jacks of your TV to power. Limited PC applications may show "COPY PROTECT." • If the Recorder's display shows "NO SIGNAL," adjust the tracking or play . • Do not connect a Progressive Scan video source (such as a DVD Player) to Digital Video or Hi-8 camcorders. You also can connect a VCR, Camcorder, or DVD Player to the COMPONENT VIDEO IN (Y PB PR), S-VIDEO IN, VIDEO IN, and AUDIO IN jacks on...
... page (with the Recorder.) 4 Connect audio cables to the AUDIO OUT jacks of your TV to power. Limited PC applications may show "COPY PROTECT." • If the Recorder's display shows "NO SIGNAL," adjust the tracking or play . • Do not connect a Progressive Scan video source (such as a DVD Player) to Digital Video or Hi-8 camcorders. You also can connect a VCR, Camcorder, or DVD Player to the COMPONENT VIDEO IN (Y PB PR), S-VIDEO IN, VIDEO IN, and AUDIO IN jacks on...
User manual
Page 20
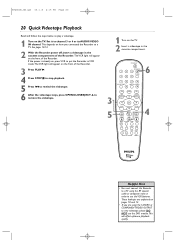
... cassette compartment. 3 5 STANDBY-ON 1 2 OPEN/CLOSE 3 EJECT 6 TV/VIDEO 4 5 6 7 8 VCR Plus +/TIMER 0 9 MONITOR CHANNEL VCR DISC MENU CLEAR DVD SYSTEM MENU OK SELECT RETURN PLAY VCR REC STOP DVD REC MODE PLAY MODE AUDIO PAUSE REC FSS T/C DISPLAY SLOW VOLUME MUTE MODE TV SEARCH 4 Helpful Hint • You must connect the Recorder to a TV using the S-VIDEO or COMPONENT VIDEO OUTPUT to a TV. E9480UD_EN.qx3 05.1.8 4:15 PM Page 20 20 Quick Videotape Playback Read and follow the steps below to channel 3 or 4 or its AUDIO/VIDEO IN channel. If the power...
... cassette compartment. 3 5 STANDBY-ON 1 2 OPEN/CLOSE 3 EJECT 6 TV/VIDEO 4 5 6 7 8 VCR Plus +/TIMER 0 9 MONITOR CHANNEL VCR DISC MENU CLEAR DVD SYSTEM MENU OK SELECT RETURN PLAY VCR REC STOP DVD REC MODE PLAY MODE AUDIO PAUSE REC FSS T/C DISPLAY SLOW VOLUME MUTE MODE TV SEARCH 4 Helpful Hint • You must connect the Recorder to a TV using the S-VIDEO or COMPONENT VIDEO OUTPUT to a TV. E9480UD_EN.qx3 05.1.8 4:15 PM Page 20 20 Quick Videotape Playback Read and follow the steps below to channel 3 or 4 or its AUDIO/VIDEO IN channel. If the power...
User manual
Page 21
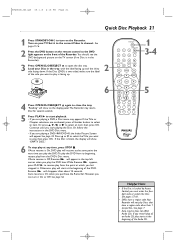
... Recorder. Otherwise, play from the DVD's Disc menu. If Auto resume is facing up and the shiny side facing down. See page 7. • Auto resume does not affect Audio CDs. "Reading" will start at which you must enter the fourdigit code or unlock the Disc. If the Disc is Locked by Access Control, you last stopped it. STANDBY-ON OPEN/CLOSE 1 2 3 EJECT TV/VIDEO 4 5 6 7 8 VCR Plus +/TIMER 0 9 MONITOR CHANNEL VCR DISC MENU CLEAR DVD SYSTEM MENU OK SELECT RETURN PLAY VCR REC STOP DVD REC MODE PLAY MODE AUDIO PAUSE REC...
... Recorder. Otherwise, play from the DVD's Disc menu. If Auto resume is facing up and the shiny side facing down. See page 7. • Auto resume does not affect Audio CDs. "Reading" will start at which you must enter the fourdigit code or unlock the Disc. If the Disc is Locked by Access Control, you last stopped it. STANDBY-ON OPEN/CLOSE 1 2 3 EJECT TV/VIDEO 4 5 6 7 8 VCR Plus +/TIMER 0 9 MONITOR CHANNEL VCR DISC MENU CLEAR DVD SYSTEM MENU OK SELECT RETURN PLAY VCR REC STOP DVD REC MODE PLAY MODE AUDIO PAUSE REC...

User manual
Page 22
...this . "COPY PROTECT" may not be accessible when you connected the other DVD Players. 5 STANDBY-ON 1 2 2-3 OPEN/CLOSE 3 EJECT TV/VIDEO 4 5 6 7 8 VCR Plus +/TIMER 0 9 MONITOR CHANNEL VCR DISC MENU CLEAR DVD SYSTEM MENU 6 1 8 OK SELECT RETURN PLAY VCR REC STOP DVD REC MODE PLAY MODE AUDIO PAUSE REC FSS T/C DISPLAY SLOW VOLUME MUTE MODE TV SEARCH 4 7 Helpful Hints • You cannot record only Audio (sound) to select an empty Title box on the display panel. If the Disc is empty and has no recordings,"EMPTY DISC" will take a minute. LABEL POWER ON...
...this . "COPY PROTECT" may not be accessible when you connected the other DVD Players. 5 STANDBY-ON 1 2 2-3 OPEN/CLOSE 3 EJECT TV/VIDEO 4 5 6 7 8 VCR Plus +/TIMER 0 9 MONITOR CHANNEL VCR DISC MENU CLEAR DVD SYSTEM MENU 6 1 8 OK SELECT RETURN PLAY VCR REC STOP DVD REC MODE PLAY MODE AUDIO PAUSE REC FSS T/C DISPLAY SLOW VOLUME MUTE MODE TV SEARCH 4 7 Helpful Hints • You cannot record only Audio (sound) to select an empty Title box on the display panel. If the Disc is empty and has no recordings,"EMPTY DISC" will take a minute. LABEL POWER ON...
User manual
Page 24
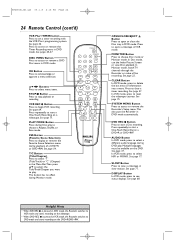
... Title/Track/Chapter you want to choose Disc mode or Monitor mode. MONITOR Button Press to play. See page 22. See page 75. Multiple languages must be available on a videotape. SLOW Button Press to choose a Repeat, Shuffle, or Scan mode. PLAY MODE Button Press during playback of information into a menu. In Disc mode, use the Index Picture Screen or view Disc playback. SYSTEM MENU Button Press to open or close the Disc tray in DVD mode. Press repeatedly to display or remove the Favorite Scene Selection menu during Disc play . This button...
... Title/Track/Chapter you want to choose Disc mode or Monitor mode. MONITOR Button Press to play. See page 22. See page 75. Multiple languages must be available on a videotape. SLOW Button Press to choose a Repeat, Shuffle, or Scan mode. PLAY MODE Button Press during playback of information into a menu. In Disc mode, use the Index Picture Screen or view Disc playback. SYSTEM MENU Button Press to open or close the Disc tray in DVD mode. Press repeatedly to display or remove the Favorite Scene Selection menu during Disc play . This button...
User manual
Page 43
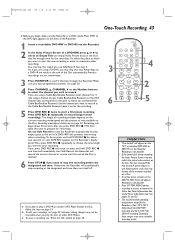
... OPEN/CLOSE 1 2 3 EJECT TV/VIDEO 4 5 6 3 7 8 VCR Plus +/TIMER 0 9 MONITOR CHANNEL VCR DISC MENU CLEAR DVD SYSTEM MENU 4 OK SELECT RETURN PLAY 2 6 VCR REC STOP DVD REC 5 Helpful Hints • "Disc locked" will automatically stop recording at the end of a DVD+RW, press K or L to choose the time length you press DVD REC I only once, or press and hold DVD REC I repeatedly to select an Empty Title (or empty Index Picture box) on the front of the Recorder. 1 Insert a recordable DVD+RW or DVD+R into the Recorder. 2 In the Index Picture Screen of a DVD...
... OPEN/CLOSE 1 2 3 EJECT TV/VIDEO 4 5 6 3 7 8 VCR Plus +/TIMER 0 9 MONITOR CHANNEL VCR DISC MENU CLEAR DVD SYSTEM MENU 4 OK SELECT RETURN PLAY 2 6 VCR REC STOP DVD REC 5 Helpful Hints • "Disc locked" will automatically stop recording at the end of a DVD+RW, press K or L to choose the time length you press DVD REC I only once, or press and hold DVD REC I repeatedly to select an Empty Title (or empty Index Picture box) on the front of the Recorder. 1 Insert a recordable DVD+RW or DVD+R into the Recorder. 2 In the Index Picture Screen of a DVD...
User manual
Page 44
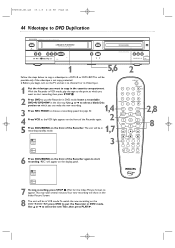
... Recorder. The unit will be in the cassette compartment. With the Recorder in VCR mode, play the tape to the point at which you want to copy in recording standby mode. 7 8 VCR Plus +/TIMER 0 9 MONITOR CHANNEL VCR DISC MENU CLEAR DVD SYSTEM MENU OK SELECT RETURN PLAY VCR REC STOP DVD REC 2,8 8 I RW r e c 2:59:00 0:00:01 012 7 To stop recording, press STOP C. STANDBY-ON OPEN/CLOSE 1 2 3 EJECT TV/VIDEO 4 5 6 Press DVD to select the new Title, then press PLAY B. Insert a recordable DVD+R/ DVD+RW in DVD mode. Use K or L to put the Recorder...
... Recorder. The unit will be in the cassette compartment. With the Recorder in VCR mode, play the tape to the point at which you want to copy in recording standby mode. 7 8 VCR Plus +/TIMER 0 9 MONITOR CHANNEL VCR DISC MENU CLEAR DVD SYSTEM MENU OK SELECT RETURN PLAY VCR REC STOP DVD REC 2,8 8 I RW r e c 2:59:00 0:00:01 012 7 To stop recording, press STOP C. STANDBY-ON OPEN/CLOSE 1 2 3 EJECT TV/VIDEO 4 5 6 Press DVD to select the new Title, then press PLAY B. Insert a recordable DVD+R/ DVD+RW in DVD mode. Use K or L to put the Recorder...
User manual
Page 45
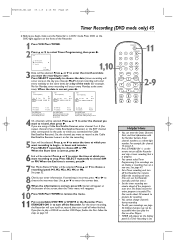
... the program's start time.This helps ensure the entire program is recorded.The Disc needs about 30 seconds to prepare for channel 15, press1,5. • Press STANDBY-ON y on the remote to play the Disc on the day you plan to turn off the Recorder. Start End Mode Mo 122 09:00AM 09:30AM M1 STANDBY-ON OPEN/CLOSE 11 1 2 3 EJECT TV/VIDEO 4 5 6 7 8 VCR Plus +/TIMER 0 9 MONITOR CHANNEL VCR DISC MENU CLEAR DVD SYSTEM MENU OK SELECT RETURN 2-9 PLAY VCR REC STOP DVD REC...
... the program's start time.This helps ensure the entire program is recorded.The Disc needs about 30 seconds to prepare for channel 15, press1,5. • Press STANDBY-ON y on the remote to play the Disc on the day you plan to turn off the Recorder. Start End Mode Mo 122 09:00AM 09:30AM M1 STANDBY-ON OPEN/CLOSE 11 1 2 3 EJECT TV/VIDEO 4 5 6 7 8 VCR Plus +/TIMER 0 9 MONITOR CHANNEL VCR DISC MENU CLEAR DVD SYSTEM MENU OK SELECT RETURN 2-9 PLAY VCR REC STOP DVD REC...
User manual
Page 59
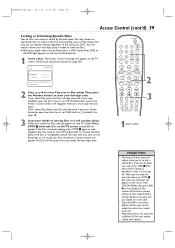
... four-digit code. STANDBY-ON OPEN/CLOSE 1 2 3 EJECT TV/VIDEO 4 5 6 7 8 VCR Plus +/TIMER 0 9 MONITOR CHANNEL VCR DISC MENU CLEAR DVD SYSTEM MENU OK SELECT RETURN PLAY 2 VCR REC STOP DVD REC MODE PLAY MODE AUDIO PAUSE REC FSS T/C DISPLAY SLOW VOLUME MUTE MODE TV SEARCH 3 1Insert a Disc. If you begin, make sure the Recorder is on the front of a DVD. Unlock each volume. E9480UD_EN.qx3 05.1.8 4:16 PM Page 59 Access Control (cont'd) 59 Locking or Unlocking Specific Discs Not all the Access Control settings to specifically lock or unlock a Disc by...
... four-digit code. STANDBY-ON OPEN/CLOSE 1 2 3 EJECT TV/VIDEO 4 5 6 7 8 VCR Plus +/TIMER 0 9 MONITOR CHANNEL VCR DISC MENU CLEAR DVD SYSTEM MENU OK SELECT RETURN PLAY 2 VCR REC STOP DVD REC MODE PLAY MODE AUDIO PAUSE REC FSS T/C DISPLAY SLOW VOLUME MUTE MODE TV SEARCH 3 1Insert a Disc. If you begin, make sure the Recorder is on the front of a DVD. Unlock each volume. E9480UD_EN.qx3 05.1.8 4:16 PM Page 59 Access Control (cont'd) 59 Locking or Unlocking Specific Discs Not all the Access Control settings to specifically lock or unlock a Disc by...
User manual
Page 63
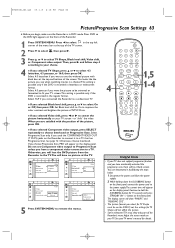
...-ON OPEN/CLOSE 1 2 3 EJECT TV/VIDEO 4 5 6 7 8 VCR Plus +/TIMER 0 9 MONITOR CHANNEL VCR DISC MENU CLEAR DVD SYSTEM MENU 1,5 OK SELECT RETURN PLAY 1-4 VCR REC STOP DVD REC MODE PLAY MODE AUDIO PAUSE REC FSS T/C DISPLAY SLOW VOLUME MUTE MODE ● If you will lose the DVD picture from the power supply. 2 While holding down the D.DUBBING button on the front panel, connect the power cord to the power supply.The current time will show only part of the screen.This looks like the picture you begin, make sure the Recorder is recorded in the regular format...
...-ON OPEN/CLOSE 1 2 3 EJECT TV/VIDEO 4 5 6 7 8 VCR Plus +/TIMER 0 9 MONITOR CHANNEL VCR DISC MENU CLEAR DVD SYSTEM MENU 1,5 OK SELECT RETURN PLAY 1-4 VCR REC STOP DVD REC MODE PLAY MODE AUDIO PAUSE REC FSS T/C DISPLAY SLOW VOLUME MUTE MODE ● If you will lose the DVD picture from the power supply. 2 While holding down the D.DUBBING button on the front panel, connect the power cord to the power supply.The current time will show only part of the screen.This looks like the picture you begin, make sure the Recorder is recorded in the regular format...
User manual
Page 81
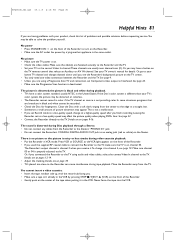
... STOP C / EJECT A (VCR) on the front of the Recorder. • Gently push on pages 9-16. You cannot insert a video cassette. • Insert the tape, window side up, with your product, check this list of problems and possible solutions before requesting service.You may affect the picture quality when playing DVDs later. E9480UD_EN.qx3 05.1.8 4:16 PM Page 81 Helpful Hints 81 If you are using audio and video cables, select...
... STOP C / EJECT A (VCR) on the front of the Recorder. • Gently push on pages 9-16. You cannot insert a video cassette. • Insert the tape, window side up, with your product, check this list of problems and possible solutions before requesting service.You may affect the picture quality when playing DVDs later. E9480UD_EN.qx3 05.1.8 4:16 PM Page 81 Helpful Hints 81 If you are using audio and video cables, select...
User manual
Page 82
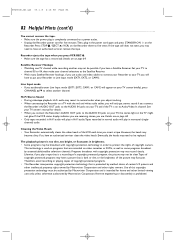
... your TV owner's manual for home and other rights owners. Press STOP C / EJECT A (VCR) on the Recorder. Set your TV to channel 03 or 04, then make your channel selections at the Satellite Receiver. • With many Satellite Receiver hookups, if you use audio and video cables to connect your Recorder to your Recorder in brightness. • Some programs may not be authorized by Macrovision Corporation and is protected by Macrovision...
... your TV owner's manual for home and other rights owners. Press STOP C / EJECT A (VCR) on the Recorder. Set your TV to channel 03 or 04, then make your channel selections at the Satellite Receiver. • With many Satellite Receiver hookups, if you use audio and video cables to connect your Recorder to your Recorder in brightness. • Some programs may not be authorized by Macrovision Corporation and is protected by Macrovision...
User manual
Page 83
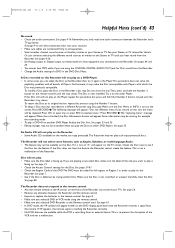
...-61. • Check the Region Code of the DVD.The DVD must be coded for All regions or Region 1 in the DVD Disc Menu. See page 8. • Make sure you selected DVD or VCR mode using the remote control. • Make sure you connected to play such copy-protected discs. If D appears, the remote signal is finished, the Disc Information Screen will appear. See your situation. • Make sure cables are using the Number 1 button. • To adapt a Disc that is reaching the Recorder correctly. •...
...-61. • Check the Region Code of the DVD.The DVD must be coded for All regions or Region 1 in the DVD Disc Menu. See page 8. • Make sure you selected DVD or VCR mode using the remote control. • Make sure you connected to play such copy-protected discs. If D appears, the remote signal is finished, the Disc Information Screen will appear. See your situation. • Make sure cables are using the Number 1 button. • To adapt a Disc that is reaching the Recorder correctly. •...
User manual
Page 84
... record. Messages or strange codes appear on the Recorder's display. • Remove and reinsert the Disc. • Clean the Disc. • Disconnect the power cord from the power outlet for service reasons. • Press SYSTEM MENU. E9480UD_EN.qx3 05.1.8 4:16 PM Page 84 84 Helpful Hints (cont'd) Recordings are error messages that shows on your Antenna/Cable TV system must connect the Recorder to dub or record copyrighted material onto a DVD+R or DVD+RW using the Recorder. Delete...
... record. Messages or strange codes appear on the Recorder's display. • Remove and reinsert the Disc. • Clean the Disc. • Disconnect the power cord from the power outlet for service reasons. • Press SYSTEM MENU. E9480UD_EN.qx3 05.1.8 4:16 PM Page 84 84 Helpful Hints (cont'd) Recordings are error messages that shows on your Antenna/Cable TV system must connect the Recorder to dub or record copyrighted material onto a DVD+R or DVD+RW using the Recorder. Delete...
User manual
Page 88
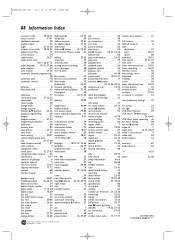
... play mode button 24, 42 play once 59 playable discs 7 playback audio 66 playback control 56 playing a disc 21 pluscode 46, 48 power cord 10-16, 27 preserving memories 17 previous H button 23, 26, 36, 40, 76 progressive scan 12, 63 protection 53 quick disc playback 21 quick disc recording 22 rear panel 27 rec mode button 23, 73 record I buttons 26 record mode 52 record one channel/ watch another 49, 70 record settings 52 recording audio 66 region codes 7 remote control 23-24 remote control used 67 remote sensor 26 repeat 33, 42 repeat a-b 33, 42 repeat playback...
... play mode button 24, 42 play once 59 playable discs 7 playback audio 66 playback control 56 playing a disc 21 pluscode 46, 48 power cord 10-16, 27 preserving memories 17 previous H button 23, 26, 36, 40, 76 progressive scan 12, 63 protection 53 quick disc playback 21 quick disc recording 22 rear panel 27 rec mode button 23, 73 record I buttons 26 record mode 52 record one channel/ watch another 49, 70 record settings 52 recording audio 66 region codes 7 remote control 23-24 remote control used 67 remote sensor 26 repeat 33, 42 repeat a-b 33, 42 repeat playback...
Quick start guide
Page 1
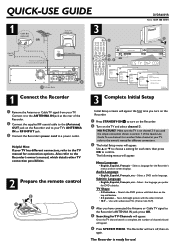
... PLAY REW F.FWD RECORD CHANNEL IR DVD OPEN/CLOSE D.DUBBING SOURCE VCR DVD DVD RECORDER DVD+RW/+R RECORDING STOP PLAY RECORD PROGRESSIVE SCAN DV IS TV ON? The Recorder is ready for TV Channels will appear: Menu Language • English, Español, Français - Programming Auto ch. The following menus will appear. Audio Language • English, Español, Français, etc - Use 3 or 4 to choose a setting for different connections. 3 The Initial Setup menu will turn on the Recorder. 2 Turn on -screen displays...
... PLAY REW F.FWD RECORD CHANNEL IR DVD OPEN/CLOSE D.DUBBING SOURCE VCR DVD DVD RECORDER DVD+RW/+R RECORDING STOP PLAY RECORD PROGRESSIVE SCAN DV IS TV ON? The Recorder is ready for TV Channels will appear: Menu Language • English, Español, Français - Programming Auto ch. The following menus will appear. Audio Language • English, Español, Français, etc - Use 3 or 4 to choose a setting for different connections. 3 The Initial Setup menu will turn on the Recorder. 2 Turn on -screen displays...


