
Leaflet
Page 2
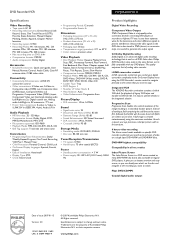
...compatibility Compatibility in all DVD-Video discs. Specifications are the property of Koninklijke Philips Electronics N.V. It is fully compatible with the even lines, both fields ... screen first, followed by the field with any DVD player. DVD Recorder/VCR DVDR600VR/37 Specifications Video Recording • Tape speeds: LP, SP • Recording...• Audio compression: Dolby Digital Accessories • Included Accessories: Quick start guide, User Manual, Remote Control, Audio Cable, Coax RF antenna cable, CVBS video cable Connectivity • Connectivity Enhancements: i....
...compatibility Compatibility in all DVD-Video discs. Specifications are the property of Koninklijke Philips Electronics N.V. It is fully compatible with the even lines, both fields ... screen first, followed by the field with any DVD player. DVD Recorder/VCR DVDR600VR/37 Specifications Video Recording • Tape speeds: LP, SP • Recording...• Audio compression: Dolby Digital Accessories • Included Accessories: Quick start guide, User Manual, Remote Control, Audio Cable, Coax RF antenna cable, CVBS video cable Connectivity • Connectivity Enhancements: i....
User manual
Page 5
...Devices (DVD 17 Initial Setup 18-19 Basic Play and Recording Quick Videotape Playback 20 Quick Disc Playback 21 Quick Disc Recording 22 Controls Remote Control 23-24 Display Panel (VCR 25 Front Panel 26 Rear Panel 27 Advanced Installation TV Channel Programming 28 VCR Plus+® Channels... 57-61 DVD Recorder Features Menu 62 Picture/Progressive Scan Settings 63 Digital Output 64 Analog Output 65 Language Settings 66 Night Mode, Remote Control Used 67 VCR Displays VCR Status Displays 68 VCR Recording Options Videotape Recording 69 Record One Channel/Watch Another (VCR 70 One-...
...Devices (DVD 17 Initial Setup 18-19 Basic Play and Recording Quick Videotape Playback 20 Quick Disc Playback 21 Quick Disc Recording 22 Controls Remote Control 23-24 Display Panel (VCR 25 Front Panel 26 Rear Panel 27 Advanced Installation TV Channel Programming 28 VCR Plus+® Channels... 57-61 DVD Recorder Features Menu 62 Picture/Progressive Scan Settings 63 Digital Output 64 Analog Output 65 Language Settings 66 Night Mode, Remote Control Used 67 VCR Displays VCR Status Displays 68 VCR Recording Options Videotape Recording 69 Record One Channel/Watch Another (VCR 70 One-...
User manual
Page 6
...the Gemstar Development Corporation. All rights reserved. Confidential unpublished works. Manufactured under license from Gemstar Development Corporation. Your Philips DVD and Video Cassette Recorder records both DVD+RW/DVD+R and videotapes, but also plays prerecorded videotapes, DVDs ...Plus+ Programming Package Contents ● DVD and Video Cassette Recorder ● Remote control with two AA batteries ● One RF coaxial cable (black with silver tip, with videotapes. Copyright 2004 Philips Consumer Electronics. E9480UD_EN.qx3 05.1.8 4:15 PM Page 6 6 Introduction Welcome!...
...the Gemstar Development Corporation. All rights reserved. Confidential unpublished works. Manufactured under license from Gemstar Development Corporation. Your Philips DVD and Video Cassette Recorder records both DVD+RW/DVD+R and videotapes, but also plays prerecorded videotapes, DVDs ...Plus+ Programming Package Contents ● DVD and Video Cassette Recorder ● Remote control with two AA batteries ● One RF coaxial cable (black with silver tip, with videotapes. Copyright 2004 Philips Consumer Electronics. E9480UD_EN.qx3 05.1.8 4:15 PM Page 6 6 Introduction Welcome!...
User manual
Page 8
...An "X" will not be available on every Disc. ends aligned as indicated. Make sure there are accessible only when play properly, please contact Philips for assistance. See page 36. Available Disc Features... Or, try stopping or starting play, then try to make it click into place. 2 Using... the Remote Control Unless stated otherwise, the remote control can operate all DVDs 3 have become both common and easy to complete. See page 26. Some explanations in this manual...
...An "X" will not be available on every Disc. ends aligned as indicated. Make sure there are accessible only when play properly, please contact Philips for assistance. See page 36. Available Disc Features... Or, try stopping or starting play, then try to make it click into place. 2 Using... the Remote Control Unless stated otherwise, the remote control can operate all DVDs 3 have become both common and easy to complete. See page 26. Some explanations in this manual...
User manual
Page 9
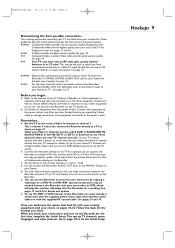
... audio connections provide the clearest sound. See page 16. See pages 12-15. Determine how to the power outlets only after you finish your TV remote control may have finished hooking up TV channels, menu languages, and other equipment. Connect the equipment to choose different Audio and Video In channels on...
... audio connections provide the clearest sound. See page 16. See pages 12-15. Determine how to the power outlets only after you finish your TV remote control may have finished hooking up TV channels, menu languages, and other equipment. Connect the equipment to choose different Audio and Video In channels on...
User manual
Page 10
... Antenna or Cable TV signal to the ANTENNA IN jack on the correct Video In channel (channel 3 for several seconds until you turn on the remote instead.) Helpful Hint • If "IS TV ON? Your antenna or Cable TV signal may have it to channel 3.This is already occupied, you turn... Recorder. You should appear. (To go back to using channel 3 at the TV, press and hold the Number 4 button on the remote for this connection). Press DVD on the remote.Then press and hold the Number 3 button on the Recorder. C03" appears on the display panel, you need to use of both...
... Antenna or Cable TV signal to the ANTENNA IN jack on the correct Video In channel (channel 3 for several seconds until you turn on the remote instead.) Helpful Hint • If "IS TV ON? Your antenna or Cable TV signal may have it to channel 3.This is already occupied, you turn... Recorder. You should appear. (To go back to using channel 3 at the TV, press and hold the Number 4 button on the remote for this connection). Press DVD on the remote.Then press and hold the Number 3 button on the Recorder. C03" appears on the display panel, you need to use of both...
User manual
Page 11
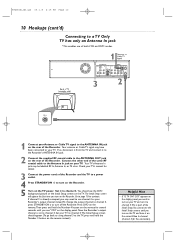
... the Recorder in Monitor mode and on channel 3 or 4. (Press MONITOR on the Recorder's remote.) Change TV channels at your TV manual for details. Press DVD on the remote.Then press and hold the Number 4 button on the remote for step 3). Your TV's Antenna In jack may need to turn on your TV...
... the Recorder in Monitor mode and on channel 3 or 4. (Press MONITOR on the Recorder's remote.) Change TV channels at your TV manual for details. Press DVD on the remote.Then press and hold the Number 4 button on the remote for step 3). Your TV's Antenna In jack may need to turn on your TV...
User manual
Page 12
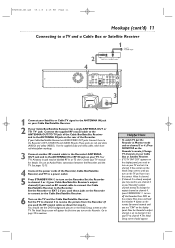
... panel, you need to turn on the Recorder. It is set it on the correct Component Video In channel. 7 Turn on the TV. Your TV remote may be labelled RF In,Antenna In, or 75 ohm. Or, go to your lowest TV channel and change channels down until you see the...
... panel, you need to turn on the Recorder. It is set it on the correct Component Video In channel. 7 Turn on the TV. Your TV remote may be labelled RF In,Antenna In, or 75 ohm. Or, go to your lowest TV channel and change channels down until you see the...
User manual
Page 13
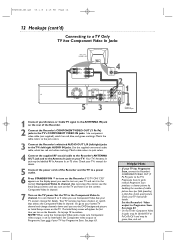
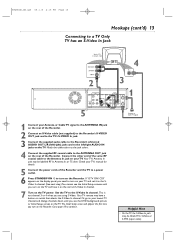
... on the TV. Helpful Hint • On the TV, the S-Video In jack may be labelled RF In,Antenna In, or 75 ohm. Your TV remote may be labeled Y/C, S-Video, or S-VHS (super video). Match the cable colors to the jack colors. 4 Connect the supplied RF coaxial cable to continue. Go...
... on the TV. Helpful Hint • On the TV, the S-Video In jack may be labelled RF In,Antenna In, or 75 ohm. Your TV remote may be labeled Y/C, S-Video, or S-VHS (super video). Match the cable colors to the jack colors. 4 Connect the supplied RF coaxial cable to continue. Go...
User manual
Page 14
... turn on the Recorder. See your TV's VIDEO IN jack. Or, go to continue. The supplied audio cable has red and white markings. Your TV remote may be called AUX or AUXILIARY IN, AUDIO/VIDEO or A/V IN, EXT1 or EXT2 or External In, etc. Helpful Hint • The TV's Video In...
... turn on the Recorder. See your TV's VIDEO IN jack. Or, go to continue. The supplied audio cable has red and white markings. Your TV remote may be called AUX or AUXILIARY IN, AUDIO/VIDEO or A/V IN, EXT1 or EXT2 or External In, etc. Helpful Hint • The TV's Video In...

User manual
Page 15
...; Set Analog output accordingly. C03" appears on the display panel, you need one video connection. Or, go to your TV's VIDEO IN jack. Your TV remote may be labelled RF In,Antenna In, or 75 ohm. Use the supplied video cable that selects the Video In channel. Choose the correct Video...
...; Set Analog output accordingly. C03" appears on the display panel, you need one video connection. Or, go to your TV's VIDEO IN jack. Your TV remote may be labelled RF In,Antenna In, or 75 ohm. Use the supplied video cable that selects the Video In channel. Choose the correct Video...
User manual
Page 16
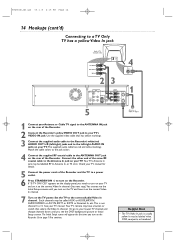
Your TV's Antenna In jack may produce a strong, distorted sound or no sound at the TV. Or, go to your TV manual.Your TV remote may have a button or switch that has yellow markings. 4 Connect the supplied RF coaxial cable to the ANTENNA OUT jack on the TV power. Go ...
Your TV's Antenna In jack may produce a strong, distorted sound or no sound at the TV. Or, go to your TV manual.Your TV remote may have a button or switch that has yellow markings. 4 Connect the supplied RF coaxial cable to the ANTENNA OUT jack on the TV power. Go ...
User manual
Page 21
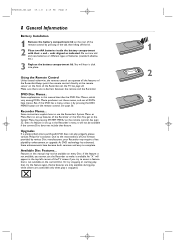
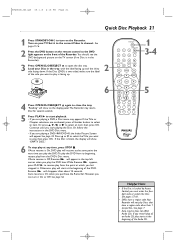
..., play starts at the beginning of the Audio CD. However, you restart play of the DVD. See pages 9-16. 2 Press the DVD button on the remote control so the DVD light appears on your Disc in the DVD Disc menu. • If you want to close the tray. LABEL POWER ON...
..., play starts at the beginning of the Audio CD. However, you restart play of the DVD. See pages 9-16. 2 Press the DVD button on the remote control so the DVD light appears on your Disc in the DVD Disc menu. • If you want to close the tray. LABEL POWER ON...

User manual
Page 22
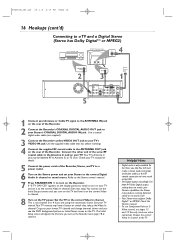
... a DVD+R after a few seconds. Choose the EXT (External) or CAM (Camcorder) channel that matches the jack to a DVD+RW/DVD+R. Follow the steps on the remote. Before you connected the other DVD Players. 5 STANDBY-ON 1 2 2-3 OPEN/CLOSE 3 EJECT TV/VIDEO 4 5 6 7 8 VCR Plus +/TIMER 0 9 MONITOR CHANNEL VCR DISC MENU CLEAR DVD SYSTEM...
... a DVD+R after a few seconds. Choose the EXT (External) or CAM (Camcorder) channel that matches the jack to a DVD+RW/DVD+R. Follow the steps on the remote. Before you connected the other DVD Players. 5 STANDBY-ON 1 2 2-3 OPEN/CLOSE 3 EJECT TV/VIDEO 4 5 6 7 8 VCR Plus +/TIMER 0 9 MONITOR CHANNEL VCR DISC MENU CLEAR DVD SYSTEM...
User manual
Page 23
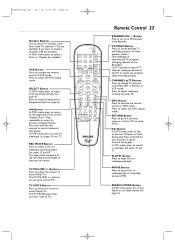
... K/ L Buttons Press to mute the sound on a Video CD or some DVDs. E9480UD_EN.qx3 05.1.8 4:16 PM Page 23 Number Buttons Use to activate the remote control in VCR mode. If you can record. VCR Button Press to select TV channels. SELECT Button In DVD mode, press to the beginning of... some Philips TVs. j Button In DVD mode, press to return to adjust timer recording settings. See pages 52 and 69. Buttons Press to watch TV channels (changing...
... K/ L Buttons Press to mute the sound on a Video CD or some DVDs. E9480UD_EN.qx3 05.1.8 4:16 PM Page 23 Number Buttons Use to activate the remote control in VCR mode. If you can record. VCR Button Press to select TV channels. SELECT Button In DVD mode, press to the beginning of... some Philips TVs. j Button In DVD mode, press to return to adjust timer recording settings. See pages 52 and 69. Buttons Press to watch TV channels (changing...
User manual
Page 24
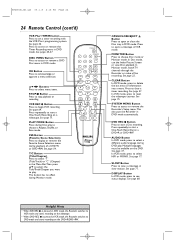
...+ programming system. See page 69. See page 46. See page 71. See page 77. See page 22. E9480UD_EN.qx3 05.1.8 4:16 PM Page 24 24 Remote Control (cont'd) VCR Plus+/TIMER button Press to select HIFI or MONO. OK Button Press to select a different audio language during Disc play .
...+ programming system. See page 69. See page 46. See page 71. See page 77. See page 22. E9480UD_EN.qx3 05.1.8 4:16 PM Page 24 24 Remote Control (cont'd) VCR Plus+/TIMER button Press to select HIFI or MONO. OK Button Press to select a different audio language during Disc play .
User manual
Page 26
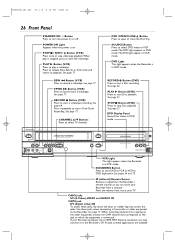
See page 77. See page 71. Point the remote here, not at your Personal Computer has an IEEE 1394 Firewire connector, you can work your Recorder from a distance. If your TV. Press to release ... DVD mode. Use these jacks, flip down the door or rubber flap that corresponds to the jack to the Recorder's DV IN jack. IR (infrared) Remote Sensor Receives a signal from the Recorder's remote control so you may connect it to which the equipment is in DVD mode.
See page 77. See page 71. Point the remote here, not at your Personal Computer has an IEEE 1394 Firewire connector, you can work your Recorder from a distance. If your TV. Press to release ... DVD mode. Use these jacks, flip down the door or rubber flap that corresponds to the jack to the Recorder's DV IN jack. IR (infrared) Remote Sensor Receives a signal from the Recorder's remote control so you may connect it to which the equipment is in DVD mode.
User manual
Page 32
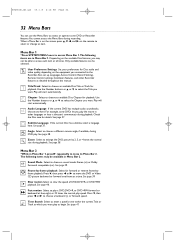
... Bar 2. See page 41. X Chapter Select to choose an available Disc Chapter for Disc audio and video quality, depending on the remote to begin. Y Audio Language If the current DVD has multiple audio soundtracks, choose one frame at which you play to select or change.... See page 37. Only available features can use the Menu Bars to the Recorder.Also set up Languages,Access Control, Record Settings, Remote Control settings, Installation features, and other languages or hear a director's commentary during DVD play speed. User Preference Settings Set your preferences ...
... Bar 2. See page 41. X Chapter Select to choose an available Disc Chapter for Disc audio and video quality, depending on the remote to begin. Y Audio Language If the current DVD has multiple audio soundtracks, choose one frame at which you play to select or change.... See page 37. Only available features can use the Menu Bars to the Recorder.Also set up Languages,Access Control, Record Settings, Remote Control settings, Installation features, and other languages or hear a director's commentary during DVD play speed. User Preference Settings Set your preferences ...
User manual
Page 34
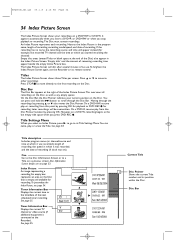
... the recordings by pressing OK for recording. If the recording has no use.To brighten the Index Picture Screen again, use the Recorder or its remote control. Disc Bar The Disc Bar appears at which you select an Index Picture, press B to go to the first recording on the Disc, as...
... the recordings by pressing OK for recording. If the recording has no use.To brighten the Index Picture Screen again, use the Recorder or its remote control. Disc Bar The Disc Bar appears at which you select an Index Picture, press B to go to the first recording on the Disc, as...
User manual
Page 39
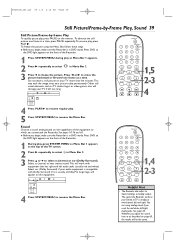
... described on the capabilities of the equipment to hear stereo sound.This will be the same. Press DVD so the DVD light appears on the remote. See pages 10-16 and 65. ● Before you connected the Recorder. E9480UD_EN.qx3 05.1.8 4:16 PM Page 39 Still Picture/Frame-by-Frame Play...
... described on the capabilities of the equipment to hear stereo sound.This will be the same. Press DVD so the DVD light appears on the remote. See pages 10-16 and 65. ● Before you connected the Recorder. E9480UD_EN.qx3 05.1.8 4:16 PM Page 39 Still Picture/Frame-by-Frame Play...


