Leaflet
Page 3
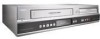
... 12 NC: 8670 000 29843 UPC: 6 09585 13276 4 © 2009 Koninklijke Philips Electronics N.V. All Rights reserved. Trademarks are subject to change without notice. DVD recorder/VCR Specifications DVDR3545V/37 Picture/Display • D/A converter: 10 bit, 54 MHz • Picture ... out, S-Video in Convenience • Programmable Events: 12 • Programming Period: 1 month • Programming/Timer Enhancements: Daily/Weekly Repeat Program, Manual Timer, One Touch Recording Power • Power supply: 120V, 60Hz • Power consumption: 30 W • Standby power consumption: < 3.3 W...
... 12 NC: 8670 000 29843 UPC: 6 09585 13276 4 © 2009 Koninklijke Philips Electronics N.V. All Rights reserved. Trademarks are subject to change without notice. DVD recorder/VCR Specifications DVDR3545V/37 Picture/Display • D/A converter: 10 bit, 54 MHz • Picture ... out, S-Video in Convenience • Programmable Events: 12 • Programming Period: 1 month • Programming/Timer Enhancements: Daily/Weekly Repeat Program, Manual Timer, One Touch Recording Power • Power supply: 120V, 60Hz • Power consumption: 30 W • Standby power consumption: < 3.3 W...
User manual
Page 1
Introduction Connections DIGITAL VIDEO DISC RECORDER & VIDEO CASSETTE RECORDER WITH DIGITAL TUNER User Manual STOP ARRÊT DVDR3545V/37 ALTO Basic Setup Recording Playback Editing Function Setup VCR Functions Others E9H90UD.indd 1 2007/06/20 13:35:48
Introduction Connections DIGITAL VIDEO DISC RECORDER & VIDEO CASSETTE RECORDER WITH DIGITAL TUNER User Manual STOP ARRÊT DVDR3545V/37 ALTO Basic Setup Recording Playback Editing Function Setup VCR Functions Others E9H90UD.indd 1 2007/06/20 13:35:48
User manual
Page 4
..., please contact our customer service center. Safety Precautions Warning: To prevent fire or shock hazard, do not expose this manual. These limits are questions regarding your TV set compatibility with this device does cause harmful interference to the 'standard definition'...copyright protection technology must be an infringement of Conformity Model Number: DVDR3545V/37 Trade Name: Philips Responsible Party: Philips Consumer Electronics Company Marietta, GA 30006-0026 1-888-PHILIPS (744-5477) Copyright 2007 Philips. This device should remove the cover or attempt to rain or...
..., please contact our customer service center. Safety Precautions Warning: To prevent fire or shock hazard, do not expose this manual. These limits are questions regarding your TV set compatibility with this device does cause harmful interference to the 'standard definition'...copyright protection technology must be an infringement of Conformity Model Number: DVDR3545V/37 Trade Name: Philips Responsible Party: Philips Consumer Electronics Company Marietta, GA 30006-0026 1-888-PHILIPS (744-5477) Copyright 2007 Philips. This device should remove the cover or attempt to rain or...

User manual
Page 5
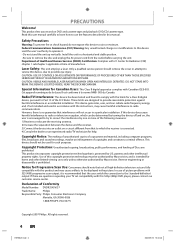
If you believe the representative will need to help you . philips.com/welcome Cleaning the cabinet • Wipe the front panel and ...in its inside the unit when it away from the center to out. EN 5 Editing Function Setup VCR Functions Others E9H90UD.indd 5 2007/05/16 15:43:46 Our representatives will play back on the ... Playback PRECAUTIONS Supplied Accessories remote control with batteries (AAAx2) RF coaxial cable RCA audio/video cables user manual User Manual quick start guide Maintenance Servicing • Please refer to relevant topics on "TROUBLESHOOTING" on pages 107-...
If you believe the representative will need to help you . philips.com/welcome Cleaning the cabinet • Wipe the front panel and ...in its inside the unit when it away from the center to out. EN 5 Editing Function Setup VCR Functions Others E9H90UD.indd 5 2007/05/16 15:43:46 Our representatives will play back on the ... Playback PRECAUTIONS Supplied Accessories remote control with batteries (AAAx2) RF coaxial cable RCA audio/video cables user manual User Manual quick start guide Maintenance Servicing • Please refer to relevant topics on "TROUBLESHOOTING" on pages 107-...

User manual
Page 6
... SYSTEM 20 Basic Setup BEFORE YOU START 21 Finding the Viewing Channel on Your TV 21 On-Screen Display / Menu 22 Main Menu 24 Switching VCR / DVD Mode 25 How to Insert a Disc / Cassette Tape 25 INITIAL SETTING 26 CHANNEL SETTING 27 Auto Channel Scan 27 Adding / Deleting ...Channels 28 SETTING THE CLOCK 30 Auto Clock Setting 30 Manual Clock Setting 31 Daylight Saving Time 31 TUNER SETTINGS 32 Switching Analog Mode / Digital Mode 32 Channel Selection 32 Selecting TV Audio 33 DTV ...
... SYSTEM 20 Basic Setup BEFORE YOU START 21 Finding the Viewing Channel on Your TV 21 On-Screen Display / Menu 22 Main Menu 24 Switching VCR / DVD Mode 25 How to Insert a Disc / Cassette Tape 25 INITIAL SETTING 26 CHANNEL SETTING 27 Auto Channel Scan 27 Adding / Deleting ...Channels 28 SETTING THE CLOCK 30 Auto Clock Setting 30 Manual Clock Setting 31 Daylight Saving Time 31 TUNER SETTINGS 32 Switching Analog Mode / Digital Mode 32 Channel Selection 32 Selecting TV Audio 33 DTV ...

User manual
Page 9
Introduction Connections Basic Setup FEATURES Symbols Used in this unit. Recording Playback Editing Function Setup VCR Functions Others E9H90UD.indd 9 EN 9 2007/05/16 15:43:48 Symbol Description For Recording, Playing Back, and Editing Description refers to DVD+RW Description ... than +VR is not recordable on this unit unless you erase all contents in the mode other than +VR is not recordable on this User Manual To specify for what disc type each item to operate. * DVD-RW/-R recorded in VR mode or non compatible recording format are not playable. * DVD...
Introduction Connections Basic Setup FEATURES Symbols Used in this unit. Recording Playback Editing Function Setup VCR Functions Others E9H90UD.indd 9 EN 9 2007/05/16 15:43:48 Symbol Description For Recording, Playing Back, and Editing Description refers to DVD+RW Description ... than +VR is not recordable on this unit unless you erase all contents in the mode other than +VR is not recordable on this User Manual To specify for what disc type each item to operate. * DVD-RW/-R recorded in VR mode or non compatible recording format are not playable. * DVD...

User manual
Page 16
... • RF modulator is not supplied with the RF modulator. RF MODULATOR CONNECTION If your TV has antenna in jack only, it according to the manual supplied with the RF modulator. 4) Plug in the power cords of the devices to the AC outlet. 5) Turn on your TV and choose the... possible to connect this unit to your TV by using a commercially available stereo audio/video RF modulator. In this case, follow the manual supplied with this unit S-VIDEO DVD/VCR DVD DVD/VCR OUT DIGITAL AUDIO S-VIDEO COMPONENT S-VIDEO IN ---AUDIO---OUT IN --- You need to purchase it at your TV ANT.
... • RF modulator is not supplied with the RF modulator. RF MODULATOR CONNECTION If your TV has antenna in jack only, it according to the manual supplied with the RF modulator. 4) Plug in the power cords of the devices to the AC outlet. 5) Turn on your TV and choose the... possible to connect this unit to your TV by using a commercially available stereo audio/video RF modulator. In this case, follow the manual supplied with this unit S-VIDEO DVD/VCR DVD DVD/VCR OUT DIGITAL AUDIO S-VIDEO COMPONENT S-VIDEO IN ---AUDIO---OUT IN --- You need to purchase it at your TV ANT.

User manual
Page 20
... Dolby Digital If output is Dolby Digital encoded audio, connect to any external devices. PCM * To complete these settings, refer to the manual accompanying external devices for more information. 2 Channel Analog Audio Connection stereo system audio Digital Audio Connection Dolby Digital decoder, MD deck or DAT ...OUT L OUT PB /CB COAXIAL R PR /CR digital audio coaxial cable DIGITAL AUDIO OUT DVD AUDIO S-VIDEO COMPONENT S-VIDEO OUT VIDEO OUT Y DVD/VCR IN ---AUDIO---OUT L L OUT IN COAXIAL L OUT R PB /CB IN PR /CR ANTENNA R R IN ---VIDEO---OUT DIGITAL AUDIO OUT ...
... Dolby Digital If output is Dolby Digital encoded audio, connect to any external devices. PCM * To complete these settings, refer to the manual accompanying external devices for more information. 2 Channel Analog Audio Connection stereo system audio Digital Audio Connection Dolby Digital decoder, MD deck or DAT ...OUT L OUT PB /CB COAXIAL R PR /CR digital audio coaxial cable DIGITAL AUDIO OUT DVD AUDIO S-VIDEO COMPONENT S-VIDEO OUT VIDEO OUT Y DVD/VCR IN ---AUDIO---OUT L L OUT IN COAXIAL L OUT R PB /CB IN PR /CR ANTENNA R R IN ---VIDEO---OUT DIGITAL AUDIO OUT ...

User manual
Page 21
... to step 2 in standby mode before proceeding. 3 Press "2" on the TV's remote control, then press channel down button repeatedly until you see the PHILIPS screen saver instead of "Initial Setup" menu. It may be a button on the unit, you may be labeled "SOURCE", "AV", or "SELECT.... 2 Turn on your TV. • If connected to your TV's user manual for different brand's models of TVs. • Consult your VCR make sure it repeatedly. PHILIPS screen saver: Recording Playback Editing Function Setup VCR Functions Note • Video input selection varies for details. • If more ...
... to step 2 in standby mode before proceeding. 3 Press "2" on the TV's remote control, then press channel down button repeatedly until you see the PHILIPS screen saver instead of "Initial Setup" menu. It may be a button on the unit, you may be labeled "SOURCE", "AV", or "SELECT.... 2 Turn on your TV. • If connected to your TV's user manual for different brand's models of TVs. • Consult your VCR make sure it repeatedly. PHILIPS screen saver: Recording Playback Editing Function Setup VCR Functions Note • Video input selection varies for details. • If more ...
User manual
Page 26
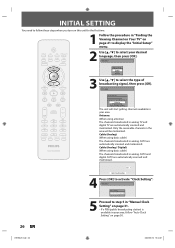
... Clock Setting -- : -- -- 5 Proceed to step 5 in your desired language, then press [OK]. Only the receivable channels in the area will start getting channels available in "Manual Clock Setting" on page 31. • If a PBS (public broadcasting station) is connected to select your area. Cable (Analog): (When using basic cable) The channels...
... Clock Setting -- : -- -- 5 Proceed to step 5 in your desired language, then press [OK]. Only the receivable channels in the area will start getting channels available in "Manual Clock Setting" on page 31. • If a PBS (public broadcasting station) is connected to select your area. Cable (Analog): (When using basic cable) The channels...

User manual
Page 28
CHANNEL SETTING Adding / Deleting Channels You may want to add/delete channels. 2 Press [SETUP] and use [K / L] to select "Manual Channel Preset", then press [OK]. Auto Channel Preset Manual Channel Preset TV Audio Select • If you are adding or deleting analog TV/CATV channels, go to ANALOG to continue. • If you are...
CHANNEL SETTING Adding / Deleting Channels You may want to add/delete channels. 2 Press [SETUP] and use [K / L] to select "Manual Channel Preset", then press [OK]. Auto Channel Preset Manual Channel Preset TV Audio Select • If you are adding or deleting analog TV/CATV channels, go to ANALOG to continue. • If you are...

User manual
Page 29
...can continue adding or deleting channels. 7 Press [SETUP] to exit. Recording Playback Editing Function Setup VCR Functions Others E9H90UD.indd 29 EN 29 2007/05/16 15:44:04 Manual Channel Preset Your setting will be activated and it will be activated. Then select the next channel... to delete. • If the setting is complete, press [BACK ] to activate "Manual Channel Preset". Introduction Connections Basic Setup CHANNEL SETTING ANALOG 5 Select the channel number to add or delete. • Use [CH / ] to ...
...can continue adding or deleting channels. 7 Press [SETUP] to exit. Recording Playback Editing Function Setup VCR Functions Others E9H90UD.indd 29 EN 29 2007/05/16 15:44:04 Manual Channel Preset Your setting will be activated and it will be activated. Then select the next channel... to delete. • If the setting is complete, press [BACK ] to activate "Manual Channel Preset". Introduction Connections Basic Setup CHANNEL SETTING ANALOG 5 Select the channel number to add or delete. • Use [CH / ] to ...

User manual
Page 30
...appear. 3 Use [K / L] to select "Auto Clock Setting", then press [OK]. 4 Use [K / L] to select "Auto", then press [OK]. Auto Clock Setting OFF Auto Manual 5 Press [SETUP] to exit. 6 Press [STANDBY-ON y] to turn off the unit. E9H90UD.indd 30 2007/05/16 15:44:05 Make sure • The... local PBS station on page 31. Note • The clock may set the clock. Set Channel No. If not, follow "Auto Clock Setting" below . 1 Select "Manual" at 12:00 a.m. / p.m. CH 1 3 Press [SETUP] and turn off the unit. If a PBS (public broadcasting station) is available in the power cord. ...
...appear. 3 Use [K / L] to select "Auto Clock Setting", then press [OK]. 4 Use [K / L] to select "Auto", then press [OK]. Auto Clock Setting OFF Auto Manual 5 Press [SETUP] to exit. 6 Press [STANDBY-ON y] to turn off the unit. E9H90UD.indd 30 2007/05/16 15:44:05 Make sure • The... local PBS station on page 31. Note • The clock may set the clock. Set Channel No. If not, follow "Auto Clock Setting" below . 1 Select "Manual" at 12:00 a.m. / p.m. CH 1 3 Press [SETUP] and turn off the unit. If a PBS (public broadcasting station) is available in the power cord. ...

User manual
Page 31
Recording Playback Editing Function Setup VCR Functions Note • Your setting will be canceled if you ...Saving Time" is a power failure or this unit has been unplugged for more than 30 seconds when you set the clock manually. • For setting the day, year, hour, and minute, [the Number buttons] can also be activated. "Clock"...[OK]. 6 Press [SETUP] to select "General Setting", then press [OK]. Introduction Connections Basic Setup SETTING THE CLOCK Manual Clock Setting Daylight Saving Time 1 Press [SETUP] and use [K / L] to exit. NOV): Move forward one hour...
Recording Playback Editing Function Setup VCR Functions Note • Your setting will be canceled if you ...Saving Time" is a power failure or this unit has been unplugged for more than 30 seconds when you set the clock manually. • For setting the day, year, hour, and minute, [the Number buttons] can also be activated. "Clock"...[OK]. 6 Press [SETUP] to select "General Setting", then press [OK]. Introduction Connections Basic Setup SETTING THE CLOCK Manual Clock Setting Daylight Saving Time 1 Press [SETUP] and use [K / L] to exit. NOV): Move forward one hour...

User manual
Page 32
... a channel you want to watch. Channel Selection Select channels by using [CH / ] or [the Number buttons] found on remote control. [CH / ] Use [CH / ] to change manually by a signal network. By using [CH / ] 32 EN E9H90UD.indd 32 2007/05/16 15:44:06 For 2-digit number e.g.) 35-16ch: major channel [3] + [5] minor...
... a channel you want to watch. Channel Selection Select channels by using [CH / ] or [the Number buttons] found on remote control. [CH / ] Use [CH / ] to change manually by a signal network. By using [CH / ] 32 EN E9H90UD.indd 32 2007/05/16 15:44:06 For 2-digit number e.g.) 35-16ch: major channel [3] + [5] minor...

User manual
Page 42
Before recording, make sure • Set the clock before setting a timer programming. • Insert a recordable disc with the step 4 in "Manual Clock Setting" on page 31 before setting a timer programming. • Use [s / B] to move the cursor to select "New Program", then press [OK]. In .... When finished operating, press [TIMER SET] to resume the timer-standby mode. • In the timer-standby mode, you have not set for VCR) will be canceled UNLESS their recording channels are the same, the timer recording will change as follows. e.g.) January 1st SUN JAN/31 E9H90UD.indd 42...
Before recording, make sure • Set the clock before setting a timer programming. • Insert a recordable disc with the step 4 in "Manual Clock Setting" on page 31 before setting a timer programming. • Use [s / B] to move the cursor to select "New Program", then press [OK]. In .... When finished operating, press [TIMER SET] to resume the timer-standby mode. • In the timer-standby mode, you have not set for VCR) will be canceled UNLESS their recording channels are the same, the timer recording will change as follows. e.g.) January 1st SUN JAN/31 E9H90UD.indd 42...

User manual
Page 90
... End of Timer Rec ON OFF Dubbing Mode Pages 53-54 Make Recording Compatible Page 39 VCR DVD DVD VCR ON OFF Clock Clock Setting Pages 30-31 Auto Clock Setting Daylight Saving Time OFF Auto Manual ON(MAR-NOV) ON(APR-OCT) OFF Contents Set edge type of the displayed caption. Set...
... End of Timer Rec ON OFF Dubbing Mode Pages 53-54 Make Recording Compatible Page 39 VCR DVD DVD VCR ON OFF Clock Clock Setting Pages 30-31 Auto Clock Setting Daylight Saving Time OFF Auto Manual ON(MAR-NOV) ON(APR-OCT) OFF Contents Set edge type of the displayed caption. Set...

User manual
Page 91
... Swedish Dutch Russian1 Russian2 Hungarian Polish Czech RGB YCbCr ON OFF Normal Enhanced Yes No Contents Tune the channels automatically. Tune the channels manually. E9H90UD.indd 91 EN 91 2007/05/16 15:45:12 Set the language for HDMI RGB output. Set the black-white contrast...the color space for output and recording. Set the analog TV audio type for the HDMI output. Basic Setup Recording Playback Editing Function Setup VCR Functions Others Note • Your change to the default setting. Set whether or not to output the HDMI audio signal. Introduction Connections LIST...
... Swedish Dutch Russian1 Russian2 Hungarian Polish Czech RGB YCbCr ON OFF Normal Enhanced Yes No Contents Tune the channels automatically. Tune the channels manually. E9H90UD.indd 91 EN 91 2007/05/16 15:45:12 Set the language for HDMI RGB output. Set the black-white contrast...the color space for output and recording. Set the analog TV audio type for the HDMI output. Basic Setup Recording Playback Editing Function Setup VCR Functions Others Note • Your change to the default setting. Set whether or not to output the HDMI audio signal. Introduction Connections LIST...

User manual
Page 104
...: Press [PLAY B]. erase-protection tab 2) Select the recording mode using [CH / ] or [the Number buttons]. 5) Press [REC I ]. Playback VCR FUNCTIONS Recording Press [VCR] first. 1) Insert a prerecorded tape (refer to page 25 on this unit. Press [STOP C] to stop the recording. To record on it will ...video head from damage. • Refer to pages 42-45 for instructions on a recorded cassette tape, remove its erase- To adjust the tracking manually, press [CH / ] on the remote control. • S-VHS cassette tape is inserted, the unit will be automatically adjusted upon playback....
...: Press [PLAY B]. erase-protection tab 2) Select the recording mode using [CH / ] or [the Number buttons]. 5) Press [REC I ]. Playback VCR FUNCTIONS Recording Press [VCR] first. 1) Insert a prerecorded tape (refer to page 25 on this unit. Press [STOP C] to stop the recording. To record on it will ...video head from damage. • Refer to pages 42-45 for instructions on a recorded cassette tape, remove its erase- To adjust the tracking manually, press [CH / ] on the remote control. • S-VHS cassette tape is inserted, the unit will be automatically adjusted upon playback....
User manual
Page 107
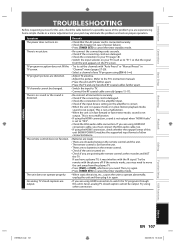
...• The remote control is set the channels with the plasma off. TV program pictures are experiencing. Try the remote with "Auto Preset" or "Manual Preset" in again. • If you are output. Try using the HDMI connection, check whether the output format of this unit (HDMI FORMAT) matches...unit does not operate properly. Some simple checks or a minor adjustment on . • Check if you are no picture. Playback Editing Function Setup VCR Functions Others E9H90UD.indd 107 EN 107 2007/05/16 15:45:25 This is not a malfunction. • When the unit is in the ...
...• The remote control is set the channels with the plasma off. TV program pictures are experiencing. Try the remote with "Auto Preset" or "Manual Preset" in again. • If you are output. Try using the HDMI connection, check whether the output format of this unit (HDMI FORMAT) matches...unit does not operate properly. Some simple checks or a minor adjustment on . • Check if you are no picture. Playback Editing Function Setup VCR Functions Others E9H90UD.indd 107 EN 107 2007/05/16 15:45:25 This is not a malfunction. • When the unit is in the ...


