
User manual
Page 3
.... SmartPictureTM is a trademark of Dolby Laboratories. Copyright 2003 Philips Consumer Electronics. Getting Started Contents 3 Safety Information 4-5 Introduction 6 Playable Discs 7 General Information 8 Hookups 9-15 Quick Disc Playback Quick Disc Playback 16 DVD Player Controls Remote Control Buttons 17 Front Panel 18 Rear Panel ...Dim, Analog Output 39 Digital Output 40 Sound Mode, Reverb Mode 41 Display Language, Closed Captions 42 Screen Saver, DVD Player Defaults 43 Setting the Remote to Operate Your TV 44-45 Information You May Need Helpful Hints 46-47 Glossary 48...
.... SmartPictureTM is a trademark of Dolby Laboratories. Copyright 2003 Philips Consumer Electronics. Getting Started Contents 3 Safety Information 4-5 Introduction 6 Playable Discs 7 General Information 8 Hookups 9-15 Quick Disc Playback Quick Disc Playback 16 DVD Player Controls Remote Control Buttons 17 Front Panel 18 Rear Panel ...Dim, Analog Output 39 Digital Output 40 Sound Mode, Reverb Mode 41 Display Language, Closed Captions 42 Screen Saver, DVD Player Defaults 43 Setting the Remote to Operate Your TV 44-45 Information You May Need Helpful Hints 46-47 Glossary 48...
User manual
Page 6
...the disc tray closed to excessive moisture, rain, sand, heat, or humidity. q Do not use its features.To get the most from the DVD Player, read this manual carefully. Safety Information q Do not expose the system to avoid dust on for Audio, Subtitles, and Disc Menus q MP3 ...bearings and must not be recycled and reused if disassembled by your favorite scene repeatedly. q The mechanical parts of the DVD Player for ventilation. This Digital Video Disc Player will not operate normally. Hear a movie in a circular pattern. Please observe the local regulations regarding the disposal of...
...the disc tray closed to excessive moisture, rain, sand, heat, or humidity. q Do not use its features.To get the most from the DVD Player, read this manual carefully. Safety Information q Do not expose the system to avoid dust on for Audio, Subtitles, and Disc Menus q MP3 ...bearings and must not be recycled and reused if disassembled by your favorite scene repeatedly. q The mechanical parts of the DVD Player for ventilation. This Digital Video Disc Player will not operate normally. Hear a movie in a circular pattern. Please observe the local regulations regarding the disposal of...
User manual
Page 7
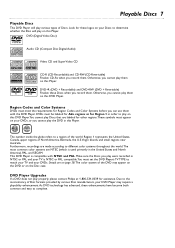
...use them . The color system of Discs. DVD Player Upgrades If a DVD does not play various types of the DVD may require a playability enhancement. Furthermore, recordings are made according to determine whether the Disc will play properly, please contact Philips at 1-800-531-0039 for Region Codes and... Color Systems before you play on this DVD Player.You cannot play Discs that are NTSC (which is used primarily in NTSC or PAL...
...use them . The color system of Discs. DVD Player Upgrades If a DVD does not play various types of the DVD may require a playability enhancement. Furthermore, recordings are made according to determine whether the Disc will play properly, please contact Philips at 1-800-531-0039 for Region Codes and... Color Systems before you play on this DVD Player.You cannot play Discs that are NTSC (which is used primarily in NTSC or PAL...
User manual
Page 8
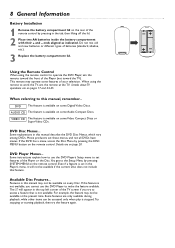
... feature is not available, you try the feature again. Features in the top left corner of the TV screen if you cannot use the DVD Player's Setup menu to the Setup Menu by pressing SYSTEM MENU on the remote control. This remote may not be available on every Disc. Details...available if the current Disc does not include that is stopped.Try stopping or starting playback, then try to operate the DVD Player, aim the remote toward the front of the Player (not toward the TV). Available Disc Features... If the feature is available on some features of your television. For ...
... feature is not available, you try the feature again. Features in the top left corner of the TV screen if you cannot use the DVD Player's Setup menu to the Setup Menu by pressing SYSTEM MENU on the remote control. This remote may not be available on every Disc. Details...available if the current Disc does not include that is stopped.Try stopping or starting playback, then try to operate the DVD Player, aim the remote toward the front of the Player (not toward the TV). Available Disc Features... If the feature is available on some features of your television. For ...
User manual
Page 9
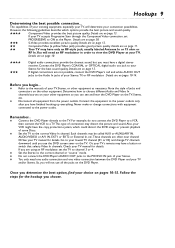
... the power outlets only after you determine the best option, find your TV, Stereo, or other equipment so you see and hear the DVD Player on the DVD Player. q Disconnect all the jacks on the TV, Stereo, etc. Connect the equipment to the manuals of your choice on pages 10-14...Stereo. Details are on page 13. Note the style of your Stereo for details. q Do not connect the DVD Player's AUDIO OUT jacks to view the DVD Player at the Player. Connect the DVD Player's COAXIAL or OPTICAL digital audio out jack to the correct Video In channel. Check your TV and/or Stereo....
... the power outlets only after you determine the best option, find your TV, Stereo, or other equipment so you see and hear the DVD Player on the DVD Player. q Disconnect all the jacks on the TV, Stereo, etc. Connect the equipment to the manuals of your choice on pages 10-14...Stereo. Details are on page 13. Note the style of your Stereo for details. q Do not connect the DVD Player's AUDIO OUT jacks to view the DVD Player at the Player. Connect the DVD Player's COAXIAL or OPTICAL digital audio out jack to the correct Video In channel. Check your TV and/or Stereo....

User manual
Page 10
... of all the equipment to the VIDEO IN jack on your Television. 5 Your RF Modulator should see the Player's blue DVD screen on which you set it now from Philips or most consumer electronics retailers. 1 Connect the supplied video cable (which has red and white markings) to ...the Player's AUDIO OUT (left ). Refer to the instructions provided with the RF Modulator. 6 Connect the power cords of the cable to ...
... of all the equipment to the VIDEO IN jack on your Television. 5 Your RF Modulator should see the Player's blue DVD screen on which you set it now from Philips or most consumer electronics retailers. 1 Connect the supplied video cable (which has red and white markings) to ...the Player's AUDIO OUT (left ). Refer to the instructions provided with the RF Modulator. 6 Connect the power cords of the cable to ...

User manual
Page 11
... supplied video cable, which has yellow markings. 2 Connect the supplied audio cable to the red and white AUDIO OUT (left and right) jacks on the DVD Player and to the left/right AUDIO IN jacks on the TV. Or, go from the left /right Audio In jacks, you see the... 02) and change channels downward until you will need a "splitter" audio cable to go to your TV has a single Audio In jack instead of the DVD Player and the TV into an active power outlet. You need a different audio cable. Set it on. 4 Turn on your TV. The supplied audio cables have...
... supplied video cable, which has yellow markings. 2 Connect the supplied audio cable to the red and white AUDIO OUT (left and right) jacks on the DVD Player and to the left/right AUDIO IN jacks on the TV. Or, go from the left /right Audio In jacks, you see the... 02) and change channels downward until you will need a "splitter" audio cable to go to your TV has a single Audio In jack instead of the DVD Player and the TV into an active power outlet. You need a different audio cable. Set it on. 4 Turn on your TV. The supplied audio cables have...

User manual
Page 12
... TV (example only) RIGHT AUDIO IN LEFT AUDIO IN S-VIDEO IN 2 3 1 Connect an S-Video cable (not supplied) to the S-VIDEO (VIDEO OUT) jack of the DVD Player and to the TV's S-VIDEO In jack. 2 Connect the supplied audio cable to the red and white AUDIO OUT (left and right) jacks on the... DVD Player and to the left/right AUDIO IN jacks on the TV. Helpful Hints • On the TV, the S-Video In jack may be labeled Y/C, S-Video, ...
... TV (example only) RIGHT AUDIO IN LEFT AUDIO IN S-VIDEO IN 2 3 1 Connect an S-Video cable (not supplied) to the S-VIDEO (VIDEO OUT) jack of the DVD Player and to the TV's S-VIDEO In jack. 2 Connect the supplied audio cable to the red and white AUDIO OUT (left and right) jacks on the... DVD Player and to the left/right AUDIO IN jacks on the TV. Helpful Hints • On the TV, the S-Video In jack may be labeled Y/C, S-Video, ...

User manual
Page 13
...only) Pr/Cr RIGHT AUDIO IN Pb/Cb LEFT AUDIO IN Y Pr/Cr RIGHT AUDIO IN Pb/Cb LEFT AUDIO IN Y 3 2 1 Connect the DVD Player's Y Pb Pr (VIDEO OUT) jacks to the corresponding COMPONENT VIDEO IN jacks on the TV. Details are on your TV has Progressive Scan, set PROGRESSIVE... necessary. Use component video cables (not supplied).The Component Video jacks are specifically labelled Progressive Scan. Press STANDBY-ON y on the front of the DVD Player to the single Audio In jack on page 38. Hookups (cont'd) 13 Connecting to a TV Only TV has Component Video In Jacks (red, green...
...only) Pr/Cr RIGHT AUDIO IN Pb/Cb LEFT AUDIO IN Y Pr/Cr RIGHT AUDIO IN Pb/Cb LEFT AUDIO IN Y 3 2 1 Connect the DVD Player's Y Pb Pr (VIDEO OUT) jacks to the corresponding COMPONENT VIDEO IN jacks on the TV. Details are on your TV has Progressive Scan, set PROGRESSIVE... necessary. Use component video cables (not supplied).The Component Video jacks are specifically labelled Progressive Scan. Press STANDBY-ON y on the front of the DVD Player to the single Audio In jack on page 38. Hookups (cont'd) 13 Connecting to a TV Only TV has Component Video In Jacks (red, green...

User manual
Page 14
... VIDEO IN Stereo (example only) LEFT AUDIO IN RIGHT AUDIO IN 2 3 1 Connect the supplied video cable to the yellow VIDEO (VIDEO OUT) jack of the DVD Player to turn it on. 4 Turn on the Stereo and set it to your TV owner's manual for details. 5 Turn on the front of the.... See your lowest TV channel (01 or 02) and change channels downward until you prefer or need one video connection between the TV and the DVD Player. Or, go to the correct Video In channel. Match the cable colors to the left and right) jacks on the Stereo. The supplied video cable...
... VIDEO IN Stereo (example only) LEFT AUDIO IN RIGHT AUDIO IN 2 3 1 Connect the supplied video cable to the yellow VIDEO (VIDEO OUT) jack of the DVD Player to turn it on. 4 Turn on the Stereo and set it to your TV owner's manual for details. 5 Turn on the front of the.... See your lowest TV channel (01 or 02) and change channels downward until you prefer or need one video connection between the TV and the DVD Player. Or, go to the correct Video In channel. Match the cable colors to the left and right) jacks on the Stereo. The supplied video cable...
User manual
Page 15
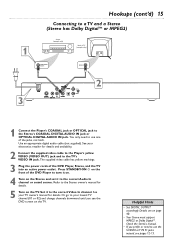
...supplied video cable to the Player's yellow VIDEO (VIDEO OUT) jack and to the correct Video In channel. Set it to use the S-VIDEO or Y Pb Pr jacks instead, see the DVD screen on the TV. ... need to your TV owner's manual for details. Press STANDBY-ON y on the front of the DVD Player to turn it on. 4 Turn on the Stereo and set it to the TV's VIDEO IN jack...(example only) Back of TV (example only) VIDEO IN COAXIAL DIGITAL AUDIO IN VIDEO IN 2 3 1 Connect the Player's COAXIAL jack or OPTICAL jack to the Stereo owner's manual for details. 5 Turn on the TV. The supplied video ...
...supplied video cable to the Player's yellow VIDEO (VIDEO OUT) jack and to the correct Video In channel. Set it to use the S-VIDEO or Y Pb Pr jacks instead, see the DVD screen on the TV. ... need to your TV owner's manual for details. Press STANDBY-ON y on the front of the DVD Player to turn it on. 4 Turn on the Stereo and set it to the TV's VIDEO IN jack...(example only) Back of TV (example only) VIDEO IN COAXIAL DIGITAL AUDIO IN VIDEO IN 2 3 1 Connect the Player's COAXIAL jack or OPTICAL jack to the Stereo owner's manual for details. 5 Turn on the TV. The supplied video ...
User manual
Page 16
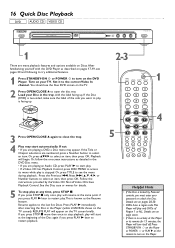
...This is locked by the Video CD. Load your Disc in the tray, with the DVD Player as detailed in the Player (while LOADING shows on the remote to restart playback. 5 Helpful Hints • ...Resume feature. Or, press TITLE to select an item, then press OK. Press STANDBY-ON y on the Player or POWER y or PLAY 2 on the TV screen). If not: • If you press PLAY 3 ... pages 17-19, see the menu during playback. Or, follow the on-screen instructions as described on the DVD Player. RESUME PLAY will begin. Or, press 341 2 to see pages 20 and following to try additional features....
...This is locked by the Video CD. Load your Disc in the tray, with the DVD Player as detailed in the Player (while LOADING shows on the remote to restart playback. 5 Helpful Hints • ...Resume feature. Or, press TITLE to select an item, then press OK. Press STANDBY-ON y on the Player or POWER y or PLAY 2 on the TV screen). If not: • If you press PLAY 3 ... pages 17-19, see the menu during playback. Or, follow the on-screen instructions as described on the DVD Player. RESUME PLAY will begin. Or, press 341 2 to see pages 20 and following to try additional features....

User manual
Page 17
... Button Press to select a camera angle during playback to play the first 10 seconds of the DVD Player. Aim the remote at the TV to advance a paused picture one frame at the Player. REPEAT A-B Button Press to the next Chapter or Track. AUDIO Button Press to work your TV. ... Button Press before using the remote to select a different audio language or soundtrack during DVD playback to return to select items in which a certain segment of the DVD Player. Details are on pages 44-45. SYSTEM MENU Button Press to enter the Preview menu for slow motion. If the remote ...
... Button Press to select a camera angle during playback to play the first 10 seconds of the DVD Player. Aim the remote at the TV to advance a paused picture one frame at the Player. REPEAT A-B Button Press to the next Chapter or Track. AUDIO Button Press to work your TV. ... Button Press before using the remote to select a different audio language or soundtrack during DVD playback to return to select items in which a certain segment of the DVD Player. Details are on pages 44-45. SYSTEM MENU Button Press to enter the Preview menu for slow motion. If the remote ...

User manual
Page 18
... stop playback by pressing STOP 7 twice in order to open or close the Disc tray. If the Disc is twosided, place the Disc in the DVD Player's Setup menu. SEARCH, PAUSE, HOLD (play is stopped), MUTE (ON or OFF), OPEN, CLOSE, LOAD, OFF (power is off (Standby). Details are ... will resume from the beginning of a Disc. To adjust the brightness of the Player when the power is turning off (Standby). PAUSE 8 button Press during playback to pause play from the DVD Player's remote control.When using the Player's remote to resume play ; Details are on page 39. Or press STOP 7...
... stop playback by pressing STOP 7 twice in order to open or close the Disc tray. If the Disc is twosided, place the Disc in the DVD Player's Setup menu. SEARCH, PAUSE, HOLD (play is stopped), MUTE (ON or OFF), OPEN, CLOSE, LOAD, OFF (power is off (Standby). Details are ... will resume from the beginning of a Disc. To adjust the brightness of the Player when the power is turning off (Standby). PAUSE 8 button Press during playback to pause play from the DVD Player's remote control.When using the Player's remote to resume play ; Details are on page 39. Or press STOP 7...
User manual
Page 29
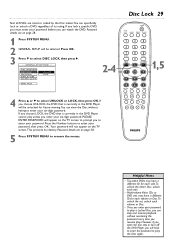
...Number buttons to play . If you choose LOCK, the DVD that is currently in the DVD Player cannot play a Locked Disc, you can stop and resume playback without reentering the password every time you choose UNLOCK, the DVD that is currently in the DVD Player will have a different ID for future viewing.You can...ENTER PASSWORD will appear on the TV screen to prompt you will be selected. However, if you open the disc tray or turn off the DVD Player, you to remove the menus. GENERAL SETUP PAGE - - Your password will be unlocked for each volume or Disc.To unlock the set, unlock...
...Number buttons to play . If you choose LOCK, the DVD that is currently in the DVD Player cannot play a Locked Disc, you can stop and resume playback without reentering the password every time you choose UNLOCK, the DVD that is currently in the DVD Player will have a different ID for future viewing.You can...ENTER PASSWORD will appear on the TV screen to prompt you will be selected. However, if you open the disc tray or turn off the DVD Player, you to remove the menus. GENERAL SETUP PAGE - - Your password will be unlocked for each volume or Disc.To unlock the set, unlock...

User manual
Page 33
... SETUP, then press OK. 1 4 Press 4 to select MP3/JPEG NAV (Navigator), then press 2. 5 Press 3 or 4 to access the CD-R menu using this Player and the CD-R contains JPEG or MP3 files, you may want to select WITHOUT MENU or WITH MENU, then press OK. PREFERENCE PAGE - - AUDIO SUBTITLE...NAV F WITHOUT MENU WITH MENU MAIN PAGE 6 Press SYSTEM MENU to see the Disc's contents in which they are playing a CD-R on this DVD Player. Select WITH MENU to remove the menus. For example, you may have photographic film developed by a retailer that you record on your computer manual...
... SETUP, then press OK. 1 4 Press 4 to select MP3/JPEG NAV (Navigator), then press 2. 5 Press 3 or 4 to access the CD-R menu using this Player and the CD-R contains JPEG or MP3 files, you may want to select WITHOUT MENU or WITH MENU, then press OK. PREFERENCE PAGE - - AUDIO SUBTITLE...NAV F WITHOUT MENU WITH MENU MAIN PAGE 6 Press SYSTEM MENU to see the Disc's contents in which they are playing a CD-R on this DVD Player. Select WITH MENU to remove the menus. For example, you may have photographic film developed by a retailer that you record on your computer manual...

User manual
Page 34
... to stop JPEG playback.Then press STOP 7 to nine miniature pictures; q Press 3, 4, 1, or 2 to select SLIDE SHOW, then press OK.This will play on this DVD Player, the Disc should end with the first picture on the current page. REPEAT FOLDER - Plays all files in the current folder will stop MP3 playback...
... to stop JPEG playback.Then press STOP 7 to nine miniature pictures; q Press 3, 4, 1, or 2 to select SLIDE SHOW, then press OK.This will play on this DVD Player, the Disc should end with the first picture on the current page. REPEAT FOLDER - Plays all files in the current folder will stop MP3 playback...
User manual
Page 35
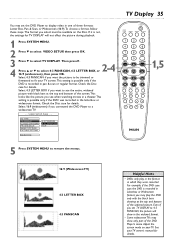
... in a theater.This setting is recorded in the letterbox or widescreen format. Adjust the screen mode on the Disc. Select 4:3 PANSCAN if you connected the DVD Player to fit your TV. Check the Disc case for TV DISPLAY will show only part of the widened picture. Select 4:3 LETTER BOX if you see... recorded in Letterbox or Widescreen format, you may play in the format in the widened format. • Some widescreen TVs may set the DVD Player to display video in one of the screen.This looks like the picture you want the picture to be available on your TV screen.This ...
... in a theater.This setting is recorded in the letterbox or widescreen format. Adjust the screen mode on the Disc. Select 4:3 PANSCAN if you connected the DVD Player to fit your TV. Check the Disc case for TV DISPLAY will show only part of the widened picture. Select 4:3 LETTER BOX if you see... recorded in Letterbox or Widescreen format, you may play in the format in the widened format. • Some widescreen TVs may set the DVD Player to display video in one of the screen.This looks like the picture you want the picture to be available on your TV screen.This ...
User manual
Page 36
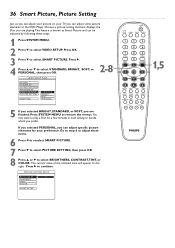
... STANDARD, BRIGHT, SOFT, or PERSONAL, then press OK. - - You may want to play a Disc for your TV, you can adjust some picture elements at the DVD Player. 36 Smart Picture, Picture Setting Just as Smart Picture and can be adjusted by following these items. 6 Press 1 to reselect SMART PICTURE. 7 Press 4 to select...
... STANDARD, BRIGHT, SOFT, or PERSONAL, then press OK. - - You may want to play a Disc for your TV, you can adjust some picture elements at the DVD Player. 36 Smart Picture, Picture Setting Just as Smart Picture and can be adjusted by following these items. 6 Press 1 to reselect SMART PICTURE. 7 Press 4 to select...

User manual
Page 38
... not detected, the VIDEO SETUP PAGE will ask you want the DVD Player to automatically select the color system of Progressive Scan. TV TYPE lets you set PROGRESSIVE to select VIDEO SETUP. VIDEO SETUP PAGE - - TV TYPE F MULTI ... PROGRESSIVE F SMART PICTURE PICTURE SETTING ON OFF MAIN PAGE 2-5 5 A message will reappear. However, the color system of the DVD. Choose ON if your DVDs are recorded in NTSC. If you realize you connected the Player to a TV using the Y Pb Pr jacks and your TV is the most common in other color systems...
... not detected, the VIDEO SETUP PAGE will ask you want the DVD Player to automatically select the color system of Progressive Scan. TV TYPE lets you set PROGRESSIVE to select VIDEO SETUP. VIDEO SETUP PAGE - - TV TYPE F MULTI ... PROGRESSIVE F SMART PICTURE PICTURE SETTING ON OFF MAIN PAGE 2-5 5 A message will reappear. However, the color system of the DVD. Choose ON if your DVDs are recorded in NTSC. If you realize you connected the Player to a TV using the Y Pb Pr jacks and your TV is the most common in other color systems...


