
Leaflet
Page 2
... User Interface • RS232 connection • Ergonomic Remote Control • English/French/Spanish menu • Closed Caption viewing This television receiver provides display of television closed captioning in accordance with 15.119 of the FCC rules. ➢ Optional FTR9955 e-Box delivers superior picture with Digital Natural motion and the convenience of one cable hookup ➢ Optional Matchline FTR9965 e-Box delivers all of today's High Definition sources. Connectivity • DVI-d input • 1 Set...
... User Interface • RS232 connection • Ergonomic Remote Control • English/French/Spanish menu • Closed Caption viewing This television receiver provides display of television closed captioning in accordance with 15.119 of the FCC rules. ➢ Optional FTR9955 e-Box delivers superior picture with Digital Natural motion and the convenience of one cable hookup ➢ Optional Matchline FTR9965 e-Box delivers all of today's High Definition sources. Connectivity • DVI-d input • 1 Set...

User manual
Page 1
... purchase for future reference. Model Registration Returning your Warranty Registration Card right away guarantees you'll receive all the information and special offers which is located on the rear of plug to wide slot, fully insert. As a member of the PHILIPS "family," you should read the enclosed literature closely to prevent operating and maintenance problems. WARNING: TO PREVENT FIRE...
... purchase for future reference. Model Registration Returning your Warranty Registration Card right away guarantees you'll receive all the information and special offers which is located on the rear of plug to wide slot, fully insert. As a member of the PHILIPS "family," you should read the enclosed literature closely to prevent operating and maintenance problems. WARNING: TO PREVENT FIRE...

User manual
Page 2
... antenna-discharge unit, size of grounding connectors, location of the ventilation openings. Read these instructions. 3. Use only with a cart, stand, tripod, bracket, or table specified by the manufacturer, or sold with recommended international global safety standards for the grounding electrode. This product may be taken so that produce heat. 9. Disposal of the obsolete outlet. 10. The power supply cord or the plug...
... antenna-discharge unit, size of grounding connectors, location of the ventilation openings. Read these instructions. 3. Use only with a cart, stand, tripod, bracket, or table specified by the manufacturer, or sold with recommended international global safety standards for the grounding electrode. This product may be taken so that produce heat. 9. Disposal of the obsolete outlet. 10. The power supply cord or the plug...

User manual
Page 3
... make a request for service with PHILIPS 50 inch plasma displays. When aligning the grooves of the display fittings to the fixed unit, check to use with any parts. Do not modify any other fittings. Do not use the supplied parts for Concrete Walls: Commercial anchors that are securely engaged. Do not obstruct the ventilation holes of the display monitor screen and cause a deterioration in image quality. Doing so...
... make a request for service with PHILIPS 50 inch plasma displays. When aligning the grooves of the display fittings to the fixed unit, check to use with any parts. Do not modify any other fittings. Do not use the supplied parts for Concrete Walls: Commercial anchors that are securely engaged. Do not obstruct the ventilation holes of the display monitor screen and cause a deterioration in image quality. Doing so...

User manual
Page 4
... plasma display, then fasten the display fittings using the supplied screws. Remove the plasma display form the carton, place the protective sheet that the installation work . Be careful not to be sure it will withstand the weight (about 97 Lbs) of the plasma display and mounting hardware. Unpacking and wall mounting instructions Special technology is required in the packaging on a flat surface (which packages the plasma display and remove the styrofoam. é Remove...
... plasma display, then fasten the display fittings using the supplied screws. Remove the plasma display form the carton, place the protective sheet that the installation work . Be careful not to be sure it will withstand the weight (about 97 Lbs) of the plasma display and mounting hardware. Unpacking and wall mounting instructions Special technology is required in the packaging on a flat surface (which packages the plasma display and remove the styrofoam. é Remove...

User manual
Page 5
... screws to turn. Fasten securely until they come out of the hole. Slide in the plasma display falling and causing injury. 5 Note: It is being fixed securely enough so that the power cable and various signal cables be used for level positioning. The enclosed template can be plugged into the grooves of the (upper) wall fittings and adjust for level positioning. Assembling and mounting the wall mount...
... screws to turn. Fasten securely until they come out of the hole. Slide in the plasma display falling and causing injury. 5 Note: It is being fixed securely enough so that the power cable and various signal cables be used for level positioning. The enclosed template can be plugged into the grooves of the (upper) wall fittings and adjust for level positioning. Assembling and mounting the wall mount...

User manual
Page 7
.... ' Use the bands to standby and the red indicator lights up and the screen comes on : Press the power button B at the rear side of the receiver box. To an electronic receiver box See the handbook of the receiver box. & Connect one end of a VGA cable to the video card of the computer and the other end to the VGA (or to RGB Digital DVI in the correct display mode (see p. 19). ' Switch the plasma display...
.... ' Use the bands to standby and the red indicator lights up and the screen comes on : Press the power button B at the rear side of the receiver box. To an electronic receiver box See the handbook of the receiver box. & Connect one end of a VGA cable to the video card of the computer and the other end to the VGA (or to RGB Digital DVI in the correct display mode (see p. 19). ' Switch the plasma display...

User manual
Page 8
... function. q Picture format Press the q button to the DVI (digital RGB) connector. MENU To switch the menu on again (Does not operate when POWER/STANDBY indicator of the plasma display is off Cursor buttons To select your choice V No function ¬ Mute button No function CH/PR Program selection To browse through the sources selected. OK To activate your choice and to alter a selected adjustment. VGA Press...
... function. q Picture format Press the q button to the DVI (digital RGB) connector. MENU To switch the menu on again (Does not operate when POWER/STANDBY indicator of the plasma display is off Cursor buttons To select your choice V No function ¬ Mute button No function CH/PR Program selection To browse through the sources selected. OK To activate your choice and to alter a selected adjustment. VGA Press...
User manual
Page 9
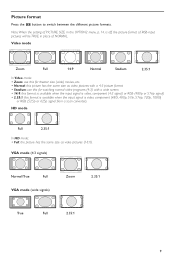
...:1 In Video mode: • Zoom: use this for theater size (wide) movies, etc. • Normal: this format is available when the input signal is off, the picture format of RGB-input pictures will be TRUE in place of PICTURE SIZE in the OPTION2 menu, p. 14, is video, component (480i, 480p, 576i, 576p, 720p, 1080i) or RGB (525p or 625p signal from a scan converter). Picture format Press the q button to switch between...
...:1 In Video mode: • Zoom: use this for theater size (wide) movies, etc. • Normal: this format is available when the input signal is off, the picture format of RGB-input pictures will be TRUE in place of PICTURE SIZE in the OPTION2 menu, p. 14, is video, component (480i, 480p, 576i, 576p, 720p, 1080i) or RGB (525p or 625p signal from a scan converter). Picture format Press the q button to switch between...

User manual
Page 10
... the remote control to display/ cancel the MAIN MENU. é Use the cursor button in NTSC encoded transmissions. Contrast This control allows you to adjust the contrast level of the environment in which you to select a picture mode according to compensate for the color variations in the up /down directions to adjust the edge definition of the menus MAIN MENU PICTURE 1 PICTURE 2 SCREEN OPTION 1 OPTION 2 SET-UP SOURCE...
... the remote control to display/ cancel the MAIN MENU. é Use the cursor button in NTSC encoded transmissions. Contrast This control allows you to adjust the contrast level of the environment in which you to select a picture mode according to compensate for the color variations in the up /down directions to adjust the edge definition of the menus MAIN MENU PICTURE 1 PICTURE 2 SCREEN OPTION 1 OPTION 2 SET-UP SOURCE...
User manual
Page 11
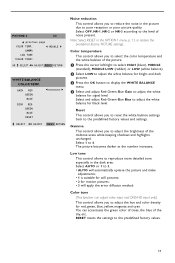
... the OPTION 1 menu, p. 13, to poor reception or poor picture quality. PICTURE 2 2/2 o previous page COLOR TEMP. Select and adjust Red-Green-Blue Bias to adjust the white balance for bright and dark pictures. Reset This control allows you to reset the white balance settings back to the predefined factory values. 11 You can adjust video input and DVD/HD input only.) This control allows you to select the color temperature and the white balance of...
... the OPTION 1 menu, p. 13, to poor reception or poor picture quality. PICTURE 2 2/2 o previous page COLOR TEMP. Select and adjust Red-Green-Blue Bias to adjust the white balance for bright and dark pictures. Reset This control allows you to reset the white balance settings back to the predefined factory values. 11 You can adjust video input and DVD/HD input only.) This control allows you to select the color temperature and the white balance of...

User manual
Page 12
...: On screen information will be displayed at the same position. are made manually. Option 1 menu OSD OSD DISPLAY Select DISPLAY OSD OFF if you select AUTO PICTURE OFF. - OSD ADJUST Select OSD ADJUST 1-9 to adjust the position of the image (except for STADIUM picture format mode), H-WIDTH adjusts the horizontal size of the picture. OSD 1 2 8 3 7 4 6 5 12 Select RESET in the OPTION 1 menu, p. 13, to restore the predefined factory PICTURE settings. & Select ASPECT MODE and...
...: On screen information will be displayed at the same position. are made manually. Option 1 menu OSD OSD DISPLAY Select DISPLAY OSD OFF if you select AUTO PICTURE OFF. - OSD ADJUST Select OSD ADJUST 1-9 to adjust the position of the image (except for STADIUM picture format mode), H-WIDTH adjusts the horizontal size of the picture. OSD 1 2 8 3 7 4 6 5 12 Select RESET in the OPTION 1 menu, p. 13, to restore the predefined factory PICTURE settings. & Select ASPECT MODE and...

User manual
Page 13
... the suitable mode for the specifications of input signals as listed in the table "Computer input signals supported by this system", p. 19. • STILL: to the predefined factory values and settings. & Select ALL RESET and press the OK button. é Select ALL RESET. All Reset This control allows you to reset all the settings are restored to RGB or Component. Use this mode for a moving image, such as video mode, wide mode or a digital broadcast...
... the suitable mode for the specifications of input signals as listed in the table "Computer input signals supported by this system", p. 19. • STILL: to the predefined factory values and settings. & Select ALL RESET and press the OK button. é Select ALL RESET. All Reset This control allows you to reset all the settings are restored to RGB or Component. Use this mode for a moving image, such as video mode, wide mode or a digital broadcast...

User manual
Page 14
... button: a white vertical bar is not turned on . Select WAITING TIME and enter the hours (h) and minutes (m) with the cursor buttons to enter the menu. " Select PLE AUTO or LOCK 1, 2 or 3. • AUTO automatically adjusts the brightness of the screen to suit the picture quality. • LOCK sets the brightness level to OFF. SOFT FOCUS settings reduce the edges and soften the picture.The higher numbers create a softer image...
... button: a white vertical bar is not turned on . Select WAITING TIME and enter the hours (h) and minutes (m) with the cursor buttons to enter the menu. " Select PLE AUTO or LOCK 1, 2 or 3. • AUTO automatically adjusts the brightness of the screen to suit the picture quality. • LOCK sets the brightness level to OFF. SOFT FOCUS settings reduce the edges and soften the picture.The higher numbers create a softer image...

User manual
Page 15
....The predefined factory setting is 0 (black) and the level can be selected for the sides of the screen when a normal 4:3 picture mode is displayed. OPTION 2 2/2 o previous page POWER MGT. L ON M (CINEMA MODE) LONG LIFE GRAY LEVEL S1/S2 PICTURE SIZE POWER ON MODE J SELECT LM ADJUST MENU RETURN Gray level This control allows you to select the input source to detect a full (S1) or a zoomed (S2) picture format. Power on your...
....The predefined factory setting is 0 (black) and the level can be selected for the sides of the screen when a normal 4:3 picture mode is displayed. OPTION 2 2/2 o previous page POWER MGT. L ON M (CINEMA MODE) LONG LIFE GRAY LEVEL S1/S2 PICTURE SIZE POWER ON MODE J SELECT LM ADJUST MENU RETURN Gray level This control allows you to select the input source to detect a full (S1) or a zoomed (S2) picture format. Power on your...

User manual
Page 16
... a digital interface compliant with the DVI (digital visual Interface) standard to confirm. FREQUENCY • 43.3 KHZ V. POLARITY • NEGATIVE V. Setting the video signal format This control allows you are displayed in the country you to set accordingly. DVI SET-UP PLUG/PLAY PC BLACK LEVEL J SELECT LM ADJUST MENU RETURN SOURCE INFORMATION H. FREQUENCY • 85.0 KHZ H. MENU RETURN 16 The menu items cannot be selected nor controlled and are now located. & Use the...
... a digital interface compliant with the DVI (digital visual Interface) standard to confirm. FREQUENCY • 43.3 KHZ V. POLARITY • NEGATIVE V. Setting the video signal format This control allows you are displayed in the country you to set accordingly. DVI SET-UP PLUG/PLAY PC BLACK LEVEL J SELECT LM ADJUST MENU RETURN SOURCE INFORMATION H. FREQUENCY • 85.0 KHZ H. MENU RETURN 16 The menu items cannot be selected nor controlled and are now located. & Use the...

User manual
Page 17
... sound. No picture Are the supplied cables connected properly? (The power cable to the screen.When your monitor off . Do you have selected the correct display mode in the OPTION 2 menu. Transport Keep the original packaging to repair a defective monitor yourself. Very incidentally and after the set has been turned on the monitor, can damage the glass surface of the screen. Solution: replace the batteries of the remote control or change position...
... sound. No picture Are the supplied cables connected properly? (The power cable to the screen.When your monitor off . Do you have selected the correct display mode in the OPTION 2 menu. Transport Keep the original packaging to repair a defective monitor yourself. Very incidentally and after the set has been turned on the monitor, can damage the glass surface of the screen. Solution: replace the batteries of the remote control or change position...
User manual
Page 18
The batteries supplied do not contain the heavy metals mercury and cadmium. Ambient temperature: + 5~ + 40°C . Standby consumption: 1 W . Weight (excl. Dimensions (wxhxd): Display: 48.1 x 28.9 x 3.7 inch . How to dispose of Select RESET ALL in the OPTION1 menu, p. 12 to restore the predefined adjustment factory settings. 18 Nevertheless in many countries batteries may not be recycled and reused. air pressure 800hPa) . Please ensure you...
The batteries supplied do not contain the heavy metals mercury and cadmium. Ambient temperature: + 5~ + 40°C . Standby consumption: 1 W . Weight (excl. Dimensions (wxhxd): Display: 48.1 x 28.9 x 3.7 inch . How to dispose of Select RESET ALL in the OPTION1 menu, p. 12 to restore the predefined adjustment factory settings. 18 Nevertheless in many countries batteries may not be recycled and reused. air pressure 800hPa) . Please ensure you...

User manual
Page 20
... (Digital Protection, LLC). If this equipment in which case the user will be compressed. • This monitor has a resolution of IBM, Inc. Note: • While the input signals comply with the instruction manual, may cause harmful interference to 'MOTION'. If the picture is not displayed properly, set automatically. HDCP is HDCP technology? What is an acronym for the input signals listed in the original resolution...
... (Digital Protection, LLC). If this equipment in which case the user will be compressed. • This monitor has a resolution of IBM, Inc. Note: • While the input signals comply with the instruction manual, may cause harmful interference to 'MOTION'. If the picture is not displayed properly, set automatically. HDCP is HDCP technology? What is an acronym for the input signals listed in the original resolution...

User manual
Page 21
... part replacement because of misuse, accident, unauthorized repair or other cause not within the control of Philips Consumer Electronics Company. • reception problems caused by signal conditions or cable or antenna systems outside the unit. • a product that you if necessary. If your dealer. It will attempt to provide service (although there may not apply to you buy your owner's manual before requesting service. Philips...
... part replacement because of misuse, accident, unauthorized repair or other cause not within the control of Philips Consumer Electronics Company. • reception problems caused by signal conditions or cable or antenna systems outside the unit. • a product that you if necessary. If your dealer. It will attempt to provide service (although there may not apply to you buy your owner's manual before requesting service. Philips...


