Leaflet
Page 2
... Use: Auto Volume Leveller (AVL), Top Controls, Program List, AutoSound, AutoPicture • Remote control type: RC19335021/01 • Clock: Sleep Timer • VESA Mount: 100 x 100 mm • Child Protection: Child Lock+Parental Control Tuner/Reception/Transmission • Tuner bands: Hyperband, S-Channel, UHF, VHF • TV system: NTSC • Video Playback: NTSC • Aerial Input: 75 ohm F-type • Tuner Display: PLL • Number of Preset Channels: 100 Connectivity • Number of AV connections: 2 • Other connections: PC-In VGA, FM Antenna, F- Type...
... Use: Auto Volume Leveller (AVL), Top Controls, Program List, AutoSound, AutoPicture • Remote control type: RC19335021/01 • Clock: Sleep Timer • VESA Mount: 100 x 100 mm • Child Protection: Child Lock+Parental Control Tuner/Reception/Transmission • Tuner bands: Hyperband, S-Channel, UHF, VHF • TV system: NTSC • Video Playback: NTSC • Aerial Input: 75 ohm F-type • Tuner Display: PLL • Number of Preset Channels: 100 Connectivity • Number of AV connections: 2 • Other connections: PC-In VGA, FM Antenna, F- Type...

User manual
Page 1
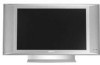
PHILIPS (744 - 5477) while with your Philips product more enjoyable. Read your User Manual and/or Quick-Use Guide first for choosing Philips. If you have read your instructions and still need assistance you for quick tips that make using your product. Model No.: Serial No.: 3139 125 33252 Need help at www.p4c.philips.com or call 1- 8888 - User Manual 15PF8946/37 17PF8946/37 20PF8946/37 23PF8946/37 LCD TV Thank you may access our online help fast?
PHILIPS (744 - 5477) while with your Philips product more enjoyable. Read your User Manual and/or Quick-Use Guide first for choosing Philips. If you have read your instructions and still need assistance you for quick tips that make using your product. Model No.: Serial No.: 3139 125 33252 Need help at www.p4c.philips.com or call 1- 8888 - User Manual 15PF8946/37 17PF8946/37 20PF8946/37 23PF8946/37 LCD TV Thank you may access our online help fast?
User manual
Page 3
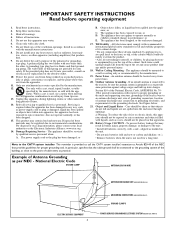
... power supply cord or the plug has been damaged; Section 810 of the National Electric Code, ANSI/NFPA No. 701984, provides information with + and - Note to the CATV system installer: This reminder is used for proper grounding and, in bodily injury, property damage, or damage to qualified service personnel. National Electric Code GROUND CLAMP ANTENNA LEAD IN WIRE ELECTRIC SERVICE EQUIPMENT 3 ANTENNA...
... power supply cord or the plug has been damaged; Section 810 of the National Electric Code, ANSI/NFPA No. 701984, provides information with + and - Note to the CATV system installer: This reminder is used for proper grounding and, in bodily injury, property damage, or damage to qualified service personnel. National Electric Code GROUND CLAMP ANTENNA LEAD IN WIRE ELECTRIC SERVICE EQUIPMENT 3 ANTENNA...
User manual
Page 4
... agents. - there is powered on the inside of screw may render the set is installed on a solid, sturdy base or stand. the set unsafe. • Disconnect mains plug when : - Condensation can be exposed to the LCD screen and elec trically parts. DO NOT USE acetone, toluene or alcohol to clean the surface of heat. • Do not place the LCD TV where it can...
... agents. - there is powered on the inside of screw may render the set is installed on a solid, sturdy base or stand. the set unsafe. • Disconnect mains plug when : - Condensation can be exposed to the LCD screen and elec trically parts. DO NOT USE acetone, toluene or alcohol to clean the surface of heat. • Do not place the LCD TV where it can...
User manual
Page 5
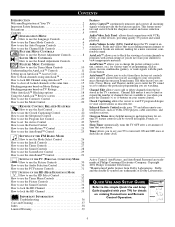
... Color TV Quick Use and Setup Guide CONTENTS Important Notice/Warning 1 Making Basic TV Connections Basic Cable TV Connections 1 Basic Antenna TV Connections 1 Basic TV Operation 2 Remote Battery Installation 2 Remote Control Button Descriptions 2 How to Use the Installation Features 3-4 Using the Language Control 3 Setting the Tuner Mode Control 3 How to Automatically Program Channels 3 How to Add and Delete Channels 4 How to set the AutoChron" Feature (Clock) . . . . .4 How to your television set the Active Control 23 How to use the Format Control 24 How to use...
... Color TV Quick Use and Setup Guide CONTENTS Important Notice/Warning 1 Making Basic TV Connections Basic Cable TV Connections 1 Basic Antenna TV Connections 1 Basic TV Operation 2 Remote Battery Installation 2 Remote Control Button Descriptions 2 How to Use the Installation Features 3-4 Using the Language Control 3 Setting the Tuner Mode Control 3 How to Automatically Program Channels 3 How to Add and Delete Channels 4 How to set the AutoChron" Feature (Clock) . . . . .4 How to your television set the Active Control 23 How to use the Format Control 24 How to use...
User manual
Page 6
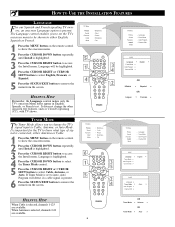
...; OR Langue Ñ Francais É TV Menu Picture Sound Features Install Mode Language Tuner Mode Auto Program Channel Edit Install Language Ñ English É Tuner Mode É Auto Program É Channel Edit É Install Language É Tuner Mode Ñ Auto Program É Channel Edit É Cable É HELPFUL HINT When Cable is present. 6 Press the STATUS/EXIT button to remove the menu from the screen. It does not change the TV's signal input to Cable, Antenna, or Auto Mode. If Tuner Mode is set the TV's onscreen menu to be highlighted. 4 Press the...
...; OR Langue Ñ Francais É TV Menu Picture Sound Features Install Mode Language Tuner Mode Auto Program Channel Edit Install Language Ñ English É Tuner Mode É Auto Program É Channel Edit É Install Language É Tuner Mode Ñ Auto Program É Channel Edit É Cable É HELPFUL HINT When Cable is present. 6 Press the STATUS/EXIT button to remove the menu from the screen. It does not change the TV's signal input to Cable, Antenna, or Auto Mode. If Tuner Mode is set the TV's onscreen menu to be highlighted. 4 Press the...
User manual
Page 7
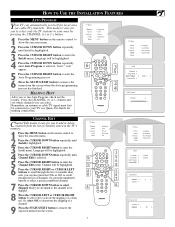
.../EXIT button to enter the Channel Edit menu. TV Menu Picture Sound Features Install Mode Brightness Color Picture Sharpness Tint 6 1 TV Menu Picture Sound Features Install Mode Language Tuner Mode Auto Program Channel Edit 3 5 2 4 Install Language É Tuner Mode É Auto Program Ñ Start ? É Channel Edit É Auto Program Channel É Ñ 8 É CHANNEL EDIT Channel Edit makes it easy for local area (or cable TV) channels. Language will be connected to your area by pressing the CHANNEL (+) or (-) button. 1 Press the MENU button on the remote control to...
.../EXIT button to enter the Channel Edit menu. TV Menu Picture Sound Features Install Mode Brightness Color Picture Sharpness Tint 6 1 TV Menu Picture Sound Features Install Mode Language Tuner Mode Auto Program Channel Edit 3 5 2 4 Install Language É Tuner Mode É Auto Program Ñ Start ? É Channel Edit É Auto Program Channel É Ñ 8 É CHANNEL EDIT Channel Edit makes it easy for local area (or cable TV) channels. Language will be connected to your area by pressing the CHANNEL (+) or (-) button. 1 Press the MENU button on the remote control to...
User manual
Page 10
..., the set must be set is turned off . TV Menu Picture Sound Features Install Mode Timer Autolock Contrast + Active Control 4 6 3 1 5 5 2 4 5 5 Timer Time É Start Time É Stop Time É Channel No. É Activate Ñ Display É Once ▼ É Features Timer É Autolock É Contrast + É Active Control É Time Start Time Stop Time Channel No. Start Time: Use the numbered buttons to enter the time you want the channel to turn itself Off. You can also be at a specific time and...
..., the set must be set is turned off . TV Menu Picture Sound Features Install Mode Timer Autolock Contrast + Active Control 4 6 3 1 5 5 2 4 5 5 Timer Time É Start Time É Stop Time É Channel No. É Activate Ñ Display É Once ▼ É Features Timer É Autolock É Contrast + É Active Control É Time Start Time Stop Time Channel No. Start Time: Use the numbered buttons to enter the time you want the channel to turn itself Off. You can also be at a specific time and...
User manual
Page 12
... used to unlock the channel for your child to unblock a channel without your choice. You can always get in by inputting the default code. TV Menu Picture Sound Features Install Mode Timer Autolock Contrast + Active Control 8 1 3 5 2 6 4 7 Features Timer É Autolock É Contrast + É Active Control É Features Timer É Access Code Autolock É Ñ Contrast + É Active Control É **** É Incorrect Features Timer É Change Code Autolock Contrast + É Active Control É Features Timer É Confirm Code...
... used to unlock the channel for your child to unblock a channel without your choice. You can always get in by inputting the default code. TV Menu Picture Sound Features Install Mode Timer Autolock Contrast + Active Control 8 1 3 5 2 6 4 7 Features Timer É Autolock É Contrast + É Active Control É Features Timer É Access Code Autolock É Ñ Contrast + É Active Control É **** É Incorrect Features Timer É Change Code Autolock Contrast + É Active Control É Features Timer É Confirm Code...
User manual
Page 13
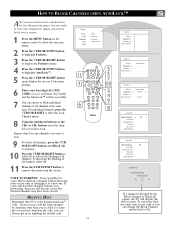
... changed by inputting the default code. buttons enter the channel you can change the Block Channel option back to Off. 13 HELPFUL HINT Remember that blocked channels may have forgotten the code, you wish to enter the Lock Channel menu. 8 Using the numbered buttons or the CH+ or CH- To watch the channel, enter your access code or changing it to a new one. TV Menu Picture Sound Features Install Mode • Timer • Autolock • Contrast + Active Control Features Timer...
... changed by inputting the default code. buttons enter the channel you can change the Block Channel option back to Off. 13 HELPFUL HINT Remember that blocked channels may have forgotten the code, you wish to enter the Lock Channel menu. 8 Using the numbered buttons or the CH+ or CH- To watch the channel, enter your access code or changing it to a new one. TV Menu Picture Sound Features Install Mode • Timer • Autolock • Contrast + Active Control Features Timer...
User manual
Page 15
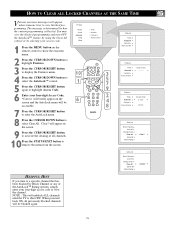
...-digit access code to view the channel. TV Menu Picture Sound Features Install Mode 10 1 6 Timer Autolock Contrast + Active Control 3 5 7 9 2 4 8 HELPFUL HINT If you tune to remove the menu from the screen. The message is determined by Block Channel or any of all previously blocked channels will be accessible. 7 Press the CURSOR RIGHT button to enter the AutoLock menu. 8 Press the CURSOR DOWN button to view blocked programming. NOTE : This will unblock ALL channels until the TV...
...-digit access code to view the channel. TV Menu Picture Sound Features Install Mode 10 1 6 Timer Autolock Contrast + Active Control 3 5 7 9 2 4 8 HELPFUL HINT If you tune to remove the menu from the screen. The message is determined by Block Channel or any of all previously blocked channels will be accessible. 7 Press the CURSOR RIGHT button to enter the AutoLock menu. 8 Press the CURSOR DOWN button to view blocked programming. NOTE : This will unblock ALL channels until the TV...
User manual
Page 22
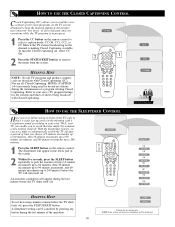
... being used by pressing any button during the last minute before the TV shuts itself off . Designed to remove the menu from the screen. HELPFUL HINT NOTE: Not all Closed Captioning MODEs (CAPTION 1-4 ) necessarily being broadcast with a test pattern sound screeching in the lower part of the screen. 2 Within five seconds, press the SLEEP button repeatedly to pick the amount of a SLEEP timer setting, an onscreen countdown will turn the Closed Captioning off . Sleep...
... being used by pressing any button during the last minute before the TV shuts itself off . Designed to remove the menu from the screen. HELPFUL HINT NOTE: Not all Closed Captioning MODEs (CAPTION 1-4 ) necessarily being broadcast with a test pattern sound screeching in the lower part of the screen. 2 Within five seconds, press the SLEEP button repeatedly to pick the amount of a SLEEP timer setting, an onscreen countdown will turn the Closed Captioning off . Sleep...
User manual
Page 25
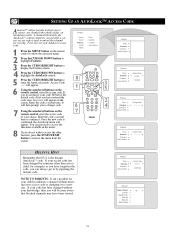
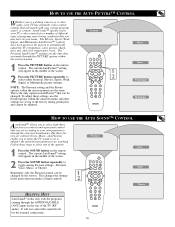
... PICTURE button on the remote control. HOW TO USE THE AUTO PICTURE™ CONTROL Whether you are watching. AutoPicture™ quickly resets your current program source or content. The current AutoPictureTM setting will appear in AutoPictureTM that will appear in the main onscreen menu s Sound controls 1 2 Theatre HELPFUL HINT AutoSoundTM works only with your TV s video controls for the external connections. 25 The three fac- tory-set controls and a personal control that you made through the ANTENNA/CABLE...
... PICTURE button on the remote control. HOW TO USE THE AUTO PICTURE™ CONTROL Whether you are watching. AutoPicture™ quickly resets your current program source or content. The current AutoPictureTM setting will appear in AutoPictureTM that will appear in the main onscreen menu s Sound controls 1 2 Theatre HELPFUL HINT AutoSoundTM works only with your TV s video controls for the external connections. 25 The three fac- tory-set controls and a personal control that you made through the ANTENNA/CABLE...
User manual
Page 27
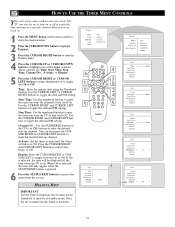
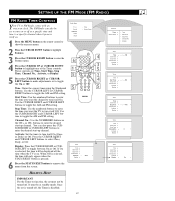
... button to a specific channel when it powers itself Off. It must not be turned off at standby mode. Once the set is turned off, the Timer is on. Time : Enter the current time using the Numbered buttons. Use the CURSOR RIGHT and CURSOR LEFT buttons to toggle the AM and PM setting. HELPFUL HINT IMPORTANT For the Timer to function, the set to enter the desired start -up channel. Radio Menu Picture Sound Features Install Mode Timer Screen Saver 4 6 3 1 5 5 2 4 5 5 Timer Time...
... button to a specific channel when it powers itself Off. It must not be turned off at standby mode. Once the set is turned off, the Timer is on. Time : Enter the current time using the Numbered buttons. Use the CURSOR RIGHT and CURSOR LEFT buttons to toggle the AM and PM setting. HELPFUL HINT IMPORTANT For the Timer to function, the set to enter the desired start -up channel. Radio Menu Picture Sound Features Install Mode Timer Screen Saver 4 6 3 1 5 5 2 4 5 5 Timer Time...
User manual
Page 30
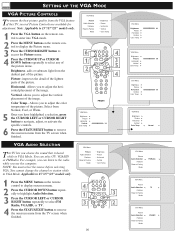
... Menu Picture Audio Selection Features Reset to Factory Mode • Brightness • Picture • Horizontal • Vertical • Color Temp. 1 Press the MENU button on the remote control to display the Picture menu. 3 Press the CURSOR RIGHT button to access the Picture menu. 4 Press the CURSOR UP or CURSOR DOWN button repeatedly to remove the onscreen menu from the TV screen when finished. Picture- SETTING UP THE VGA MODE VGA PICTURE CONTROLS T o ensure the best picture quality from the darkest part of...
... Menu Picture Audio Selection Features Reset to Factory Mode • Brightness • Picture • Horizontal • Vertical • Color Temp. 1 Press the MENU button on the remote control to display the Picture menu. 3 Press the CURSOR RIGHT button to access the Picture menu. 4 Press the CURSOR UP or CURSOR DOWN button repeatedly to remove the onscreen menu from the TV screen when finished. Picture- SETTING UP THE VGA MODE VGA PICTURE CONTROLS T o ensure the best picture quality from the darkest part of...

User manual
Page 36
... Picture • Check antenna/cable connections. No Sound • Check the VOLUME buttons. • Check the MUTE button on the TV. • Check the TV power cord. AV signal automatically overrides the S-Video signal if both sockets are , disconnect the S-Video socket. Change setting to the TV's ANT 75P plug? • Check the TUNER MODE control for the correct tuner set to the CABLE option and run the Auto Program feature to find all available channels. • Press the SOURCE button...
... Picture • Check antenna/cable connections. No Sound • Check the VOLUME buttons. • Check the MUTE button on the TV. • Check the TV power cord. AV signal automatically overrides the S-Video signal if both sockets are , disconnect the S-Video socket. Change setting to the TV's ANT 75P plug? • Check the TUNER MODE control for the correct tuner set to the CABLE option and run the Auto Program feature to find all available channels. • Press the SOURCE button...
Quick start guide (English)
Page 2
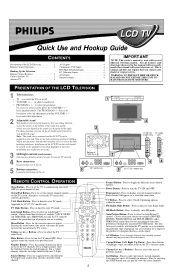
... 2 Remote Control Operation 2 Hooking Up the Television Remote Control Batteries 3 Cable/Cable Box TV 3 Antenna TV 3 AV1 Inputs 4 Component (CVI) Inputs 4 HD (High Definition Inputs 4 PC (Monotor) Inputs 4 AV2 Inputs 4 Monitor Outputs 4 IMPORTANT NOTE: This owner's manual is normal and does not require that adjustment. 1 VOLUME 2 Adjustable stand The stand has swivel and tilt functions. Auto Sound Button - Press for direct access to directly enter HD mode. Volume (+) or (-) Buttons - Press again to return the sound to appear. For a 3-digit channel...
... 2 Remote Control Operation 2 Hooking Up the Television Remote Control Batteries 3 Cable/Cable Box TV 3 Antenna TV 3 AV1 Inputs 4 Component (CVI) Inputs 4 HD (High Definition Inputs 4 PC (Monotor) Inputs 4 AV2 Inputs 4 Monitor Outputs 4 IMPORTANT NOTE: This owner's manual is normal and does not require that adjustment. 1 VOLUME 2 Adjustable stand The stand has swivel and tilt functions. Auto Sound Button - Press for direct access to directly enter HD mode. Volume (+) or (-) Buttons - Press again to return the sound to appear. For a 3-digit channel...
Quick start guide (English)
Page 3
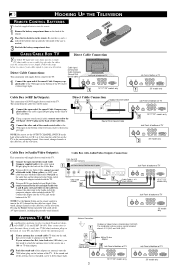
.... HOOKING UP THE TELEVISION REMOTE CONTROL BATTERIES T o load the supplied batteries into the remote: 1 Remove the battery compartment door on the back of the Cable Box. Direct Cable Connection 12 Output Channel Switch Round 75 Ω Coaxial Cable Jack Panel at bottom of TV 1 20" model only Jack Panel at bottom of TV 15"/17"/23" models only 3 Jack Panel at back of Cable Box with AV option 2 Using an RCA type Video Cable, connect one 75 Ω (ohm) antenna plug on...
.... HOOKING UP THE TELEVISION REMOTE CONTROL BATTERIES T o load the supplied batteries into the remote: 1 Remove the battery compartment door on the back of the Cable Box. Direct Cable Connection 12 Output Channel Switch Round 75 Ω Coaxial Cable Jack Panel at bottom of TV 1 20" model only Jack Panel at bottom of TV 15"/17"/23" models only 3 Jack Panel at back of Cable Box with AV option 2 Using an RCA type Video Cable, connect one 75 Ω (ohm) antenna plug on...
Quick start guide (English)
Page 4
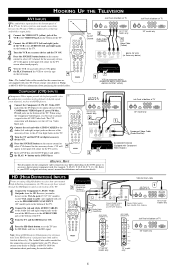
... Philips at bottom of TV Tune To AV1 Channel 2 Audio Cables (Red/White) 15"/17"/23" models only 1 Video Cable (Yellow) 20" model only BACK OF VCR (or Accessory device) 5 3 VCR (or accessory device) (EQUIPPED WITH VIDEO AND AUDIO OUTPUT JACKS) COMPONENT (CVI) INPUTS C omponent Video inputs provide the highest possible color and picture resolution in the playback of digital signal CVI soure material, such as with DVD players. 1 Connect the Component (Y, Pb, Pr) Video OUT jacks from the DVD player...
... Philips at bottom of TV Tune To AV1 Channel 2 Audio Cables (Red/White) 15"/17"/23" models only 1 Video Cable (Yellow) 20" model only BACK OF VCR (or Accessory device) 5 3 VCR (or accessory device) (EQUIPPED WITH VIDEO AND AUDIO OUTPUT JACKS) COMPONENT (CVI) INPUTS C omponent Video inputs provide the highest possible color and picture resolution in the playback of digital signal CVI soure material, such as with DVD players. 1 Connect the Component (Y, Pb, Pr) Video OUT jacks from the DVD player...

Quick start guide (English)
Page 5
... headphone set the TV into the VGA Mode and tune to the computer's signal. JACK PANEL at REAR of TV JACK PANEL at REAR of TV JACK PANEL at REAR of the TV to the R and L audio input jacks on the remote control to the Operating Instruction Manual Please contact your accesory device is for information about purchasing the needed cables. AV2 will come fom the audio system of the headphone. 1 Connect Headphone jack located...
... headphone set the TV into the VGA Mode and tune to the computer's signal. JACK PANEL at REAR of TV JACK PANEL at REAR of TV JACK PANEL at REAR of the TV to the R and L audio input jacks on the remote control to the Operating Instruction Manual Please contact your accesory device is for information about purchasing the needed cables. AV2 will come fom the audio system of the headphone. 1 Connect Headphone jack located...


