
Owner's Manual
Page 2
... or changing presser foot, etc. • Always unplug sewing machine from all controls to person: • This sewing machine is provided with double insulation. A double-insulated product is marked with the sewing machine. • Use this sewing machine only for its intended use by persons (including children) ...OF DOUBLE INSULATED PRODUCTS In a double-insulated product, two systems of insulation are provided instead of electric shock: • A sewing machine should a means for a double-insulated product must be added to those parts in this manual. • Never operate this ...
... or changing presser foot, etc. • Always unplug sewing machine from all controls to person: • This sewing machine is provided with double insulation. A double-insulated product is marked with the sewing machine. • Use this sewing machine only for its intended use by persons (including children) ...OF DOUBLE INSULATED PRODUCTS In a double-insulated product, two systems of insulation are provided instead of electric shock: • A sewing machine should a means for a double-insulated product must be added to those parts in this manual. • Never operate this ...
Owner's Manual
Page 3
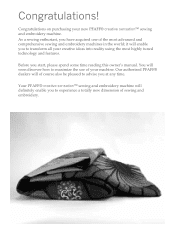
You will deÀnitely enable you to maximize the use of sewing and embroidery. Your PFAFF® creative sensation™ sewing and embroidery machine will soon discover how to transform all your creative ideas into reality using the most advanced and comprehensive sewing and embroidery machines in the world; it will of the most highly tuned technology and features...
You will deÀnitely enable you to maximize the use of sewing and embroidery. Your PFAFF® creative sensation™ sewing and embroidery machine will soon discover how to transform all your creative ideas into reality using the most advanced and comprehensive sewing and embroidery machines in the world; it will of the most highly tuned technology and features...
Owner's Manual
Page 4
...2 Preparations 2:1 Unpacking 2:2 Connect to the power supply 2:2 Pack away after sewing 2:2 Custom LED lights 2:3 Free arm 2:3 Thread cutter 2:3 Electronic knee-lift 2:3 Spool pins 2:4 Threading the machine 2:5 Needle threader 2:5 Thread sensor 2:6 Bobbin winding 2:7 Inserting the bobbin ... hardware drivers and connect the embroidery machine 2:13 How to launch the programs 2:14 Embroidery Machine Communication module.... 2:14 How to update your machine 2:14 Soft Touch Buttons and indicators 2:15 3 PFAFF® creative™ Color Touch Screen 3:1 Start...
...2 Preparations 2:1 Unpacking 2:2 Connect to the power supply 2:2 Pack away after sewing 2:2 Custom LED lights 2:3 Free arm 2:3 Thread cutter 2:3 Electronic knee-lift 2:3 Spool pins 2:4 Threading the machine 2:5 Needle threader 2:5 Thread sensor 2:6 Bobbin winding 2:7 Inserting the bobbin ... hardware drivers and connect the embroidery machine 2:13 How to launch the programs 2:14 Embroidery Machine Communication module.... 2:14 How to update your machine 2:14 Soft Touch Buttons and indicators 2:15 3 PFAFF® creative™ Color Touch Screen 3:1 Start...
Owner's Manual
Page 5
overview 4:2 Select a stitch 4:3 Sewing recommendations 4:3 Machine settings 4:3 Raise and lower the presser foot 4:3 Stitch settings 4:4 Stitch width 4:4 Stitch positioning 4:4 Stitch length 4:4 Stitch density 4:5 Mirroring ...Saving a sequence 5:7 Important sequencing information 5:8 Common sequencing pop-ups 5:8 6 Stitch Creator 6:1 Stitch Creator - If you suspect that your sewing machine. overview 5:2 Open and exit sequencing 5:3 Create a sequence 5:3 Sequence commands 5:4 Horizontal preview 5:5 Directional stitches 5:5 Zoom to avoid the...
overview 4:2 Select a stitch 4:3 Sewing recommendations 4:3 Machine settings 4:3 Raise and lower the presser foot 4:3 Stitch settings 4:4 Stitch width 4:4 Stitch positioning 4:4 Stitch length 4:4 Stitch density 4:5 Mirroring ...Saving a sequence 5:7 Important sequencing information 5:8 Common sequencing pop-ups 5:8 6 Stitch Creator 6:1 Stitch Creator - If you suspect that your sewing machine. overview 5:2 Open and exit sequencing 5:3 Create a sequence 5:3 Sequence commands 5:4 Horizontal preview 5:5 Directional stitches 5:5 Zoom to avoid the...
Owner's Manual
Page 11
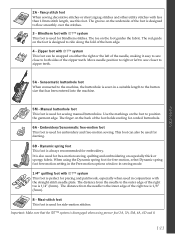
... needle plate. The distance from the needle to ride along the fold of the zipper teeth. Important: Make sure that has been entered into the machine. 5M - The groove on the underside of the right toe is designed to Áow smoothly over the stitches. 3 - Zipper foot with IDT&#... is disengaged when using the Dynamic spring foot for free-motion, select Dynamic spring foot free-motion setting in the Free-motion options window in sewing mode. 1/4" quilting foot with less than 1.0mm stitch length, use this foot. Introduction 2A - Move needle position to right or left of the ...
... needle plate. The distance from the needle to ride along the fold of the zipper teeth. Important: Make sure that has been entered into the machine. 5M - The groove on the underside of the right toe is designed to Áow smoothly over the stitches. 3 - Zipper foot with IDT&#... is disengaged when using the Dynamic spring foot for free-motion, select Dynamic spring foot free-motion setting in the Free-motion options window in sewing mode. 1/4" quilting foot with less than 1.0mm stitch length, use this foot. Introduction 2A - Move needle position to right or left of the ...
Owner's Manual
Page 24
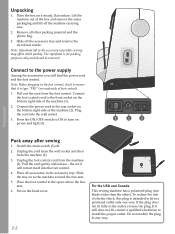
...the power cord and the foot control. Slide the tray on power and light (3). 3 1 2 Preparations Pack away after sewing 1. For the USA and Canada This sewing machine has a polarized plug (one way. If it is for packing purposes only and should be removed. Remove all accessories in ... box and remove the outer packaging and lift off the machine carrying case. 2. Unpacking 1. Do not modify the plug in the accessory tray while sewing may affect stitch quality. The styrofoam is type "FR5" (see underside of the machine (1). 2. Pull the cord gently and release - Place ...
...the power cord and the foot control. Slide the tray on power and light (3). 3 1 2 Preparations Pack away after sewing 1. For the USA and Canada This sewing machine has a polarized plug (one way. If it is for packing purposes only and should be removed. Remove all accessories in ... box and remove the outer packaging and lift off the machine carrying case. 2. Unpacking 1. Do not modify the plug in the accessory tray while sewing may affect stitch quality. The styrofoam is type "FR5" (see underside of the machine (1). 2. Pull the cord gently and release - Place ...
Owner's Manual
Page 25
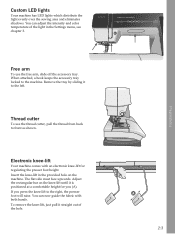
...To remove the knee-lift, just pull it straight out of the light in the provided hole on the knee-lift until it to the machine. Thread cutter To use the free arm, slide off the accessory tray. Insert the knee-lift in the Settings menu, see chapter 3. If... you (A). A 2:3 Preparations When attached, a hook keeps the accessory tray locked to the left. Adjust the rectangular bar on the machine. Electronic knee-lift Your machine comes with both hands. The Áat a comfortable height for regulating the presser foot height. You can adjust the intensity and color ...
...To remove the knee-lift, just pull it straight out of the light in the provided hole on the knee-lift until it to the machine. Thread cutter To use the free arm, slide off the accessory tray. Insert the knee-lift in the Settings menu, see chapter 3. If... you (A). A 2:3 Preparations When attached, a hook keeps the accessory tray locked to the left. Adjust the rectangular bar on the machine. Electronic knee-lift Your machine comes with both hands. The Áat a comfortable height for regulating the presser foot height. You can adjust the intensity and color ...
Owner's Manual
Page 26
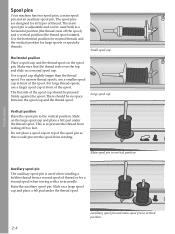
... pin in vertical position Auxiliary spool pin The auxiliary spool pin is adjustable and can be pressed Àrmly against the spool. Spool pins Your machine has two spool pins, a main spool pin and an auxiliary spool pin. The spool pins are designed for large spools or specialty threads. Use a ...spool cap slightly larger than the thread spool. The main spool pin is used both in front of thread or for a second spool when sewing with a twin needle. Small spool cap Horizontal position Place a spool cap and the thread spool on the large spool cap and place a felt pad ...
... pin in vertical position Auxiliary spool pin The auxiliary spool pin is adjustable and can be pressed Àrmly against the spool. Spool pins Your machine has two spool pins, a main spool pin and an auxiliary spool pin. The spool pins are designed for large spools or specialty threads. Use a ...spool cap slightly larger than the thread spool. The main spool pin is used both in front of thread or for a second spool when sewing with a twin needle. Small spool cap Horizontal position Place a spool cap and the thread spool on the large spool cap and place a felt pad ...
Owner's Manual
Page 28
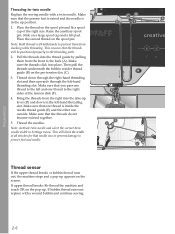
... will limit the width of all stitches for twin needle Replace the sewing needle with a wound bobbin and continue sewing. Thread down in Settings menu. This will be positioned properly in the up . If upper thread breaks: Re-thread the machine and touch OK on the spool pin and Àt a spool cap... other one thread to the right E sides of the right size. A Thread sensor If the upper thread breaks or bobbin thread runs out, the machine stops and a pop-up lever (D) and down through the right-hand threading slot and then upwards through the left -hand threading slot. Make sure ...
... will limit the width of all stitches for twin needle Replace the sewing needle with a wound bobbin and continue sewing. Thread down in Settings menu. This will be positioned properly in the up . If upper thread breaks: Re-thread the machine and touch OK on the spool pin and Àt a spool cap... other one thread to the right E sides of the right size. A Thread sensor If the upper thread breaks or bobbin thread runs out, the machine stops and a pop-up lever (D) and down through the right-hand threading slot and then upwards through the left -hand threading slot. Make sure ...
Owner's Manual
Page 31
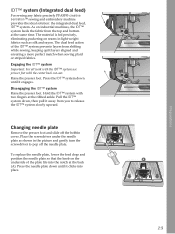
...until it engages. A 2:9 Preparations Pull the IDT™ system down until it clicks into the notch at the same time. As on industrial machines, the IDT™ system feeds the fabric from you to pop off the bobbin cover. Disengaging the IDT™ system Raise the presser foot...needle plate down , then pull it away from the top and bottom at the back (A). IDT™ system (Integrated dual feed) For sewing any fabric precisely PFAFF® creative sensation™ sewing and embroidery machine provides the ideal solution: the integrated dual feed, IDT™ system.
...until it engages. A 2:9 Preparations Pull the IDT™ system down until it clicks into the notch at the same time. As on industrial machines, the IDT™ system feeds the fabric from you to pop off the bobbin cover. Disengaging the IDT™ system Raise the presser foot...needle plate down , then pull it away from the top and bottom at the back (A). IDT™ system (Integrated dual feed) For sewing any fabric precisely PFAFF® creative sensation™ sewing and embroidery machine provides the ideal solution: the integrated dual feed, IDT™ system.
Owner's Manual
Page 32
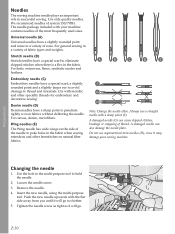
... needles (E) The Wing needle has wide wings on the side of fabric types and weights. Do not use a straight needle with your sewing machine. Preparations Changing the needle 1. Needles The sewing machine needle plays an important role in the multi-purpose tool to hold the needle. 2. A B C D E Embroidery needle (C) Embroidery needles have a special scarf to...
... needles (E) The Wing needle has wide wings on the side of fabric types and weights. Do not use a straight needle with your sewing machine. Preparations Changing the needle 1. Needles The sewing machine needle plays an important role in the multi-purpose tool to hold the needle. 2. A B C D E Embroidery needle (C) Embroidery needles have a special scarf to...

Owner's Manual
Page 34
...with an Embroidery Machine Communication CD. Note: Do not remove the USB embroidery stick when the hourglass is shown on the CD is connected to connect either your computer for the Àrst time. Make sure that time can easily move Àles between the computer and sewing machine. Use the ...stick to your machine (P/N:412 62 59-04) plugs in this port. To remove, carefully pull the USB embroidery stick or the plug of the cable...
...with an Embroidery Machine Communication CD. Note: Do not remove the USB embroidery stick when the hourglass is shown on the CD is connected to connect either your computer for the Àrst time. Make sure that time can easily move Àles between the computer and sewing machine. Use the ...stick to your machine (P/N:412 62 59-04) plugs in this port. To remove, carefully pull the USB embroidery stick or the plug of the cable...
Owner's Manual
Page 35
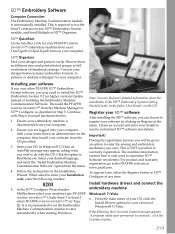
... details to start automatically when starting Windows. Installing your PFAFF® creative sensation™ embroidery machine from the menu. 4. Under Send 1 or Send 2 select PFAFF® creative sensation™ (or Type Q). Create an account and enter... your computer. Browse them in the Installation Wizard. In Windows® 7/Vista, an AutoPlay message may appear, asking what you may need to use the Send To features in any time. Note: You can choose to enter the sewing and embroidery machine...
... details to start automatically when starting Windows. Installing your PFAFF® creative sensation™ embroidery machine from the menu. 4. Under Send 1 or Send 2 select PFAFF® creative sensation™ (or Type Q). Create an account and enter... your computer. Browse them in the Installation Wizard. In Windows® 7/Vista, an AutoPlay message may appear, asking what you may need to use the Send To features in any time. Note: You can choose to enter the sewing and embroidery machine...
Owner's Manual
Page 37
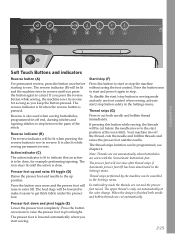
... button again to cancel. Press the button once more to raise the presser foot to pivot height. The presser foot will be lit and the machine sews in the Settings menu. The presser foot is pressed. D B E C F G H I J Preparations A Soft Touch Buttons and indicators Reverse button (A) For permanent reverse.... Press the button once more and the presser foot will be done, for as long as you press the reverse button while sewing, the machine sews in reverse. Reverse is to get thick fabric under the presser foot. Action indicator (C) The action indicator is lit to cut ...
... button again to cancel. Press the button once more to raise the presser foot to pivot height. The presser foot will be lit and the machine sews in the Settings menu. The presser foot is pressed. D B E C F G H I J Preparations A Soft Touch Buttons and indicators Reverse button (A) For permanent reverse.... Press the button once more and the presser foot will be done, for as long as you press the reverse button while sewing, the machine sews in reverse. Reverse is to get thick fabric under the presser foot. Action indicator (C) The action indicator is lit to cut ...
Owner's Manual
Page 72
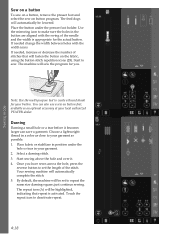
...save a garment. Darning Darning a small hole or a tear before it . 4. just continue sewing. Start sewing above the hole and over it becomes larger can also use a sew on button program. Your sewing machine will be lowered. Start to deactivate repeat. 4:18 28 A Once you . Choose a lightweight ...repeat the same size darning square; Sewing mode Sew on a button To sew on a button, remove the presser foot and select the sew on button foot, available as an optional accessory at your garment as close to your local authorized PFAFF® dealer. Place fabric or...
...save a garment. Darning Darning a small hole or a tear before it . 4. just continue sewing. Start sewing above the hole and over it becomes larger can also use a sew on button program. Your sewing machine will be lowered. Start to deactivate repeat. 4:18 28 A Once you . Choose a lightweight ...repeat the same size darning square; Sewing mode Sew on a button To sew on a button, remove the presser foot and select the sew on button foot, available as an optional accessory at your garment as close to your local authorized PFAFF® dealer. Place fabric or...

Owner's Manual
Page 74
...sometimes used. The stitches can also use the optional presser foot, Stitchin-Ditch w/IDT™ system P/N 820 925 096. You move your sewing machine for your stitching, then begin stitching your quilt. Touch the free-motion options icon (B) and select one of the quilt. Take one ...batting from the center of your quilt. It is done with safety pins, starting from your quilt. Maintaining a consistent speed while free-motion sewing will also help keep stitches even. 4. Begin near the center of your quilt, while keeping the layers together. Activate Needle down. 5. ...
...sometimes used. The stitches can also use the optional presser foot, Stitchin-Ditch w/IDT™ system P/N 820 925 096. You move your sewing machine for your stitching, then begin stitching your quilt. Touch the free-motion options icon (B) and select one of the quilt. Take one ...batting from the center of your quilt. It is done with safety pins, starting from your quilt. Maintaining a consistent speed while free-motion sewing will also help keep stitches even. 4. Begin near the center of your quilt, while keeping the layers together. Activate Needle down. 5. ...
Owner's Manual
Page 105
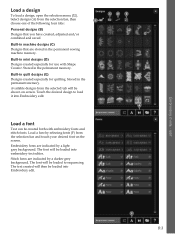
... fonts and stitch fonts. The font will be created both with Shape Creator. Load a design To load a design, open the selection menu (32). Built-in machine designs (C) Designs that you have created, adjusted and/or combined and saved. Touch the desired design to sequencing. The font will then be loaded to... background. The text created will be loaded into Embroidery edit. Embroidery mode - Built-in mini designs (D) Designs created especially for quilting. Built-in the permanent sewing machine memory.
... fonts and stitch fonts. The font will be created both with Shape Creator. Load a design To load a design, open the selection menu (32). Built-in machine designs (C) Designs that you have created, adjusted and/or combined and saved. Touch the desired design to sequencing. The font will then be loaded to... background. The text created will be loaded into Embroidery edit. Embroidery mode - Built-in mini designs (D) Designs created especially for quilting. Built-in the permanent sewing machine memory.
Owner's Manual
Page 154
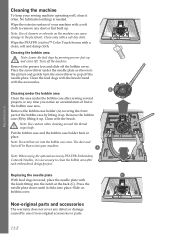
...The warranty does not cover any defect or damage caused by lifting it up . Note: Use of lint in the bobbin case area. Wipe the PFAFF® creative™ Color Touch Screen with the accessories. Clean the feed dogs with the brush found with a clean, soft and damp cloth. Put the ...plate as shown in place. Clean with a soft dry cloth. Note: Do not blow air into the bobbin case area. Maintenance Cleaning the machine To keep your sewing machine operating well, clean it clicks into place. Clean only with the brush. Cleaning the bobbin area Note: Lower the feed dogs by lifting ...
...The warranty does not cover any defect or damage caused by lifting it up . Note: Use of lint in the bobbin case area. Wipe the PFAFF® creative™ Color Touch Screen with the accessories. Clean the feed dogs with the brush found with a clean, soft and damp cloth. Put the ...plate as shown in place. Clean with a soft dry cloth. Note: Do not blow air into the bobbin case area. Maintenance Cleaning the machine To keep your sewing machine operating well, clean it clicks into place. Clean only with the brush. Cleaning the bobbin area Note: Lower the feed dogs by lifting ...
Owner's Manual
Page 156
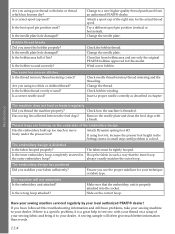
...clean the feed dogs with your thread on a scrap of the right size for the actual thread spool. Maintenance Have your sewing machine serviced regularly by your dealer. Is the best spool pin position used ? Try a different spool pin position (vertical or horizontal). ...proper stabilizer for this troubleshooting information and still have problems, take your sewing machine to your local authorized PFAFF® dealer! Bobbin thread breaks Did you insert the bobbin properly? Clean lint from an authorized PFAFF® dealer. The seam has uneven stitches Is the thread tension/...
...clean the feed dogs with your thread on a scrap of the right size for the actual thread spool. Maintenance Have your sewing machine serviced regularly by your dealer. Is the best spool pin position used ? Try a different spool pin position (vertical or horizontal). ...proper stabilizer for this troubleshooting information and still have problems, take your sewing machine to your local authorized PFAFF® dealer! Bobbin thread breaks Did you insert the bobbin properly? Clean lint from an authorized PFAFF® dealer. The seam has uneven stitches Is the thread tension/...
Owner's Manual
Page 162
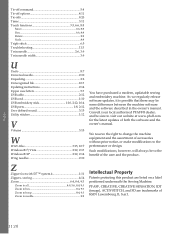
... 8:4, 9:3 Zoom to hoop 8:4, 9:3 Zoom to the performance or design. PFAFF, CREATIVE, CREATIVE SENSATION, IDT (image), ACTIVSTITCH, and 5D are trademarks of accessories without prior notice, or make modiÀcations to needle 9:8 Intellectual Property Patents protecting this product are listed on a label positioned underneath the Sewing Machine. Index 11:10 As we regularly release software updates...
... 8:4, 9:3 Zoom to hoop 8:4, 9:3 Zoom to the performance or design. PFAFF, CREATIVE, CREATIVE SENSATION, IDT (image), ACTIVSTITCH, and 5D are trademarks of accessories without prior notice, or make modiÀcations to needle 9:8 Intellectual Property Patents protecting this product are listed on a label positioned underneath the Sewing Machine. Index 11:10 As we regularly release software updates...


