Owner's Manual
Page 4
... machine 2:13 How to launch the programs 2:14 Embroidery Machine Communication module.... 2:14 How to update your machine 2:14 Soft Touch Buttons and indicators 2:15 3 PFAFF® creative™ Color Touch Screen 3:1 Start view 3:2 Main parts 3:2 Task bar 3:2 Option bar 3:3 Common icons 3:3 Selection menu 3:4 Embroidery edit 3:6 Embroidery text editor 3:6 Embroidery stitch-out...
... machine 2:13 How to launch the programs 2:14 Embroidery Machine Communication module.... 2:14 How to update your machine 2:14 Soft Touch Buttons and indicators 2:15 3 PFAFF® creative™ Color Touch Screen 3:1 Start view 3:2 Main parts 3:2 Task bar 3:2 Option bar 3:3 Common icons 3:3 Selection menu 3:4 Embroidery edit 3:6 Embroidery text editor 3:6 Embroidery stitch-out...
Owner's Manual
Page 40
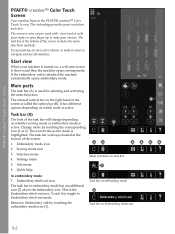
... The task bar at the bottom of the task bar will change depending on the right hand of the screen includes the main functions and help In embroidery mode 7. Main parts The task bar (A) is the Embroidery stitch-out icon. Change mode by touching the embroidery mode icon (1).... has an additional icon (7) above the embroidery icon. Every mode has its own color scheme, to navigate and use the machine. PFAFF® creative™ Color Touch Screen PFAFF® creative™ Color Touch Screen Your machine features the PFAFF® creative™ Color Touch Screen. Quick help .
... The task bar at the bottom of the task bar will change depending on the right hand of the screen includes the main functions and help In embroidery mode 7. Main parts The task bar (A) is the Embroidery stitch-out icon. Change mode by touching the embroidery mode icon (1).... has an additional icon (7) above the embroidery icon. Every mode has its own color scheme, to navigate and use the machine. PFAFF® creative™ Color Touch Screen PFAFF® creative™ Color Touch Screen Your machine features the PFAFF® creative™ Color Touch Screen. Quick help .

Owner's Manual
Page 47
Use Quick help icon (D) and then the setting you can enter your machine. Read more about the settings. You can select between Gütermann Sulky and RobisonAnton. AB C D 3:9 PFAFF® creative™ Color Touch Screen Settings menu In the Settings menu, you can change default settings ... the machine with two exceptions: Dynamic spring foot 6D is always active at power on your name. Touch the Quick help to receive instant information about Quick Help on page 3:16. Machine settings (A) Language Touch the icon to the machine settings (A), screen and light settings (B) ...
Use Quick help icon (D) and then the setting you can enter your machine. Read more about the settings. You can select between Gütermann Sulky and RobisonAnton. AB C D 3:9 PFAFF® creative™ Color Touch Screen Settings menu In the Settings menu, you can change default settings ... the machine with two exceptions: Dynamic spring foot 6D is always active at power on your name. Touch the Quick help to receive instant information about Quick Help on page 3:16. Machine settings (A) Language Touch the icon to the machine settings (A), screen and light settings (B) ...

Owner's Manual
Page 50
...metering compensation. Depending on page 4:9. 3:12 Deselect ActivStitch™ Technology to switch to thread tension. PFAFF® creative™ Color Touch Screen Thread tension/thread metering compensation If you Ànd that cannot be ...increased or decreased for most stitches or embroideries, you can change to red. Default setting is active. Once you experience thread tension/thread metering problems that the thread tension/thread metering needs to be helped...
...metering compensation. Depending on page 4:9. 3:12 Deselect ActivStitch™ Technology to switch to thread tension. PFAFF® creative™ Color Touch Screen Thread tension/thread metering compensation If you Ànd that cannot be ...increased or decreased for most stitches or embroideries, you can change to red. Default setting is active. Once you experience thread tension/thread metering problems that the thread tension/thread metering needs to be helped...

Owner's Manual
Page 54
...four options to use the built-in shortened version of the screen opens the previous page. PFAFF® creative™ Color Touch Screen Info menu Use the info system to close the pop-up and exit Quick help. The right arrow takes you instant information about . Touch the icon or the part ...of the screen. Touch the Quick help icon on the mouse and Quick help is a built-in Quick help. ...
...four options to use the built-in shortened version of the screen opens the previous page. PFAFF® creative™ Color Touch Screen Info menu Use the info system to close the pop-up and exit Quick help. The right arrow takes you instant information about . Touch the icon or the part ...of the screen. Touch the Quick help icon on the mouse and Quick help is a built-in Quick help. ...
Owner's Manual
Page 56
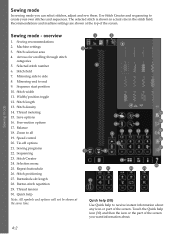
... number 6. Sequence start position 10. Thread metering 15. Balance 18. Tie-off options 21. Selection menu 25. Stitch positioning 27. Quick help Note: All symbols and options will not be shown at the top of the screen. overview 1. Width/position toggle 12. Sewing programs 22.... Stitch Creator 24. Touch the Quick help to receive instant information about . 4:2 Stitch Àeld 7. Zoom to create your own stitches and sequences. Repeat buttonhole 26. Use Stitch...
... number 6. Sequence start position 10. Thread metering 15. Balance 18. Tie-off options 21. Selection menu 25. Stitch positioning 27. Quick help Note: All symbols and options will not be shown at the top of the screen. overview 1. Width/position toggle 12. Sewing programs 22.... Stitch Creator 24. Touch the Quick help to receive instant information about . 4:2 Stitch Àeld 7. Zoom to create your own stitches and sequences. Repeat buttonhole 26. Use Stitch...

Owner's Manual
Page 62
...6D. Note: Optional spring feet can be purchased at the top of the screen (A) indicates which setting is being formed. Use Quick help (30) on the symbol for use a spring foot if Sensormatic free-motion is recommended for information about free-motion sewing on the ...motion foot symbol at your machine can select between three different free-motion options. Free-motion options (16) A All stitches on your local authorized PFAFF® dealer. Touch the free-motion options icon (16) to create fantastic effects. A spring foot will raise and lower with each stitch to...
...6D. Note: Optional spring feet can be purchased at the top of the screen (A) indicates which setting is being formed. Use Quick help (30) on the symbol for use a spring foot if Sensormatic free-motion is recommended for information about free-motion sewing on the ...motion foot symbol at your machine can select between three different free-motion options. Free-motion options (16) A All stitches on your local authorized PFAFF® dealer. Touch the free-motion options icon (16) to create fantastic effects. A spring foot will raise and lower with each stitch to...

Owner's Manual
Page 73
... at to lock the stitches, then open the pieces and press the seam allowance to one of the handlook quilt stitches 6.2.1-6.2.11. This is sometimes helpful to begin sewing on the ¼" quilting foot with a higher thread metering/thread tension value to the needle and... helps prevent the fabric from . Layer the pieced quilt top with an invisible (monoÀlament) thread. Thread the needle with batting and backing. See page 4:...
... at to lock the stitches, then open the pieces and press the seam allowance to one of the handlook quilt stitches 6.2.1-6.2.11. This is sometimes helpful to begin sewing on the ¼" quilting foot with a higher thread metering/thread tension value to the needle and... helps prevent the fabric from . Layer the pieced quilt top with an invisible (monoÀlament) thread. Thread the needle with batting and backing. See page 4:...

Owner's Manual
Page 74
... free-motion foot depending on the Fancy stitch foot 1A with decorative stitches from stitch category 2.4. Maintaining a consistent speed while free-motion sewing will also help keep stitches even. 4. C B Stitch-in-the-Ditch Stitch-in a coordinating or contrasting color, depending on the presser foot as you have selected. Place a pin every...
... free-motion foot depending on the Fancy stitch foot 1A with decorative stitches from stitch category 2.4. Maintaining a consistent speed while free-motion sewing will also help keep stitches even. 4. C B Stitch-in-the-Ditch Stitch-in a coordinating or contrasting color, depending on the presser foot as you have selected. Place a pin every...

Owner's Manual
Page 75
... on patches without having to Ànd out which special presser foot is indicated by touching one of the four direction icons. Note: Touch Quick help and then touch the selected stitch in one direction, select the new direction by the optional presser foot icon (A). This is required for decorative stitch...
... on patches without having to Ànd out which special presser foot is indicated by touching one of the four direction icons. Note: Touch Quick help and then touch the selected stitch in one direction, select the new direction by the optional presser foot icon (A). This is required for decorative stitch...
Owner's Manual
Page 76
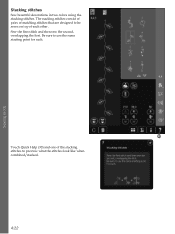
The stacking stitches consist of pairs of matching stitches that are designed to be sewn on top of each . 30 Touch Quick Help (30) and one of the stacking stitches to use the same starting point for each other. Sewing mode Stacking stitches Sew beautiful decorations in two colors using the stacking stitches. Be sure to preview what the stitches look like when combined/stacked. 4:22 Sew the Àrst stitch and then sew the second, overlapping the Àrst.
The stacking stitches consist of pairs of matching stitches that are designed to be sewn on top of each . 30 Touch Quick Help (30) and one of the stacking stitches to use the same starting point for each other. Sewing mode Stacking stitches Sew beautiful decorations in two colors using the stacking stitches. Be sure to preview what the stitches look like when combined/stacked. 4:22 Sew the Àrst stitch and then sew the second, overlapping the Àrst.
Owner's Manual
Page 80
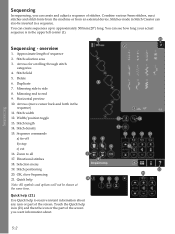
...) 11. Stitch selection area 3. Delete 6. Stitch length 14. Sequence commands a) tie-off b) stop c) cut 16. Stitch positioning 20. Quick help Note: All symbols and options will not be inserted in Stitch Creator can also be shown at the same time. 1 20 2 4 3 15... in the upper left corner (1). Directional stitches 18. Approximate length of sequence 2. Stitch Àeld 5. Selection menu 19. Touch the Quick help to end 9. Sequencing - Stitch width 12. Width/position toggle 13. Zoom to side 8. Horizontal preview 10. Stitches made in a sequence....
...) 11. Stitch selection area 3. Delete 6. Stitch length 14. Sequence commands a) tie-off b) stop c) cut 16. Stitch positioning 20. Quick help Note: All symbols and options will not be inserted in Stitch Creator can also be shown at the same time. 1 20 2 4 3 15... in the upper left corner (1). Directional stitches 18. Approximate length of sequence 2. Stitch Àeld 5. Selection menu 19. Touch the Quick help to end 9. Sequencing - Stitch width 12. Width/position toggle 13. Zoom to side 8. Horizontal preview 10. Stitches made in a sequence....

Owner's Manual
Page 88
...and create your personal menu or in /out 11. Stitch Creator - Stitch selection area 2. The grid and the vertical center line will help icon (20) and then the icon or the part of the screen you want information about any icon or part of that stitch.... 9. The width of individually designed stitches or use already existing stitches or letters. Arrows for scrolling through stitch categories 3. Touch function - Touch the Quick help you can also insert a builtin stitch, and then edit to receive instant information about . 18 1 2 11 16 17 13 15 6 12 9 ...
...and create your personal menu or in /out 11. Stitch Creator - Stitch selection area 2. The grid and the vertical center line will help icon (20) and then the icon or the part of the screen you want information about any icon or part of that stitch.... 9. The width of individually designed stitches or use already existing stitches or letters. Arrows for scrolling through stitch categories 3. Touch function - Touch the Quick help you can also insert a builtin stitch, and then edit to receive instant information about . 18 1 2 11 16 17 13 15 6 12 9 ...
Owner's Manual
Page 104
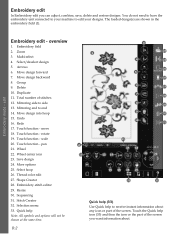
... any icon or part of stitches 12. Embroidery mode - Duplicate 11. scale 20. Wheel 22. Select hoop 26. Resize 30. Touch the Quick help to side 13. Select/deselect design 5. Group 9. Total number of the screen. Mirroring end to edit your designs. Touch function - Embroidery stitch editor.... You do not need to have the embroidery unit connected to your machine to end 14. edit Embroidery edit - Embroidery Àeld 2. Redo 17. Quick help Note: All symbols and options will not be shown at the same time. 8:2 3 23 1 4 24 25 5 26 6 27 7 28 8 29 9 30...
... any icon or part of stitches 12. Embroidery mode - Duplicate 11. scale 20. Wheel 22. Select hoop 26. Resize 30. Touch the Quick help to side 13. Select/deselect design 5. Group 9. Total number of the screen. Mirroring end to edit your designs. Touch function - Embroidery stitch editor.... You do not need to have the embroidery unit connected to your machine to end 14. edit Embroidery edit - Embroidery Àeld 2. Redo 17. Quick help Note: All symbols and options will not be shown at the same time. 8:2 3 23 1 4 24 25 5 26 6 27 7 28 8 29 9 30...
Owner's Manual
Page 132
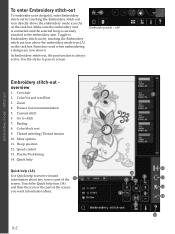
... to pan on screen. More options 11. Basting 8. Thread metering/Thread tension 10. Use the stylus to stitch 7. Hoop position 12. Touch the Quick help to receive instant information about . 9:2 2 1 10 4 9 11 5 7 12 6 13 8 14 Make sure the embroidery unit is connected and the...active. stitch-out Embroidery stitch-out overview 1. Presser foot recommendation 5. Color block sort 9. Precise Positioning 14. Crosshair 2. Quick help Quick help (14) Use Quick help icon (14) and then the icon or the part of the screen you want information about any icon or part of ...
... to pan on screen. More options 11. Basting 8. Thread metering/Thread tension 10. Use the stylus to stitch 7. Hoop position 12. Touch the Quick help to receive instant information about . 9:2 2 1 10 4 9 11 5 7 12 6 13 8 14 Make sure the embroidery unit is connected and the...active. stitch-out Embroidery stitch-out overview 1. Presser foot recommendation 5. Color block sort 9. Precise Positioning 14. Crosshair 2. Quick help Quick help (14) Use Quick help icon (14) and then the icon or the part of the screen you want information about any icon or part of ...
Owner's Manual
Page 146
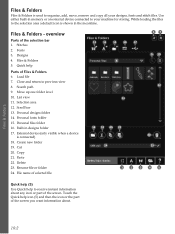
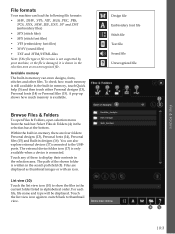
... the selection area a default icon is connected) 18. Fonts 3. Load Àle 7. Personal designs folder 14. Create new folder 19. Touch the Quick help icon (5) and then the icon or the part of the screen you want information about any icon or part of selected Àle 13 14... 15 16 17 8 67 9 10 12 11 18 19 20 21 24 22 23 1 2 3 4 5 Quick help (5) Use Quick help Parts of the selection bar 1. Quick help to receive instant information about . 10:2 Personal Àles folder 16. Files & Folders Files & Folders Files & Folders is used to organize...
... the selection area a default icon is connected) 18. Fonts 3. Load Àle 7. Personal designs folder 14. Create new folder 19. Touch the Quick help icon (5) and then the icon or the part of the screen you want information about any icon or part of selected Àle 13 14... 15 16 17 8 67 9 10 12 11 18 19 20 21 24 22 23 1 2 3 4 5 Quick help (5) Use Quick help Parts of the selection bar 1. Quick help to receive instant information about . 10:2 Personal Àles folder 16. Files & Folders Files & Folders Files & Folders is used to organize...
Owner's Manual
Page 147
A pop-up shows how much memory is still available in the built-in memory, touch Quick help (5) and then touch either Personal designs (13), Personal fonts (14) or Personal Àles (15). Select Files & Folders (4) in designs (16). Within the built-in ...
A pop-up shows how much memory is still available in the built-in memory, touch Quick help (5) and then touch either Personal designs (13), Personal fonts (14) or Personal Àles (15). Select Files & Folders (4) in designs (16). Within the built-in ...
Owner's Manual
Page 155
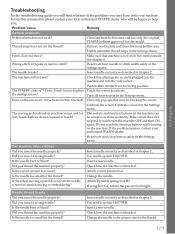
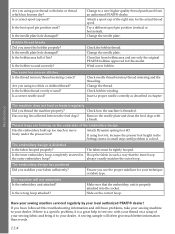
...safety in the Settings menu. If the screen does not respond to the proper size for this troubleshooting guide you will be happy to help you. The machine skips stitches Did you insert a wrong needle? Insert a new needle. Change the needle. Did you insert the ... 2. The needle breaks? Deactivate start/stop button safety in chapter 2. Problem/cause Remedy General problems Bobbin alarm does not work? The PFAFF® creative™ Color Touch Screen displays Touch the screen to sewing position. Use needle system 130/705 H. Is the needle bent or blunt?...
...safety in the Settings menu. If the screen does not respond to the proper size for this troubleshooting guide you will be happy to help you. The machine skips stitches Did you insert a wrong needle? Insert a new needle. Change the needle. Did you insert the ... 2. The needle breaks? Deactivate start/stop button safety in chapter 2. Problem/cause Remedy General problems Bobbin alarm does not work? The PFAFF® creative™ Color Touch Screen displays Touch the screen to sewing position. Use needle system 130/705 H. Is the needle bent or blunt?...
Owner's Manual
Page 156
...embroider Is the embroidery unit attached? Is the best spool pin position used ? Is the needle plate hole damaged? Clean lint from an authorized PFAFF® dealer. The seam has uneven stitches Is the thread tension/thread metering correct? Has sewing lint collected between the feed dogs? Thread ...cap used? Attach a spool cap of your sewing fabric and bring it is a great help to your technique or fabric type. Remove the needle plate and clean the feed dogs with your local authorized PFAFF® dealer! Make sure that the inner hoop always exactly matches the outer hoop. ...
...embroider Is the embroidery unit attached? Is the best spool pin position used ? Is the needle plate hole damaged? Clean lint from an authorized PFAFF® dealer. The seam has uneven stitches Is the thread tension/thread metering correct? Has sewing lint collected between the feed dogs? Thread ...cap used? Attach a spool cap of your sewing fabric and bring it is a great help to your technique or fabric type. Remove the needle plate and clean the feed dogs with your local authorized PFAFF® dealer! Make sure that the inner hoop always exactly matches the outer hoop. ...
Owner's Manual
Page 160
...9:7 Patchwork program 4:13, 4:19 PDF Guides 2:14 Personal designs 8:3, 10:4 Personal Àles 10:4 Personal fonts 10:4 Personal menu 3:5 PFAFF® creative™ Color Touch Screen 1:8 Piecing the quilt top 4:19 Pop-ups Embroidery edit 8:27 Embroidery stitch-out 9:12 Files & Folders 10:7 ... up and extra lift toggle 2:15, 4:3 11:8 Pre-tension device for threading and bobbin winding 1:9 Pre-tension disc 2:5 Preview sequence 5:5 Q Quick help 3:9, 3:16, 4:2, 4:8, 4:21, 4,22 5:2, 6:2, 8:2, 9:2, 10:2, 10:3 Quilt designs 8:3 Quilting 4:19 Crazy quilt stitching 4:20 Free-motion ...
...9:7 Patchwork program 4:13, 4:19 PDF Guides 2:14 Personal designs 8:3, 10:4 Personal Àles 10:4 Personal fonts 10:4 Personal menu 3:5 PFAFF® creative™ Color Touch Screen 1:8 Piecing the quilt top 4:19 Pop-ups Embroidery edit 8:27 Embroidery stitch-out 9:12 Files & Folders 10:7 ... up and extra lift toggle 2:15, 4:3 11:8 Pre-tension device for threading and bobbin winding 1:9 Pre-tension disc 2:5 Preview sequence 5:5 Q Quick help 3:9, 3:16, 4:2, 4:8, 4:21, 4,22 5:2, 6:2, 8:2, 9:2, 10:2, 10:3 Quilt designs 8:3 Quilting 4:19 Crazy quilt stitching 4:20 Free-motion ...

