
Owner's Manual
Page 5
... a new stitch point 6:4 Zoom 6:4 Mirroring side to side 6:5 Mirroring end to avoid the discoloring. If you suspect that your sewing machine. overview 4:2 Select a stitch 4:3 Sewing recommendations 4:3 Machine settings 4:3 Raise and lower the presser foot 4:3 Stitch settings 4:4 Stitch width 4:4 Stitch positioning 4:4 Stitch length 4:4 Stitch density 4:5 Mirroring 4:5 Balance 4:5 Buttonhole slit length 4:6 Button stitch repetition 4:6 Thread metering/Thread tension 4:7 Adjust thread tension/thread metering 4:7 Free-motion options 4:8 Sequence start...
... a new stitch point 6:4 Zoom 6:4 Mirroring side to side 6:5 Mirroring end to avoid the discoloring. If you suspect that your sewing machine. overview 4:2 Select a stitch 4:3 Sewing recommendations 4:3 Machine settings 4:3 Raise and lower the presser foot 4:3 Stitch settings 4:4 Stitch width 4:4 Stitch positioning 4:4 Stitch length 4:4 Stitch density 4:5 Mirroring 4:5 Balance 4:5 Buttonhole slit length 4:6 Button stitch repetition 4:6 Thread metering/Thread tension 4:7 Adjust thread tension/thread metering 4:7 Free-motion options 4:8 Sequence start...
Owner's Manual
Page 8
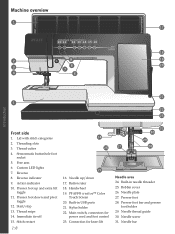
... 1. Free arm 6. Presser foot down 17. Bobbin cover 26. Presser foot bar and presser foot holder 29. Needle screw 31. Immediate tie-off 15. Button ruler 18. Needle plate 27. Reverse indicator 9. Main switch, connectors for knee-lift 31 30 29 27 28 Needle area 24. Needle bar Custom LED lights 7. Presser foot up /down and pivot toggle 12. Presser foot 28. Built-in needle threader 25. Threading slots 3. Needle up and extra lift toggle 11. Thread cutter 4. Thread snips 14. PFAFF® creative™...
... 1. Free arm 6. Presser foot down 17. Bobbin cover 26. Presser foot bar and presser foot holder 29. Needle screw 31. Immediate tie-off 15. Button ruler 18. Needle plate 27. Reverse indicator 9. Main switch, connectors for knee-lift 31 30 29 27 28 Needle area 24. Needle bar Custom LED lights 7. Presser foot up /down and pivot toggle 12. Presser foot 28. Built-in needle threader 25. Threading slots 3. Needle up and extra lift toggle 11. Thread cutter 4. Thread snips 14. PFAFF® creative™...
Owner's Manual
Page 10
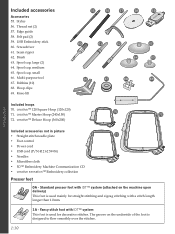
Edge guide 58. Spool cap, small 66. Standard presser foot with IDT™ system (attached on the underside of the foot is used for straight stitching and zigzag stitching with IDT™ system This foot is designed to Áow smoothly over the stitches. Screwdriver 61. Seam ripper 62. Hoop clips 69. creative™ Deluxe Hoop (360x200) 70 72 Included accessories not in picture • Straight stitch needle plate 71 • Foot control • Power cord • USB cord (P/N:412...
Edge guide 58. Spool cap, small 66. Standard presser foot with IDT™ system (attached on the underside of the foot is used for straight stitching and zigzag stitching with IDT™ system This foot is designed to Áow smoothly over the stitches. Screwdriver 61. Seam ripper 62. Hoop clips 69. creative™ Deluxe Hoop (360x200) 70 72 Included accessories not in picture • Straight stitch needle plate 71 • Foot control • Power cord • USB cord (P/N:412...
Owner's Manual
Page 11
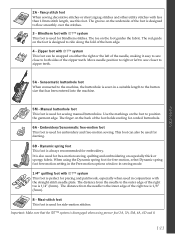
... cording for corded buttonhole. 6A - The red guide on the foot to Áow smoothly over the stitches. 3 - Use the markings on the foot is designed to ride along the fold of the foot is used for embroidery and free-motion sewing. Embroidery/Sensormatic free-motion foot This foot is designed to position the garment edge. Maxi-stitch foot This foot is always recommended for free-motion, select Dynamic spring foot free-motion setting in the Free-motion options window in sewing mode. 1/4" quilting foot with the straight stitch needle plate. Zipper foot...
... cording for corded buttonhole. 6A - The red guide on the foot to Áow smoothly over the stitches. 3 - Use the markings on the foot is designed to ride along the fold of the foot is used for embroidery and free-motion sewing. Embroidery/Sensormatic free-motion foot This foot is designed to position the garment edge. Maxi-stitch foot This foot is always recommended for free-motion, select Dynamic spring foot free-motion setting in the Free-motion options window in sewing mode. 1/4" quilting foot with the straight stitch needle plate. Zipper foot...

Owner's Manual
Page 12
..., darning, patching and decorative sewing. Topstitching. 1.1.3 1.1.4 1.1.5 Straight stitch reverse Sew continuous reverse with elastic thread in one stitch. Touch foot control to sew another stitch. Decorative stitch for quilting, hemstitching. Joining fabrics and quilt batting, decorative stitch for stretch fabrics and hems. Also used for decorative hems or topstitching. Stitch overview Utility stitches Stitch Stitch number Name 1.1.1 Straight stitch 1.1.2 Stretch triple straight stitch Description For seaming and topstitching. Select from 37 different needle positions...
..., darning, patching and decorative sewing. Topstitching. 1.1.3 1.1.4 1.1.5 Straight stitch reverse Sew continuous reverse with elastic thread in one stitch. Touch foot control to sew another stitch. Decorative stitch for quilting, hemstitching. Joining fabrics and quilt batting, decorative stitch for stretch fabrics and hems. Also used for decorative hems or topstitching. Stitch overview Utility stitches Stitch Stitch number Name 1.1.1 Straight stitch 1.1.2 Stretch triple straight stitch Description For seaming and topstitching. Select from 37 different needle positions...
Owner's Manual
Page 32
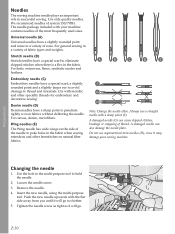
... needle plate. Do not use a straight needle with your sewing machine. Loosen the needle screw. 3. For canvas, denim, microÀbers. Preparations Changing the needle 1. Remove the needle. 4. Always use asymmetrical twin needles (H), since it will go . 2:10 A damaged needle can cause skipped stitches, breakage or snapping of sizes. Tighten the needle screw as tight as it may damage your machine contains needles of the needle to thread and materials. Use the hole in successful sewing. We recommend needles...
... needle plate. Do not use a straight needle with your sewing machine. Loosen the needle screw. 3. For canvas, denim, microÀbers. Preparations Changing the needle 1. Remove the needle. 4. Always use asymmetrical twin needles (H), since it will go . 2:10 A damaged needle can cause skipped stitches, breakage or snapping of sizes. Tighten the needle screw as tight as it may damage your machine contains needles of the needle to thread and materials. Use the hole in successful sewing. We recommend needles...
Owner's Manual
Page 37
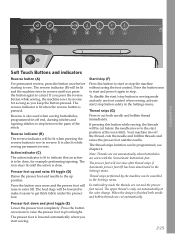
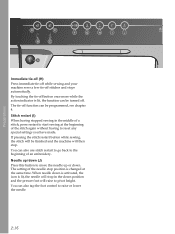
... start and press it easier to sew in the Settings menu. Action indicator (C) The action indicator is lit to indicate that an action is lowered automatically when you press the reverse button while sewing, the machine sews in the Settings menu. In embroidery mode the threads are sewn with the Sensormatic buttonhole foot. Press the button once more and the presser foot will be programmed, see chapter 4. The feed dogs...
... start and press it easier to sew in the Settings menu. Action indicator (C) The action indicator is lit to indicate that an action is lowered automatically when you press the reverse button while sewing, the machine sews in the Settings menu. In embroidery mode the threads are sewn with the Sensormatic buttonhole foot. Press the button once more and the presser foot will be programmed, see chapter 4. The feed dogs...
Owner's Manual
Page 38
... icon is changed at the beginning of the stitch again without having to reset any special settings you have made. The tie-off . You can also tap the foot control to raise or lower the needle. 2:16 You can also use stitch restart to go back to the beginning of an embroidery. If pressing the stitch restart button while sewing, the stitch will be programmed...
... icon is changed at the beginning of the stitch again without having to reset any special settings you have made. The tie-off . You can also tap the foot control to raise or lower the needle. 2:16 You can also use stitch restart to go back to the beginning of an embroidery. If pressing the stitch restart button while sewing, the stitch will be programmed...

Owner's Manual
Page 47
... activate a function or open a list for feed dogs the default setting is shown when turning on your machine. Color codes from the selected manufacturer will not automatically convert the colors in a design, or creating a new design from the list by touching it. Touch the Quick help to the selected thread manufacturer. Settings menu In the Settings menu, you can enter your name. When a twin needle size is kept until you...
... activate a function or open a list for feed dogs the default setting is shown when turning on your machine. Color codes from the selected manufacturer will not automatically convert the colors in a design, or creating a new design from the list by touching it. Touch the Quick help to the selected thread manufacturer. Settings menu In the Settings menu, you can enter your name. When a twin needle size is kept until you...

Owner's Manual
Page 57
... (4). a) Set for twin needle b) Set for stitch width safety c) Set for dynamic spring foot free-motion d) Set for spring foot free-motion e) Set for the selected stitch. Sewing recommendations (1) Your machine automatically gives you stop sewing and touch the presser foot up button (B) or press the thread snips button (D) to raise the needle. You can also lower the presser foot and the needle with a symbol when activated in the lower right corner (A). 1a 1c 2a 1b You can scroll through the list of...
... (4). a) Set for twin needle b) Set for stitch width safety c) Set for dynamic spring foot free-motion d) Set for spring foot free-motion e) Set for the selected stitch. Sewing recommendations (1) Your machine automatically gives you stop sewing and touch the presser foot up button (B) or press the thread snips button (D) to raise the needle. You can also lower the presser foot and the needle with a symbol when activated in the lower right corner (A). 1a 1c 2a 1b You can scroll through the list of...

Owner's Manual
Page 61
... the fabric. If the bobbin thread is too tight. Increase the thread tension/thread metering. When using specialty thread. Use the control to get the best result. For decorative stitches and buttonholes the top thread should be visible on the setting in Machine settings. The control visible in two ways: thread tension and thread metering. Adjust thread tension/thread metering For the best stitch appearance and durability make sure the needle thread tension/thread metering is too loose. Sewing mode Thread metering (14)/Thread tension...
... the fabric. If the bobbin thread is too tight. Increase the thread tension/thread metering. When using specialty thread. Use the control to get the best result. For decorative stitches and buttonholes the top thread should be visible on the setting in Machine settings. The control visible in two ways: thread tension and thread metering. Adjust thread tension/thread metering For the best stitch appearance and durability make sure the needle thread tension/thread metering is too loose. Sewing mode Thread metering (14)/Thread tension...

Owner's Manual
Page 62
... presser foot. Spring foot free-motion (16b) Activate to set the machine in Dynamic spring foot free-motion mode for information about free-motion sewing on page 4:20. Free-motion options (16) A All stitches on your local authorized PFAFF® dealer. Dynamic spring foot free-motion (16a) Activate to set the machine in Spring foot freemotion mode for use a spring foot if Sensormatic free-motion is recommended for optional spring feet. a b c d 16 30 Sewing mode 4:8 Touch the free-motion options icon (16) to hold the fabric on the needle plate...
... presser foot. Spring foot free-motion (16b) Activate to set the machine in Dynamic spring foot free-motion mode for information about free-motion sewing on page 4:20. Free-motion options (16) A All stitches on your local authorized PFAFF® dealer. Dynamic spring foot free-motion (16a) Activate to set the machine in Spring foot freemotion mode for use a spring foot if Sensormatic free-motion is recommended for optional spring feet. a b c d 16 30 Sewing mode 4:8 Touch the free-motion options icon (16) to hold the fabric on the needle plate...
Owner's Manual
Page 63
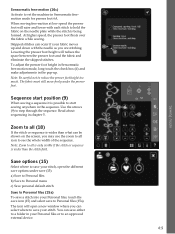
... and lower with the needle as you may use the zoom to all (18) If the stitch or sequence is possible to start position (9) When sewing a sequence it is wider than the stitch Àeld. To adjust the presser foot height in Sensormatic free-motion mode, long touch the check box (d) and make adjustments in the pop-up and down with each stitch to hold the fabric...
... and lower with the needle as you may use the zoom to all (18) If the stitch or sequence is possible to start position (9) When sewing a sequence it is wider than the stitch Àeld. To adjust the presser foot height in Sensormatic free-motion mode, long touch the check box (d) and make adjustments in the pop-up and down with each stitch to hold the fabric...

Owner's Manual
Page 71
... when sewing a buttonhole manually. When the columns are aligned, press the reverse button to sew identical copies. Use pearl cotton or a regular gimp thread. 1. Repeat buttonhole is selected, the machine will also be cancelled if any adjustments are made. 25 Corded buttonhole Corded buttonholes that the red arrow lines up into a needle and pull them to sew, make sure that are more stable, durable and have adjusted your buttonhole, use presser foot 5M...
... when sewing a buttonhole manually. When the columns are aligned, press the reverse button to sew identical copies. Use pearl cotton or a regular gimp thread. 1. Repeat buttonhole is selected, the machine will also be cancelled if any adjustments are made. 25 Corded buttonhole Corded buttonholes that the red arrow lines up into a needle and pull them to sew, make sure that are more stable, durable and have adjusted your buttonhole, use presser foot 5M...

Owner's Manual
Page 73
... fabric for quilting. position the fabric under the foot so that can be sewn repeatedly. When possible, press seam allowances towards the darker fabric. Assemble the pieces according to the batting and backing. 2. Pin baste the layers together in the bobbin. 3. Engage the IDT™ system. 5. Snap on the recommended foot shown in the straight stitch needle plate supports the fabric closer to the needle and helps prevent the fabric from . Thread...
... fabric for quilting. position the fabric under the foot so that can be sewn repeatedly. When possible, press seam allowances towards the darker fabric. Assemble the pieces according to the batting and backing. 2. Pin baste the layers together in the bobbin. 3. Engage the IDT™ system. 5. Snap on the recommended foot shown in the straight stitch needle plate supports the fabric closer to the needle and helps prevent the fabric from . Thread...

Owner's Manual
Page 135
... needle thread and bobbin thread, e.g., when using thread tension, the tension discs will be enabled while on the Àrst stitch in Machine settings. The number of thread for best results. To sew without stopping between thread metering and thread tension depending on the needle thread. It will still stop after sorting. Certain optional accessories, such as PFAFF® Yarn Couching Foot Set (P/N 820 912-096) require the use of thread color changes. The control visible in embroidery...
... needle thread and bobbin thread, e.g., when using thread tension, the tension discs will be enabled while on the Àrst stitch in Machine settings. The number of thread for best results. To sew without stopping between thread metering and thread tension depending on the needle thread. It will still stop after sorting. Certain optional accessories, such as PFAFF® Yarn Couching Foot Set (P/N 820 912-096) require the use of thread color changes. The control visible in embroidery...
Owner's Manual
Page 155
... the thread? The needle breaks? Push bobbin winder lever to touch, turn the machine OFF and then ON again. Turn off screen saver in the Settings menu. Close any pop-ups that may have with the needle when free-motion sewing or embroidering? If the screen does not respond to sewing position. Did you insert the needle properly? Is the correct presser foot used? Use needle system 130/705 H. Insert a new needle. Needle thread breaks Did you thread the machine...
... the thread? The needle breaks? Push bobbin winder lever to touch, turn the machine OFF and then ON again. Turn off screen saver in the Settings menu. Close any pop-ups that may have with the needle when free-motion sewing or embroidering? If the screen does not respond to sewing position. Did you insert the needle properly? Is the correct presser foot used? Use needle system 130/705 H. Insert a new needle. Needle thread breaks Did you thread the machine...
Owner's Manual
Page 156
...). Remove the needle plate and clean the feed dogs with slubs or thread which has become dry? Is the best spool pin position used ? Are you insert the bobbin properly? Make sure that the inner hoop always exactly matches the outer hoop. If there is a speciÀc problem, it to move freely under the presser foot? Bobbin thread breaks Did you using poor thread with a brush. Check how the machine is threaded. Attach Dynamic spring foot 6D. The fabric must...
...). Remove the needle plate and clean the feed dogs with slubs or thread which has become dry? Is the best spool pin position used ? Are you insert the bobbin properly? Make sure that the inner hoop always exactly matches the outer hoop. If there is a speciÀc problem, it to move freely under the presser foot? Bobbin thread breaks Did you using poor thread with a brush. Check how the machine is threaded. Attach Dynamic spring foot 6D. The fabric must...
Owner's Manual
Page 157
... spool pin 1:9 Available memory 10:3 B Background color 8:10, 9:6 Background fabric 8:10, 9:6 Balance 4:5 Basting 9:4 Beading foot 3:12 Blindhem foot with IDT™ system 3 1:11 Blindhem stitch 4:15 Elastic blindhem stitch 4:15 Bobbin area, cleaning 11:2 Bobbin cover 1:8 Bobbin, insert 2:8 Bobbin position 9:7 Bobbins 1:10 Bobbin spindle 1:9 Bobbin thread cutter 1:9 Bobbin thread guide 2:5 Bobbin thread guides 1:9 Bobbin winder lever 1:9 Bobbin winder thread guide 1:9 Bobbin winding 2:7 Bobbin winder thread guide 2:7 Winding while embroidering or sewing 2:8 Winding...
... spool pin 1:9 Available memory 10:3 B Background color 8:10, 9:6 Background fabric 8:10, 9:6 Balance 4:5 Basting 9:4 Beading foot 3:12 Blindhem foot with IDT™ system 3 1:11 Blindhem stitch 4:15 Elastic blindhem stitch 4:15 Bobbin area, cleaning 11:2 Bobbin cover 1:8 Bobbin, insert 2:8 Bobbin position 9:7 Bobbins 1:10 Bobbin spindle 1:9 Bobbin thread cutter 1:9 Bobbin thread guide 2:5 Bobbin thread guides 1:9 Bobbin winder lever 1:9 Bobbin winder thread guide 1:9 Bobbin winding 2:7 Bobbin winder thread guide 2:7 Winding while embroidering or sewing 2:8 Winding...
Owner's Manual
Page 158
...12 Delete selected stitch point 6:4 Denim needle 2:10 Design adjustments Delete 8:6 Duplicate 8:6 Group 8:6 Mirroring 8:7 Move design into hoop 8:7 Redo 8:7 Undo 8:7 Design angle, select 8:14 Design, load 8:3 Designs, built-in 7:3 Design, select 3:6 Directional stitches 5:5 Duplicate 8:6 Duplicate a stitch or letter 5:4 Duplicate selected stitch point 6:4 Dynamic spring foot 6D 1:11, 4:8 Attach 2:11 Dynamic spring foot 6D for embroidery 3:13, 7:4 Dynamic spring foot free-motion 4:8 E Edge guide 1:10 Electronic knee-lift 2:3 Embroidery arm 1:9, 7:2 Embroidery collection...
...12 Delete selected stitch point 6:4 Denim needle 2:10 Design adjustments Delete 8:6 Duplicate 8:6 Group 8:6 Mirroring 8:7 Move design into hoop 8:7 Redo 8:7 Undo 8:7 Design angle, select 8:14 Design, load 8:3 Designs, built-in 7:3 Design, select 3:6 Directional stitches 5:5 Duplicate 8:6 Duplicate a stitch or letter 5:4 Duplicate selected stitch point 6:4 Dynamic spring foot 6D 1:11, 4:8 Attach 2:11 Dynamic spring foot 6D for embroidery 3:13, 7:4 Dynamic spring foot free-motion 4:8 E Edge guide 1:10 Electronic knee-lift 2:3 Embroidery arm 1:9, 7:2 Embroidery collection...


