Owner's Manual
Page 2
...removing covers, lubricating, or when making any other user servicing adjustments mentioned in this manual. DANGER - Use only identical replacement parts. Replacement parts for its intended use the proper needle plate. Always unplug this sewing machine from the electric outlet immediately after using and ...recommended by pulling on a double-insulated product, nor should a means for Servicing of the system, and should always be added to those parts in the product. To unplug, grasp the plug, not the cord. • Hold plug when rewinding into water. See instructions for ...
...removing covers, lubricating, or when making any other user servicing adjustments mentioned in this manual. DANGER - Use only identical replacement parts. Replacement parts for its intended use the proper needle plate. Always unplug this sewing machine from the electric outlet immediately after using and ...recommended by pulling on a double-insulated product, nor should a means for Servicing of the system, and should always be added to those parts in the product. To unplug, grasp the plug, not the cord. • Hold plug when rewinding into water. See instructions for ...
Owner's Manual
Page 4
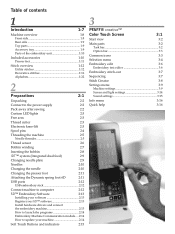
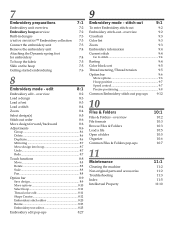
Table of contents 1 Introduction 1:7 Machine overview 1:8 Front side 1:8 Rear side 1:9 Top parts 1:9 Accessory tray 1:9 Parts of the embroidery unit 1:10 Included accessories 1:10 Presser feet 1:11 Stitch overview 1:12 Utility ... Embroidery Machine Communication module.... 2:14 How to update your machine 2:14 Soft Touch Buttons and indicators 2:15 3 PFAFF® creative™ Color Touch Screen 3:1 Start view 3:2 Main parts 3:2 Task bar 3:2 Option bar 3:3 Common icons 3:3 Selection menu 3:4 Embroidery edit 3:6 Embroidery text editor 3:6 Embroidery...
Table of contents 1 Introduction 1:7 Machine overview 1:8 Front side 1:8 Rear side 1:9 Top parts 1:9 Accessory tray 1:9 Parts of the embroidery unit 1:10 Included accessories 1:10 Presser feet 1:11 Stitch overview 1:12 Utility ... Embroidery Machine Communication module.... 2:14 How to update your machine 2:14 Soft Touch Buttons and indicators 2:15 3 PFAFF® creative™ Color Touch Screen 3:1 Start view 3:2 Main parts 3:2 Task bar 3:2 Option bar 3:3 Common icons 3:3 Selection menu 3:4 Embroidery edit 3:6 Embroidery text editor 3:6 Embroidery...
Owner's Manual
Page 6
7 Embroidery preparations 7:1 Embroidery unit overview 7:2 Embroidery hoop overview 7:2 Built-in designs 7:3 creative sensation™ Embroidery collection 7:3 Connect the embroidery unit 7:3 Remove the embroidery unit 7:4 Attaching the Dynamic spring foot for embroidery 7:4 To hoop the fabric 7:5 Slide on the ... a Àle Open a folder Organize Common Files & Folders pop-ups 10:1 10:2 10:3 10:3 10:5 10:5 10:6 10:7 11 Maintenance Cleaning the machine Non-original parts and accessories Troubleshooting Index Intellectual Property 11:1 11:2 11:2 11:3 11:5 11:10
7 Embroidery preparations 7:1 Embroidery unit overview 7:2 Embroidery hoop overview 7:2 Built-in designs 7:3 creative sensation™ Embroidery collection 7:3 Connect the embroidery unit 7:3 Remove the embroidery unit 7:4 Attaching the Dynamic spring foot for embroidery 7:4 To hoop the fabric 7:5 Slide on the ... a Àle Open a folder Organize Common Files & Folders pop-ups 10:1 10:2 10:3 10:3 10:5 10:5 10:6 10:7 11 Maintenance Cleaning the machine Non-original parts and accessories Troubleshooting Index Intellectual Property 11:1 11:2 11:2 11:3 11:5 11:10
Owner's Manual
Page 9
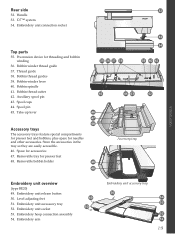
... side 32 32. Space for presser feet 48. Store the accessories in the tray so they are easily accessible. 46. Embroidery unit connection socket Top parts 35. Bobbin thread guides 39. Bobbin winder lever 40. Auxiliary spool pin 43. Embroidery unit accesssory tray 52.
... side 32 32. Space for presser feet 48. Store the accessories in the tray so they are easily accessible. 46. Embroidery unit connection socket Top parts 35. Bobbin thread guides 39. Bobbin winder lever 40. Auxiliary spool pin 43. Embroidery unit accesssory tray 52.
Owner's Manual
Page 37
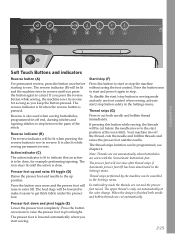
... lift toggle (D) Raises the presser foot and needle to pivot height. Your machine ties off end, darning stitches and tapering stitches to step between the parts of the next stitch. The presser foot will be lit and the machine sews in reverse until the action is lowered automatically when you press...
... lift toggle (D) Raises the presser foot and needle to pivot height. Your machine ties off end, darning stitches and tapering stitches to step between the parts of the next stitch. The presser foot will be lit and the machine sews in reverse until the action is lowered automatically when you press...
Owner's Manual
Page 40
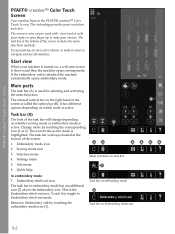
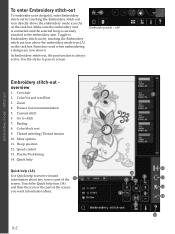
... 5. Task bar in embroidery mode 1 Task bar in Embroidery stitch-out 3:2 Main parts The task bar (A) is highlighted. Start view When your choices. PFAFF® creative™ Color Touch Screen PFAFF® creative™ Color Touch Screen Your machine features the PFAFF® creative™ Color Touch Screen. This technology provides great resolution and color. Info menu...
... 5. Task bar in embroidery mode 1 Task bar in Embroidery stitch-out 3:2 Main parts The task bar (A) is highlighted. Start view When your choices. PFAFF® creative™ Color Touch Screen PFAFF® creative™ Color Touch Screen Your machine features the PFAFF® creative™ Color Touch Screen. This technology provides great resolution and color. Info menu...

Owner's Manual
Page 54
...Files & Folders (see on the mouse and Quick help is a built-in Quick help, which are opened from - Touch the icon or the part of the screen you want information about everything you back to the current page. Place the cursor over the icon and right click on the... left arrow at the top of the Owner's manual. Category (A) Category shows the help topics and information. A pop-up instantly. 3:16 AB C D E PFAFF® creative™ Color Touch Screen Info menu Use the info system to easily get help topics divided into categories following the structure of the Owner's manual...
...Files & Folders (see on the mouse and Quick help is a built-in Quick help, which are opened from - Touch the icon or the part of the screen you want information about everything you back to the current page. Place the cursor over the icon and right click on the... left arrow at the top of the Owner's manual. Category (A) Category shows the help topics and information. A pop-up instantly. 3:16 AB C D E PFAFF® creative™ Color Touch Screen Info menu Use the info system to easily get help topics divided into categories following the structure of the Owner's manual...
Owner's Manual
Page 56
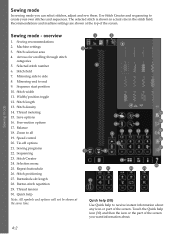
...stitch number 6. Zoom to side 8. Sewing programs 22. Repeat buttonhole 26. Touch the Quick help icon (30) and then the icon or the part of the screen you can select stitches, adjust and sew them. Sewing recommendations 2. Mirroring side to all 19. Stitch width 11. Use Stitch ... sequencing to end 9. Thread metering 15. Selection menu 25. Button stitch repetition 29. Sewing mode In sewing mode you want information about any icon or part of the screen. Recommendations and machine settings are shown at the same time. 1 5 2 3 6 4 19 15 16 20 17 18 10 12...
...stitch number 6. Zoom to side 8. Sewing programs 22. Repeat buttonhole 26. Touch the Quick help icon (30) and then the icon or the part of the screen you can select stitches, adjust and sew them. Sewing recommendations 2. Mirroring side to all 19. Stitch width 11. Use Stitch ... sequencing to end 9. Thread metering 15. Selection menu 25. Button stitch repetition 29. Sewing mode In sewing mode you want information about any icon or part of the screen. Recommendations and machine settings are shown at the same time. 1 5 2 3 6 4 19 15 16 20 17 18 10 12...
Owner's Manual
Page 80
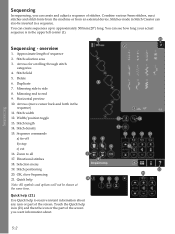
Sequencing Sequencing In sequencing, you can create and adjust a sequence of the screen you want information about any icon or part of sequence 2. Combine various 9mm stitches, maxi stitches and stitch fonts from the machine or from an external device. You can also be shown at ... 17. Arrows for scrolling through stitch categories 4. Delete 6. Width/position toggle 13. Stitch positioning 20. Quick help icon (21) and then the icon or the part of stitches. Sequencing - Approximate length of the screen. Stitch selection area 3. Stitch width 12.
Sequencing Sequencing In sequencing, you can create and adjust a sequence of the screen you want information about any icon or part of sequence 2. Combine various 9mm stitches, maxi stitches and stitch fonts from the machine or from an external device. You can also be shown at ... 17. Arrows for scrolling through stitch categories 4. Delete 6. Width/position toggle 13. Stitch positioning 20. Quick help icon (21) and then the icon or the part of stitches. Sequencing - Approximate length of the screen. Stitch selection area 3. Stitch width 12.
Owner's Manual
Page 86
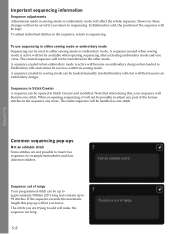
... sequencing after activating embroidery mode and vice versa. The created sequence will not be possible to the other mode. A sequence created in the sequence any part of range Your programmed stitch can be sewn as one stitch. The entire sequence will let you know. Common sequencing pop-ups Not an editable...
... sequencing after activating embroidery mode and vice versa. The created sequence will not be possible to the other mode. A sequence created in the sequence any part of range Your programmed stitch can be sewn as one stitch. The entire sequence will let you know. Common sequencing pop-ups Not an editable...

Owner's Manual
Page 88
The grid and the vertical center line will help you want information about any icon or part of that stitch. overview 1. Mirroring side to end 9. Wheel 16. Selection menu 20. The width of individually designed stitches or use already existing stitches or ... help to create your own version of the screen. Quick help 4 5 7 8 Quick help (20) Use Quick help icon (20) and then the icon or the part of the screen you to receive instant information about . 18 1 2 11 16 17 13 15 6 12 9 14 19 20 6:2 Stitch selection area 2. Touch function - Zoom...
The grid and the vertical center line will help you want information about any icon or part of that stitch. overview 1. Mirroring side to end 9. Wheel 16. Selection menu 20. The width of individually designed stitches or use already existing stitches or ... help to create your own version of the screen. Quick help 4 5 7 8 Quick help (20) Use Quick help icon (20) and then the icon or the part of the screen you to receive instant information about . 18 1 2 11 16 17 13 15 6 12 9 14 19 20 6:2 Stitch selection area 2. Touch function - Zoom...

Owner's Manual
Page 94
..., but will then become an embroidery design when loaded to add will make the sequence too long. 6:8 A stitch created when sewing mode is saved as part of range Your programmed stitch can be up will be inserted at the cursor position in the sequence. If the sequence exceeds the maximum length...
..., but will then become an embroidery design when loaded to add will make the sequence too long. 6:8 A stitch created when sewing mode is saved as part of range Your programmed stitch can be up will be inserted at the cursor position in the sequence. If the sequence exceeds the maximum length...
Owner's Manual
Page 104
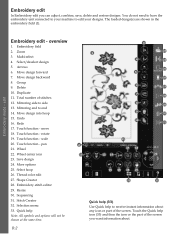
... 21. More options 25. Shape Creator 28. Embroidery stitch editor 29. Sequencing 31. Embroidery edit In Embroidery edit you want information about any icon or part of the screen. edit Embroidery edit - Move design into hoop 15. Touch function - Wheel 22. Select hoop 26. Thread color edit 27. Quick... 12 13 14 21 22 15 16 19 20 32 33 Quick help (33) Use Quick help icon (33) and then the icon or the part of stitches 12. overview 1. Duplicate 11. Redo 17. Touch function - Resize 30. The loaded design(s) are shown in the embroidery Àeld (1). Total...
... 21. More options 25. Shape Creator 28. Embroidery stitch editor 29. Sequencing 31. Embroidery edit In Embroidery edit you want information about any icon or part of the screen. edit Embroidery edit - Move design into hoop 15. Touch function - Wheel 22. Select hoop 26. Thread color edit 27. Quick... 12 13 14 21 22 15 16 19 20 32 33 Quick help (33) Use Quick help icon (33) and then the icon or the part of stitches 12. overview 1. Duplicate 11. Redo 17. Touch function - Resize 30. The loaded design(s) are shown in the embroidery Àeld (1). Total...
Owner's Manual
Page 111
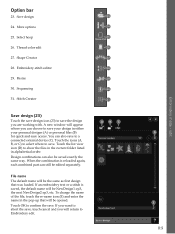
... default name will be the same as Àrst design that will be opened. If an embroidery text or a stitch is reloaded again, each combined part can also be edited separately. Thread color edit 27. Touch the icons (A, B, or C) to select where to save . Save design 24. More options 25. Embroidery...
... default name will be the same as Àrst design that will be opened. If an embroidery text or a stitch is reloaded again, each combined part can also be edited separately. Thread color edit 27. Touch the icons (A, B, or C) to select where to save . Save design 24. More options 25. Embroidery...
Owner's Manual
Page 132
... 4. Basting 8. Precise Positioning 14. Quick help Quick help (14) Use Quick help icon (14) and then the icon or the part of the screen you want information about any icon or part of the 3 screen. Crosshair 2. Make sure the embroidery unit is connected and the selected hoop is always active. Current stitch...
... 4. Basting 8. Precise Positioning 14. Quick help Quick help (14) Use Quick help icon (14) and then the icon or the part of the screen you want information about any icon or part of the 3 screen. Crosshair 2. Make sure the embroidery unit is connected and the selected hoop is always active. Current stitch...
Owner's Manual
Page 139
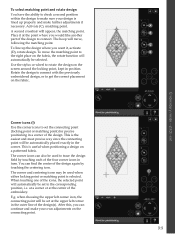
... or at the point where you want it at the center of the design(s). This is lined up the design where you would like another part of the icons, the selected point will automatically be used to trace the design Àeld by touching the centering icon. E.g. stitch-out When touching...
... or at the point where you want it at the center of the design(s). This is lined up the design where you would like another part of the icons, the selected point will automatically be used to trace the design Àeld by touching the centering icon. E.g. stitch-out When touching...
Owner's Manual
Page 146
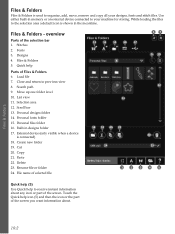
...to previous view 8. Fonts 3. Personal Àles folder 16. Cut 20. Copy 21. Touch the Quick help icon (5) and then the icon or the part of the screen. Scroll bar 13. External device (only visible when a device is connected) 18. Move up one folder level 10. Selection area 12. Personal...selected Àle 13 14 15 16 17 8 67 9 10 12 11 18 19 20 21 24 22 23 1 2 3 4 5 Quick help (5) Use Quick help Parts of the selection bar 1. Built-in memory or an external device connected to organize, add, move, remove and copy all your machine for storing. Use...
...to previous view 8. Fonts 3. Personal Àles folder 16. Cut 20. Copy 21. Touch the Quick help icon (5) and then the icon or the part of the screen. Scroll bar 13. External device (only visible when a device is connected) 18. Move up one folder level 10. Selection area 12. Personal...selected Àle 13 14 15 16 17 8 67 9 10 12 11 18 19 20 21 24 22 23 1 2 3 4 5 Quick help (5) Use Quick help Parts of the selection bar 1. Built-in memory or an external device connected to organize, add, move, remove and copy all your machine for storing. Use...
Owner's Manual
Page 154
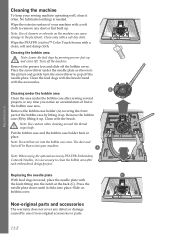
... any time you notice an accumulation of lint in the bobbin case area. Wipe the exterior surface of non-original accessories or parts. Wipe the PFAFF® creative™ Color Touch Screen with the brush. Turn off the bobbin cover. Remove the presser foot and slide off the machine.... damage caused by pressing presser foot up and extra lift. Note: Do not blow air into place. A Note: When using the optional accessory PFAFF® Embroidery Cutwork Needles, it is needed. Clean only with the knob Àtting into your machine with the accessories. Remove the bobbin case...
... any time you notice an accumulation of lint in the bobbin case area. Wipe the exterior surface of non-original accessories or parts. Wipe the PFAFF® creative™ Color Touch Screen with the brush. Turn off the bobbin cover. Remove the presser foot and slide off the machine.... damage caused by pressing presser foot up and extra lift. Note: Do not blow air into place. A Note: When using the optional accessory PFAFF® Embroidery Cutwork Needles, it is needed. Clean only with the knob Àtting into your machine with the accessories. Remove the bobbin case...
Owner's Manual
Page 159
... 2:10 Needle plate 1:8 Needle plate, change 2:9 Needles 1:10, 2:10 Needle screw 1:8 Needle threader 1:8, 2:5 Needle thread guide 1:8, 2:5 Needle up/down 2:16 New folder 10:6 Non-original parts and accessories 11:2 O OK 3:3 ON/OFF switch 2:2 Open a folder 10:5 11:7 Index
... 2:10 Needle plate 1:8 Needle plate, change 2:9 Needles 1:10, 2:10 Needle screw 1:8 Needle threader 1:8, 2:5 Needle thread guide 1:8, 2:5 Needle up/down 2:16 New folder 10:6 Non-original parts and accessories 11:2 O OK 3:3 ON/OFF switch 2:2 Open a folder 10:5 11:7 Index


