Owner's Manual
Page 4
...of contents 1 Introduction 1:7 Machine overview 1:8 Front side 1:8 Rear side 1:9 Top parts 1:9 Accessory tray 1:9 Parts of the embroidery unit 1:10 Included accessories 1:10 Presser feet 1:11 Stitch overview 1:12 Utility stitches 1:12 Decorative stitches 1:16 Alphabets ...the programs 2:14 Embroidery Machine Communication module.... 2:14 How to update your machine 2:14 Soft Touch Buttons and indicators 2:15 3 PFAFF® creative™ Color Touch Screen 3:1 Start view 3:2 Main parts 3:2 Task bar 3:2 Option bar 3:3 Common icons 3:3 Selection menu ...
...of contents 1 Introduction 1:7 Machine overview 1:8 Front side 1:8 Rear side 1:9 Top parts 1:9 Accessory tray 1:9 Parts of the embroidery unit 1:10 Included accessories 1:10 Presser feet 1:11 Stitch overview 1:12 Utility stitches 1:12 Decorative stitches 1:16 Alphabets ...the programs 2:14 Embroidery Machine Communication module.... 2:14 How to update your machine 2:14 Soft Touch Buttons and indicators 2:15 3 PFAFF® creative™ Color Touch Screen 3:1 Start view 3:2 Main parts 3:2 Task bar 3:2 Option bar 3:3 Common icons 3:3 Selection menu ...
Owner's Manual
Page 6
...Folders pop-ups 10:1 10:2 10:3 10:3 10:5 10:5 10:6 10:7 11 Maintenance Cleaning the machine Non-original parts and accessories Troubleshooting Index Intellectual Property 11:1 11:2 11:2 11:3 11:5 11:10 overview 8:2 Load a design 8:3 Load a font 8:3 Load...stitch-out 9:2 Embroidery stitch-out - 7 Embroidery preparations 7:1 Embroidery unit overview 7:2 Embroidery hoop overview 7:2 Built-in designs 7:3 creative sensation™ Embroidery collection 7:3 Connect the embroidery unit 7:3 Remove the embroidery unit 7:4 Attaching the Dynamic spring foot for embroidery 7:4 ...
...Folders pop-ups 10:1 10:2 10:3 10:3 10:5 10:5 10:6 10:7 11 Maintenance Cleaning the machine Non-original parts and accessories Troubleshooting Index Intellectual Property 11:1 11:2 11:2 11:3 11:5 11:10 overview 8:2 Load a design 8:3 Load a font 8:3 Load...stitch-out 9:2 Embroidery stitch-out - 7 Embroidery preparations 7:1 Embroidery unit overview 7:2 Embroidery hoop overview 7:2 Built-in designs 7:3 creative sensation™ Embroidery collection 7:3 Connect the embroidery unit 7:3 Remove the embroidery unit 7:4 Attaching the Dynamic spring foot for embroidery 7:4 ...
Owner's Manual
Page 9
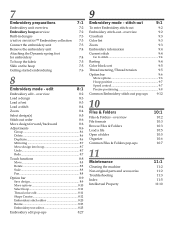
...adjusting feet 51. Embroidery unit accesssory tray 52. Thread guide 38. Spool pin 45. Store the accessories in the tray so they are easily accessible. 46. Embroidery arm 49 50 Embroidery unit accessory tray 50 54 53 52 51 1:9 Bobbin winder lever 40. Bobbin thread cutter 42. Spool caps... 44. Removable tray for threading and bobbin winding 36. Bobbin spindle 41. Take-up lever Accessory trays The accessory trays feature special compartments for presser feet and bobbins, plus space for accessories 47. Removable bobbin holder 35 36 37 38 33 34 39 40 41 45 44 43 42...
...adjusting feet 51. Embroidery unit accesssory tray 52. Thread guide 38. Spool pin 45. Store the accessories in the tray so they are easily accessible. 46. Embroidery arm 49 50 Embroidery unit accessory tray 50 54 53 52 51 1:9 Bobbin winder lever 40. Bobbin thread cutter 42. Spool caps... 44. Removable tray for threading and bobbin winding 36. Bobbin spindle 41. Take-up lever Accessory trays The accessory trays feature special compartments for presser feet and bobbins, plus space for accessories 47. Removable bobbin holder 35 36 37 38 33 34 39 40 41 45 44 43 42...
Owner's Manual
Page 10
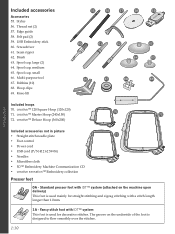
...; Deluxe Hoop (360x200) 70 72 Included accessories not in picture • Straight stitch needle plate 71 • Foot control • Power cord • USB cord (P/N:412 62 59-04) • Needles • MicroÀber cloth • 5D™ Embroidery Machine Communication CD • creative sensation™ Embroidery collection Presser feet 0A - Thread...
...; Deluxe Hoop (360x200) 70 72 Included accessories not in picture • Straight stitch needle plate 71 • Foot control • Power cord • USB cord (P/N:412 62 59-04) • Needles • MicroÀber cloth • 5D™ Embroidery Machine Communication CD • creative sensation™ Embroidery collection Presser feet 0A - Thread...
Owner's Manual
Page 24
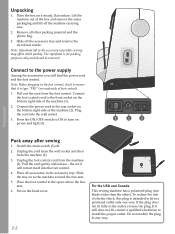
...the foot control cord from the machine (2). 3. To reduce the risk of electric shock, this plug is intended to the power supply Among the accessories you will retract itself into the wall socket. 3. Note: Styrofoam left in the space above the free arm. 6. Pull out the cord ...machine carrying case. 2. Note: Before plugging in the outlet, reverse the plug. If it is for packing purposes only and should be removed. Remove all accessories in any way. 2:2 The styrofoam is type "FR5" (see underside of the machine (2). Slide the tray on power and light (3). 3 1 2 ...
...the foot control cord from the machine (2). 3. To reduce the risk of electric shock, this plug is intended to the power supply Among the accessories you will retract itself into the wall socket. 3. Note: Styrofoam left in the space above the free arm. 6. Pull out the cord ...machine carrying case. 2. Note: Before plugging in the outlet, reverse the plug. If it is for packing purposes only and should be removed. Remove all accessories in any way. 2:2 The styrofoam is type "FR5" (see underside of the machine (2). Slide the tray on power and light (3). 3 1 2 ...
Owner's Manual
Page 25
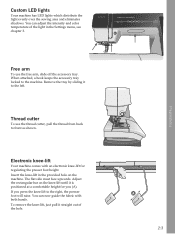
... over the sewing area and eliminates shadows. The Áat a comfortable height for regulating the presser foot height. If you (A). When attached, a hook keeps the accessory tray locked to the right, the presser foot will raise. Electronic knee-lift Your machine comes with both hands. Insert the knee-lift in the... fabric with an electronic knee-lift for you press the knee-lift to the machine. Thread cutter To use the free arm, slide off the accessory tray. Free arm To use the thread cutter, pull the thread from back to the left.
... over the sewing area and eliminates shadows. The Áat a comfortable height for regulating the presser foot height. If you (A). When attached, a hook keeps the accessory tray locked to the right, the presser foot will raise. Electronic knee-lift Your machine comes with both hands. Insert the knee-lift in the... fabric with an electronic knee-lift for you press the knee-lift to the machine. Thread cutter To use the free arm, slide off the accessory tray. Free arm To use the thread cutter, pull the thread from back to the left.
Owner's Manual
Page 27
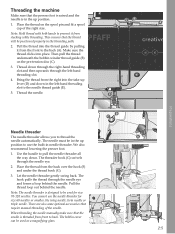
... needle. Let the needle threader gently swing back. Thread down . Note: The needle threader is threaded from slacking while threading. There are also some optional accessories that the thread will be used for size 60 needles or smaller, the wing needle, twin needle or triple needle. Make sure the thread clicks...
... needle. Let the needle threader gently swing back. Thread down . Note: The needle threader is threaded from slacking while threading. There are also some optional accessories that the thread will be used for size 60 needles or smaller, the wing needle, twin needle or triple needle. Make sure the thread clicks...

Owner's Manual
Page 50
...cases, e.g., when free-motion is normal. When activated, the machine will automatically use of thread tension for all stitches and/or embroidery. PFAFF® creative™ Color Touch Screen Thread tension/thread metering compensation If you Ànd that cannot be increased or decreased for most stitches or embroideries... regularly sew or embroider on special fabric or use thread tension in two ways: thread tension and thread metering. Certain optional accessories or special techniques may need to thread tension. You may require the use thread metering if possible.
...cases, e.g., when free-motion is normal. When activated, the machine will automatically use of thread tension for all stitches and/or embroidery. PFAFF® creative™ Color Touch Screen Thread tension/thread metering compensation If you Ànd that cannot be increased or decreased for most stitches or embroideries... regularly sew or embroider on special fabric or use thread tension in two ways: thread tension and thread metering. Certain optional accessories or special techniques may need to thread tension. You may require the use thread metering if possible.

Owner's Manual
Page 61
... ActivStitch™ Technology feature controls the needle thread in Machine settings. Reduce the thread tension/thread metering. Increase the thread tension/thread metering. Certain optional accessories or special techniques may require the use thread metering when possible, to adjust the balance between the two fabric layers. for best results. Thread tension...
... ActivStitch™ Technology feature controls the needle thread in Machine settings. Reduce the thread tension/thread metering. Increase the thread tension/thread metering. Certain optional accessories or special techniques may require the use thread metering when possible, to adjust the balance between the two fabric layers. for best results. Thread tension...
Owner's Manual
Page 68
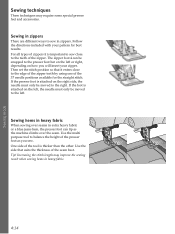
... Sewing techniques These techniques may improve the sewing result when sewing hems in zippers. Increasing the stitch length may require some special presser feet and accessories. For all types of the presser foot as the machine climbs over seams in extra heavy fabric or a blue jeans hem, the presser foot can...
... Sewing techniques These techniques may improve the sewing result when sewing hems in zippers. Increasing the stitch length may require some special presser feet and accessories. For all types of the presser foot as the machine climbs over seams in extra heavy fabric or a blue jeans hem, the presser foot can...
Owner's Manual
Page 72
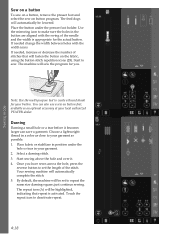
... the actual button. Start sewing above the hole and over it becomes larger can also use a sew on button foot, available as an optional accessory at your garment as close to repeat the same size darning square; Touch the repeat icon to sew. If needed change the width between holes... the length of stitches that repeat is appropriate for you have sewn across the hole, press the reverse button to set to your local authorized PFAFF® dealer. Darning Darning a small hole or a tear before it . 4. Place fabric or stabilizer in the button are aligned with the width icons. ...
... the actual button. Start sewing above the hole and over it becomes larger can also use a sew on button foot, available as an optional accessory at your garment as close to repeat the same size darning square; Touch the repeat icon to sew. If needed change the width between holes... the length of stitches that repeat is appropriate for you have sewn across the hole, press the reverse button to set to your local authorized PFAFF® dealer. Darning Darning a small hole or a tear before it . 4. Place fabric or stabilizer in the button are aligned with the width icons. ...

Owner's Manual
Page 75
These techniques may require some special presser feet and accessories. Note: Touch Quick help and then touch the selected stitch in the stitch Àeld (B). The starting point, select one of the four direction icons. ...
These techniques may require some special presser feet and accessories. Note: Touch Quick help and then touch the selected stitch in the stitch Àeld (B). The starting point, select one of the four direction icons. ...
Owner's Manual
Page 96
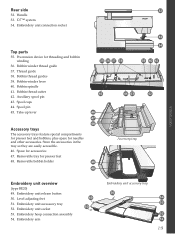
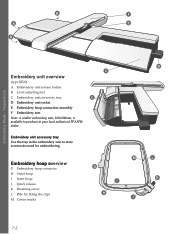
...type BE20) A Embroidery unit release button B Level adjusting feet C Embroidery unit accessory tray C D Embroidery unit socket E Embroidery hoop connection assembly F Embroidery arm Note: A smaller embroidery unit, 260x200mm, is available to store accessories used for Àtting the clips M Center marks M G I H J ...D L K 7:2 Embroidery hoop overview G Embroidery hoop connector H Outer hoop I Inner hoop J Quick release K Retaining screw L Ribs for embroidering. Embroidery unit accessory tray Use ...
...type BE20) A Embroidery unit release button B Level adjusting feet C Embroidery unit accessory tray C D Embroidery unit socket E Embroidery hoop connection assembly F Embroidery arm Note: A smaller embroidery unit, 260x200mm, is available to store accessories used for Àtting the clips M Center marks M G I H J ...D L K 7:2 Embroidery hoop overview G Embroidery hoop connector H Outer hoop I Inner hoop J Quick release K Retaining screw L Ribs for embroidering. Embroidery unit accessory tray Use ...
Owner's Manual
Page 97
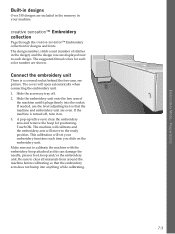
...fonts. A pop-up tells you slide on . 3. Make sure not to clear the embroidery area and remove the hoop for positioning. Slide the accessory tray off , turn it plugs Àrmly into anything while calibrating. 7:3 If needed, use the level adjusting feet so that the embroidery arm... the embroidery unit. The cover will open automatically when connecting the embroidery unit. 1. Be sure to each color number are even. creative sensation™ Embroidery collection Page through the creative sensation™ Embroidery collection for each design. Embroidery Mode -
...fonts. A pop-up tells you slide on . 3. Make sure not to clear the embroidery area and remove the hoop for positioning. Slide the accessory tray off , turn it plugs Àrmly into anything while calibrating. 7:3 If needed, use the level adjusting feet so that the embroidery arm... the embroidery unit. The cover will open automatically when connecting the embroidery unit. 1. Be sure to each color number are even. creative sensation™ Embroidery collection Page through the creative sensation™ Embroidery collection for each design. Embroidery Mode -
Owner's Manual
Page 99
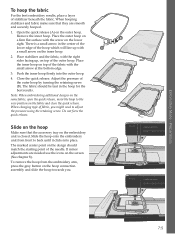
... the embroidery unit from the embroidery arm, press the grey button on top of fabric, you . 7:5 When hooping stabilizer and fabric make sure that the accessory tray on the fabric and close the quick release. To remove the hoop from front to the new position on the embroidery unit is a small...
... the embroidery unit from the embroidery arm, press the grey button on top of fabric, you . 7:5 When hooping stabilizer and fabric make sure that the accessory tray on the fabric and close the quick release. To remove the hoop from front to the new position on the embroidery unit is a small...

Owner's Manual
Page 135
The two sides will remain the same, even after each color block. Certain optional accessories, such as PFAFF® Yarn Couching Foot Set (P/N 820 912-096) require the use thread metering when possible, to adjust the balance between the color blocks, use the ...
The two sides will remain the same, even after each color block. Certain optional accessories, such as PFAFF® Yarn Couching Foot Set (P/N 820 912-096) require the use thread metering when possible, to adjust the balance between the color blocks, use the ...

Owner's Manual
Page 144
... motor and power supply are marked with a cutwork needle symbol in the creative sensation™ Embroidery Collection. These designs are no longer overloaded, the OK button will then have to Cutwork Needle (optional accessory) Some cutwork designs can also be stitched out without the cutwork needles, ... the Start/Stop button to resume embroidering. 9:14 Touch OK to resume. stitch-out Change to be stitched out using the optional accessory PFAFF® Embroidery Cutwork Needle Kit, (P/N 820 945-096). Note: These cutwork designs can be cut manually. Main motor overloaded If ...
... motor and power supply are marked with a cutwork needle symbol in the creative sensation™ Embroidery Collection. These designs are no longer overloaded, the OK button will then have to Cutwork Needle (optional accessory) Some cutwork designs can also be stitched out without the cutwork needles, ... the Start/Stop button to resume embroidering. 9:14 Touch OK to resume. stitch-out Change to be stitched out using the optional accessory PFAFF® Embroidery Cutwork Needle Kit, (P/N 820 945-096). Note: These cutwork designs can be cut manually. Main motor overloaded If ...
Owner's Manual
Page 154
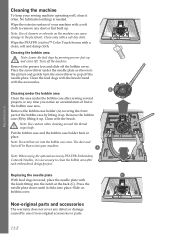
...you notice an accumulation of lint in the bobbin case area. Remove the bobbin case holder (A) covering the front part of non-original accessories or parts. Remove the bobbin case (B) by lifting it clicks into your sewing machine operating well, clean it often. Replacing the ... soft dry cloth. Wipe the PFAFF® creative™ Color Touch Screen with the knob Àtting into the bobbin case area. No lubrication (oiling) is neccessary to remove any dust or lint built up and extra lift. A Note: When using the optional accessory PFAFF® Embroidery Cutwork Needles, it ...
...you notice an accumulation of lint in the bobbin case area. Remove the bobbin case holder (A) covering the front part of non-original accessories or parts. Remove the bobbin case (B) by lifting it clicks into your sewing machine operating well, clean it often. Replacing the ... soft dry cloth. Wipe the PFAFF® creative™ Color Touch Screen with the knob Àtting into the bobbin case area. No lubrication (oiling) is neccessary to remove any dust or lint built up and extra lift. A Note: When using the optional accessory PFAFF® Embroidery Cutwork Needles, it ...
Owner's Manual
Page 157
... 8:10, 9:6 5D™ Embroidery Machine Communication CD ....... 1:10 5D™ Embroidery Software 2:13 5D™ Organizer 2:13, 3:10 5D™ QuickFont 2:13 Computer Connection 2:13 A Accessories 1:10 Accessory tray 1:9, 2:3 Action indicator 2:15 ActivStitch™ Technology 3:12, 4:7, 9:5 Add a letter into a text 8:25 Add a stitch or stitch point 6:3 Adjust Custom LED lights 3:14 Adjustments...
... 8:10, 9:6 5D™ Embroidery Machine Communication CD ....... 1:10 5D™ Embroidery Software 2:13 5D™ Organizer 2:13, 3:10 5D™ QuickFont 2:13 Computer Connection 2:13 A Accessories 1:10 Accessory tray 1:9, 2:3 Action indicator 2:15 ActivStitch™ Technology 3:12, 4:7, 9:5 Add a letter into a text 8:25 Add a stitch or stitch point 6:3 Adjust Custom LED lights 3:14 Adjustments...
Owner's Manual
Page 158
... Embroidery needle 2:10 Embroidery stitch editor 8:20 Embroidery stitch-out 9:2-9:14 Embroidery stitch-out pop-ups 9:12 Embroidery text editor 8:25 Embroidery time 9:4 Embroidery unit accessory tray 7:2 Embroidery unit, connect 7:3 Embroidery unit connection socket 1:9 Embroidery unit overview 1:9, 7:2 Embroidery unit release button 1:9, 7:2 Embroidery unit, remove 7:4 Embroidery unit socket 1:9, 7:2 Enter number of designs...
... Embroidery needle 2:10 Embroidery stitch editor 8:20 Embroidery stitch-out 9:2-9:14 Embroidery stitch-out pop-ups 9:12 Embroidery text editor 8:25 Embroidery time 9:4 Embroidery unit accessory tray 7:2 Embroidery unit, connect 7:3 Embroidery unit connection socket 1:9 Embroidery unit overview 1:9, 7:2 Embroidery unit release button 1:9, 7:2 Embroidery unit, remove 7:4 Embroidery unit socket 1:9, 7:2 Enter number of designs...


