

Owner's Manual
Page 2
... allow plug to whip when rewinding. • This sewing machine is provided with any opening. • Do not use as threading needle, changing needle, threading bobbin, or changing presser foot, etc. • Always unplug sewing machine from the electrical outlet when removing covers, lubricating, or when making any other user servicing...
... allow plug to whip when rewinding. • This sewing machine is provided with any opening. • Do not use as threading needle, changing needle, threading bobbin, or changing presser foot, etc. • Always unplug sewing machine from the electrical outlet when removing covers, lubricating, or when making any other user servicing...
Owner's Manual
Page 4
...arm 2:3 Thread cutter 2:3 Electronic knee-lift 2:3 Spool pins 2:4 Threading the machine 2:5 Needle threader 2:5 Thread sensor 2:6 Bobbin winding 2:7 Inserting the bobbin 2:8 IDT™ system (Integrated dual feed) 2:9 Changing needle plate 2:9 Needles 2:10 Changing the needle 2:10 Changing...2:14 Embroidery Machine Communication module.... 2:14 How to update your machine 2:14 Soft Touch Buttons and indicators 2:15 3 PFAFF® creative™ Color Touch Screen 3:1 Start view 3:2 Main parts 3:2 Task bar 3:2 Option bar 3:3 Common icons 3:3 Selection ...
...arm 2:3 Thread cutter 2:3 Electronic knee-lift 2:3 Spool pins 2:4 Threading the machine 2:5 Needle threader 2:5 Thread sensor 2:6 Bobbin winding 2:7 Inserting the bobbin 2:8 IDT™ system (Integrated dual feed) 2:9 Changing needle plate 2:9 Needles 2:10 Changing the needle 2:10 Changing...2:14 Embroidery Machine Communication module.... 2:14 How to update your machine 2:14 Soft Touch Buttons and indicators 2:15 3 PFAFF® creative™ Color Touch Screen 3:1 Start view 3:2 Main parts 3:2 Task bar 3:2 Option bar 3:3 Common icons 3:3 Selection ...
Owner's Manual
Page 8
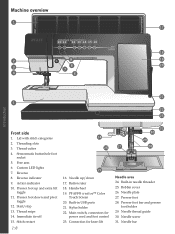
... 22. Needle plate 27. Needle screw 31. Lid with stitch categories 2. Free arm 6. Presser foot bar and presser foot holder 29. Start/stop 13. PFAFF® creative™ Color Touch Screen 20. Action indicator 10. Built-in needle threader 25. Presser foot 28. Needle up and extra lift toggle 11. Main switch... 19. Thread snips 14. Threading slots 3. Machine overview 1 17 10 11 12 13 14 15 16 18 2 9 19 3 8 7 20 4 6 Introduction 21 5 22 23 Front side 1. Bobbin cover 26.
... 22. Needle plate 27. Needle screw 31. Lid with stitch categories 2. Free arm 6. Presser foot bar and presser foot holder 29. Start/stop 13. PFAFF® creative™ Color Touch Screen 20. Action indicator 10. Built-in needle threader 25. Presser foot 28. Needle up and extra lift toggle 11. Main switch... 19. Thread snips 14. Threading slots 3. Machine overview 1 17 10 11 12 13 14 15 16 18 2 9 19 3 8 7 20 4 6 Introduction 21 5 22 23 Front side 1. Bobbin cover 26.
Owner's Manual
Page 9
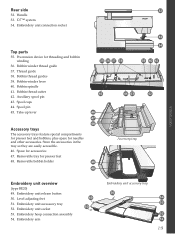
... guides 39. Take-up lever Accessory trays The accessory trays feature special compartments for presser feet and bobbins, plus space for threading and bobbin winding 36. Removable bobbin holder 35 36 37 38 33 34 39 40 41 45 44 43 42 46 47 48 Accessory tray 46 48 Introduction...42. Embroidery unit release button 50. Embroidery hoop connection assembly 54. Embroidery arm 49 50 Embroidery unit accessory tray 50 54 53 52 51 1:9 Bobbin winder thread guide 37. Auxiliary spool pin 43. Embroidery unit accesssory tray 52. Embroidery unit socket 53. Rear side 32 32. IDT™ ...
... guides 39. Take-up lever Accessory trays The accessory trays feature special compartments for presser feet and bobbins, plus space for threading and bobbin winding 36. Removable bobbin holder 35 36 37 38 33 34 39 40 41 45 44 43 42 46 47 48 Accessory tray 46 48 Introduction...42. Embroidery unit release button 50. Embroidery hoop connection assembly 54. Embroidery arm 49 50 Embroidery unit accessory tray 50 54 53 52 51 1:9 Bobbin winder thread guide 37. Auxiliary spool pin 43. Embroidery unit accesssory tray 52. Embroidery unit socket 53. Rear side 32 32. IDT™ ...
Owner's Manual
Page 10
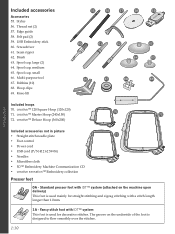
... upon delivery) This foot is used for straight stitching and zigzag stitching with a stitch length longer than 1.0mm. 1:10 1A - Spool cap, large (2) 64. Bobbins (10) 68. creative™ 120 Square Hoop (120x120) 71. Brush 63. Standard presser foot with IDT™ system This foot is designed to Áow smoothly over... • Power cord • USB cord (P/N:412 62 59-04) • Needles • MicroÀber cloth • 5D™ Embroidery Machine Communication CD • creative sensation™ Embroidery collection Presser feet 0A - Screwdriver 61.
... upon delivery) This foot is used for straight stitching and zigzag stitching with a stitch length longer than 1.0mm. 1:10 1A - Spool cap, large (2) 64. Bobbins (10) 68. creative™ 120 Square Hoop (120x120) 71. Brush 63. Standard presser foot with IDT™ system This foot is designed to Áow smoothly over... • Power cord • USB cord (P/N:412 62 59-04) • Needles • MicroÀber cloth • 5D™ Embroidery Machine Communication CD • creative sensation™ Embroidery collection Presser feet 0A - Screwdriver 61.

Owner's Manual
Page 12
... stitch Sewing blindhems on stretch fabrics. 1.1.18 Stretch tricot stitch Sewing seams on stretch fabrics. 1:12 1.2.1 Closed overlock Seam and overcast stretch fabrics in the bobbin. Note: This stitch makes a stronger tie-off . Joining stitch for undergarments, terry cloth, leather, bulky fabrics where overlapping the seams. Elastic decorative hem for basting...
... stitch Sewing blindhems on stretch fabrics. 1.1.18 Stretch tricot stitch Sewing seams on stretch fabrics. 1:12 1.2.1 Closed overlock Seam and overcast stretch fabrics in the bobbin. Note: This stitch makes a stronger tie-off . Joining stitch for undergarments, terry cloth, leather, bulky fabrics where overlapping the seams. Elastic decorative hem for basting...
Owner's Manual
Page 26
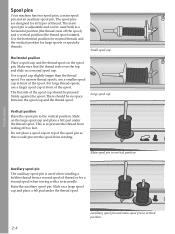
... the spool. Preparations Auxiliary spool pin and main spool pin in a horizontal position (the thread reels off too fast. There should be used when winding a bobbin thread from reeling off the spool) and a vertical position (the thread spool rotates).
... the spool. Preparations Auxiliary spool pin and main spool pin in a horizontal position (the thread reels off too fast. There should be used when winding a bobbin thread from reeling off the spool) and a vertical position (the thread spool rotates).
Owner's Manual
Page 27
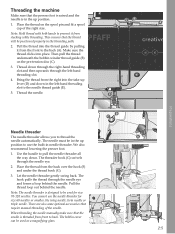
... threader. Needle threader The needle threader allows you to back. Place the thread on the pre-tension disc (C). 3. Then pull the thread underneath the bobbin winder thread guide (B) on the spool pin and Àt a spool cap of the needle. You cannot use the built-in the up lever (D)...loop behind the needle. The hook pulls the thread through the needle eye. 2. Thread the needle. Let the needle threader gently swing back. The bobbin cover can be used as a magnifying glass. Pull the thread loop out behind the needle. Note: Hold thread with both hands to be used ...
... threader. Needle threader The needle threader allows you to back. Place the thread on the pre-tension disc (C). 3. Then pull the thread underneath the bobbin winder thread guide (B) on the spool pin and Àt a spool cap of the needle. You cannot use the built-in the up lever (D)...loop behind the needle. The hook pulls the thread through the needle eye. 2. Thread the needle. Let the needle threader gently swing back. The bobbin cover can be used as a magnifying glass. Pull the thread loop out behind the needle. Note: Hold thread with both hands to be used ...
Owner's Manual
Page 28
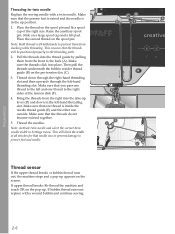
... right into place. Make sure that needle size to prevent damage to the right E sides of the right size. Then pull the threads underneath the bobbin winder thread guide (B) on the spool pin. Make sure that the threads do not become twisted together. 5. Thread the needles. B C Note: ...-up appears on the pop-up lever (D) and down through the right-hand threading slot and then upwards through the left -hand threading slot. If bobbin thread runs out: replace with a twin needle. Preparations 2:6 CB A D F Note: Hold threads with both hands to the back (A). Make sure the ...
... right into place. Make sure that needle size to prevent damage to the right E sides of the right size. Then pull the threads underneath the bobbin winder thread guide (B) on the spool pin. Make sure that the threads do not become twisted together. 5. Thread the needles. B C Note: ...-up appears on the pop-up lever (D) and down through the right-hand threading slot and then upwards through the left -hand threading slot. If bobbin thread runs out: replace with a twin needle. Preparations 2:6 CB A D F Note: Hold threads with both hands to the back (A). Make sure the ...
Owner's Manual
Page 29
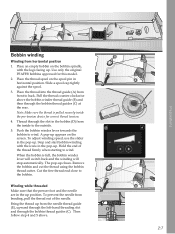
...the free thread end close to wind. Then follow step 4 and 5 above the bobbin winder thread guide (B) and then through the bobbin thread guides (C) at the rear. Use only the original PFAFF® bobbins approved for correct thread tension. 4. Place the thread into the thread guide (A) from... the inside the pre-tension device for this model. 2. Bobbin winding Winding from bending, pull the...
...the free thread end close to wind. Then follow step 4 and 5 above the bobbin winder thread guide (B) and then through the bobbin thread guides (C) at the rear. Use only the original PFAFF® bobbins approved for correct thread tension. 4. Place the thread into the thread guide (A) from... the inside the pre-tension device for this model. 2. Bobbin winding Winding from bending, pull the...
Owner's Manual
Page 30
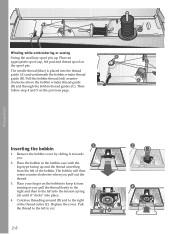
...thread (blue) is placed into place. 4. Then follow step 4 and 5 on the spool pin. Pull the thread to cut. B C A Preparations Inserting the bobbin 1 2 1. Continue threading around (B) and to the left into the tension spring B (A) until it from the left to the left of the thread cutter (C). Place... your Ànger on the bobbin to keep it "clicks" into the thread guide (A) and underneath the bobbin winder thread guide (B). Winding while embroidering or sewing Swing the auxiliary spool pin up and the thread ...
...thread (blue) is placed into place. 4. Then follow step 4 and 5 on the spool pin. Pull the thread to cut. B C A Preparations Inserting the bobbin 1 2 1. Continue threading around (B) and to the left into the tension spring B (A) until it from the left to the left of the thread cutter (C). Place... your Ànger on the bobbin to keep it "clicks" into the thread guide (A) and underneath the bobbin winder thread guide (B). Winding while embroidering or sewing Swing the auxiliary spool pin up and the thread ...
Owner's Manual
Page 31
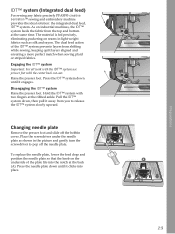
... machines, the IDT™ system feeds the fabric from you to pop off the bobbin cover. Press the needle plate down , then pull it engages. IDT™ system (Integrated dual feed) For sewing any fabric precisely PFAFF® creative sensation™ sewing and embroidery machine provides the ideal solution: the integrated dual feed, IDT...
... machines, the IDT™ system feeds the fabric from you to pop off the bobbin cover. Press the needle plate down , then pull it engages. IDT™ system (Integrated dual feed) For sewing any fabric precisely PFAFF® creative sensation™ sewing and embroidery machine provides the ideal solution: the integrated dual feed, IDT...
Owner's Manual
Page 37
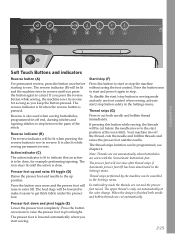
...foot. The upper thread is lowered automatically when you keep the button pressed. The presser foot is only cut both needle and bobbin threads are cut automatically when buttonholes are sewn with the Sensormatic buttonhole foot. It is pressed. The thread snips function can be ...at the color change. Presser foot down and pivot toggle (E) Lower the presser foot completely. Reverse is Ànished both needle and bobbin thread immediately. Note: Threads are cut before starting to the start /stop the machine without using the foot control. Thread snips performed...
...foot. The upper thread is lowered automatically when you keep the button pressed. The presser foot is only cut both needle and bobbin threads are cut automatically when buttonholes are sewn with the Sensormatic buttonhole foot. It is pressed. The thread snips function can be ...at the color change. Presser foot down and pivot toggle (E) Lower the presser foot completely. Reverse is Ànished both needle and bobbin thread immediately. Note: Threads are cut before starting to the start /stop the machine without using the foot control. Thread snips performed...

Owner's Manual
Page 57
...-motion d) Set for spring foot free-motion e) Set for the selected stitch. Note: With Needle down position, the presser foot raises to cut needle and bobbin thread and raise the foot. The number of the stitch selection area (4). If you will be lowered into the fabric. You can also lower the...
...-motion d) Set for spring foot free-motion e) Set for the selected stitch. Note: With Needle down position, the presser foot raises to cut needle and bobbin thread and raise the foot. The number of the stitch selection area (4). If you will be lowered into the fabric. You can also lower the...

Owner's Manual
Page 61
... use of thread for the selected stitch. When using specialty thread. Use the control to adjust the balance between needle thread and bobbin thread. For decorative stitches and buttonholes the top thread should be visible on the needle thread. Thread metering control Thread tension control ... tension/thread metering For the best stitch appearance and durability make sure the needle thread tension/thread metering is too tight. If the bobbin thread is visible on the underside of the fabric. Sewing mode Thread metering (14)/Thread tension (29) The ActivStitch™ Technology ...
... use of thread for the selected stitch. When using specialty thread. Use the control to adjust the balance between needle thread and bobbin thread. For decorative stitches and buttonholes the top thread should be visible on the needle thread. Thread metering control Thread tension control ... tension/thread metering For the best stitch appearance and durability make sure the needle thread tension/thread metering is too tight. If the bobbin thread is visible on the underside of the fabric. Sewing mode Thread metering (14)/Thread tension (29) The ActivStitch™ Technology ...

Owner's Manual
Page 73
...needle plate Attach the straight stitch neede plate when piecing your quilt top with batting and backing. This is sometimes helpful to intentionally pull up bobbin thread and produce the desired "hand look" effect. 4:19 Snap on a leader cloth and then continue with IDT™ system; position ...the handlook quilt stitches 6.2.1-6.2.11. Press the seam Áat the beginning and/or end of a seam. Pin baste the layers together in the bobbin. 3. Thread the needle with a higher thread metering/thread tension value to begin sewing on the ¼" quilting foot with the piecing. Use ...
...needle plate Attach the straight stitch neede plate when piecing your quilt top with batting and backing. This is sometimes helpful to intentionally pull up bobbin thread and produce the desired "hand look" effect. 4:19 Snap on a leader cloth and then continue with IDT™ system; position ...the handlook quilt stitches 6.2.1-6.2.11. Press the seam Áat the beginning and/or end of a seam. Pin baste the layers together in the bobbin. 3. Thread the needle with a higher thread metering/thread tension value to begin sewing on the ¼" quilting foot with the piecing. Use ...

Owner's Manual
Page 74
Place a pin every 6-8 inches (15-20 cm). Take one stitch and pull the bobbin thread to prevent stitches that are too long or too short. Take a few stitches right next to one of the three options. Plan a path for ...
Place a pin every 6-8 inches (15-20 cm). Take one stitch and pull the bobbin thread to prevent stitches that are too long or too short. Take a few stitches right next to one of the three options. Plan a path for ...
Owner's Manual
Page 77
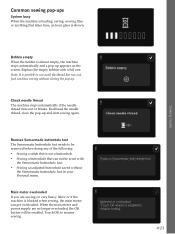
Bobbin empty When the bobbin is almost empty, the machine stops automatically and a pop-up . Just continue sewing without the Sensormatic buttonhole foot in your Personal menu. Main motor overloaded ... Touch OK to sew until the thread has run out. Remove Sensormatic buttonhole foot The Sensormatic buttonhole foot needs to be enabled. Replace the empty bobbin with the Sensormatic buttonhole foot. • Sewing an adjusted buttonhole saved without closing the pop-up appears on the screen.
Bobbin empty When the bobbin is almost empty, the machine stops automatically and a pop-up . Just continue sewing without the Sensormatic buttonhole foot in your Personal menu. Main motor overloaded ... Touch OK to sew until the thread has run out. Remove Sensormatic buttonhole foot The Sensormatic buttonhole foot needs to be enabled. Replace the empty bobbin with the Sensormatic buttonhole foot. • Sewing an adjusted buttonhole saved without closing the pop-up appears on the screen.
Owner's Manual
Page 100
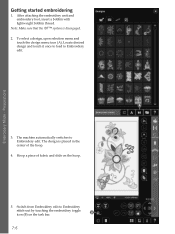
... center of fabric and slide on the task bar. Switch from Embroidery edit to Embroidery edit. B 7:6 After attaching the embroidery unit and embroidery foot, insert a bobbin with lightweight bobbin thread. Getting started embroidering 1. Locate desired design and touch it once to load to Embroidery edit. Hoop a piece of the hoop. 4.
... center of fabric and slide on the task bar. Switch from Embroidery edit to Embroidery edit. B 7:6 After attaching the embroidery unit and embroidery foot, insert a bobbin with lightweight bobbin thread. Getting started embroidering 1. Locate desired design and touch it once to load to Embroidery edit. Hoop a piece of the hoop. 4.

Owner's Manual
Page 102
When the embroidery is completed, your machine cuts the needle and bobbin thread and stops. Preparations 9. The needle and presser foot raise automatically for easy removal of the hoop. A pop-up appears asking you that your design ...
When the embroidery is completed, your machine cuts the needle and bobbin thread and stops. Preparations 9. The needle and presser foot raise automatically for easy removal of the hoop. A pop-up appears asking you that your design ...


