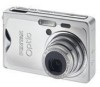
Operation Manual
Page 8
... Operating Manual 9 Checking the Contents of the Package 10 Names of Parts 11 Names of Operating Parts 12 Getting Started 13 Attaching the Strap 13 Powering the Camera 14 Installing the Battery 14 Removing the Battery 14 Charging the Battery 16 Charging the Battery Abroad 19 Using the AC Adapter (optional 21 Installing the SD Memory Card 23 Image Size and Quality of Still Pictures 25 Size and Quality of Movies 26 Initial Settings (Setting the Display Language and the Date...
... Operating Manual 9 Checking the Contents of the Package 10 Names of Parts 11 Names of Operating Parts 12 Getting Started 13 Attaching the Strap 13 Powering the Camera 14 Installing the Battery 14 Removing the Battery 14 Charging the Battery 16 Charging the Battery Abroad 19 Using the AC Adapter (optional 21 Installing the SD Memory Card 23 Image Size and Quality of Still Pictures 25 Size and Quality of Movies 26 Initial Settings (Setting the Display Language and the Date...
Operation Manual
Page 9
... Scene Mode 61 Taking Movies (Movie Mode 62 Reducing Camera Shake and Blurring in Photos (Blur reduction Mode 64 Taking Pictures in Frame Composite mode 65 Using the Self-timer 67 Continuous Shooting (Continuous Shooting Mode 69 Using the Remote Control Unit (optional 71 Using the Zoom to Change the Subject Size 73 Setting the Shooting Functions 75 Selecting the Focus Mode 75 Selecting the Flash Mode 78 Selecting the Recorded Pixels of Still Pictures 80 Selecting the Quality Level of Still Pictures 82 Adjusting the White Balance 84...
... Scene Mode 61 Taking Movies (Movie Mode 62 Reducing Camera Shake and Blurring in Photos (Blur reduction Mode 64 Taking Pictures in Frame Composite mode 65 Using the Self-timer 67 Continuous Shooting (Continuous Shooting Mode 69 Using the Remote Control Unit (optional 71 Using the Zoom to Change the Subject Size 73 Setting the Shooting Functions 75 Selecting the Focus Mode 75 Selecting the Flash Mode 78 Selecting the Recorded Pixels of Still Pictures 80 Selecting the Quality Level of Still Pictures 82 Adjusting the White Balance 84...
Operation Manual
Page 10
... SD Memory Card or the Built-in Memory 152 Changing the Sound Settings 153 Changing the Date and Time 156 Setting the World Time 158 Changing the Display Language 160 Changing the Image Folder Name 161 Changing the USB Connection Mode 162 Changing the Video Output Format 162 Adjusting the Brightness of the LCD Monitor 163 Setting Power Saving 163 Setting Auto Power Off 164 Setting the Guide Display 164 Resetting to Default Settings 165 Appendix 166 List of City 166 Default Settings 167 Optional Accessories 174 Messages 175 Troubleshooting 177 Main Specifications...
... SD Memory Card or the Built-in Memory 152 Changing the Sound Settings 153 Changing the Date and Time 156 Setting the World Time 158 Changing the Display Language 160 Changing the Image Folder Name 161 Changing the USB Connection Mode 162 Changing the Video Output Format 162 Adjusting the Brightness of the LCD Monitor 163 Setting Power Saving 163 Setting Auto Power Off 164 Setting the Guide Display 164 Resetting to Default Settings 165 Appendix 166 List of City 166 Default Settings 167 Optional Accessories 174 Messages 175 Troubleshooting 177 Main Specifications...

Operation Manual
Page 26
... are taking movies even when there is equipped with a write-protect switch. Refer to "Formatting an SD Memory Card or the Built-in the following circumstances. Write-protect switch Setting the switch to [LOCK] protects the existing data by prohibiting recording of new data, deletion of existing data or formatting of important data on a PC. • Avoid using or storing the card where it may be exposed to static electricity or electrical interference. • Avoid using...
... are taking movies even when there is equipped with a write-protect switch. Refer to "Formatting an SD Memory Card or the Built-in the following circumstances. Write-protect switch Setting the switch to [LOCK] protects the existing data by prohibiting recording of new data, deletion of existing data or formatting of important data on a PC. • Avoid using or storing the card where it may be exposed to static electricity or electrical interference. • Avoid using...
Operation Manual
Page 30
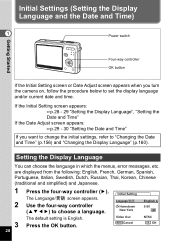
... four-way controller (5). The Language/ screen appears. Setting the Display Language You can choose the language in which the menus, error messages, etc. Use the four-way controller (2345) to choose a language. Initial Settings (Setting the Display Language and the Date and Time) 1 Power switch Getting Started Four-way controller OK button If the Initial Setting screen or Date Adjust screen appears when you want to change the initial settings, refer to "Changing the Date and Time" (p.156) and "Changing the Display Language" (p.160). The default setting is English.
... four-way controller (5). The Language/ screen appears. Setting the Display Language You can choose the language in which the menus, error messages, etc. Use the four-way controller (2345) to choose a language. Initial Settings (Setting the Display Language and the Date and Time) 1 Power switch Getting Started Four-way controller OK button If the Initial Setting screen or Date Adjust screen appears when you want to change the initial settings, refer to "Changing the Date and Time" (p.156) and "Changing the Display Language" (p.160). The default setting is English.
Operation Manual
Page 33
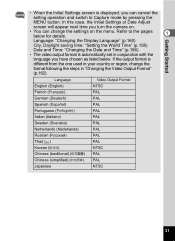
... to Capture mode by pressing the MENU button. If the output format is automatically set in conjunction with the language you can change the format following the steps in your country or region, change the settings on . • You can cancel the setting operation and switch to the pages below . In this case, the Initial Settings or Date Adjust screen will appear next time you turn the camera on the...
... to Capture mode by pressing the MENU button. If the output format is automatically set in conjunction with the language you can change the format following the steps in your country or region, change the settings on . • You can cancel the setting operation and switch to the pages below . In this case, the Initial Settings or Date Adjust screen will appear next time you turn the camera on the...
Operation Manual
Page 34
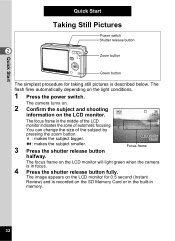
... change the size of automatic focusing. Quick Start Quick Start Taking Still Pictures Power switch Shutter release button 2 Zoom button Green button The simplest procedure for 0.5 second (Instant Review) and is recorded on the LCD monitor. The focus frame in the middle of the LCD monitor indicates the zone of the subject by pressing the zoom button. The camera turns on. 2 Confirm the subject and shooting 36 information on the SD Memory Card or in the built-in focus. 4 Press the shutter...
... change the size of automatic focusing. Quick Start Quick Start Taking Still Pictures Power switch Shutter release button 2 Zoom button Green button The simplest procedure for 0.5 second (Instant Review) and is recorded on the LCD monitor. The focus frame in the middle of the LCD monitor indicates the zone of the subject by pressing the zoom button. The camera turns on. 2 Confirm the subject and shooting 36 information on the SD Memory Card or in the built-in focus. 4 Press the shutter...
Operation Manual
Page 38
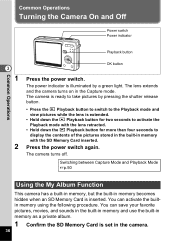
... take pictures by a green light. Common Operations Turning the Camera On and Off Power switch Power indicator Common Operations Playback button 3 1 2 OK button Press the power switch. The power indicator is inserted. The lens extends and the camera turns on in memory with the SD Memory Card inserted. Switching between Capture Mode and Playback Mode 1p.50 Using the My Album Function This camera has a built-in memory, but the built-in the camera. 36 You can activate the builtin memory using the following procedure. The camera turns...
... take pictures by a green light. Common Operations Turning the Camera On and Off Power switch Power indicator Common Operations Playback button 3 1 2 OK button Press the power switch. The power indicator is inserted. The lens extends and the camera turns on in memory with the SD Memory Card inserted. Switching between Capture Mode and Playback Mode 1p.50 Using the My Album Function This camera has a built-in memory, but the built-in the camera. 36 You can activate the builtin memory using the following procedure. The camera turns...
Operation Manual
Page 44
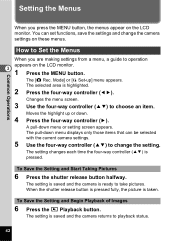
... menu displays only those items that can set functions, save the settings and change the setting. To Save the Setting and Begin Playback of Images 6 Press the Q Playback button. When the shutter release button is pressed fully, the picture is highlighted. 2 Press the four-way controller (45). To Save the Setting and Start Taking Pictures 6 Press the shutter release button halfway. Common Operations Setting the Menus When you are making settings from a menu, a guide to take pictures. The [A Rec. The setting is saved and the camera...
... menu displays only those items that can set functions, save the settings and change the setting. To Save the Setting and Begin Playback of Images 6 Press the Q Playback button. When the shutter release button is pressed fully, the picture is highlighted. 2 Press the four-way controller (45). To Save the Setting and Start Taking Pictures 6 Press the shutter release button halfway. Common Operations Setting the Menus When you are making settings from a menu, a guide to take pictures. The [A Rec. The setting is saved and the camera...
Operation Manual
Page 52
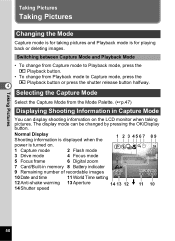
...47) Displaying Shooting Information in memory 8 Battery indicator 9 Remaining number of recordable images 1/160 F2.7 10 Date and time 11 World Time setting 08/24/2006 12:00 12 Anti-shake warning 13 Aperture 14 Shutter speed 14 13 12 11 10 50 Taking Pictures Taking Pictures Taking Pictures Changing the Mode Capture mode is for playing back or deleting images. The display mode can display shooting information on the LCD monitor when taking pictures and Playback mode is turned on. 36 1 Capture mode 2 Flash mode 3 Drive mode 4 Focus mode 5 Focus frame 6 Digital zoom 7 Card...
...47) Displaying Shooting Information in memory 8 Battery indicator 9 Remaining number of recordable images 1/160 F2.7 10 Date and time 11 World Time setting 08/24/2006 12:00 12 Anti-shake warning 13 Aperture 14 Shutter speed 14 13 12 11 10 50 Taking Pictures Taking Pictures Taking Pictures Changing the Mode Capture mode is for playing back or deleting images. The display mode can display shooting information on the LCD monitor when taking pictures and Playback mode is turned on. 36 1 Capture mode 2 Flash mode 3 Drive mode 4 Focus mode 5 Focus frame 6 Digital zoom 7 Card...

Operation Manual
Page 104
...; The zoom position setting in the digital zoom range will be reset to the defaults when the camera is turned off. O DISPLAY The LCD monitor display mode is saved. P File # The file number is saved. The drive mode setting (gj, etc.) selected using the four-way controller (2) is saved. Default Setting O P P Zoom Position The optical zoom position setting on the [A Rec.Mode] menu is saved. Item 4 Flash Mode Drive Mode Focus Mode Description The flash mode setting on the [A Rec.Mode] menu is saved. Saving the Settings Taking Pictures Saving the Menu Items (Memory...
...; The zoom position setting in the digital zoom range will be reset to the defaults when the camera is turned off. O DISPLAY The LCD monitor display mode is saved. P File # The file number is saved. The drive mode setting (gj, etc.) selected using the four-way controller (2) is saved. Default Setting O P P Zoom Position The optical zoom position setting on the [A Rec.Mode] menu is saved. Item 4 Flash Mode Drive Mode Focus Mode Description The flash mode setting on the [A Rec.Mode] menu is saved. Saving the Settings Taking Pictures Saving the Menu Items (Memory...
Operation Manual
Page 126
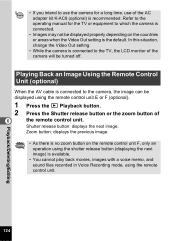
... no zoom button on the remote control unit F, only an operation using the shutter release button (displaying the next image) is available. • You cannot play back movies, images with a voice memo, and sound files recorded in Voice Recording mode, using the remote control unit E or F (optional). 1 Press the Q Playback button. 2 Press the Shutter release button or the zoom button of the camera will be displayed properly depending on the countries or areas when the Video Out setting is the default. Shutter release button: displays...
... no zoom button on the remote control unit F, only an operation using the shutter release button (displaying the next image) is available. • You cannot play back movies, images with a voice memo, and sound files recorded in Voice Recording mode, using the remote control unit E or F (optional). 1 Press the Q Playback button. 2 Press the Shutter release button or the zoom button of the camera will be displayed properly depending on the countries or areas when the Video Out setting is the default. Shutter release button: displays...

Operation Manual
Page 160
...). This is currently selected blinks on the [B Set-up ] menu Shutter release button MENU Four-way controller OK button MENU button Rec. New York ODSFTF Settings X : Displays the time in the city selected MENU as the Destination city W : Displays the time in the city selected as the Home Time setting. Mode Recorded Pixels Quality Level White Balance AF Setting AE Metering Sensitivity 7M AWB Auto MENU Exit Setting the World Time The date and time selected in a city other...
...). This is currently selected blinks on the [B Set-up ] menu Shutter release button MENU Four-way controller OK button MENU button Rec. New York ODSFTF Settings X : Displays the time in the city selected MENU as the Destination city W : Displays the time in the city selected as the Home Time setting. Mode Recorded Pixels Quality Level White Balance AF Setting AE Metering Sensitivity 7M AWB Auto MENU Exit Setting the World Time The date and time selected in a city other...
Operation Manual
Page 171
...setting Yes No p.162 Standard Yes Yes p.163 5 sec Off Yes Yes p.163 8 Yes Yes p.110 3 min Yes Yes p.164 On Yes Yes p.164 - - - p.165 Appendix 169 z [B Set-up] Menu Item Format Sound Date Adjust World Time Operation Volume Playback Volume Start-up Sound Shutter Sound Operation Sound Self-timer Sound Date Style Select time Destination (City) Destination (DST) Hometown (City) Hometown (DST) Language/ Folder Name USB Connection Video Out Brightness Level Power Saving Quick Zoom Auto Power Off Guide Display Reset Default Setting Last Memory Setting Reset Setting...
...setting Yes No p.162 Standard Yes Yes p.163 5 sec Off Yes Yes p.163 8 Yes Yes p.110 3 min Yes Yes p.164 On Yes Yes p.164 - - - p.165 Appendix 169 z [B Set-up] Menu Item Format Sound Date Adjust World Time Operation Volume Playback Volume Start-up Sound Shutter Sound Operation Sound Self-timer Sound Date Style Select time Destination (City) Destination (DST) Hometown (City) Hometown (DST) Language/ Folder Name USB Connection Video Out Brightness Level Power Saving Quick Zoom Auto Power Off Guide Display Reset Default Setting Last Memory Setting Reset Setting...
Operation Manual
Page 177
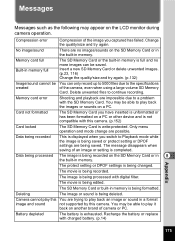
... Playback mode while the image is write-protected. Recharge the battery or replace with the SD Memory Card. Insert a new SD Memory Card or delete unwanted images. (p.23, 116) Change the quality/size and try again. Delete unwanted files to a problem with charged battery. (p.14) Appendix 175 Camera cannot play this You are trying to play back an image or sound in a format image and sound not supported by this camera. (p.152) Card locked The SD Memory Card is being deleted. No image/sound There are being recorded...
... Playback mode while the image is write-protected. Recharge the battery or replace with the SD Memory Card. Insert a new SD Memory Card or delete unwanted images. (p.23, 116) Change the quality/size and try again. Delete unwanted files to a problem with charged battery. (p.14) Appendix 175 Camera cannot play this You are trying to play back an image or sound in a format image and sound not supported by this camera. (p.152) Card locked The SD Memory Card is being deleted. No image/sound There are being recorded...
Operation Manual
Page 179
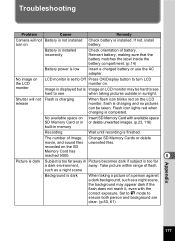
.... Flash icon lights red when charging is low Insert a charged battery or use the AC adapter. Shutter will not Battery is not installed Check battery is installed. recorded on the SD Memory Card has reached 5000. 8 Picture is dark Subject is too far away in Picture becomes dark if subject is installed incorrectly Check orientation of image, Change SD Memory Cards or delete movie, and sound files unwanted files. No image on the LCD monitor LCD monitor is set to Off Press OK/Display button...
.... Flash icon lights red when charging is low Insert a charged battery or use the AC adapter. Shutter will not Battery is not installed Check battery is installed. recorded on the SD Memory Card has reached 5000. 8 Picture is dark Subject is too far away in Picture becomes dark if subject is installed incorrectly Check orientation of image, Change SD Memory Cards or delete movie, and sound files unwanted files. No image on the LCD monitor LCD monitor is set to Off Press OK/Display button...

Operation Manual
Page 183
... used. Self-timer. 2-sec. Time Function World Time setting for 71 cities (28 time zones) Power Supply Rechargeable lithium-ion battery D-LI8, AC adapter (optional) Battery Life Approx. 180 images (at 23°C with LCD monitor on, flash fired for 50% of Auto) Tele: Approx. 0.4 m - Self-timer, 3-sec. Flash Type Auto flash with the conditions under which the camera is based on the CIPA standard measurement, but it may vary with red-eye reduction function Flash Modes Auto, Flash...
... used. Self-timer. 2-sec. Time Function World Time setting for 71 cities (28 time zones) Power Supply Rechargeable lithium-ion battery D-LI8, AC adapter (optional) Battery Life Approx. 180 images (at 23°C with LCD monitor on, flash fired for 50% of Auto) Tele: Approx. 0.4 m - Self-timer, 3-sec. Flash Type Auto flash with the conditions under which the camera is based on the CIPA standard measurement, but it may vary with red-eye reduction function Flash Modes Auto, Flash...
Operation Manual
Page 190
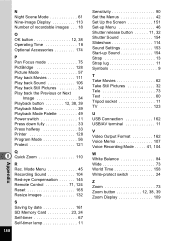
... Sound Settings 153 Start-up Sound 154 Strap 13 Strap lug 11 Symbols 9 T Take Movies 62 Take Still Pictures 32 Tele 73 Text 60 Tripod socket 11 TV 123 U USB Connection 162 USB/AV terminal 11 V Video Output Format 162 Voice Memo 107 Voice Recording Mode . . . . . 41, 104 W White Balance 84 Wide 73 World Time 158 Write-protect switch 24 Z Zoom 73 Zoom button 12, 38, 39 Zoom Display 109 Appendix N Night Scene Mode 61 Nine-Image Display 113 Number...
... Sound Settings 153 Start-up Sound 154 Strap 13 Strap lug 11 Symbols 9 T Take Movies 62 Take Still Pictures 32 Tele 73 Text 60 Tripod socket 11 TV 123 U USB Connection 162 USB/AV terminal 11 V Video Output Format 162 Voice Memo 107 Voice Recording Mode . . . . . 41, 104 W White Balance 84 Wide 73 World Time 158 Write-protect switch 24 Z Zoom 73 Zoom button 12, 38, 39 Zoom Display 109 Appendix N Night Scene Mode 61 Nine-Image Display 113 Number...
Connection Guide
Page 1
... PENTAX Software Installer screen. 5 Choose a language from the following the steps below to update Windows Media Player before installing the software. 1 Turn your PC on the Internet Product Registration. Download the file and then install it to your PC using an AC adapter, make sure that you that has administrative rights before installing the software. 1 Cancel installation of ACDSee for PENTAX 2.0. A pull-down menu appears. 5 Use the four-way controller (23) to select [USB Connection...
... PENTAX Software Installer screen. 5 Choose a language from the following the steps below to update Windows Media Player before installing the software. 1 Turn your PC on the Internet Product Registration. Download the file and then install it to your PC using an AC adapter, make sure that you that has administrative rights before installing the software. 1 Cancel installation of ACDSee for PENTAX 2.0. A pull-down menu appears. 5 Use the four-way controller (23) to select [USB Connection...

Connection Guide
Page 2
... menu commands. F Properties pane Displays the properties and database information of professional quality. Macintosh Step 4 Transferring Images to a Macintosh Connecting the Camera and Macintosh 1 Turn your Macintosh using the USB cable. for PENTAX] screen appears. 2 Click [Create Video File]. It is called the browser, appears. for PENTAX 2.0] icon on the desktop. The access lamp blinks while the camera is recognized as video files on the desktop. ACD FotoSlate starts and the [Quick Start] screen...
... menu commands. F Properties pane Displays the properties and database information of professional quality. Macintosh Step 4 Transferring Images to a Macintosh Connecting the Camera and Macintosh 1 Turn your Macintosh using the USB cable. for PENTAX] screen appears. 2 Click [Create Video File]. It is called the browser, appears. for PENTAX 2.0] icon on the desktop. The access lamp blinks while the camera is recognized as video files on the desktop. ACD FotoSlate starts and the [Quick Start] screen...


