
Operation Manual
Page 2
... copyrights Images taken using the J that have an Aperture s (Auto) position. To users of images. This product supports PRINT Image Matching III. All Rights Reserved. Thank you for display. To use of the pixels may not illuminate or may not function correctly when used without permission according to the rights as items for purchasing the PENTAX J Digital Camera. However, this manual before using the camera in helping you should be erased...
... copyrights Images taken using the J that have an Aperture s (Auto) position. To users of images. This product supports PRINT Image Matching III. All Rights Reserved. Thank you for display. To use of the pixels may not illuminate or may not function correctly when used without permission according to the rights as items for purchasing the PENTAX J Digital Camera. However, this manual before using the camera in helping you should be erased...

Operation Manual
Page 16
14 Names of Working Parts Before Using Your Camera Camera 1 Lens mount index Shutter release button Main switch Self-Timer lamp/ Remote control receiver Lens unlock button 3 button i button M button Q button Mirror AF coupler Focus mode lever Lens information contacts e-dial L/Z button Four-way controller 4 button { button Battery cover Tripod socket
14 Names of Working Parts Before Using Your Camera Camera 1 Lens mount index Shutter release button Main switch Self-Timer lamp/ Remote control receiver Lens unlock button 3 button i button M button Q button Mirror AF coupler Focus mode lever Lens information contacts e-dial L/Z button Four-way controller 4 button { button Battery cover Tripod socket

Operation Manual
Page 18
...) 5 White balance (p.112) 6 Sensitivity (p.115) 7 Shooting mode (Mode dial position) (p.104) 8 World time warning display (p.164) 9 Date and time (p.163) * Indicators 3,4,5 and 6 only appear when the setting other than the default setting is selected. 8 only appears when World Time is On or Operating Mode Dial Guides appear on the LCD monitor for three seconds when powered on the status of 1 the camera. Before Using Your Camera LCD monitor While Power is On. 16 LCD Monitor Indications...
...) 5 White balance (p.112) 6 Sensitivity (p.115) 7 Shooting mode (Mode dial position) (p.104) 8 World time warning display (p.164) 9 Date and time (p.163) * Indicators 3,4,5 and 6 only appear when the setting other than the default setting is selected. 8 only appears when World Time is On or Operating Mode Dial Guides appear on the LCD monitor for three seconds when powered on the status of 1 the camera. Before Using Your Camera LCD monitor While Power is On. 16 LCD Monitor Indications...

Operation Manual
Page 24
... (p.130) 2 Aperture (p.136) No indicator: 3 Flash mode (p.49) Multi-segment metering b : Built-in flash is ready M : Center-weighted metering (when blinking, flash should be used or incompatible N : Spot metering lens is being used) 7 Auto bracketing (p.145) a : Flash off 8 White balance (p.112) E : Auto discharge (Not displayed when set to Auto) > : Red-eye reduction flash on 9 Battery level 4 Drive Mode (p.102) 10 EV compensation (p.141) 9 : Single frame shooting j : Continuous shooting g : Self-Timer shooting h : Remote control shooting 11 Number of recordable images/ EV...
... (p.130) 2 Aperture (p.136) No indicator: 3 Flash mode (p.49) Multi-segment metering b : Built-in flash is ready M : Center-weighted metering (when blinking, flash should be used or incompatible N : Spot metering lens is being used) 7 Auto bracketing (p.145) a : Flash off 8 White balance (p.112) E : Auto discharge (Not displayed when set to Auto) > : Red-eye reduction flash on 9 Battery level 4 Drive Mode (p.102) 10 EV compensation (p.141) 9 : Single frame shooting j : Continuous shooting g : Self-Timer shooting h : Remote control shooting 11 Number of recordable images/ EV...

Operation Manual
Page 32
... played back, or the camera is equipped with other cameras. 1Formatting the SD Memory Card (p.162) Setting the switch to LOCK protects the existing data by the user. (2) the SD Memory Card is exposed to static electricity or electrical interference. (3) the card has not been used with a write-protect switch. Also format SD Memory Card used for data that is deleted if (1) the SD Memory Card is mishandled by prohibiting recording of new data, deletion of existing data or formatting of important data...
... played back, or the camera is equipped with other cameras. 1Formatting the SD Memory Card (p.162) Setting the switch to LOCK protects the existing data by the user. (2) the SD Memory Card is exposed to static electricity or electrical interference. (3) the card has not been used with a write-protect switch. Also format SD Memory Card used for data that is deleted if (1) the SD Memory Card is mishandled by prohibiting recording of new data, deletion of existing data or formatting of important data...

Operation Manual
Page 51
... lens 3 being used and the capture conditions. Flash discharges when popped up when not necessary.) b Manual discharge Discharges flash manually. C Auto flash+Redeye reduct Light a red-eye reduction light before manual flash. • In a Flash OFF mode, flash does not discharge even if settings are used. Exposure will not be properly controlled and vignetting may occur depending on the lens being used and set Flash mode is retained. • Manual discharge mode (Flash ON) is used regardless of flash mode settings if the K button...
... lens 3 being used and the capture conditions. Flash discharges when popped up when not necessary.) b Manual discharge Discharges flash manually. C Auto flash+Redeye reduct Light a red-eye reduction light before manual flash. • In a Flash OFF mode, flash does not discharge even if settings are used. Exposure will not be properly controlled and vignetting may occur depending on the lens being used and set Flash mode is retained. • Manual discharge mode (Flash ON) is used regardless of flash mode settings if the K button...

Operation Manual
Page 57
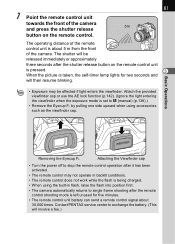
... shutter release button fully. Use the self-timer mode to stop . The number of the [A Custom] menu. Display the Fn menu again and set to enable shutter release before the builtin flash is complete when using the built-in [Recordable image No.] of continuously recordable images (buffer space) appears when shutter is adjusted for each time the shutter is released if the focus mode lever is set to 9 (Single frame shooting) to include the photographer in the picture...
... shutter release button fully. Use the self-timer mode to stop . The number of the [A Custom] menu. Display the Fn menu again and set to enable shutter release before the builtin flash is complete when using the built-in [Recordable image No.] of continuously recordable images (buffer space) appears when shutter is adjusted for each time the shutter is released if the focus mode lever is set to 9 (Single frame shooting) to include the photographer in the picture...
Operation Manual
Page 63
... lock function (p.142). (Ignore the light entering the viewfinder when the exposure mode is set to exchange the battery. (This will involve a fee.) Contact PENTAX service center to a (manual) (p.138).) • Remove the Eyecup FL by pulling one side upward when using the built-in flash, raise the flash into position first. • The camera automatically returns to single frame shooting after the shutter release button on the remote control. Removing...
... lock function (p.142). (Ignore the light entering the viewfinder when the exposure mode is set to exchange the battery. (This will involve a fee.) Contact PENTAX service center to a (manual) (p.138).) • Remove the Eyecup FL by pulling one side upward when using the built-in flash, raise the flash into position first. • The camera automatically returns to single frame shooting after the shutter release button on the remote control. Removing...

Operation Manual
Page 66
The image is rotated 90° counterclockwise each time the button is displayed on the LCD monitor. 2 Press the four-way controller (3). 64 2 Press the four-way controller (45). 4 : The previous image appears. 5 : The next image appears. Basic Operations 3 Rotating Images You can rotate images 90° counterclockwise at a time. The most recently captured image (image with the largest file number) is pressed. Make images shot vertically easier to view. 100-0001 100-0001 100-0001 OK OK OK OK 1 Press the Q button after taking a picture.
The image is rotated 90° counterclockwise each time the button is displayed on the LCD monitor. 2 Press the four-way controller (3). 64 2 Press the four-way controller (45). 4 : The previous image appears. 5 : The next image appears. Basic Operations 3 Rotating Images You can rotate images 90° counterclockwise at a time. The most recently captured image (image with the largest file number) is pressed. Make images shot vertically easier to view. 100-0001 100-0001 100-0001 OK OK OK OK 1 Press the Q button after taking a picture.

Operation Manual
Page 100
... Level Set the image quality. p.111 Contrast Set the image contrast. Set Auto Bracket shooting. Item Plybk dsply mthd Hot spot wrnng Digital Filter Slideshow Function Page Set capturing information to . p.68 p.108 Recorded Pixels Set the recording size of flash discharged. p.110 Saturation Set the color saturation. Comp. Mode] menu. p.130 Swtch dst msr pt Choose the part of the screen to set focus to show during Instant Review or Playback. p.71 Play back recorded images one...
... Level Set the image quality. p.111 Contrast Set the image contrast. Set Auto Bracket shooting. Item Plybk dsply mthd Hot spot wrnng Digital Filter Slideshow Function Page Set capturing information to . p.68 p.108 Recorded Pixels Set the recording size of flash discharged. p.110 Saturation Set the color saturation. Comp. Mode] menu. p.130 Swtch dst msr pt Choose the part of the screen to set focus to show during Instant Review or Playback. p.71 Play back recorded images one...

Operation Manual
Page 101
.... p.168 Transfer Mode Set the USB cable connection (PC or printer). p.167 p.167 4 Brightness Level Change the brightness of local time when traveling abroad. p.84 Auto Power Off Sets the time to display indicators in the up ] menu. p.169 Sensor Cleaning Lock the mirror in LCD monitor. p.162 Beep Switch the beep tone on/off automatically. p.168 Video Out Set the output format to add file numbers. p.171 Menu Reference p.180 Reset Reset all settings other than Date/Time, Language/ , Video Out...
.... p.168 Transfer Mode Set the USB cable connection (PC or printer). p.167 p.167 4 Brightness Level Change the brightness of local time when traveling abroad. p.84 Auto Power Off Sets the time to display indicators in the up ] menu. p.169 Sensor Cleaning Lock the mirror in LCD monitor. p.162 Beep Switch the beep tone on/off automatically. p.168 Video Out Set the output format to add file numbers. p.171 Menu Reference p.180 Reset Reset all settings other than Date/Time, Language/ , Video Out...

Operation Manual
Page 112
... Setting the Quality Level You can set the image quality level. Mode] menu. (p.98) Rec. The file size will also differ according to a PC, apply effects with the enclosed PENTAX PHOTO Laboratory 2.0 and create JPEG and TIFF images. Image is saved in JPEG format. Standard compression rate, suited for attaching to the image but such information is CCD output data saved without processing. Effects such as White Balance...
... Setting the Quality Level You can set the image quality level. Mode] menu. (p.98) Rec. The file size will also differ according to a PC, apply effects with the enclosed PENTAX PHOTO Laboratory 2.0 and create JPEG and TIFF images. Image is saved in JPEG format. Standard compression rate, suited for attaching to the image but such information is CCD output data saved without processing. Effects such as White Balance...

Operation Manual
Page 134
...). c Set aperture and use to capture images that look still or subjects that p (Bulb) require slow shutter speeds such No as fireworks and night scenes. Yes Priority) Use to adjust the depth of fast moving subjects. Function Reference Changing the Exposure Mode This camera features five exposure modes along with the picture modes. No Yes Combine set for taking pictures at the proper exposure. 132 Setting the Meter Operating Time Set the metering time in [Meter Operating Time...
...). c Set aperture and use to capture images that look still or subjects that p (Bulb) require slow shutter speeds such No as fireworks and night scenes. Yes Priority) Use to adjust the depth of fast moving subjects. Function Reference Changing the Exposure Mode This camera features five exposure modes along with the picture modes. No Yes Combine set for taking pictures at the proper exposure. 132 Setting the Meter Operating Time Set the metering time in [Meter Operating Time...

Operation Manual
Page 147
Mode] menu. (p.98) Auto Bracket Bracketng amount Shooting images 0.5 0 5 Function Reference Taking Only Over-exposed or Under-exposed Pictures You can use the auto bracketing mode for only under-exposure or overexposure shots by combining the operation with exposure compensation (p.141). The auto bracketing is performed in both cases on the basis of steps in [Expsr Setting Steps] in the [A Custom] menu. (p.142) Set in [Auto Bracket] in the [A Rec. Bracketng...
Mode] menu. (p.98) Auto Bracket Bracketng amount Shooting images 0.5 0 5 Function Reference Taking Only Over-exposed or Under-exposed Pictures You can use the auto bracketing mode for only under-exposure or overexposure shots by combining the operation with exposure compensation (p.141). The auto bracketing is performed in both cases on the basis of steps in [Expsr Setting Steps] in the [A Custom] menu. (p.142) Set in [Auto Bracket] in the [A Rec. Bracketng...

Operation Manual
Page 177
... Yes Yes p.163 Date Adjust According to default setting Yes World Time setting P (Off) Yes Hometown (City) According to default setting Yes No p.163 Yes 6 No World Time Hometown (DST) Destination (City) Destination (DST) According to default setting Yes Same as Hometown Yes Same as Hometown Yes No p.164 No No Language/ Guide display Brightness Level Video Out Transfer Mode Auto Power Off File # Sensor Cleaning Reset According to default setting Yes O (On...
... Yes Yes p.163 Date Adjust According to default setting Yes World Time setting P (Off) Yes Hometown (City) According to default setting Yes No p.163 Yes 6 No World Time Hometown (DST) Destination (City) Destination (DST) According to default setting Yes Same as Hometown Yes Same as Hometown Yes No p.164 No No Language/ Guide display Brightness Level Video Out Transfer Mode Auto Power Off File # Sensor Cleaning Reset According to default setting Yes O (On...
Operation Manual
Page 189
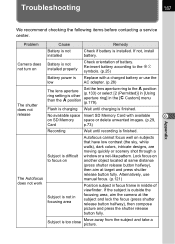
... and lock the focus (press shutter release button halfway), then compose picture and press the shutter release button fully. Lock focus on SD Memory space or delete unwanted images. (p.29, Card p.73) Recording Wait until charging is outside the focusing area, aim the camera at target and press shutter release button fully. Troubleshooting 187 Appendix We recommend checking the following items before contacting a service center. Problem Cause Remedy Battery is not installed Check if battery...
... and lock the focus (press shutter release button halfway), then compose picture and press the shutter release button fully. Lock focus on SD Memory space or delete unwanted images. (p.29, Card p.73) Recording Wait until charging is outside the focusing area, aim the camera at target and press shutter release button fully. Troubleshooting 187 Appendix We recommend checking the following items before contacting a service center. Problem Cause Remedy Battery is not installed Check if battery...
Operation Manual
Page 190
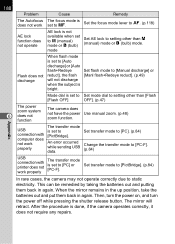
.... Set transfer mode to [PC]. (p.84) Change the transfer mode to [PC-F]. (p.84) USB connection with computer does not work properly The transfer mode is set to a (manual) mode or p (bulb) mode Set AE lock to setting other than a (manual) mode or p (bulb) mode. After the procedure is done, if the camera operates correctly, it does not require any repairs. An error occurred while sending USB data. When the mirror remains in the up position, take the batteries out...
.... Set transfer mode to [PC]. (p.84) Change the transfer mode to [PC-F]. (p.84) USB connection with computer does not work properly The transfer mode is set to a (manual) mode or p (bulb) mode Set AE lock to setting other than a (manual) mode or p (bulb) mode. After the procedure is done, if the camera operates correctly, it does not require any repairs. An error occurred while sending USB data. When the mirror remains in the up position, take the batteries out...

Operation Manual
Page 192
...Single frame shooting, j=Cotinuous shooting, g=Self-timer, h=Remote control shooting, ?=Battery exhaustion warning, ]=Auto bracketing exposure (exposure setting steps can be set beep. self-timer) Auto Bracket Three frames continuous shots with 50 mm f/1.4 lens at ∞), Diopter: -2.5m-1 to +1.5m-1. (per meter) Focus information: ] is lit when in-focus and blinking when unable to focus, b is lit=Built-in flash ready, Blinking=Flash Viewfinder Indication should be used or incompatible lens is being used, Shutter speed, Aperture value, e-dial enabled indicator, Focus point, @=AE...
...Single frame shooting, j=Cotinuous shooting, g=Self-timer, h=Remote control shooting, ?=Battery exhaustion warning, ]=Auto bracketing exposure (exposure setting steps can be set beep. self-timer) Auto Bracket Three frames continuous shots with 50 mm f/1.4 lens at ∞), Diopter: -2.5m-1 to +1.5m-1. (per meter) Focus information: ] is lit when in-focus and blinking when unable to focus, b is lit=Built-in flash ready, Blinking=Flash Viewfinder Indication should be used or incompatible lens is being used, Shutter speed, Aperture value, e-dial enabled indicator, Focus point, @=AE...
Operation Manual
Page 199
... 140 Fix Exposure 126 Fix Focus 125 Flash 49, 146 Flash (White Balance) ..........112 Flash Compensation 146 Flash Off 47 Flash OFF a 47 K (Flash pop-up) button ....93 Fluorescent Light (White Balance 112 { button 93, 95 197 Fn Menu 102 Focus Indication 101 Focus Lock 125 Focus mode lever 93 Focus Point 123 Focusing 118 Format 162 Four-way controller .......... 93, 95 G Guide display 16, 167 H High-Speed Flash Sync Mode 155 Histogram 19, 170 Hot Spot Warning 160 Appendix I Image Tone 108 M button 93...
... 140 Fix Exposure 126 Fix Focus 125 Flash 49, 146 Flash (White Balance) ..........112 Flash Compensation 146 Flash Off 47 Flash OFF a 47 K (Flash pop-up) button ....93 Fluorescent Light (White Balance 112 { button 93, 95 197 Fn Menu 102 Focus Indication 101 Focus Lock 125 Focus mode lever 93 Focus Point 123 Focusing 118 Format 162 Four-way controller .......... 93, 95 G Guide display 16, 167 H High-Speed Flash Sync Mode 155 Histogram 19, 170 Hot Spot Warning 160 Appendix I Image Tone 108 M button 93...

Operation Manual
Page 200
... Curtain Sync Flash ...... 157 [A Rec. Mode] Menu .... 98, 174 Recorded Pixels 31, 109 Red-eye reduction .......... 52, 157 Remaining image storage capacity 27 Remote Control 59 Reset 171, 172 Rotate 64 S Saturation 111 SD Memory Card 29 Select&Delete 75 Self-Timer 55 Sensitivity 115 Sensitivity Correction 115 Sepia (Digital Filter 71 [H Set-up] Menu 99, 175 Shade (White Balance) ........ 112 Sharpness 111 Shutter Priority Mode b ...... 134 Shutter release button 45, 92, 94 Shutter speed 127
... Curtain Sync Flash ...... 157 [A Rec. Mode] Menu .... 98, 174 Recorded Pixels 31, 109 Red-eye reduction .......... 52, 157 Remaining image storage capacity 27 Remote Control 59 Reset 171, 172 Rotate 64 S Saturation 111 SD Memory Card 29 Select&Delete 75 Self-Timer 55 Sensitivity 115 Sensitivity Correction 115 Sepia (Digital Filter 71 [H Set-up] Menu 99, 175 Shade (White Balance) ........ 112 Sharpness 111 Shutter Priority Mode b ...... 134 Shutter release button 45, 92, 94 Shutter speed 127


