User Guide
Page 4
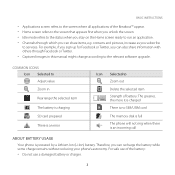
... not ring when there is an incoming call ABOUT BATTERY USAGE Your phone is an error Icon Selected to the screen where all applications of the battery: xx Do not use of the Breakout™ appear. COMMON ICONS Icon Selected to Adjust value Zoom in this manual might change according to the... battery or charger. 3 For example, if you sign up for Facebook or Twitter, you can recharge the battery while some charge remains without reducing your phone's autonomy. Therefore, you subscribe to run an application. xx Home screen refers to the relevant software upgrade.
... not ring when there is an incoming call ABOUT BATTERY USAGE Your phone is an error Icon Selected to the screen where all applications of the battery: xx Do not use of the Breakout™ appear. COMMON ICONS Icon Selected to Adjust value Zoom in this manual might change according to the... battery or charger. 3 For example, if you sign up for Facebook or Twitter, you can recharge the battery while some charge remains without reducing your phone's autonomy. Therefore, you subscribe to run an application. xx Home screen refers to the relevant software upgrade.

User Guide
Page 5
...car in accordance with the + and - xx Use the battery only for the device for which it is fully charged. xx Avoid dropping the phone or the battery. xx Since overcharging may reduce its charger once it to your network's base station, the longer you can use your battery in...of an unqualified battery or charger may present a risk of and recycle used batteries in summer or winter, may shorten battery life, remove the phone from its capacity and life. Unplug the charger once charging is required for inspection. xx To prevent injury or burns, ensure that has been ...
...car in accordance with the + and - xx Use the battery only for the device for which it is fully charged. xx Avoid dropping the phone or the battery. xx Since overcharging may reduce its charger once it to your network's base station, the longer you can use your battery in...of an unqualified battery or charger may present a risk of and recycle used batteries in summer or winter, may shorten battery life, remove the phone from its capacity and life. Unplug the charger once charging is required for inspection. xx To prevent injury or burns, ensure that has been ...

User Guide
Page 6
GETTING STARTED GETTING STARTED...12 CHECKING PACKAGE...12 REMOVING THE BACK COVER...13 REPLACING THE BACK COVER...13 INSTALLING THE 4G SIM CARD...14 REMOVING THE 4G SIM CARD...14 INSTALLING THE microSD™ CARD...15 REMOVING THE microSD™ CARD...15 INSTALLING THE BATTERY...16 REMOVING THE BATTERY...16 CHARGING THE BATTERY...17 POWERING YOUR PHONE ON/OFF...17 MANAGING SCREEN...18 OVERVIEWING PRODUCT...20 GRIPPING Breakout™...23 ACTIVATING Breakout™...24 BACKING-UP DATA...26 5 TABLE OF CONTENTS BASIC INSTRUCTIONS...2 BASIC INSTRUCTIONS...2 TABLE OF CONTENTS...5 1.
GETTING STARTED GETTING STARTED...12 CHECKING PACKAGE...12 REMOVING THE BACK COVER...13 REPLACING THE BACK COVER...13 INSTALLING THE 4G SIM CARD...14 REMOVING THE 4G SIM CARD...14 INSTALLING THE microSD™ CARD...15 REMOVING THE microSD™ CARD...15 INSTALLING THE BATTERY...16 REMOVING THE BATTERY...16 CHARGING THE BATTERY...17 POWERING YOUR PHONE ON/OFF...17 MANAGING SCREEN...18 OVERVIEWING PRODUCT...20 GRIPPING Breakout™...23 ACTIVATING Breakout™...24 BACKING-UP DATA...26 5 TABLE OF CONTENTS BASIC INSTRUCTIONS...2 BASIC INSTRUCTIONS...2 TABLE OF CONTENTS...5 1.

User Guide
Page 10
STORAGE STORAGE...160 MANAGING THE MEMORY CARD...160 CONNECTING TO A PC ...161 USING Breakout™ AS MASS STORAGE...162 TRANSFERRING FILES THROUGH WINDOW MEDIA SYNC...163 11. SETTINGS SETTINGS...165 WIRELESS & NETWORKS...165 CALL SETTINGS...166 SOUND...168 DISPLAY...170 LOCATION & SECURITY...171 APPLICATIONS...175 ACCOUNTS & SYNC...177 PRIVACY...177 STORAGE...178 LANGUAGE & KEYBOARD...178 VOICE INPUT & OUTPUT...179 ACCESSIBILITY...180 DATE & TIME...180 ABOUT PHONE...182 9 TABLE OF CONTENTS 10.
STORAGE STORAGE...160 MANAGING THE MEMORY CARD...160 CONNECTING TO A PC ...161 USING Breakout™ AS MASS STORAGE...162 TRANSFERRING FILES THROUGH WINDOW MEDIA SYNC...163 11. SETTINGS SETTINGS...165 WIRELESS & NETWORKS...165 CALL SETTINGS...166 SOUND...168 DISPLAY...170 LOCATION & SECURITY...171 APPLICATIONS...175 ACCOUNTS & SYNC...177 PRIVACY...177 STORAGE...178 LANGUAGE & KEYBOARD...178 VOICE INPUT & OUTPUT...179 ACCESSIBILITY...180 DATE & TIME...180 ABOUT PHONE...182 9 TABLE OF CONTENTS 10.
User Guide
Page 12
1 GETTING STARTED This chapter provides important information to know before using the Breakout™, including: CHECKING PACKAGE REMOVING THE BACK COVER REPLACING THE BACK COVER INSTALLING THE 4G SIM CARD REMOVING THE 4G SIM CARD INSTALLING THE microSD™ CARD REMOVING THE microSD™ CARD INSTALLING THE BATTERY REMOVING THE BATTERY CHARGING THE BATTERY POWERING YOUR PHONE ON/OFF MANAGING SCREEN OVERVIEWING PRODUCT GRIPPING Breakout™ ACTIVATING Breakout™ BACKING-UP DATA UNDERSTANDING HOME SCREEN CUSTOMIZING HOME SCREEN MANAGING APPLICATIONS SCREEN
1 GETTING STARTED This chapter provides important information to know before using the Breakout™, including: CHECKING PACKAGE REMOVING THE BACK COVER REPLACING THE BACK COVER INSTALLING THE 4G SIM CARD REMOVING THE 4G SIM CARD INSTALLING THE microSD™ CARD REMOVING THE microSD™ CARD INSTALLING THE BATTERY REMOVING THE BATTERY CHARGING THE BATTERY POWERING YOUR PHONE ON/OFF MANAGING SCREEN OVERVIEWING PRODUCT GRIPPING Breakout™ ACTIVATING Breakout™ BACKING-UP DATA UNDERSTANDING HOME SCREEN CUSTOMIZING HOME SCREEN MANAGING APPLICATIONS SCREEN

User Guide
Page 14
REPLACING THE BACK COVER 1 Place the back cover over the battery compartment, slide it upward until it securely with both hands with the front facing out. 2 Pull down the back cover with both thumbs. GETTING STARTED REMOVING THE BACK COVER 1 Make sure to turn off your phone and hold it clicks into place. 13
REPLACING THE BACK COVER 1 Place the back cover over the battery compartment, slide it upward until it securely with both hands with the front facing out. 2 Pull down the back cover with both thumbs. GETTING STARTED REMOVING THE BACK COVER 1 Make sure to turn off your phone and hold it clicks into place. 13
User Guide
Page 15
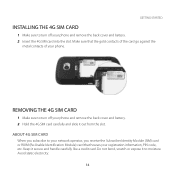
... Identity Module (SIM) card or RUIM (Re-Usable Identification Module) card that the gold contacts of the card go against the metal contacts of your phone. Avoid static electricity. 14 Make sure that houses your registration information, PIN code, etc. REMOVING THE 4G SIM CARD 1 Make sure to turn off your... phone and remove the back cover and battery. 2 Hold the 4G SIM card carefully and slide it out from the slot. Do not bend, scratch or ...
... Identity Module (SIM) card or RUIM (Re-Usable Identification Module) card that the gold contacts of the card go against the metal contacts of your phone. Avoid static electricity. 14 Make sure that houses your registration information, PIN code, etc. REMOVING THE 4G SIM CARD 1 Make sure to turn off your... phone and remove the back cover and battery. 2 Hold the 4G SIM card carefully and slide it out from the slot. Do not bend, scratch or ...
User Guide
Page 16
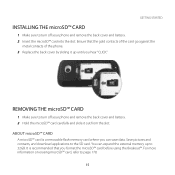
... card where you can expand the external memory up until you hear "CLICK." Ensure that you format the microSD™ card before using the Breakout™. Save pictures and contacts, and download applications to page 178. 15 GETTING STARTED INSTALLING THE microSD™ CARD 1 Make sure to turn... off your phone and remove the back cover and battery. 2 Hold the microSD™ card carefully and slide it up to 32GB. For more information on ...
... card where you can expand the external memory up until you hear "CLICK." Ensure that you format the microSD™ card before using the Breakout™. Save pictures and contacts, and download applications to page 178. 15 GETTING STARTED INSTALLING THE microSD™ CARD 1 Make sure to turn... off your phone and remove the back cover and battery. 2 Hold the microSD™ card carefully and slide it up to 32GB. For more information on ...

User Guide
Page 17
ABOUT BATTERY The Breakout™ uses a Lithium Ion (Li-Ion) battery. For more details, inquire at your phone tightly after removing the back cover. 2 Align the battery contacts (1) with the terminals in the battery compartment. 3 Press the battery down (2) until it clicks... vary depending on service types offered by lifting the top of the battery using the fingertip cutout. GETTING STARTED INSTALLING THE BATTERY 1 Hold your phone tightly after removing the back cover. 2 Remove the battery from the battery compartment by the service provider and temperatures. Make sure to use the...
ABOUT BATTERY The Breakout™ uses a Lithium Ion (Li-Ion) battery. For more details, inquire at your phone tightly after removing the back cover. 2 Align the battery contacts (1) with the terminals in the battery compartment. 3 Press the battery down (2) until it clicks... vary depending on service types offered by lifting the top of the battery using the fingertip cutout. GETTING STARTED INSTALLING THE BATTERY 1 Hold your phone tightly after removing the back cover. 2 Remove the battery from the battery compartment by the service provider and temperatures. Make sure to use the...
User Guide
Page 18
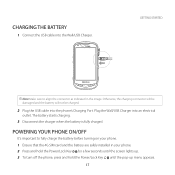
... damaged and the battery will not be charged. 2 Plug the USB cable into an electrical outlet. POWERING YOUR PHONE ON/OFF It's important to align the connector as indicated in your phone. 1 Ensure that the 4G SIM card and the battery are safely installed in the image. Plug the Wall/...USB Charger into the phone's Charging Port. GETTING STARTED Note Make sure to fully charge the battery before turning on your phone. 2 Press and hold the Power/Lock Key F E for a few seconds until the screen lights up. 3 ...
... damaged and the battery will not be charged. 2 Plug the USB cable into an electrical outlet. POWERING YOUR PHONE ON/OFF It's important to align the connector as indicated in your phone. 1 Ensure that the 4G SIM card and the battery are safely installed in the image. Plug the Wall/...USB Charger into the phone's Charging Port. GETTING STARTED Note Make sure to fully charge the battery before turning on your phone. 2 Press and hold the Power/Lock Key F E for a few seconds until the screen lights up. 3 ...
User Guide
Page 19
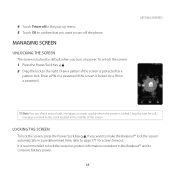
.... Enter a PIN or a password if the screen is locked by default when you turn off the phone. 4 Touch Power off in the pop-up menu. 5 Touch OK to confirm that you want to make the Breakout™ lock the screen automatically in a predetermined time, refer to page 171 for call, message or... email to the clock located in the Breakout™ and to the right. MANAGING SCREEN UNLOCKING THE SCREEN The screen is locked by a pattern lock. LOCKING THE SCREEN To lock the screen, press ...
.... Enter a PIN or a password if the screen is locked by default when you turn off the phone. 4 Touch Power off in the pop-up menu. 5 Touch OK to confirm that you want to make the Breakout™ lock the screen automatically in a predetermined time, refer to page 171 for call, message or... email to the clock located in the Breakout™ and to the right. MANAGING SCREEN UNLOCKING THE SCREEN The screen is locked by a pattern lock. LOCKING THE SCREEN To lock the screen, press ...
User Guide
Page 20
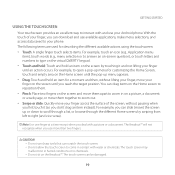
... screen until an action occurs. xx Touch and hold: Touch and hold an item for customizing the Home Screen, touch and empty area on the Breakout™. xx Pinch: Place two fingers on the screen and move ) the screen up menu for a moment and then, without pausing when you first ...touch it and not lifting your Android phone. For example, you don't drag an item instead). The touch screen may malfunction in humid conditions or in contact with and use available applications, make...
... screen until an action occurs. xx Touch and hold: Touch and hold an item for customizing the Home Screen, touch and empty area on the Breakout™. xx Pinch: Place two fingers on the screen and move ) the screen up menu for a moment and then, without pausing when you first ...touch it and not lifting your Android phone. For example, you don't drag an item instead). The touch screen may malfunction in humid conditions or in contact with and use available applications, make...

User Guide
Page 24
... into the 3.5mm Headset Jack on page 21. xx Do not wear metal accessories on your hand: it can control your phone. Check the location of calls. 23 GRIPPING Breakout™ It is strongly recommended that support common call as indicated below: Correct Incorrect xx Make sure not to block the antenna... embedded in the right position for a call management features including making and answering calls may not be compatible with some stereo earphones. Therefore the phone may not have been standardized. Note Stereo earphones that you hold the Breakout™ in the...
... into the 3.5mm Headset Jack on page 21. xx Do not wear metal accessories on your hand: it can control your phone. Check the location of calls. 23 GRIPPING Breakout™ It is strongly recommended that support common call as indicated below: Correct Incorrect xx Make sure not to block the antenna... embedded in the right position for a call management features including making and answering calls may not be compatible with some stereo earphones. Therefore the phone may not have been standardized. Note Stereo earphones that you hold the Breakout™ in the...

User Guide
Page 41
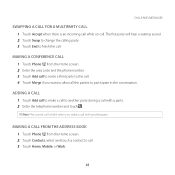
After ending a call, a call during the conversation. MAKING A CALL USING SPEED DIALING 1 Touch Phone from the Home screen. 2 Enter the area code and the phone number. Touch hold a number to which you do not want the Breakout™ to make no sound or vibration from the incoming call. 3 Touch Ignore if you have assigned...
After ending a call, a call during the conversation. MAKING A CALL USING SPEED DIALING 1 Touch Phone from the Home screen. 2 Enter the area code and the phone number. Touch hold a number to which you do not want the Breakout™ to make no sound or vibration from the incoming call. 3 Touch Ignore if you have assigned...

User Guide
Page 42
... MESSAGES ADJUSTING VOLUME 1 During a call, press the Volume Keys up to increase the ringer volume. There is stronger. MAKING AN INTERNATIONAL CALL 1 Touch Phone from the Home screen. 2 Press the Menu Key B and touch Assisted dialing. 3 Touch the check box next to Assisted dialing status. 4 Touch ...Reference country and touch the country you want to call. 5 Enter the area code and the phone number. 6 Touch to dial the number. If you want the Breakout™ to decrease the volume. A call is an incoming call or message, press the Volume Keys all the...
... MESSAGES ADJUSTING VOLUME 1 During a call, press the Volume Keys up to increase the ringer volume. There is stronger. MAKING AN INTERNATIONAL CALL 1 Touch Phone from the Home screen. 2 Press the Menu Key B and touch Assisted dialing. 3 Touch the check box next to Assisted dialing status. 4 Touch ...Reference country and touch the country you want to call. 5 Enter the area code and the phone number. 6 Touch to dial the number. If you want the Breakout™ to decrease the volume. A call is an incoming call or message, press the Volume Keys all the...
User Guide
Page 43
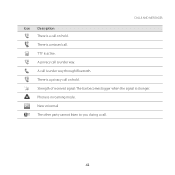
There is a privacy call . There is a missed call on hold . New voicemail The other party cannot listen to you during a call on hold . Strength of received signal: The bar becomes bigger when the signal is in roaming mode. A call is under way. Phone is stronger. A privacy call is under way through Bluetooth. CALLS AND MESSAGES Icon Description There is active. TTY is a call . 42
There is a privacy call . There is a missed call on hold . New voicemail The other party cannot listen to you during a call on hold . Strength of received signal: The bar becomes bigger when the signal is in roaming mode. A call is under way. Phone is stronger. A privacy call is under way through Bluetooth. CALLS AND MESSAGES Icon Description There is active. TTY is a call . 42
User Guide
Page 44
... Home screen. 2 Touch Contacts, select and touch a contact to participate in the conversation. MAKING A CALL FROM THE ADDRESS BOOK 1 Touch Phone from the Home screen. 2 Enter the area code and the phone number. 3 Touch Add call to invite a third party to the call. 4 Touch Merge if you make a call to finish the...
... Home screen. 2 Touch Contacts, select and touch a contact to participate in the conversation. MAKING A CALL FROM THE ADDRESS BOOK 1 Touch Phone from the Home screen. 2 Enter the area code and the phone number. 3 Touch Add call to invite a third party to the call. 4 Touch Merge if you make a call to finish the...
User Guide
Page 45
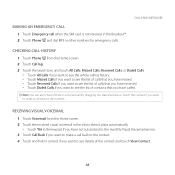
... want to see the list of calls that you have called. CALLS AND MESSAGES CHECKING CALL HISTORY 1 Touch Phone from the Home screen. 2 Touch the received visual voicemail in the Breakout™. 2 Touch Phone and dial 911 or other numbers for emergency calls. xx Touch Dialed Calls if you want to see the...
... want to see the list of calls that you have called. CALLS AND MESSAGES CHECKING CALL HISTORY 1 Touch Phone from the Home screen. 2 Touch the received visual voicemail in the Breakout™. 2 Touch Phone and dial 911 or other numbers for emergency calls. xx Touch Dialed Calls if you want to see the...
User Guide
Page 46
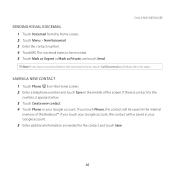
...will be recorded. 5 Touch Mark as Urgent or Mark as needed for the number, it appears below. 3 Touch Create new contact. 4 Touch Phone or your Google account. 5 Enter additional information as Private, and touch Send. CALLS AND MESSAGES SENDING VISUAL VOICEMAIL 1 Touch Voicemail from the Home ...the next steps. If you have not subscribed to be saved in the middle of the Breakout™. Note If you touch Phone, the contact will be saved in your Google account. SAVING A NEW CONTACT 1 Touch Phone from the Home screen. 2 Touch Menu > New Voicemail. 3 Enter the contact number. ...
...will be recorded. 5 Touch Mark as Urgent or Mark as needed for the number, it appears below. 3 Touch Create new contact. 4 Touch Phone or your Google account. 5 Enter additional information as Private, and touch Send. CALLS AND MESSAGES SENDING VISUAL VOICEMAIL 1 Touch Voicemail from the Home ...the next steps. If you have not subscribed to be saved in the middle of the Breakout™. Note If you touch Phone, the contact will be saved in your Google account. SAVING A NEW CONTACT 1 Touch Phone from the Home screen. 2 Touch Menu > New Voicemail. 3 Enter the contact number. ...
User Guide
Page 47
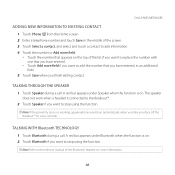
...to add the number that you have entered. The speaker does not work when a headset it connected to the Breakout™. 2 Touch Speaker if you take your face off the Breakout™ for more field if you want to the relevant manual of the Bluetooth headset for a few seconds.... Bluetooth TECHNOLOGY 1 Touch Bluetooth during a call . Note If the proximity sensor is on. CALLS AND MESSAGES ADDING NEW INFORMAITON TO EXISTING CONTACT 1 Touch Phone from the Home screen. 2 Enter a telephone number and touch Save in an additional field. 5 Touch Save when you finish editing contact. A red bar...
...to add the number that you have entered. The speaker does not work when a headset it connected to the Breakout™. 2 Touch Speaker if you take your face off the Breakout™ for more field if you want to the relevant manual of the Bluetooth headset for a few seconds.... Bluetooth TECHNOLOGY 1 Touch Bluetooth during a call . Note If the proximity sensor is on. CALLS AND MESSAGES ADDING NEW INFORMAITON TO EXISTING CONTACT 1 Touch Phone from the Home screen. 2 Enter a telephone number and touch Save in an additional field. 5 Touch Save when you finish editing contact. A red bar...


